First, JavaScript is a program, code that is executed to perform a task such as a calculation, a graphics affect, a menu operation, or some other function beyond the capabilities of a static web page or a multimedia file. Any time you need the user to participate in a customized activity, a JavaScript should be capable of it.
A JavaScript function or method can be executed as soon as the page comes up. For example, let's say you want to annoy your friends and family with a window that pops up in front of the browser that says "Hello!" and makes them press an okay button to clear the window. This code would be executed every time the page is loaded.
JavaScript can also be executed as a result of an action by the user such as pressing a button on a form. You may remember from our study of forms that there was an input type of "button". This generic input is what is used to associate a form button with a JavaScript.
A JavaScript program is embedded into the head of your HTML web page in the same way that you embedded a cascading style sheet into the head of your HTML file.
See the following figure to associate the above steps with the code you will be creating.

In this exercise, you will be using JavaScript to display text to the browser screen. Begin by creating a blank HTML web page either by hand in a text editor or by opening a new page in Dreamweaver and editing the HTML tags in the code view window. Between the <head> and </head> tags, insert the JavaScript "block" that was described earlier. The code is repeated below for your convenience.
<head>

    <script language="JavaScript">

        <!--

       //-->

    </script>

</head>

<body>

</body>
Your program will execute the single instruction:
document.writeln(
"<center>This is the output of my first JavaScript!</center>");
Insert this line of code on a new line between the comment tags exactly as it's shown above. Note: If line breaks occurred due to the display width of your browser, remove them. Put all of the code on one line. Do not add any HTML code into the body of the document. The script above will create the text to be displayed.
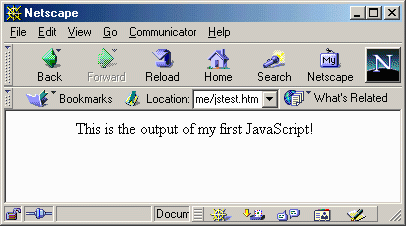
Save your page and view it in your browser. The result should look something like that shown below.

Okay, so it isn't a big deal to display text. Heck, you've been doing this with HTML since day one. This was simply an exercise to get you used to incorporating JavaScript into your web pages.
So what did the code do? Well, document is an object, specifically it's the HTML page being displayed by the browser. writeln is a function that writes the data between the parenthesis to the document object. If you're not up for coding, just trust the fact that the computer "deciphers" the code as a command to take everything between the quotes in the parenthesis and display it to the document.
Note: All JavaScript commands must end with a semicolon (;).
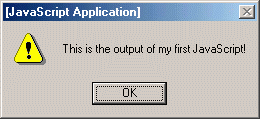
This JavaScript will display text, but it will appear in a small pop-up window with an OK button. Replace the instruction in the first example with the line of text. Once again, if your browser width has inserted line breaks, remove them so that the entire instruction is on one line.
window.alert("This is the output of my first JavaScript!");
The result (upon reloading the page) should be a window like the one shown below only without so much dithering.

In this case, window is an object, but unlike the document object before, window represents the whole browser window. alert is a function that creates the pop-up window.
When you load this file in your browser, notice whether the page itself loads before the pop-up window is displayed or after. You can do this by putting some text into the body of the page and watching for when it is displayed.
Hopefully you should notice that the text appears after the pop-up window is closed. That is because the browser performs actions that are in the head before it loads the text contained in the body of an HTML document.
If you are to become a programmer, it is vital that you remember the need to comment your code. In JavaScript, there are two methods for commenting code. These two methods are identical to those methods used in C++. They are:
Method 1:
/* This is a block comment.

It is surrounded by the slash/asterisk and asterisk/slash

that indicate the beginning and ending of a comment.

A block comment may span multiple lines. */
Method 2:
// This is a single line comment.

// Everything from the slashes to the end of the line is ignored.
Add comments to the JavaScript from exercise 2 and run it to verify that there is no change in the operations of the code.
There is actually a third method of commenting, but it is not to be used except in one case. The HTML opening comment tag (<!--) is also considered a comment tag commenting out everything after it until the next line break. This is so that the code can be commented out for non-supporting browsers as discussed earlier.
We are now going to create a program. If you do not know how and are interested in learning how to program, please review the notes from our previous class or ask your instructor for additional programming references. For now, let's just cut and paste the following code into your JavaScript block.
This JavaScript program performs the following process:
   var firstNumber,  // first string entered by user

          secondNumber,  // second string entered by user

          number1,      // first number to add

          number2,      // second number to add

          sum;
      // sum of number1 and number2


   // read in first number from user as a string

          firstNumber = window.prompt( "Enter first integer", "0" );


   // read in second number from user as a string

          secondNumber = window.prompt( "Enter second integer", "0" );


   // convert numbers from strings to integers

          number1 = parseInt( firstNumber );

          number2 = parseInt( secondNumber );


   // add the numbers

          sum = number1 + number2;


   // display the results

          document.writeln( "<H1>The sum is " + sum + "</H1>" );
When you run this code, you should first see the two pop-up windows, then the result should be displayed on the HTML web page.
Our old textbook (Niederst, Jennifer, Web Design in a Nutshell, O'Reilly & Associates, Inc., Sebastopol, CA, 1999) went through an exercise that I felt could be closely followed here for some additional in-class experience. JavaScript (with its roots in web browser technology) has a function which opens a new browser window. It is called window.open(). (Note window is the object and open() is a function "owned" by the object window.) When you execute this function, it opens a window with a specific URL, window name (to be used with things like the target attribute), and other HTML characteristics. Its format is something like this:
myWin= window.open("file.htm", "displayWindow",
      "width=510,height=440,status=no,toolbar=no,menubar=no,scrollbars=yes,resizable=yes");
Try this code by inserting it into you JavaScript block. It is important to note that you will also need to create the file "file.htm" in the same directory as your JavaScript page.
The programs we have done up until now all are executed upon loading the HTML page. Wouldn't it be nice if we could control when the JavaScript program was to be executed? We can do this, but we need to first add a little information to the JavaScript. We need to give the portion of code that we will be executing a name. By naming it and adding some additional syntax, we will be creating a function.
We are going to wrap the code you want to execute in a package that indicates it is a function and indicates the function's name. Below is an example of code where we have taken the window.open code above and made it into a function.
function openWin()

      {

      myWin= window.open("file.htm", "displayWindow",
      "width=510,height=440,status=no,toolbar=no,menubar=no,scrollbars=yes,resizable=yes");

      }
The next thing we need to do is create a method for calling the function from your web page. As a simple application, we will call the function using a hyperlink. Adding the following link to your web page (between the body tags) will create a hyperlink to the JavaScript function.
<a href="javascript:openWin();">Click here to open
      window</a>
Change your JavaScript to a function by adding the function keyword, the function name, and the curly brackets. Also, add the link to the body of your HTML file.
Now, when you load your page, you should only see the link Click here to open window.
Next, instead of linking a JavaScript to a hyperlink, let's link a JavaScript to the pressing of a button in a form. To do this, we first need to create a form. (Okay, so forms were covered a week or so ago, but we'll keep it to a simple form.) First, create the form using the begin and end form tags.
<form>

</form>
Next, we need to create the input. In this case, it will be of type "button". Make the text on the button say something like "Open Window" by setting the input's attribute value to "Open Window". To associate the pressing of the button with calling the JavaScript function you created in Exercise 6, we need to tell the form what to do "onclick". In other words, there is an input "attribute" (for lack of a better term) called onclick that defines what happens when the button is pressed. Set the value for that attribute to the name of your function. The resulting code should like something like this:
<input type="button" value="Open
      Window" onclick="openWin();">
The result should be something like this:
Replace the hyperlink in your HTML code with this form and the button and test it.
Open a new HTML web page in Dreamweaver. You should be able to do this from the File->New menu. Now, to add a rollover, from the Insert menu, select Interactive Images->Rollover.
A window will appear that asks you for a name. This name is simply the identification for the button much like the identification you used for the elements of your forms. Enter any name you like.
Next, you should see two entry boxes where you will enter the images that are swapped back and forth for the rollover. For the "Original Image", enter the URL:
http://csciwww.etsu.edu/tarnoff/labs1710/jscript/buttnoff.gif
For the "Rollover Image", enter the URL:
http://csciwww.etsu.edu/tarnoff/labs1710/jscript/buttnon.gif
The "Alternate Text" is simply the value that will be entered for the alt attribute of the image.
Lastly, since rollovers are in fact links, you should add a URL for the rollover to be linked to. If your pressed for ideas, enter http://www.etsu.edu for the "When Clicked, Go To URL" entry. Save it to your drive, open it in your browser, and see how it works.
Now examine the code. You should see two things. First, a huge amount of code has been added to your HTML document. The code for rollovers is not actually difficult. Dreamweaver just makes it very ubiquitous, and therefore, has a great deal of code just to make sure it works under every condition.
Most importantly, you should notice the addition of the onMouseOut and onMouseOver events to the <a href> tag. It is this combination of events that perform the actual function of the rollover.
If you like the effect, open Fireworks and create two buttons of your own.
The Web is plentiful with free, downloadable JavaScript. If you hit Yahoo!'s JavaScript Programming Page, you will see what I mean. You now have the knowledge to incorporate any of the scripts you find on these download pages into your own HTML pages (remembering to obey copyright stuff, right?).
Copyright 2002 by David Tarnoff. All rights reserved.