
The complexity of a system sometimes makes it susceptible to errors, especially during boot. If your machine is experiencing problems, it is possible to boot it in "safe mode". Safe mode loads only the basic files and drivers such as those needed for the keyboard and mouse, base video, and access to the hard drive and other mass storage devices such as the CDROM. It is possible to boot into safe mode with networking. From safe mode, it is possible to:
"Last Known Good Configuration" rolls back the registry to the state saved at the last shutdown making it possible to fix problems caused by things such as incorrectly installed drivers. If, however, your problem is a result of missing or corrupted O/S files, "Last Known Good Configuration" will not solve the problem.
Use the following steps to start your computer in safe mode.
Remember from last week's discussion that *.ini files, the "pre-registry" method of configuration of windows and other files, are divided into sections using a section name enclosed in square brackets. The section name is followed by a line defining an element using the format "keyname=value".
[SectionName]

  keyname=value

  ;comment
One of the problems with this method of configuration is that an *.ini file is a text file, and therefore limits the user to configuring things only in text. Another problem is that an *.ini file is flat. For example, assume that I want to configure the default window size for Windows Explorer™, Notepad™, and Paint™. I would need to have a separate *.ini file for each of these applications. The Windows registry stores data in a tree format allowing for categories all the way from top system level configuration down to the smallest details of the applications.
Each node of the registry tree is called a key. Each key can contain subkeys and/or data values. The data values can take on a number of formats including:
One similarity that both *.ini files and the registry share is that the information within the registry is accessible through functions available in Microsoft Studio products. For example, RegQueryInfoKey() retrieves information about a specific key from the registry. Possible types of information include number of subkeys, number of values associated with the key, the key's values, and the last time the key was written to. Microsoft provides an exhaustive reference for developers at their MSDN website.
A user logged onto a Windows XP machine as an administrator may manually edit the registry. Editing includes:
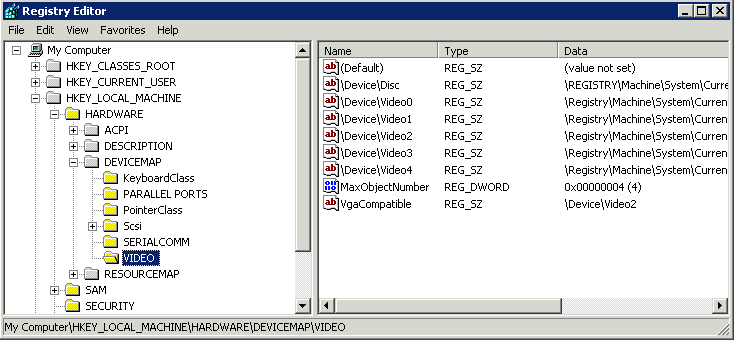
In this set of lab notes, a registry entry will be identified using the standard Windows file folder\file notation. For example, the VIDEO key highlighted in the Registry tree below is a subkey of DEVICEMAP which in turn is a subkey of HARDWARE which is a subkey of HKEY_LOCAL_MACHINE. In these notes, this would be referred to using the string HKEY_LOCAL_MACHINE\HARDWARE\DEVICEMAP\VIDEO.

Note that the window in the previous figure is from an application called the Registry Editor or "regedit." To open the Registry editor, select "Run" from the "Start" menu and type "regedit" in the "Open" text box. Clicking "OK" will open this application. The left pane in the window contains the tree of keys and subkeys. The value names, data, and types appear in the right pane.
CAUTION: Modification of the Windows Registry may render a system useless. Edit the Registry at your own risk. Do not perform this lab using the CSCI hard drives installed in the machines. Be sure to use only your XP installation on your own hard drive.
Before doing anything with the Registry, you should back up the Registry as a safety precaution. Perform the following steps on your XP installation to perform a registry backup.
Individual subkeys may be backed up without going through the process of backing up the entire Registry. Use the following steps to do this.
To restore the entire Registry and all other system data backed up using Windows Backup, use the following steps.
To restore a key from an exported file, find the file using Windows Explorer. Double clicking on the *.reg file allows you to add all of the registry information contained in the file to the Registry.
Just like programs, a database can define the type of number a value or variable is to represent. The following table is a modification of the Registry data types taken from the MSDN Registry Reference.
If you're familiar with Windows Explorer, you should be able to navigate the Registry Editor interface without any problems. As an exercise, open the Registry Editor. Remember that you open the Registry editor by selecting "Run" from the "Start" menu, typing "regedit" in the "Open" text box, then clicking "OK". Now, find the key \HKEY_LOCAL_MACHINE\SOFTWARE\Microsoft\Internet Explorer\Version Vector. Highlight this key and see if the data values make sense. You should also be able to see the data types.
The order of elements in the Start -> All Programs menu can also be found in the registry. Find the key \HKEY_CURRENT_USER\Software\Microsoft\Windows\CurrentVersion\Explorer\MenuOrder\Start Menu\Programs. The subkeys to this key should be the list of programs identified in the Start->All Programs menu.
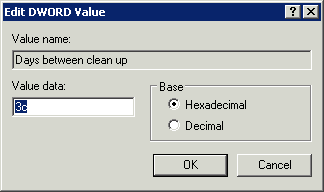
This section will take you through the modification of a simple Registry value.

Notice that the "Last time run" for the Cleanup Wizard is also maintained in the Registry.
The Registry Editor can also be used to create a new key. The following steps come from the Microsoft Support Website's page titled "How to back up, edit, and restore the registry in Windows XP and Windows Server 2003. These steps create a new subkey named "TestSubkey" to the \HKEY_LOCAL_MACHINE\SOFTWARE\Microsoft subkey.
Creating a key doesn't give it a value. You must do this manually. Use the following steps to add a value to our new key.
You can delete the key we created above by simply right-clicking on the key name and selecting "Delete" or by selecting "Delete" from the Edit menu.
Developed by David Tarnoff for CSCI 2150 -- Computer Organization at ETSU