Last week you had the opportunity to create some scripts using a "cookbook" of cut-n-paste exercises. This week, you will be writing code with a little less direction in hopes of:
This lab assumes you are comfortable with inserting scripts in the head, body, and tags of an XHTML file. If you need a refresher, see last week's lab.
You will probably need a reference to get the correct syntax and structure for the object models. Any of the following should work. Use the one you feel most comfortable with. Remember that Dreamweaver has some JavaScript support and will color keywords.
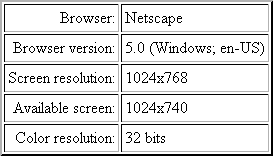
The first two objects we are going to play with will be used primarily to glean information about the client's setup. First, the Navigator object consists of properties and methods used to access information about the client's browser and operating system. You will be creating a page that will display the browser name and version number in a table format. A sample of this is shown below:

The browser name is retrieved using a property of the navigator object appName while the browser version uses the navigator property appVersion.
Remember that the output of the JavaScript is going to be interpreted by the browser as HTML. Therefore, to output a table using JavaScript, the script has to output the appropriate tags.
Let's begin with the table. If the JavaScript code is to output the table, then use the document.write method to do so. The following script outputs the table tags for a table with a 2 pixel border and cell padding of 3 pixels.
    document.write("<table border='2' cellpadding='3'>");

    document.write("</table>");
Inserting the table rows with data will be a little more complicated, but not much. We need to embed the values taken from the properties navigator.appName and navigator.appVersion. Remember that we can concatenate strings using the plus sign. For example, the string "CSCI 2910 is great!" can be created from two strings: "CSCI 2910" + " is great!" Of course this is silly, we could have just made the one string. We will be mixing strings with properties here, however, so we will need the plus sign.
The first row will have "Browser:" in the first column and navigator.appName in the second column. Remember, however, that we will need to output the XHTML tags along with the values to be placed in the table. The following shows row 1 added to our table.
document.write("<table border='2' cellpadding='3'>");
document.write("<tr><td align='right'>Browser:</td><td>" + navigator.appName + "</td></tr>");
document.write("</table>");
After you have created the above table in your own XHTML file, add the second line to display the browser version. It should be a simple copy-n-paste followed by a modification of the text and navigator property.
In an effort to avoid embarrassing situations such as unpleasant scrollbars or decapitated images, it might be nice to know some properties of the client's screen. Use the following properties to expand the table we created using the navigator object.
Modify your script from the previous section to display the overall screen resolution, the available screen resolution, and the color resolution. It should look something like the following image.

The window object is at the top of the object model, but for most things, the window object is assumed and not included in the JavaScript. There are, however, some methods and properties that are immediately associated with the window object. We're going to take a look at some of them now.
To begin with, we will extend our view of the client's setup. Window allows us to further determine the dimensions of the user's screen, specifically, the window size and the available viewing area. Note that these properties could be used to help you position items on your page using style sheets. Use the following properties to expand the table we created using the navigator and screen objects.
Use these properties to expand you table to look like that shown below.
The window object is far more robust than just a bunch of properties. It also includes a number of events and methods. Let's begin looking at some events.
The first event we will discuss is one you have already used. We are going to put a slant on the use of this event by having it triggered by a form button. To do this, we need to have a form in our XHTML document. Unlike the table we inserted earlier, let's make the form tag appear outside of the scripts. (The scripts are going to be included as attributes of the buttons.)
    <form action="#" name="js_input" id="js_input">

    </form>
Notice that we do not have an action or method defined. (If you've forgotten how to make forms, don't worry, we'll refresh your memory later) The reason this form does not need an action or a method is that the form is needed only so that we may add form inputs to our page. There will be no data for the form to send to a server. As for the name and id, we'll be using those later.
Now let's insert a button input.
<form action="#" name="js_input" id="js_input">
<input type="button" value="Click here" onClick="javascript:window.alert('Someone just clicked a button');">
</form>
Remember that the value attribute for inputs of type button merely represents the text to be placed on the button's surface. The meat of this tag is the onClick event. When the button is clicked, it runs the JavaScript code:
window.alert('Someone just clicked a button');
Note the format of the event call.
Open your code in a browser and see what happens when you click on the button. If nothing happens, see if you can figure out where the bug is.
IMPORTANT: Most of the time JavaScript coders do not use a development environment. The window method alert() is a great way to debug code by having the code pop up a window announcing, "Got here!"
It would be nice to allow users to input values to your JavaScript code. One way to do this is with the prompt() method, which is contained within the window object. When called, the prompt() method puts up a window much like the one that appears with the alert() method. The difference is that the prompt dialog box contains an input field. The format of the method or function call is:
value = window.prompt(message[, inputDefault])
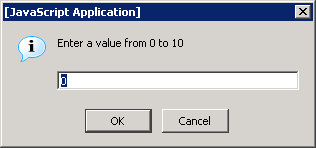
The message will be displayed in the dialog box. The user's input will be assigned to the variable value. If you want an initial value for the input field, enter it after the message in the space defined by inputDefault. For example, the code window.prompt('Enter a value from 0 to 10', 0); will generate the dialog box shown below.

Now let's put a prompt box in your code. In your XHTML file, within the form, insert another button. This time, make the value (the text on the button) equal to "Test prompt " and make the onClick event call a function called inputData(). We're going to be writing this function.
<input type="button" value="Input value" onClick="javascript:inputData();">
Now that we have a call to a function inputData(), we need to write that function. The code below can serve as that function. If first calls window.prompt() to prompt the user to enter a message. This is followed by a call to window.alert() to output the message as part of a larger string. Enter the script in the head of your XHTML file and see how it works.
    <script language="javascript" type="text/javascript">

      <!--

        function inputData()

        {

            user_string = window.prompt("Enter a message", "<Enter message here>");

            window.alert("The message you entered was '" + user_string + ".'");

        }

    //-->

    </script>
User string is assigned the value entered by the client. That string is then concatenated with the text "The message you entered was " and a terminating period so that it could be sent to the alert box. Note once again the use of the single- and double-quotation marks.
There are a number of properties and functions that will be of use with the document object. For the purpose of this lab, however, we will be concerning ourselves with the fact that the document object is the root of the tree through which you can access all of the components of your web page. For example, if you want to access the value from a text input that is contained within a form on your page, you do it through the document object.
Okay, enough of the hand holding - let's get some programming practice in. Follow the following steps to create the code to access the text from a text input inside your form. Remember earlier that you named the form "js_input". We will be using this to identify the form from which the data value is coming.
Test your script using a browser.
The last object we're going to look at today is the history object. Only three functions and one property of the history object enjoy full support. They are:
Of the three, go() is the most difficult to understand. It takes as its argument an identifier for the desired URL in the list. Typically, this is a "delta" representing the number of pages backwards (a negative number) or forward. For example, history.go(-2) will go back two pages in the history list.
Developed by David Tarnoff for his students in CSCI 2910 at ETSU