| Digital I/O Card Installation
In order to begin
programming iFix with SeaIO, the first move after creating a new workspace or opening an
existing one, is to enter the VB script editor for that project. In the picture below
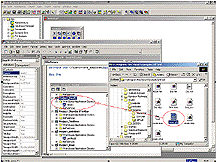
(Figure 1), we show an explorer window open to the VBTest example in SeaIO. In this
directory is the SEAIO.GLO file; it contains all the Global variables and API links for
the VBTest project. You have the option of creating your own .GLO file if this is not an
adequate framework, but make sure to put into yours the section that has about twelve
"Declare Function SeaIo_....." in our SeaIO.GLO. These "Declare
Functions" will tell Visual Basic to include the functions included in the SeaIO API
for use in your project. For a list of the API calls, view the included help files.
Figure 1 below shows where you can drag the SeaIO.GLO file into your project's tree and
have it included as a module if you so wish. Click on the image for a larger view.

After putting the
API calls into your globals, you can now start using the API calls to control a SeaIO
card.
To physically start using the SeaIO cards within your project, the first thing that has to
happen is a SeaIo_OpenDevice. This will open a specified SeaIO card and return a handle to
the device which will be needed when we start using the card to control devices. The
parameters for SeaIo_OpenDevice are as follows: SeaIo_OpenDevice(devnumber,Handle).
Devnumber is the "installed device number". If you have 3 SeaIO cards installed,
the first is "0", the second "1", the third is "2", and so
on. Handle is a variable you create that will be used with the rest of the SeaIO API as a
reference to the device you just opened.
You are now ready to close a relay, or read an input. Using SeaIo_RelayClose, you can
cause a relay to close on the card. In the example supplied, the actions of opening the
card, closing the card, closing a relay and opening a relay are all assigned to buttons
within iFix. The parameters for SeaIo_RelayClose are: SeaIo_RelayClose(Handletocard,
RelayNum). Where Handle is the handle to the card you just opened, and RelayNum is the
number of the relay starting with 0.
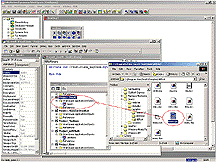
Figure 2 shows the use of the SeaIo_OpenDevice call.

From this point it
is a matter of where and how you want to use the software to control external devices.
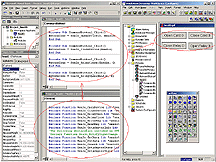
In the example provided, SeaIO.grf, there are four buttons mapped to the opendevice,
closedevice, closerelay and openrelay API calls. They give basic examples of how to use
the SeaIO cards within iFix.
Figure 3 is a picture of the completed SeaIO sample application in iFix. There are many
more API calls at your disposal, and the help files give descriptions and the
parameterization of each.

|


