


 |
    
 |
|
|
|
|
 |
|
Using SeaBERT and SeaTERM in a loop-back configuration
If you are new to synchronous communications or just want to verify that your ACB card is functioning before integrating it into your application, we suggest that you follow the steps in this document to ensure the drivers are loaded and the board is functioning correctly. This document describes how to do internal and external loop-backs using our test programs SeaBERT and SeaTERM. By performing these simple tests, you will become more familiar with the ACB line of synchronous communication cards and their associated drivers, and know that your card and software work properly.
Installation
 |
|
Click on image for larger view.
|
 |
|
Click on image for larger view.
|
Resource Configuration
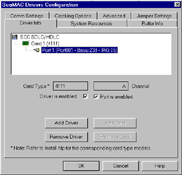
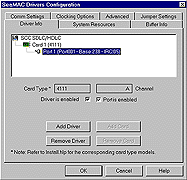
After running SeaMAC Setup you must configure the driver to match the resources that you have chosen for your card. This is done with the Control Panel app, SeaMAC Drivers Configuration. Make sure that the boards configuration and the driver resource configuration match. Refer to your boards manual for configuration options. Make sure that the resources you choose do not conflict with any other device in your system and match the configuration of the board. Any changes made with SeaMAC Drivers Configuration will make .ini and/or registry changes and will require rebooting. Also, make sure that the correct driver and port are selected. Windows 95/98 support is currently provided through our SeaMAC SCC (85230) SDLC/HLDC driver, which supports 1 port and 1 card. Windows NT support is provided via our SeaMAC SCC (85230) Asynchronous and IUSC (16C32) SDLC/HDLC driver, supporting 1 port and 1 card as well. We also provide Windows NT support via our SeaMAC SCC (85230) SCC SDLC/HDLC driver, which provides support for two ports and two cards. The SCC Monosync/Bisync selection is a place holder for a future driver development. Also, refer to the NOTES section at the end for information on ACB board options and driver information.
Initial Settings
 |
|
Click on image for larger view.
|
Clocking Options
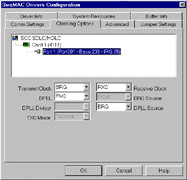
For running SeaBERT or SeaTERM configure the driver as follows.
Clocking Options: TX Clock: BRG; RX Clock: RXC; DPLL: NRZ
Again, with each change made under each tab make sure you have the correct driver and port selected. The driver and port selected show under Driver/Port Selection. The Driver/Port Selection will show up under each tab in the SeaMAC Drivers Configuration app.
These clocking options typically work with most applications, however, they may not be suited for yours.
For the purposes of running our test software choose these settings for now. Refer to the SeaMAC help file for information on each of these settings and how they effect your application.
Buffer Info
 |
|
Click on image for larger view.
|
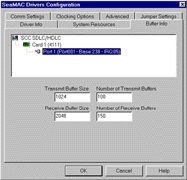
Set your buffer size and number to the values displayed in the screen shot below. Transmit Buffers=1024, Number of Buffers=100. Receive Buffers=2048, Number of Buffers=150. If, in your application, you determine that you need to have Tx buffers and Rx buffers the same size always make the Rx buffer size equal to Tx buffer size + 2 if you have CRC turned on. The two additional bytes are for the CRC and, if not accounted for in the buffer size, can cause errors. You can turn CRC error checking off and on under the Advanced tab.
The above buffer settings are rather large and most applications would not require as much buffering as those settings offer. However, it is a good place to start, ensuring that buffering will not be a problem during initial testing. In an application, depending on data rates, the number of Tx buffers could be sufficient at 10. Typically you would like to have just enough buffering to support your data rate and throughput rate. Anything above that is simply unused space.
Additional Tab Settings
 |
|
Click on image for larger view.
|
Under Driver Info check the Driver is enabled and Port is enabled box. Use the default settings for the additional tabs: Comm Settings, Buffer Info and Advanced.
Select each one of these tabs and view their settings to become familiar with what settings are available for change. For running the test software it is not necessary to alter any of these values. However, when incorporating the ACB card into your application it may be necessary to make changes. Review the SeaMAC help file for information on all settings and how they effect operation. Also, if you are planning to use the ACB adapter in an RS-485 operation, do not use any jumpers on the board that enable RS-485 and do not enable RS-485 under the Advanced tab. The reason for this is that in RS-485 mode you are tri-stating the transmitter and receiver. In a loop-back configuration, when you transmit your receiver would turn off and your loop-back test would fail because you did not receive anything.
After making the necessary changes it is now necessary to reboot. After rebooting return to the SeaMAC Drivers Configuration app in Control Panel, view Driver Info and verify that the driver is enabled and the port is enabled. There should be a check mark in each box.
If the driver and port is not enabled several things could have happened. Make sure that the correct driver and port is selected. This is especially true in Windows NT where you have a choice. If the driver and port is correct then look at Administrative Tools, Event Viewer, to see if a resource conflict has occurred. In Windows 95/98 there is a text file in the root directory, HDLC530.txt, that is written every time Windows is started. If there is a problem loading the driver this text file will tell you where it failed in its attempt to load. Usually this is because of a resource conflict. Sound cards can be a likely source for conflicts because they typically default to using two DMA channels. Before installing the driver and ACB adapter try to determine what resources in your system are free. Resource conflicts, especially with DMA channels, have proven to be the biggest cause for operational problems. If you have a conflict with another device remember that physically removing the device from your computer does not always free the resources assigned to that device. You will need to either remove the device in software or disable it through software. Depending on the device in question this can be done either through your system’s BIOS or the operating system. The reverse is also true. Having a device physically installed but with no software support or drivers loaded can cause resource conflicts.
NOTE: If, after viewing the SeaMAC Drivers Configuration app and having made no changes, click Cancel to close the app. If you click OK the app will prompt you to reboot. |

Setting Up SeaBERT
Internal loop-back
From the Start-Programs menu choose the SeaMAC folder and click on SeaBERT.
 |
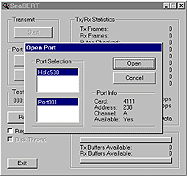 |
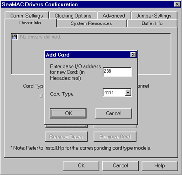
| Click the Open button under Port. |
This will bring up an information dialog box. |
Make sure that all the information in the dialog box is correct. If you get question marks under Port Info this means that the driver did not load. Again, look for resource conflicts, and make sure the board configuration matches the driver configuration. Refer to your card’s manual for board configuration options. If everything is ok, click Open.
State Dialog Page
 |
|
Click on image for larger view.
|
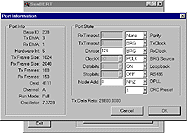
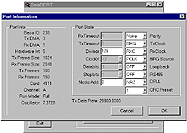
When you have the port opened you should notice a State button now highlighted under the Close button. Click this and the Port Information window will be displayed. Here you can dynamically change portions of the driver configuration without having to reboot. This means that any changes made will no longer be applicable when you exit the program. It is here that you can configure the driver to do an internal loop-back without the need for a connector. This is useful in determining if the board and driver are functioning correctly.
Change the RxClock to BRG and turn Loopback On. Leave all other settings default just as the screen shot below shows.
After making these changes and making sure that the values in your Port Information window match all of the above settings, click OK. Pay close attention to the Divisor, TxClock, RxClock, BRG Source, Loopback, and RS485 settings.
Running SeaBERT
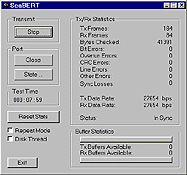 |
|
Click on image for larger view.
|
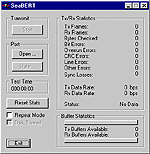
Now you are ready to run SeaBERT in an internal loop-back configuration. Click the Start button. Note: After clicking Start the button now reads Stop. The Tx frames and Rx frames should start increasing. The Tx frames will always be larger than the Rx frames and is a function of the number of Tx buffers. When you click Stop the Rx frames should continue increasing until they match the Tx frames. For details on this see SeaBERT Additional Information. If they do not match, then some error occurred which will be indicated by one or more of the error conditions listed in the window. Errors usually occur due to data rates too high, IRQ conflicts or possibly, processor overhead due to other things running in the background. Typically, if an I/O address conflict, DMA conflict or incorrect board configuration exists the program will lock, not operate at all, or Tx frames will increase but Rx frames will remain 0.
Performance, Buffers and Error Conditions
For optimal performance the available buffers should always approach 0. This bar graph gives a good indication of what is happening in the system as the test is running. If either Tx or Rx Buffers Available start moving toward 100 that is an indication of a problem with, possibly, a DMA conflict, data rate too high, buffer allocation, or the processor cannot handle the data being communicated through the board. This graph is tied closely with the Overrun Errors under the Tx/Rx Statistics. If, when you click the Start button, the Tx frames move up and then stop and the program does nothing from that point, this usually indicates a DMA conflict. If you get a lot of Out of Sync errors check that the data rate is not too high and your divisor is set to 126. If everything runs ok stop the test and click State and decrease the divisor which increases the data rate. Restart the program by clicking Start. At this point you can keep lowering the devisor until you get to the maximum speed at which the ACB card will run in your system. Remember, with SeaBERT, you are transmitting and receiving 512K packets at the same time. If your application does not require continuous simultaneous transmit and receive then the actual date rate that can be achieved with your application may be different than that achieved with SeaBERT.
External Loop-back
 |
|
Click on image for larger view.
|
Doing an external loop-back is suggested after getting the internal loop-back working. This requires two things. Changing a few options with the driver configuration and connecting pins together on the ACB card’s output pin connector.
First you will need to connect the correct pins together. The Tx and Rx pins connect and TSET and RXC connect. For differential interfaces such as RS-422/485 there will be a + and – pair for each signal. Example: Tx+, Tx-, Rx+, Rx-, TSET+, TSET-, RXC+ and RXC-. With the differential interfaces the + pins connect to the + and the – connect to the -. Please refer to your ACB card’s manual for the correct pin numbers to connect for each of these signals.
Also, remember that if your application is going to be RS-485 do not turn on RS-485 and do not have any RS-485 enable jumpers connected on your ACB card. For the loop-back tests RS-422 operation will be used. Once you integrate the ACB card into your RS-485 application you will need to turn RS-485 on in the SeaMAC Driver Configuration and have RS-485 enabled on your ACB card. This would apply to two-wire RS-485.
Once you have the Tx and Rx pins connected and the TSET and RXC pins connected open SeaBERT again and click State after opening the port. Make sure that the settings match those in the screen shot below. If the internal loop-back worked, then the external should also work if the pins are connected correctly and the settings for the driver match those in the window below. If the internal worked and the external did not check the pin connection and pay close attention to settings below:
Using SeaBERT with Two ACB Cards
If you have two ACB cards in different machines you can use the external loop-back tests to connect the two boards and verify operation. Connect the pins between the boards just like the external loop-back and make sure the driver settings match those of the external loop-Back.
SeaBERT, Additional Information
When SeaBERT is running you should notice that the Tx frames and Rx frames are not the same. This is a function of the number of Tx buffers you have allocated. At any point you could verify this by comparing the number of Tx frames transmitted to the number of Rx frames received.
When you click Stop you should notice the Rx frames continue to increase after the Tx frames have stopped. This is because Tx frames are counted as soon as they are queued to be sent. When you click Stop, no more frames are queued and currently queued frames are transmitted until the transmit queue is empty. After clicking Stop and the Rx frames continue to increase you should also notice the number of Rx Buffers Available increase until they reach 100. This is because the Rx buffers are read and nothing else is being transmitted so the buffers become available. After everything stops, the number of Tx frames and Rx frames should match. If they do not then some error or errors occurred. Check the Tx/Rx Statistics to see what type of error or errors occurred. This will help in determining the problem.
Listed under Performance, Buffers and Error Conditions is a note about buffer allocation being the possible source for the Buffer Statistics bar graph moving toward 100. Typically, in this case, the cause would be too many Tx buffers and not enough Rx buffers. As noted elsewhere, the ideal buffer allocation, which would include buffer size and number, should be set to values that are providing just enough buffering. Too much of one and not enough of the other could lead to overruns. Too many of both would be wasted memory. Determine your buffer size based on frame size and date rates. You would want a buffer size that is a multiple of your frame size, otherwise the buffering would not be efficient because of unused space. For the receive buffer, it too, should be a multiple of your frame size + 2 if CRC error checking is turned on.
If you used the buffer size and number suggested under Buffer Info the above problem should not exist. It is suggested that the most efficient size and number of buffers be determined and entered in the driver configuration. Using SeaBERT to test this is an excellent way of determining the optimum values. SeaBERT transmits 512K packets. You can use this number to determine the best buffer values for your system.
The Disk Thread option on SeaBERT simulates disk activity and can be useful in determining performance while accessing the hard disk.
The Repeat Mode is a method of testing two ACB cards in different machines. One machine would transmit to the other machine, which would be in a receive only mode, (just opening the port). On the receive only machine, the Repeat Mode would be checked and what was received would be sent back to the transmitting machine.
Reset Stats simply resets all statistics to 0.
If the program locks up for any reason the driver has entered a non-valid state and the machine will need to be restarted. If you are running Windows NT you can choose Control Panel, Devices and look for HDLC530 and stop the service and then restart the service. This is equivalent to rebooting. |
|
Using SeaTERM
Differences between SeaTERM and SeaBERT
SeaBERT sends continuous 512K packets of data, which can be a strenuous test for a machine. It is a good test because it is strenuous and can easily show system limits. SeaTERM is a terminal program allowing the user to simply type on the keyboard and have what is typed displayed on the screen. The user can also use SeaTERM to send large or small files as well. Using SeaTERM in a loop-back configuration requires the exact setup as explained for SeaBERT. Once the set up is completed the user can simply type or send files, large or small. The pin connections described for SeaBERT are also the exact same for SeaTERM.
Either test can be performed to verify driver and board operation. SeaTERM has a different graphical user interface but contains the exact same driver setup portion.
 |
|
Click on image for larger view.
|
SeaTERM Interface
SeaTERM is found in the Start-Programs-SeaMAC folder. After launching SeaTERM click Communications then Port Open. This will bring up the same Open Port information window as seen with SeaBERT. If everything is OK, click Open. If it is not refer to Running SeaBERT section for help in solving any problem that may have occurred.
Running SeaTERM
Once the Open button is clicked in the Port Information window click on Communications again. The drop down menu will now have Settings highlighted for you to choose. Click on
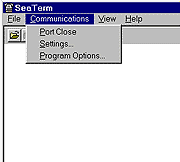 |
|
Click on image for larger view.
|
settings and this will be the same driver configuration window as described and seen in the State Dialog section of SeaBERT. Please refer to that section for the correct settings. Everything is the same for internal and external loop-back as those used in SeaBERT. Once the settings have been chosen and you clicked OK click Communications again and choose Program Options. Under Program Options you will have a choice for echo on or off. To make sure that you are seeing what is transmitted and not just an echo make sure echo is turned off. Also, you have the choice to determine the directory into which any files transferred go. If you are planning to experiment with file transfers choose the directory that you want to use. Since this is a terminal program you have the ability to use modem control signals. If your application requires modem control signals use SeaTERM to verify their operation. You can view their state on the right side of the screen. You must connect the modem control signals together before this operation can be completed. Connect RTS to CTS. RI can be included here if supported and needed. Connect DSR to DCD if supported and needed. Please refer to your ACB card’s user’s manual for the correct pin numbers to connect.
 |
|
Click on image for larger view.
|
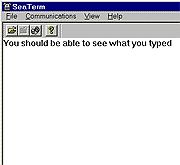
SeaTERM in Operation
Once everything is configured you can now type on the keyboard. You should see the characters typed appear on the screen. If you are doing an internal loop-back and nothing appears check the settings described in the SeaBERT State Dialog Page. If you are doing an external loop-back and nothing appears check your pin connections and the driver configuration described in the SeaBERT External Loop-back section.
File Transfers
To transfer a text file choose File, Transmit Text File. This will open a typical file selection window. Choose the text file that you wish to transfer and click open. This will send a copy of the file from the original location into the directory you chose under Communications, Program Options. If you had two ACB cards in different machines you could use this program to transfer files from one computer to the other. Simply open the port in one machine and, after having opened the port on the other machine, choose Transmit Text File and chose the file to send and click Open. The file will be transferred to the other machine.
 |
|
Click on image for larger view.
|
When you transfer a text file in a loop-back configuration or send the file to another machine as described above, you should see the text displayed on the screen as seen in the following section.
Transmitted Text File
The screen shot below shows a typical text file after having been transferred.
 |
|
Click on image for larger view.
|
This is a good test for two ACB cards in separate systems. Experiment with transmitting large and small text files and compare the received file to the original. |
|
NOTES
Windows Driver Differences
There are several differences between the Windows 95/98 driver and the Windows NT drivers that determine a valid configuration. Read through the differences to determine what the driver you choose to use can and cannot do.
Windows 95/98
The Windows 95/98 driver is an HDLC/SDLC synchronous driver that requires two DMA channels and an IRQ. Therefore, with the Windows 95/98 driver, requesting a single DMA channel or no IRQ is not a valid option. Also, the Windows 95/98 driver supports only one port. If you have a two-channel ACB card you will not be able to use the second channel when using the 95/98 driver.
Windows NT
The Windows NT drivers offer asynchronous and HDLC/SDLC synchronous options. Windows NT also supports single channel or two-channel DMA and interrupts. There is also an asynchronous interrupt mode in NT, which requires no DMA. It is not an efficient means of operation and data rates will be low if this option is chosen, but for certain applications this may be the best option. Therefore, with NT, choosing a single DMA channel is valid. This DMA channel is shared between transmit and receive, so when configuring the driver for single channel DMA, (half-duplex DMA), the same DMA channel must be entered for both the transmit and receive DMA channel selection in the SeaMAC Driver Configuration. If, in your application, you are only going to transmit or receive with your ACB card, you still need to assign a DMA channel for both transmit and receive. If you are using a signal DMA channel, that channel would be assigned to both transmit and receive. Not assigning a DMA channel for either transmit or receive is not a valid option. Also, NT needs an IRQ. Not selecting an IRQ is not a valid option. NT also supports two ports or channels. If your ACB card has two channels and you wish to use both of these be sure that the driver that is being configured is for the port that you wish the configuration options to be applied. This is the Port Selection in the SeaMAC Driver Configuration utility.
NT Asynchronous Options
The Windows NT asynchronous driver offers several options. There are trade-offs with each choice so the application must be taken into consideration when deciding which mode of operation to use. One mode uses DMA, either half or full duplex along with a DMA terminal count and an IRQ. The other mode is interrupt. This mode produces an interrupt every byte, (default), or every four bytes. This mode produces a lot of overhead and data rates will suffer but may fit certain applications. When using DMA, DMA terminal count is used. The DMA Terminal Count is part of the ACB card’s configuration. Consult your user’s manual for turning DMA Terminal Count on. This uses a timer routine which times out when a DMA read or write has occurred. It is more important during the DMA read. This method works much better than the interrupt mode with higher data rates and less overhead. Terminal count is only valid when using the asynchronous driver.
If you are using DMA for your asynchronous driver, Full Duplex is more efficient than Auto-Init if you are receiving fixed length packets that are not sent back to back. Use Auto-Init for best performance with a continuous stream, (spanning buffers). Full Duplex and Auto-Init are options with the NT driver only. Auto-Init is incorporated into the Full Duplex mode in Windows 95/98.
Driver Mode Selection
Half Duplex, Full Duplex, Auto-Init, and Interrupt are options under the SeaMAC Drivers Configuration app. In Windows 95/98 Auto-Init is incorporated into the Full Duplex option.
Resource Conflicts
Since the ACB cards do not having large buffering on the board the windows drivers use a combination of DMA and interrupts. There is, however, one case in which DMA is not used. See NT Asynchronous Options. Make sure that no other device uses the DMA channel (s) and IRQ that you choose for your configuration. Sound cards, floppy drive, SCSI controllers, LPT port in EPP mode as well as other devices use DMA channels. Determine what devices you have in your system and the resources they use before configuring the ACB card and drivers.
Resource conflicts have proven to be the most common problem when configuring an ACB card and driver. It cannot be stressed enough how important it is to have the resources assigned to the ACB card and driver free from use by any other device in a system. Windows 95/98 provides a somewhat better way of determining what resources are being used in a system than Windows NT. By choosing Device Manager and highlighting Computer and clicking Resources you will get a list of all resources being used by category, i.e. IRQ’s, DMA, I/O address, etc. The resources for an ACB card, when it is correctly installed, and with no conflicts, will show up here as, "In use by an unknown device." In Windows NT you can view resources that have been registered by going to Administrative Tools, Windows NT Diagnostics. The resources seen here have been registered in NT and are being used or held for the device listed. However, not all resources that are being used will necessarily show up here.
ACB Board Configuration Options
When using the synchronous driver for either Windows 95/98 or NT do not enable Terminal Count on the ACB card. Consult the user’s manual for your ACB card to determine how to enable or disable DMA Terminal Count. The synchronous driver will not work correctly with your ACB card if Terminal Count is enabled. Make sure that the Tx DMA channel and the Rx DMA channel you have chosen in the driver configuration match the ACB card's configuration. If the Tx and Rx DMA channels are reversed on the card from that of the driver’s configuration, the board and driver will not function correctly. If you are using half-duplex DMA refer to the user’s manual for your ACB card to determine to proper configuration of the board. Some boards differ from others.
When using DMA, choose DMA Always Enabled on your ACB card. Consult the user’s manual for your ACB card to determine the correct configuration for this.
Pin Connections
Typical pins used when using synchronous or clocked asynchronous communications are, transmit, receive, and clock input and output lines. Confusion over which clock lines to use often occurs because there are Transmit Clock and TSET pins on the ACB card. Contrary to what the description implies, the Transmit Clock line is an input by default. It can, though, be configured as an output. Consult the user’s manual for your ACB card for the proper configuration. Typically the TSET pin (s), which is the clock output, would be used to transmit the onboard clock. The Transmit Clock pin(s) is provided as a means of clocking off of a separate source than your Receive Clock pin. For example, your receive data rate could be different than your transmit data rate. The Transmit Clock pin (s) can also be used as an output clock signal, transmitting the onboard clock. In most applications it is easier to use the TSET pin (s) as your output clock signal. If there are any questions about this please contact Sealevel Systems technical support.
NOTE: If, when testing your ACB card, SeaBERT or SeaTERM locks and no longer responds the driver has entered an invalid state. You can, in certain situations, close the program that you are using but will no longer have access to the port. If this happens during your testing you will have to reboot to reset the driver. This also holds true if the driver locks while using an application that was developed for use with the ACB card. In Windows NT, Control Panel, Devices, the device HDLC530 can be stopped and restarted, which is equivalent to rebooting. |
|
|
|

|