Answers Database
FPGA Configuration: Address Pins A18 - A21 are optional for XC4000EX only

Record #1984
Product Family: Software
Product Line: FPGA Implementation
Product Part: bitgen
Product Version: 1.1.1a
Problem Title:
FPGA Configuration: Address Pins A18 - A21 are optional for XC4000EX only
Problem Description:
Urgency: Standard
General Description:
The Configuration Address Pins A18, A19, A20, A21 are all high at the beginning of a Master Parallel
configuration.
Solution 1:
Since these lines are optional, they will act like unconfigured IOs until the portion of the bitstre
am to activate them is received. This means that A18-A21 will float high at the beginning of config
uration. For Master Parallel Up configuration they need to be low from the beginning. This can be
accomplished with a pulldown.
The Address Pins A18-21 are only activated by a bitgen option -g addresslines:<value>. The value spe
cifies the total number of address lines to be activated. By default this number is 18. If you wan
ted A18 - A21 to be activated the bitgen syntax would be:
bitgen -g addresslines:22
Solution 2:
In order to set the option to activate the upper address lines
from the Design Manager GUI, you will need to perform the
following steps :
1. Create a project for your design.
2. From the Utilities pull-down menu select Template Manager.
3. Select the "xc4000" Family from the top pull down menu and
then select the "Configuration Template" buttton from the
Template Manager window.
4. Select the New button and specify a name for your personal
configuration template.
5. Being sure your template name is selected in the "Template
List" window and press the "Customize" button.
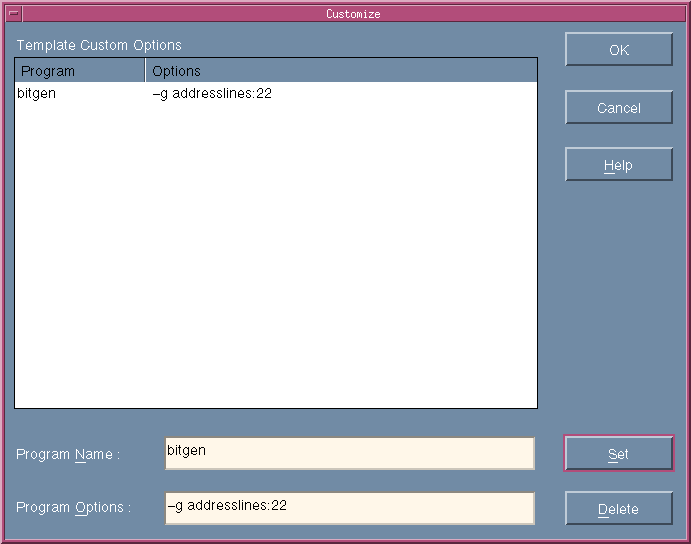
6. Once the Customize window appears, type into the following
fields (WEBIMAGE 1:Template Manager Customize Window) :
Program Name : bitgen
Program Options : -g addresslines:22
7. Press the "Set" button and then select "OK".
8. Press the "Edit" button and select all other configuration
options you wish to use for your design.
9. Close the Tamplate Manager
10. Implement your design selecteing from the Implement Options
window the configuration template you have just created.
For more information on the Template Manager consult the
"Design Manager/Flow Engine Refernce/User Guide" from your
Dynatext On-line Document Browser.
End of Record #1984 - Last Modified: 07/13/98 16:07 |

