This exercise will take you through the tools provided by Macromedia Fireworks to create an image, then break it into pieces to be put back together in a table on an HTML page.
Begin by opening Fireworks then selecting New from the File menu. Create a canvas of width 600 pixels and height 200 pixels. Next, select the rounded corner rectangle tool from the tool bar.
Click on the color fill box in the tool bar and select a color for your buttons.
![]()
Create a rectangle about the size of a button you would like to see on a web site. Once you have done this, go to the properties window at the bottom of the page to set the "Rectangle roundness" of the corners to something you find pleasing. If you do not see the properties window, go to the Window menu item at the top of the screen and verify that "Properties" is checked. Once it is checked, the window should be somewhere on your desktop. If the properties window does not have a roundness option, make sure that the button you have just created is selected. You can do this by checking the pointer tool from the tool bar, then clicking on your button. The roundness option should then appear on the object window.
Next, go to the effects portion of the properties window. This is located on the left side of the properties window at the bottom of the page. Once again, if you do not see it, make sure "Properties" is checked under the Window menu. Click the plus sign (+) in the window to add effects to your button. Use this to add an inner bevel to your button. If you don't like inner bevels, try a drop shadow or a glow. At this point, my button looks like this.
![]()
Use the text tool (button with the capital letter A on the tool bar) to add text to the face of the button. Be sure to select an appropriate font, color, and size for your text, by highlighting your text, then opening the "Text" menu (on the top menu bar) and selecting the "editor" option.
![]()
Use the pointer tool to select the button, then hold the shift key down and select the text. Next, right click and click the "group" option. This bundles your button and it's text together as 1 group. Now you can select the button and its text with one click to copy it and paste it 3 or 4 times across the drawing. Right click, and "ungroup" each button, then, double-click on the text to change the text to different items that may be on your web site.
![]()
Now, using the text tool, add an appropriate heading to your site. Feel free to add a drop shadow or other effect to enhance the look of your header.

The last step for creating our image is to trim the canvas so that there isn't any extra white space around our images. From the Modify menu item, select "Canvas", then "Trim canvas". This should remove all of the white space. If you'd like, you might also want to save your image at this time.
If you recall from our discussions on tables, an image can be broken up into
pieces to be later reconstructed in a table. Fireworks has design aids to help
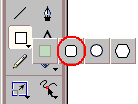
us do this. Begin by selecting the slice tool from the tool buttons, ![]() . Using this tool, highlight a box around one of your buttons. You
should see a greenish box laid over the button.
. Using this tool, highlight a box around one of your buttons. You
should see a greenish box laid over the button.

Add these slices to your images attempting to line the corners up with adjacent buttons.

The red lines on the image indicate where the table will be breaking up the image.
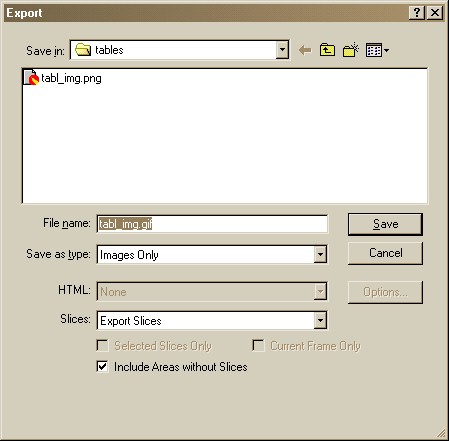
Now we can export this image as multiple images with the image broken up along the slices. From the File menu, select Export. In the window that appears, enter the primary name of the graphics file you wish to save, (you will actually be saving an image for every table cell, so there will be multiple files) select to save as type Images Only, and set the Slices to Export Slices. Clicking on Save will save you image files.
Now look in the folder where you saved these images. There should be multiple files all beginning with the file name you selected in the export window. For example, I selected the file name tabl_img. The files that were produced were:
The first image is for row 1 column 1 of our table where this cell spans five columns. This was the heading text. The next five files are for row 2 columns 1, 2, 3, 4, and 5. These were the button files. Open these files to see if the images are correct for your export.
Repeat the Export process again for your original image, except this time, Save as type should be set to HTML and Images. This time, the HTML file with the table has been saved. View this HTML file and you should see the image put back together.
As a last step to this exercise, view the source for this HTML file and verify that the table was created as you would have wanted it to be created. Also notice that the phantom top row and right column have been added, their widths and heights forced by sizing a transparent image called spacer.gif. Modify this HTML and set the border attribute to 1, then view the page again in your browser to see how the spacer.gif file affects the page.