
The purpose of this lab is to try out some of the features offered by Windows XP for maintenance and trouble shooting. They include:
A device driver is a file stored to your hard drive that contains the information the O/S needs in order to properly communicate with a device. Devices include just about every peripheral component of a PC such as displays, hard drives, CDROMs, and printers. Every operating system requires them, but they differ in how they are loaded and the interfaces they use.
Typically, when you purchase a peripheral for your computer, it comes with a device driver. If the device driver is out of date, e.g., it's for an older O/S or newer versions of the device driver have been released, or if the device driver that came with the peripheral has been lost, a new device driver can typically be downloaded from the Internet either through the Download Center of the Microsoft web site (www.microsoft.com) or the manufacturer's web site.
In the old days, i.e., long before Windows XP, device drivers could be loaded using a text file named CONFIG.SYS. This file was stored in the root directory of C:\, and upon boot up, it was examined for a list of devices to load. It was designed to work with the command line O/S DOS and is only applicable to 16-bit operation. Below is a sample of a CONFIG.SYS file:
DEVICE=C:\DRVRFILE.SYS /D:DEV_NAME
The "DEVICE=" part tells the processor when it's reading the CONFIG.SYS file that we're about to load a driver. The "C:\DRVRFILE.SYS" tells the processor that the driver file is named DRVRFILE.SYS and it is located in the root directory (\) of the C drive. The "/D:DEV_NAME" names the driver so that the O/S can identify it later once the driver has been loaded in memory.
With the onset of expanded and extended memory, the keyword "DEVICE" could be replaced with "DEVICEHIGH" in order to have the driver loaded into higher memory. CONFIG.SYS can be accessed in WinXP with the following steps. In the case of XP, it is more than likely that the CONFIG.SYS file is empty.
With the advent of Windows 3.1 and the 32-bit architecture, Microsoft began using a text file named SYSTEM.INI to list drivers. It too had a special syntax that told the O/S what drivers to load and where they could be found. In general, an INI file is divided into sections using a section name enclosed in square brackets. The section name is followed by a line defining an element using the format "keyname=value".
[SectionName]

  keyname=value

  ;comment
Note that the section names and each device listed must be on separate lines.
Device drivers can be loaded here by using the device's name as the keyname and the device driver file for the value. Typically, the default directory for these driver files is "C:\WINDOWS\system32".
[drivers]

  wave=mmdrv.dll

  timer=timer.drv
One of the other files that came up with SYSEDIT was the SYSTEM.INI file.
SYSTEM.INI files are still included in XP for backwards compatibility with older Windows applications. In addition, a number of other applications use INI files of the format described above to set their parameters. There are classes available in VB and C++ that allow the program to quickly access information from an INI file making it possible to use INI files for your own application configurations.
The last method for loading drivers that we are going to look at is the Registry. Actually, the Windows Registry does a lot more than simply load drivers -- it is a database that includes things such as user options and last window size for applications in addition to device driver information. Like the INI files, classes are available to applications that allow them to modify the Registry.
Editing the Registry can be done in a number of ways. The easiest way is to use the applications found in "Control Panel". The following steps represent one of the many ways to access a device driver's information in the Registry:
It is important to note here that this view not only presents users with information about the installed devices; it also shows if any errors have occurred. In general, there are two types of errors. An exclamation point on a yellow circle means that the device is experiencing a problem.
![]()
A red 'X' means that the device has been disabled. The red 'X' appears whether the O/S has disabled the device due to a problem or if the user has manually disabled the device.
![]()
At the top of the device properties window is information on the driver provider, date, version, and digital signer. The digital signer identifies a device driver as having been tested and approved by Microsoft's Windows Hardware Quality Lab. Drivers without a signature can still be used as long as the user understands that there is a risk involved in doing so. The system may become unstable or unusable.
There are four buttons on this driver window that perform the following functions:
The Windows Event Viewer provides access to various log files that are maintained by the O/S. It is a useful tool when it comes to checking on the health of the O/S.
The window that appears is similar in arrangement to Windows Explorer except that the directory tree is replaced with a list of the available log files and the files window is replaced with the events from the selected log file.
There are three log files: Application, Security, and System.
For the application and system logs, there are three types of events: information events, warning events, and error events.
The next step is to open a log file and view it.

Typically, a system that is working well should have mostly information events in the event viewer and very few warnings or errors.
The security log works a little differently than the system and application logs. Specifically, there are only two types of events for a security log: Success audit and Failure audit.
The large number of events that usually are contained in a log can sometimes make it difficult to find the event that you are looking for. In this case, filters can be applied to make it so that only specific events are presented to the user.
Any of the logs can be cleared by right clicking on the desired log name in the left window and selecting the option "Clear all Events."
When you turn on a PC, there is a process that the processor goes through in order to run an operating system such as Microsoft WindowsTM.
When a microprocessor first boots up, it has no clue. I'm serious. It's dumb as a rock. The first thing it needs to do is bring up its internal circuitry and initialize its internal components. It does this as soon as it senses that the appropriate power is available from the motherboard.
Once the processor has "come to", it needs to get some basic information such as how to access the hard drive or the floppy drive in order to load an operating system. This may seem trivial to you, but remember, it's dumb as a rock. Without code to execute, the processor is not capable of doing anything.
The processor finds this basic code to do simple input and output from its BIOS. BIOS stands for Basic Input/Output System, and it contains primitive software that shows the processor how to read from or write to devices such as the hard drive. Later BIOS's were capable of reading from CDROMs or a network adaptor.
Once the BIOS has shown the processor how to access the hard drive or other media where the operating system is contained, the operating system can be loaded. The operating system contains the higher level software that allows the user to do things like:
Once the operating system is running, you need to load the "details." This would include things like device drivers.
Since a computer cannot run without an operating system, how does a computer with a blank hard drive start so that you can load an operating system? Well, in the lab we used bootable CDROMs, but there is an easier way to create a bootable device. Back in the old days, an entire O/S could be contained on a single floppy diskette. Although the O/S that was loaded from a diskette was only capable of command line operation, it could be very useful when trying to recover from an error in an O/S installed on a hard drive.A floppy disk containing a bootable O/S is called a boot diskette, and they are still useful for things such as partitioning hard drives or initiating a network boot on a machine with a BIOS that is not capable of a network boot.
Due to the size of the operating system even for command line operation, Windows NT and Windows 2000 did not allow users to make a bootable diskette. Windows XP, however, has brought back the option.
Warning: All of the data on the diskette you will be using for this part of the lab will be destroyed.
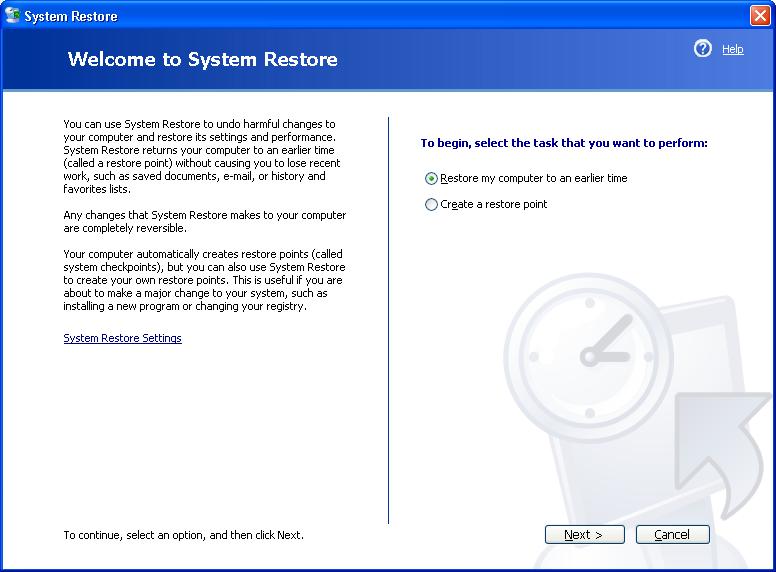
A typical cause of O/S failure occurs when a modification is made to the system such as installing new software or installing a new driver. Microsoft has created an "undo" feature called "System Restore" that allows the user to revert the condition of their system back to an earlier state without damaging documents or other files that have been saved since that time. This is done by creating "restore points". A restore point is like a bookmark identifying the full state of the O/S and its installed applications at a specific time.
Restore points are created automatically for the user at least once a day and any time a significant change is made to the system such as installing an application or driver. The user can also create restore points manually.
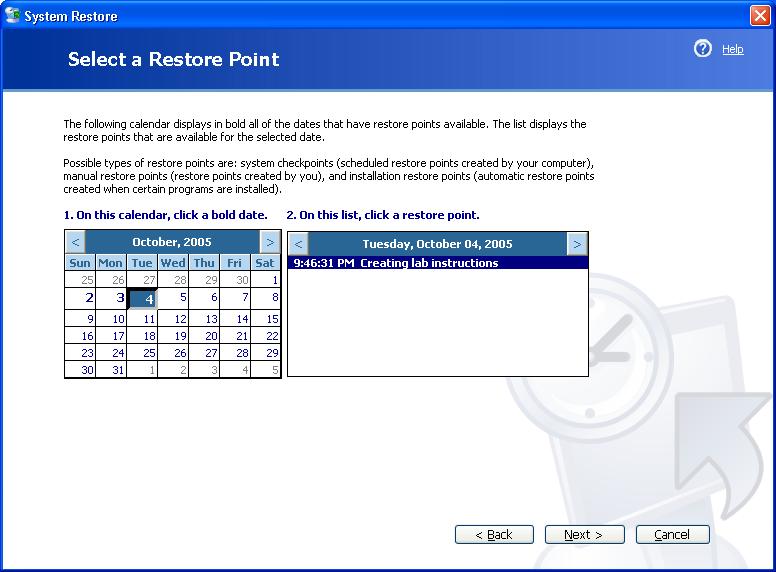
Now that a restore point has been created, it can be used later to restore the system.
Once you've performed a system restore, the opening screen for System Restore adds a new option, "Undo my last restoration."
Developed by David Tarnoff for CSCI 2150 -- Computer Organization at ETSU