This exercise will take you through the process of adding an image to your website using HTML.
Begin by opening your browser. It doesn't matter what browser you use, just that you have access to the Internet. Enter the URL:
This is a public site that offers simple images for free download. Any time you use a site such as this, be sure to read the "Terms of Use" section of the web site to verify that you are not violating any of the artist's rights when downloading. Barry's clipart has a Terms of Use section that I suggest you read before downloading any of their works.
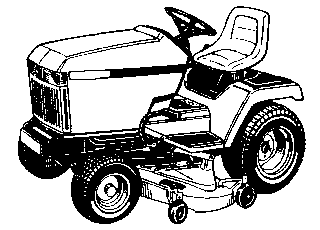
When I visited the site, I selected the "Animals and Birds" category from beneath the heading "Cool Free Clipart". From within the "Animals and Birds" category, I selected "Assorted Clipart: Farm Vehicles". It was in this section that I found the following image.
Select your own image from Barry's Clipart and download it to your local directory. To do this find your image and load it into the browser window. If you right-click on the image (pressing the right mouse button instead of the left while the cursor is over the image), a menu will appear. This menu is sometimes refered to as the "context specific" menu. To save an image to the local drive, from the context specific menu:
This will allow you to store the image locally.
While you've got the image displayed, let's also get some information about the image, specifically the size so that you know what to enter for your "width" and "height" attributes in the <img> tag. From the context specific menu:
By the way, if these don't work, and sometimes they don't, open the image in the program Paint (found under Programs -> Accessories), and from the Image menu, select "Attributes". The height and width properties should show up in that screen.
Now you should be ready to incorporate this image in your HTML document.
Create a blank HTML document with the title "CSCI 5011 -- Image Exercise". (Don't include the quotation marks.) Be sure to include all of the appropriate tags such as <html>, <head>, and <body>.
First, let's insert the image into your page. If you recall from our lecture, the image tag looks something like the following:
<img src="tractor.gif" width="320" height="230">
If the tag above (or any other tag printed in these notes) crosses multiple lines, it's a result of the window size of your browser. Be sure to make the tag on a single line in your HTML file.
Insert your image into your blank page using the information pertaining to your image, then view the page and see if it displays the way you expected it to.
If your image displayed properly, let's see what we can do to modify it. Add the attribute alt to your image tag and as its value, write a short description of the image. Remember to place the quotation marks around the description.
<img src="tractor.gif" width="320" height="230"
alt="A generic garden tractor">
Reload your page and place the mouse over the image for a moment. Your description should appear in a box over the image.
Now let's modify the height and width. Double the height and cut the width in half. For my example, that would give me a new tag of:
<img src="tractor.gif" width="160" height="460"
alt="A generic garden tractor">
My new image looks something like this:
It's still the same image. I was just able to modify it's dimensions.
Within the body, type a paragraph of text. It doesn't have to be anything fancy, just something that will appear on multiple lines. If you want to, you can past the HTML code that I've created below for a simple paragraph.
<p>This is just a paragraph about nothing. I have included it simply
  to have a line of text to show how images react when placed within a paragraph.
  The attributes of the image affect how the lines of text flow around the image
  itself. Some atttributes cause the text to simply line up with the bottom of
  the image, others the top. Still others are meant to allow text to wrap around
  the image as if it were embedded in the paragraph like those in a magazine.</p>
Restore the height and width to the original dimensions. Move your image tag to a line within the paragraph. For example, I moved the image tag between the second and third paragraphs.
<p>This is just a paragraph about nothing. I have included it simply
to have a line of text to show how images react when placed within a paragraph.
<img src="tractor.gif" width="320"
height="230" alt="A generic garden tractor">
The attributes of the image affect how the lines of text flow around the image
itself. Some atttributes cause the text to simply line up with the bottom of the
image, others the top. Still others are meant to allow text to wrap around the
image as if it were embedded in the paragraph like those in a magazine.</p>
Reload the image in your browser and note how it displays.
Lastly, examine what happens when you add the align attribute to your image and test it with each of the following five possible values: "top", "middle", "bottom", "left", and "right".
Developed by David Tarnoff for use in CSCI 5011 at ETSU