Click the Custom
Level button in the Setup Security
page. The Custom Security dialog
box appears (see figure below).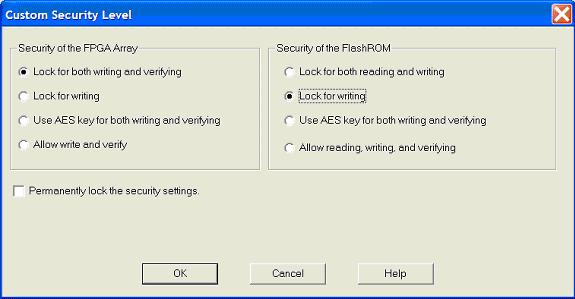
For advanced use, you can customize your security levels.
To set custom security levels:
Click the Custom
Level button in the Setup Security
page. The Custom Security dialog
box appears (see figure below).
Select the FPGA
Array Security and the FlashROM
Security levels.
The FPGA Array and the FlashROM can have different Security Settings.
See the tables below for a description of the custom security option levels
for FPGA Array and FlashROM.
FPGA Array
|
Security Option |
Description |
|
Lock for both writing and verifying |
Allows writing/erasing and verification of the FPGA Array via the JTAG interface only with a valid Pass Key. |
|
Lock for writing |
Allows the writing/erasing of the FPGA Array only with a valid Pass Key. Verification is allowed without a valid Pass Key. |
|
Use the AES Key for both writing and verifying |
Allows the writing/erasing and verification of the FPGA Array only with a valid AES Key via the JTAG interface.
This configures the device to accept an encrypted bitstream for reprogramming and verification of the FPGA Array.
Use this option if you intend to complete final programming at an unsecured site or if you plan to update the design at a remote site in the future. Accessing the device security settings requires a valid Pass Key. |
|
Allow write and verify |
Allows writing/erasing and verification of the FPGA Array with plain text bitstream and without requiring a Pass Key or an AES Key. Use this option when you develop your product in-house. |
Note: The ProASIC3/E family FPGA Array is always read protected regardless of the Pass Key or the AES Key protection.
FlashROM
|
Security Option |
Description |
|
Lock for both reading and writing |
Allows the writing/erasing and reading of the FlashROM via the JTAG interface only with a valid Pass Key. Verification is allowed without a valid Pass Key. |
|
Lock for writing |
Allows the writing/erasing of the FlashROM via the JTAG interface only with a valid Pass Key. Reading and verification is allowed without a valid Pass Key. |
|
Use the AES Key for both writing and verifying |
Allows the writing/erasing and verification of the FlashROM via the JTAG interface only with a valid AES Key.
This configures the device to accept an encrypted bitstream for reprogramming and verification of the FlashROM. Use this option if you complete final programming at an unsecured site or if you plan to update the design at a remote site in the future.
Note: The bitstream that is read back from the FlashROM is always unencrypted (plain text). |
|
Allow reading, writing, and verifying |
Allows writing/erasing, reading and verification of the FlashROM content with a plain text bitstream and without requiring a valid Pass Key or an AES Key. |
Note: The FPGA Array can always read the FlashROM content regardless of these Security Settings.
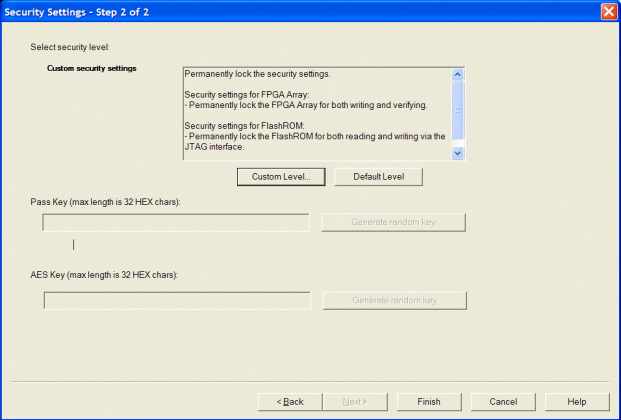
To make the Security
Settings permanent, select the Permanently lock the security settings
check box. This option prevents any future modifications of the Security
Setting of the device. A Pass Key is not required if you use this option.
Note: When you make the Security Settings permanent, you can never
reprogram the Silicon Signature. If
you Lock the write operation for the FPGA Array or the FlashROM, you can
never reprogram the FPGA Array or the FlashROM, respectively. If you use
an AES key, this key cannot be changed once you permanently lock the device.
To use the Permanent FlashLock™
feature, select Lock for both writing
and verifying for FPGA Array and Lock
for both reading and writing for FlashROM and select the Permanently lock the security settings
checkbox as shown in the figure below. This will make your device one-time-programmable.

Click the OK button.
The Security Settings page appears with the Custom security setting information as shown in the figure below.