When you create a named NetGroup, you need to specify the associated NetGroup definition and then specify a name for the NetGroup. This type of NetGroup is persistent and can be instantiated across a design. The NetGroup can also be exported as a library and then instantiated and used in other designs. However, if you need to create a NetGroup for one-time use, you create an unnamed NetGroup. For details on unnamed NetGroups, see Unnamed NetGroup.
To create a named NetGroup
-
Choose NetGroup from the Place menu in Capture.
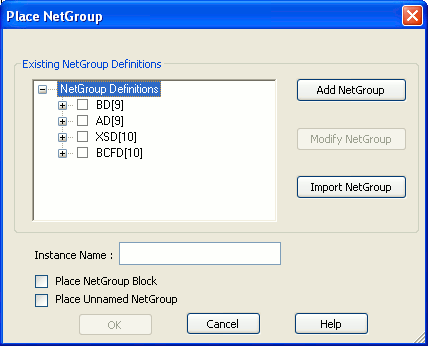
The Place / Create NetGroup dialog displays.
You use this dialog box to build associated NetGroup definitions that you can use anywhere in your design. - To specify a new associated NetGroup definition, click the Add NetGroup button.
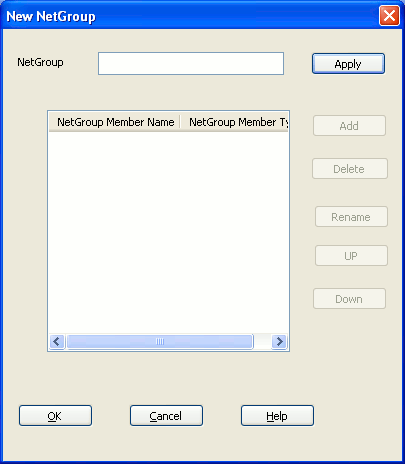
The New NetGroup dialog displays. - In the NetGroup Name text box, enter the name of the NetGroup and click Apply.
- To add a new NetGroup member, click the Add button.
Note:The Add button is disabled until you specify the NetGroup name and click Apply.
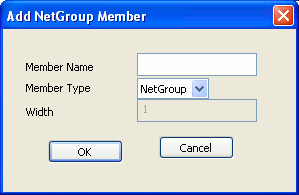
The Add NetGroup Member dialog displays.
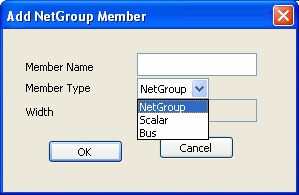
You can add NetGroups, buses or scalars as members of a NetGroup.
If you add a NetGroup or a bus, you need to also specify the width of the member. For example, if you add a NetGroup named AD that contains five signals, you will specify the name as AD[0..4] or AD[5-9]. The same holds true for buses.
When you add a bus or a NetGroup as a member of a NetGroup definition, you need to specify the bus or NetGroup member using the normenclature [LSB..MSB]. The least significant byte followed by the most significant byte.
If you add a NetGroup as a member to a NetGroup, the new NetGroup is also available for use as a NetGroup on its own. So in the Place NetGroup dialog, you will see the new associated NetGroup definition.
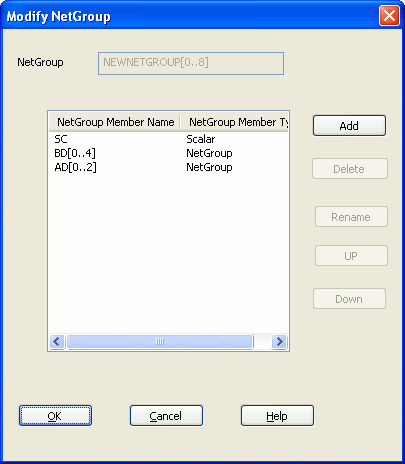
In the New NetGroup dialog, you can also rename or delete existing NetGroup memebrs. You can also move the existing memebrs up and down.
You move the positions of the members of a NetGroup, up or down to specify the horizontal position they will display in when you place the NetGroup on a page.
To rename a NetGroup member
- In the New NetGroup or Modify NetGroup dialog, select the NetGroup member to rename.
- Click the Rename button.
The Rename NetGroup Member dialog displays. - Type a new name for the member and click OK.
When you rename a NetGroup member that is either a NetGroup or a bus, you need to ensure that you only change the name of the member. This implies, in the rename procedure, you cannot change the width of the member.
When you rename a NetGroup member that is a NetGroup, you need to rename the NetGroup to the name of an existing NetGroup not already contained within the current NetGroup.
To modify a named associated NetGroup definition
- To open the NetGroup dialog, choose NetGroup from the Place menu.
- Click the check-mark next to the NetGroup you want to modify and click the Modify button.
Note: You need to click the check-mark next to the name of the NetGroup. Selecting the NetGroup name will not make the NetGroup available for edit.
When you modify an associated NetGroup definition, you can add, delete or rename members. You can also move the positions of the existing members up and down. However, you cannot change the name of the member.
To delete a named NetGroup
- Choose NetGroup from the Place menu in Capture.
- In the Place NetGroup dialog, choose the NetGroup to delete.
- Click Delete NetGroup.
- You cannot delete a NetGroup that is used in the design.
- You cannot delete a NetGroup that is defined in another NetGroup.
- If you delete a NetGroup (say, N1) that contains other NetGroups (say, SubN1 and SubN2)), the top level NetGroup (N1) is deleted. However, the contained NetGroups (SubN1 and SubN2) are not deleted.
Copy and paste NetGroups across designs
You can use the Capture Copy and Paste commands to copy a NetGroup from one design to another. This functionality is the same as for other schematic page objects.
When you copy a NetGroup to another design, the associated NetGroup definition is also copied. This means that if you open the NetGroup dialog, you will see the associated NetGroup definitions now available for use in the new design.
Also, if you copy and paste a NetGroup into another design and NetGroups of the same name exist in the destination NetGroup, the NetGroups in the destination design will not be overwritten.
Exporting and Importing Associated NetGroup Definitions
You can export the NetGroups defined in a design to an associated NetGroup definition xml file. These NetGroups can then be imported and used in any other design.
To export an Associated NetGroup to a Definition Xml
- From the Place menu choose NetGroup
- Open the NetGroup dialog
- Click Export NetGroup.
- In the Save As dialog, specify the name and destination of the NetGroup definition xml.
When you run the Export NetGroup command in Capture, all the named NetGroups in the current design are exported to the definition xml.
This implies the unnamed NetGroup definitions are not exported.
To import an Associated NetGroup Definition Xml
- From the Place menu choose NetGroup.
- Open the NetGroup dialog.
- Click Import NetGroup.
The Associated NetGroup Definitions xml files dialog box displays. - Enter the full path of the associated NetGroup definition xml file or browse to and select the associated NetGroup definition xml file and click Open.
The NetGroups contained in the file are imported into the current design.
Placing a named NetGroup on a page
After you define a NetGroup, you can place the NetGroup on the page of the design.
You can place a named NetGroup on a page as:
- a block
- a hierarchical port
- an off-page connector
- a hierarchical pin
By default, only instance name is displayed for NetGroup Blocks, Hierarchical Ports, OffPage Connectors, Globals, and Hierarchical Pins. For Net Aliases, the NetGroup definition name is also displayed if there is a mismatch between the Instance name and the NetGroup definition name.
You can change the default settings in the NetGroup section of the Extended Preferences Setup window (Options – Preferences – More Preferences).
To place a named NetGroup as a block
- To place a NetGroup as a block you need to go to the NetGroup dialog box. This box is open if you have just created a new associated NetGroup definition or you can open this from the NetGroup menu item on the Place menu.
When placing a NetGroup on a page, you have the option to place the entire NetGroup or place only selected members of the NetGroup. - To place the entire NetGroup on the page, click the check box to the left of the NetGroup name.
(To place only selected members of the NetGroup, expand the NetGroup node and click the check boxes to the left of the selected members.)
Notice, when you click the NetGroup name check box or any one of the NetGroup member check boxes, the Name field is filled with the name of the NetGroup. This is the default name given to the named NetGroup instance, and you have the option to edit this instance name. - To place the NetGroup as a block, choose the Place NetGroup Block check box and click OK.
The cursor changes to a crosshair icon. - Draw a block to contain the NetGroup. This is done the same way as when drawing a hierarchical block on a page.
To place a named NetGroup as a hierarchical port
- To place a named NetGroup as a hierarchical port, you need to go to the Place Hierarchical Port dialog box.
To open this dialog, choose the Hierarchical Port menu item from the Place menu. - Enter a symbol for the port.
- To place the hierarchical port as a NetGroup port, choose the NetGroup Port check box.
- From the drop-down list, choose the NetGroup.
- Click OK and place the port on the page.
The look and feel of a NetGroup port is different from that of a hierarchical port.
Also, if you place the cursor over the NetGroup port, the tooltip displays the associated NetGroup definition.
To place a named NetGroup as an off-page connector
- To place a named NetGroup as an off-page connector, you need go to the Place Off-Page Connector dialog box.
To open this dialog box, choose the Off-Page Connector menu item from the Place menu. - Enter a symbol for the connector.
- To place the off-page connector a NetGroup connector, choose the NetGroup Port check box.
- From the drop-down list choose the NetGroup.
- Click OK and place the connector on the page.
The look and feel of a NetGroup connector is different from an off-page connector.
Also, if you place the cursor over the NetGroup connector, the tooltip displays the associated NetGroup definition.
To place a named NetGroup as a hierarchical pin
-
To place a named NetGroup as an hierarchical pin, you need go to the Place Hierarchical Pin dialog box.
To open this dialog box, choose Place – Hierarchical Pin.
- Enter hierarchical pin's name and choose pin type from list of pin types.
- Select the pin as bus, if hierarchical pin connects to a bus, or scalar, if the hierarchical pin connects to a wire.
- Click User Properties button to edit pin's property.
- To place the hierarchical pin as a NetGroup pin, choose the NetGroup Pin check box.
- Select the required NetGroup from the drop-down list of NetGroups.
- Click OK and place the NetGroup Pin in the hierarchical block.
Sync up and down of NetGroup pins is supported in hierarchical blocks.
To add or remove pins from a netgroup
- Select the NetGroup on the design.
- Choose Add/Remove Pins on NetGroup Block from the pop-up menu.
- Select the pins to add or remove selection from pins that you want to remove.
- Click OK.
You can click to add the pins.
To assign a NetGroup to a bus
- Choose Place - Net Alias.
The Place Net Alias dialog box appears. - In the Alias field, specify a name for the alias.
- Select NetGroup Aware Aliases.
- Select a NetGroup from the list. You can also edit to specify a new NetGroup name.
- Click OK.
The alias has the same width as the specified NetGroup. - Click on a Bus in the design to assign the NetGroup.

