5.1 Using the GNOME DesktopIf you selected GNOME as the default desktop, you will see the GNOME desktop as shown in Figure 5-1 after logging in. The contents of your desktop may be different, of course. Figure 5-1. The GNOME desktop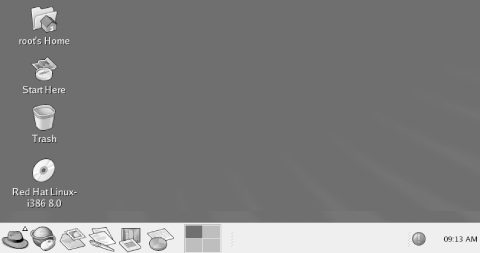 If you want to launch a GNOME session, but KDE is configured as the default desktop environment, select Gnome from the Session menu of the system login screen. Of course, GNOME must be installed in order for this to work. To log out of GNOME, left-click on the main menu, which resembles a red hat. From the pop-up menu that appears, select the Log Out menu item, as shown in Figure 5-2. A Log Out dialog box, shown in Figure 5-3, appears and asks you to confirm your decision to log out. Clicking OK terminates your GNOME session. If you enable the checkbox titled Save Current Setup, the GNOME session manager will save the state of your desktop and restore it when you log in again to GNOME. There are two other options in the Log Out dialog box. Select the Shut Down button to shut down your system, or the Restart the computer button to restart it. Figure 5-2. Logging out of GNOME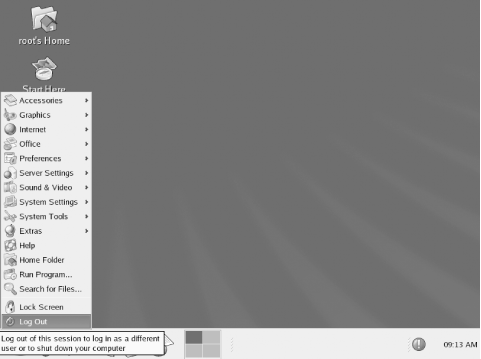 Figure 5-3. The Log Out dialog box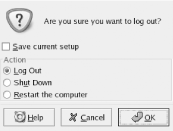 5.1.1 The GNOME DesktopThe term desktop can be used in either of two senses. It can refer either to the entire GNOME display, or to the empty area of the display where no windows or icons appear, as indicated in Figure 5-4. To keep straight these meanings, GNOME desktop will be used when referring to the entire display and desktop will be used when referring to the empty area of the display. Figure 5-4. Parts of the GNOME desktop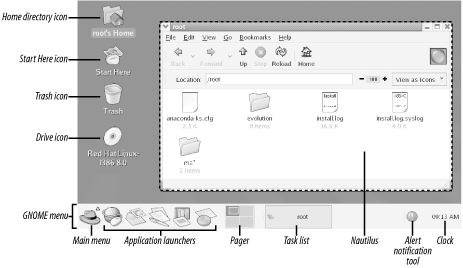 Right-clicking the desktop causes a pop-up menu to appear; this menu lets you perform a variety of operations, such as:
Figure 5-4 shows the elements of the GNOME desktop, which are described in the following sections. 5.1.1.1 PagerThere's one particular GNOME and KDE feature that I miss when working with Windows: the pager. The pager is the rectangle at the bottom of the screen, just left of center. You can recognize it by the four smaller rectangles nested within it. The pager provides what's called a virtual desktop; that is, a desktop that's larger than the size of your monitor screen. Of course, you can't see the entire virtual desktop at once, since it's larger than your monitor screen. So, you use the pager to select which quadrant of the virtual desktop you're viewing. To see how the pager works, click on a pager quadrant other than the default, which is the upper-left quadrant. Any open windows vanish. Click on the upper-left pager quadrant to restore them. As a further experiment, click on a quadrant other than the default. Then, launch a program from the menu. When the program's window appears, restore the default desktop view by clicking the upper-left pager quadrant. The new window disappears. Click again on the pager quadrant that was active when you launched the program. The new window reappears. If you look carefully at the quadrants, you'll see that they provide a bird's eye view of the associated desktop configurations. You may not be able to identify a window from its pager image. But, you can easily distinguish an empty virtual desktop quadrant from one containing one or more windows. 5.1.1.2 Home Directory iconThe Home Directory icon, which resembles a house superimposed on a file folder, is normally located in the upper-left corner of the display. The icon provides a convenient way to access the file manager: double-clicking the icon with the left mouse button launches Nautilus, GNOME's browser and file manager, which displays the contents of the user's home directory. 5.1.1.3 Drive iconsIf you have permission to mount a CD-ROM or floppy drive, and media is present, your desktop includes an icon representing the drive. Depending on the type of drive, the icon may resemble a CD-ROM or a floppy. If you right-click on the icon, a pop-up menu appears. The menu lets you unmount and eject the media, or open Nautilus to view the files residing on the device. You can also simply double click to launch Nautilus and view the contents of the media. 5.1.1.4 Start Here iconBy double-clicking the Start Here icon, you can launch Nautilus to view a folder that contains several useful icons. Double-clicking any icon in the folder launches a window containing icons that provide access to GNOME facilities. You can access the same facilities by using the GNOME menu. The icons and a summary of the operators each offers appear in the following list:
5.1.1.5 Trash iconThe Trash icon lets you view files that have been deleted by using Nautilus. Files deleted by using the rm command are not stored in the trash; they are immediately deleted. Simply double-click the icon, and GNOME launches Nautilus to view the folder where deleted files are stored. To restore a deleted file, you can drag it to a new location. You can permanently delete files stored in the Trash by right-clicking the Trash icon and selecting Empty Trash Bin from the pop-up menu. 5.1.2 The GNOME PanelBy default, the GNOME panel appears along the bottom edge of the display. However, if you prefer a different location, you can move the panel; to do so, click and drag the panel to the desired location. The panel functionally resembles the Windows taskbar; you can use it to launch programs, switch from one program to another, and perform other tasks.
The panel can also contain applets, programs represented as panel icons. Applets are typically small programs that display information or take action when clicked. For example, a launcher applet launches an application when its button in the panel is clicked. If you right click the panel and then choose Help from the pop-up menu, GNOME launches Nautilus to view the GNOME Panel Manual. The GNOME Panel Manual explains the function and operation of the GNOME panel in detail. By default, the GNOME panel contains the following items:
5.1.3 Using NautilusTo launch
the GNOME file manager, double-click the Start Here icon, or a folder
or drive icon if one is visible. You can use the GNOME file manager,
named Nautilus, to browse any drive, folder, or administrative
interface. Nautilus has two main panes, as shown in Figure 5-5. If the left pane is not visible, click View
Figure 5-5. Nautilus in icon mode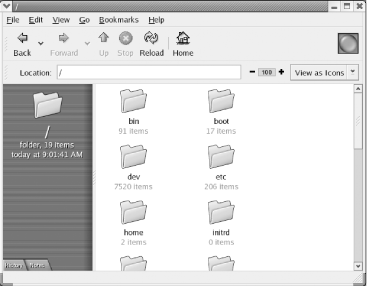 The right pane can show an icon for each file or detailed information about each file, as shown in Figure 5-6. To switch from icon to detailed mode, left-click the control labeled View as Icons or View as List. You can also select custom mode, which lets you tailor the display appearance according to your own taste. Figure 5-6. Nautilus in list mode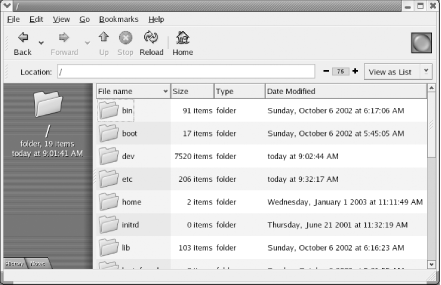 To view the contents of a folder shown in the right pane, simply double-click the folder's icon. To view the contents of the folder that contains the current folder, click the Up toolbar icon. Nautilus can be used as a file manager to copy, move, rename, and delete files. To perform one of these operations, you must first select the file (or files) by left-clicking in the right pane. To select additional files, hold down the Ctrl key as you select individual files. The Edit menu includes a menu item that lets you click on all files that appear in the right pane. Nautilus provides many ways to perform common file manager operations. Here are a few of the most important ones:
If you keep Nautilus's left pane open, operations such as the preceding can be performed conveniently. For instance, if you want to move a file from one folder to another, list folders in the left pane and navigate to the folder containing the file in the right pane. Nautilus lets you double-click on a file to launch the application associated with the file. Alternatively, you can right-click on the file and select Open With from the pop-up menu. Nautilus launches a dialog box that lets you specify the application that should be launched. Many applications are GNOME-compliant, supporting drag-and-drop operations like those supported by Windows. For example, you can open two file manager windows and drag-and-drop files or folders between them. The Nautilus menus provide additional functions, including the ability to configure the operation of Nautilus. If you're familiar with the Windows Explorer, you'll find most of these functions and capabilities familiar. To learn more about Nautilus, use the Nautilus Help menu to view the Nautilus Quick Reference. 5.1.4 Using GNOME TerminalSimilar to the MS-DOS Prompt window, the GNOME terminal, shown in Figure 5-7, provides a window in which you can type shell commands and view their output. To launch GNOME terminal, right click the desktop and select New Terminal from the pop-up menu. You can open multiple GNOME terminal windows if you like. Figure 5-7. The GNOME terminal application The Edit Figure 5-8. Editing terminal settings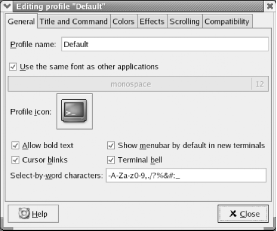 To exit GNOME terminal, simply type exit on the command line and press Enter. Alternatively, select Close Window from the File menu or simply type Ctrl-D. 5.1.5 Configuring GNOMELike most GNOME applications, GNOME itself is highly configurable. You can configure GNOME's panel, its main menu, and its overall appearance and function. The following sections briefly show you how. 5.1.5.1 The GNOME panelClicking on a launcher launches a predetermined application. You can
easily add a launcher to the GNOME panel. To do so, right-click on
the panel and select Add to Panel Figure 5-9. Creating a launcher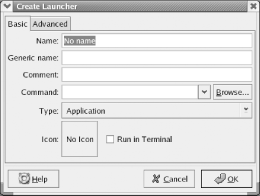 You can specify a name for the launcher, a comment, and the command that GNOME executes to launch the application. GNOME automatically provides a default icon. If the program to be run is a text-based program, check the Run in Terminal checkbox. If an application is already on the main menu, you can quickly create a launcher for it. Simply right-click on the application's menu item and select "Add this launcher to panel" or "Add this applet as a launcher to panel" from the pop-up menu. If your panel contains many launchers, it may become crowded and confusing. To remedy this, you can create one or more drawers, like that shown in Figure 5-10. Drawers act like menus; you click on a drawer to open it and view the launchers it contains. Clicking an open drawer closes it and hides its contents. Figure 5-10. A drawer To add a drawer, right-click on the panel and select Add to Panel
If you add a launcher or drawer and later decide you don't want it, you can remove it from the panel. Simply right-click on the unwanted launcher and select Remove From Panel from the pop-up menu, as shown in Figure 5-11. Figure 5-11. Removing a panel item 5.1.5.2 The GNOME Start Here facilityYou can configure the appearance and operation of GNOME and GNOME-compliant applications by using the GNOME Start Here facility, shown in Figure 5-12. The Start Here facility resembles the Windows Control Panel, although it looks and works somewhat differently. To launch the Start Here facility, click the Start Here icon on the desktop or panel. Figure 5-12. The GNOME Start Here facility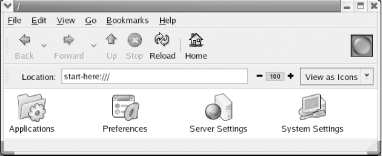 You can use the Start Here facility to:
Simply select the configuration category by double-clicking the appropriate folder in the Start Here window. Like the Windows Control Panel, the Start Here facility uses small programs called applets to perform its functions. A Start Here window generally contains a mixture of applets and folders. When you double-click on an applet, a configuration dialog box appears. You can then revise the configuration parameters by specifying the desired values. 5.1.6 GNOME ResourcesSeveral books have been written on GNOME. This chapter has described only a small fraction of what GNOME can do. The following additional resources are available:
|