 | Designing Web Audio |  |

Now that you've worked with some premade content, let's take a look at how to create your own .rmf files. The Beatnik Editor is the primary tool for creating the .rmf files native to the Beatnik Player. This tool imports standard MIDI files and facilitates access and reassignment to the players built-in sound banks and patches. In addition, digital audio samples can be imported and assigned to various key ranges of a user-defined instrument patch within the custom user bank. After the samples are mapped to MIDI note ranges, they can be triggered by MIDI note commands just like the standard samples within the Player.
The Beatnik Editor is best used in conjunction with an OMS-compatible sequencing program such as Opcode's Vision, or Emagic's Logic Audio. OMS (Open Music System) acts as an intermediary translator between the sequencing software and the Beatnik Editor, allowing a "live" MIDI connection to the Beatnik instruments. Unfortunately, there is a significant lag in the response time of the Beatnik instruments, which makes it nearly impossible to compose directly with the Beatnik sounds. Although this is something Beatnik hopes to address, currently the best workaround requires the use of another general MIDI instrument to perform the input tasks and then audition the finished sequence with the various channels assigned to the instruments of the Beatnik Editor.
You can do this by choosing the File ![]() Link to Sequence command.
You must launch the Beatnik editor first and then your sequencer in
order for the interapplication communication to work properly. This
enables your sequencer to trigger the Beatnik player's
multi-instrument tone generator, and to hear the composition exactly
as the end user will hear it. The lag is actually still present, but
all tracks are delayed by the same amount in this case, so it
doesn't create any audible problem.
Link to Sequence command.
You must launch the Beatnik editor first and then your sequencer in
order for the interapplication communication to work properly. This
enables your sequencer to trigger the Beatnik player's
multi-instrument tone generator, and to hear the composition exactly
as the end user will hear it. The lag is actually still present, but
all tracks are delayed by the same amount in this case, so it
doesn't create any audible problem.
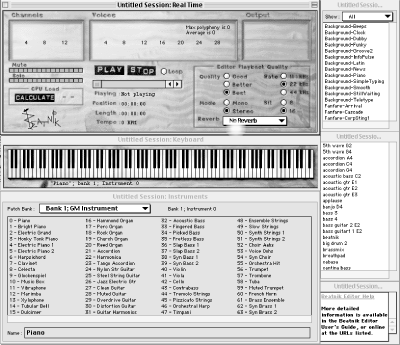
You can create MIDI sequences in any MIDI-sequencing program capable of exporting a standard type 1 MIDI file. You need to include the bank and patch assignments for the various MIDI channels in your exported file. This standard MIDI file is then imported into the editor, as shown in Figure 11-6. Note that your MIDI sequence will differ from what you heard when using the MIDI instrument you composed with. The best way to minimize the difference is to compose with a MIDI instrument that has banks and patch assignments that conform to the General MIDI specification. Since Beatnik instrument banks also map to this specification, your tracks will play with similar instrument sounds.
As of this writing, the Beatnik Editor was available only for the Macintosh. For Windows users, Beatnik has introduced the Beatnik Converter. The Converter does not allow the designer to create or assign custom instruments for the third bank, nor does it allow a live MIDI connection to the Beatnik instruments. It can import standard MIDI files or audio sample data and convert them to an .rmf file.
In order to run the Beatnik Editor, you will need a PowerPC-based Mac running System 7.1 or higher and Sound Manager 3.1 or higher. You should also have a MIDI instrument with a built-in General MIDI library. You will also want an OMS-compatible MIDI sequencing application and the OMS system extension(s). OMS is a MIDI utility that allows communication between an external MIDI controller, the computer itself, and other MIDI applications such as the Beatnik Editor or MIDI sequencer. If you want to create custom samples and instruments for the Beatnik Editor, you will also need a standard sound editing application such as Sound Designer II, Bias Peak, SoundEdit 16, or Sound Forge.
When you first open the Beatnik Editor, you will be prompted to create a new session or open an existing session. You can think of a session as the workspace in which you collect and manipulate the various elements that will eventually be integrated and exported as an .rmf file. When you save a session file, it is important to understand that the elements remain in their native format. For example, a .wav file is still a .wav file, and a standard MIDI file is still a standard MIDI file. It is not an .rmf file until it is exported as such. This allows you to save your work in progress and to re-open a session file at a later time and manipulate the various files in their native format. Once the file is exported as an .rmf file, you cannot edit the individual elements.
When you create a new session, you can name it, and the program interface will display five windows: the Real Time window, the Songs window, the Samples window, the Instruments window, and the Keyboard window. Each appears with the session name at the top of its window. The Instruments window is a list of the instruments you have available to you. Likewise, the Songs and Samples windows show the songs and the samples that are available to you. Notice that the windows have pop-up menus that allow access to other banks. The Keyboard window is a graphical representation of a MIDI keyboard on which you can mouse-click to audition various instruments at different pitches, and also view MIDI key ranges, which you can map samples to. The Real Time window allows you to view important data such as CPU load, time, global reverb settings, and other graphical feedback in real time as you load and play with different elements.
Those who have worked with a MIDI keyboard or sequencer software will find the Beatnik Editor's interface familiar and intuitive. If you haven't worked with MIDI or a keyboard sampler, don't worry. The interface is still fairly easily understood and deals mainly with MIDI channel assignments, General MIDI patch assignments, and MIDI key note ranges. There is good documentation available for the Beatnik Editor, and the software may be downloaded free of charge at Beatnik's web site http://www.beatnik.com. The Pro Version includes MP3 compression and is moderately priced.
To import a MIDI file into your session, select File
![]() Import. From the dialog box, select the MIDI file and click
the Import button (the editor also supports dragging and dropping
your standard MIDI files on the Song window). Your MIDI file will now
appear in the Song window. Once it's displayed in the Song
window, you can highlight the name of the song and then manipulate
the MIDI file by opening the song item of the menu bar.
Import. From the dialog box, select the MIDI file and click
the Import button (the editor also supports dragging and dropping
your standard MIDI files on the Song window). Your MIDI file will now
appear in the Song window. Once it's displayed in the Song
window, you can highlight the name of the song and then manipulate
the MIDI file by opening the song item of the menu bar.
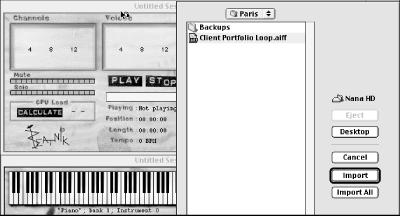
To import an audio file or sample into your session, select File
![]() Import as shown in Figure 11-7. From the
dialog box, select an AIFF, WAV, or a Sound Designer II file if (you
are a user of Digidesign's Pro Tools Software), and click the
Import button (you can also drag and drop these file types directly
into the Samples window). Your sample will now appear in the Samples
window. As with MIDI, once it's in the Samples window, you can
now manipulate the audio sample file.
Import as shown in Figure 11-7. From the
dialog box, select an AIFF, WAV, or a Sound Designer II file if (you
are a user of Digidesign's Pro Tools Software), and click the
Import button (you can also drag and drop these file types directly
into the Samples window). Your sample will now appear in the Samples
window. As with MIDI, once it's in the Samples window, you can
now manipulate the audio sample file.
The Beatnik Editor menu bar allows you to manipulate songs, instruments, and samples. The appropriate menu will become activated or grayed out depending on type of file you have highlighted (and in which window).
Let's start with songs. Standard MIDI files can be imported into the editor where they will appear in the Songs window, as shown in Figure 11-8.
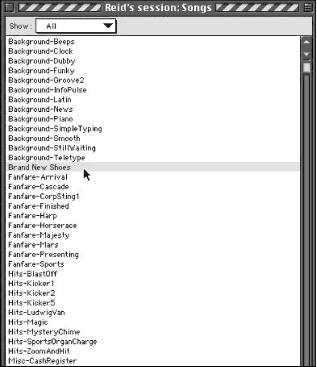
The pop-up menu at the top of the Songs window has four possible choices: All, Groovoids, User Songs, or Imported .rmf s. As explained earlier in this chapter, Groovoids are small, premade MIDI compositions that are built into the Beatnik Player, so you can experiment with these files immediately. Some are stingers and cues, and some make great interface sounds. Groovoids cannot be edited or changed in any way. However, any user-imported file that appears in the User Songs view can be edited. You can listen to any of the songs by double-clicking them, by using the keyboard shortcut Command-T, or by highlighting the name of the song and then clicking the Play button in the Real Time window.
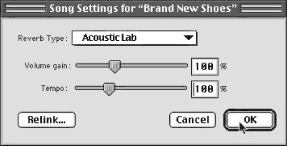
When you have highlighted a song in the Song window, you can change
the song's tempo, volume, and reverb settings by choosing Song
![]() Song Settings from the menu bar. This displays the window
shown in Figure 11-9. The value in the Tempo field
represents a percentage of the tempo for the song, where 100% is
normal speed. Percentages over 100% will cause the song to play at
faster than normal speed; values of less than 100% play at slower
than normal speed. You can select one of several different reverb
types to be associated with the song. You can also set a
"Volume gain" setting for each song. Note that these
settings will be saved with the song and will be reflected on the web
page when the song is played back using the Beatnik plug-in.
Song Settings from the menu bar. This displays the window
shown in Figure 11-9. The value in the Tempo field
represents a percentage of the tempo for the song, where 100% is
normal speed. Percentages over 100% will cause the song to play at
faster than normal speed; values of less than 100% play at slower
than normal speed. You can select one of several different reverb
types to be associated with the song. You can also set a
"Volume gain" setting for each song. Note that these
settings will be saved with the song and will be reflected on the web
page when the song is played back using the Beatnik plug-in.
You can also edit the copyright information for a song by selecting
the song and then choosing Song ![]() Copyright. The information
that you enter in the copyright window can be accessed by the user
via the Beatnik plug-in. As copyright protection with electronic
music becomes increasingly important, this is a welcome feature for
those of us who wish to protect our hard work from being copied and
pasted into a web site that didn't bother to pay for it. It
also lets you reassure your clients that the sound design you create
for them won't be available to everyone else free of charge.
The copyright information in a Beatnik .rmf
cannot be edited by the user. Tampering with it will cause the file
to be unplayable. In addition to this watermarking,
.rmf files are also scrambled with 40-bit
digital encryption, which affords further protection to the creative
community.
Copyright. The information
that you enter in the copyright window can be accessed by the user
via the Beatnik plug-in. As copyright protection with electronic
music becomes increasingly important, this is a welcome feature for
those of us who wish to protect our hard work from being copied and
pasted into a web site that didn't bother to pay for it. It
also lets you reassure your clients that the sound design you create
for them won't be available to everyone else free of charge.
The copyright information in a Beatnik .rmf
cannot be edited by the user. Tampering with it will cause the file
to be unplayable. In addition to this watermarking,
.rmf files are also scrambled with 40-bit
digital encryption, which affords further protection to the creative
community.
The copyright window contains the following fields:
The title of your piece of music
The composer of your piece of music
The music's copyright line, e.g., © 2000 CS Audio Visual, Inc.
The performer of your piece of music
Any notes about the music, such as special commentary, thanks, etc.
Once the copyright information and song settings have been adjusted to your needs, you can export your song as a Beatnik .rmf file, which maybe embedded in a web page for playback with the Beatnik Player plug-in.
There are three banks of sounds to compose with. As previously discussed, two of the banks are contained in the Beatnik Player; the third must be created in the Beatnik Editor and attached to the .rmf file. You do not have to create any original instruments to compose high-quality original music. Furthermore, if your final .rmf file uses only the standard instruments of the Beatnik Player's first two banks, you gain the advantage of extremely low data rates and quick download times for the end user. However, the option of custom instruments and samples affords the sound designer/composer powerful and unique creative possibilities (with the consequence of larger file sizes and longer load times).
Lets take a look at the three banks:
A complete set of 128 General MIDI instruments and a full GM percussion set
Room for 128 user instruments and a user percussion set
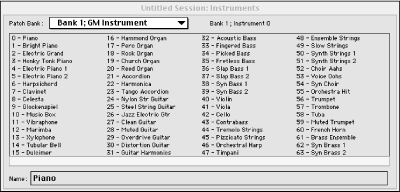
The General MIDI bank, shown in Figure 11-10, ensures almost universal compatibility with all standard MIDI files. The special bank provides an extended set of instruments created specially for the Beatnik System by Beatnik composers and sound designers, including numerous sound effects customized for the Web.
In addition to importing your own samples, you may also use the user bank to create custom-edited versions of the pre-existing Beatnik instruments by making a copy and altering the instrument settings to your specific needs. These options are described later.
What is that song called?
You don't have to remember its name. The song title, composer, copyright, and composer fields associated with each song in the copyright settings are displayed as the music is played.
You can view all of these instruments by opening the Instrument window from the Windows menu. The pop-up list in the top of the window allows you to select the different banks for viewing and editing. The instruments in the GM and special banks cannot be edited, deleted, or changed; you can, however, copy and paste them into user bank slots if you would like to modify them or create new instruments using them as a starting point.
The Instrument menu includes the following options:
Allows you to define the MIDI note range for individual samples of a multisample instrument.
Uses LFOs (Low Frequency Oscillators) to effect various parameters of the sound.
Creates and changes the instrument's envelope (attack, sustain, decay, and release).
Uses dynamic low-pass filters to change the instrument's sound.
Tweaks an instrument's reverb, looping, pitch, and pan settings.
Experiment with these different options and various settings. Altering pan settings and LFO modulation can have a striking effect on your music. In fact, a relatively simple sound, such as a bell chime or a spoken word, can be altered to sound very complex using combinations of these choices, and entirely new instruments can be created.
Including web links
You can enter URLs in the composer notes field. This allows listeners on the Web to link directly to a web page of your choosing from the copyright display window of the Beatnik plug-in. To enter a URL, type it in simple text form and the Beatnik plug-in will resolve it automatically. Do not enter complete HTML. For example, type in www.raspberrymedia.com, not http://www.raspberrymedia.com.
The Samples window shows an alphabetical list of all the samples associated with the current Beatnik session. The samples used by the built-in General MIDI bank and the special bank are displayed in italics while user-imported samples are displayed in plain text. Again, the built-in samples cannot be edited or deleted until they are copied and pasted in to a user-definable slot. They are automatically duplicated if you make a copy of a General MIDI or a special bank instrument in the Instrument window. If you want to view only the custom samples you have imported, select User Samples from the Sample window's pop-up menu.
If you select a user sample, you can then edit it by selecting choices from the pull-down Sample menu. The following options are available:
Allows you to view basic information about the selected sample and change the sample rate, root key, and loop start and end points.
Allows you to select between None, IMA, Sun, MPEG (with the Beatnik Editor Pro), and Beatnik compression types.
After you have the samples imported and compressed, they are eligible to become part of a custom instrument. To do this, move the mouse into the Instrument window, and select the user bank from the pop-up menu. In a newly created session, you will see that the bank is empty. Double-click on the first empty instrument. This brings up a keymapping tool (shown in Figure 11-11) that allows you to create zones (or keymap ranges) and assign individual samples to the various zones. If you have worked with a MIDI keyboard sampler, you will be familiar with this tool. This is the standard method in which instrument designers create a full range of chromatic notes with as few samples as possible. A sample usually sounds its best at the pitch it was sampled at (this is called the root pitch), but it is possible to "stretch" the sample across a limited note range before it starts to lose its quality. You can easily verify this by assigning one sample to the entire 88-key range of a piano and auditioning the sample at various places on the keyboard. The trick is to determine the exact range of notes where an individual sample sounds reasonably good, and to record new root samples for the note ranges where the sound quality falls apart. If you use at least one or two root samples for every octave, that is sufficient. For example, you may use root samples at C and F in every octave you intend to use. This is a common practice of sound designers who routinely create their own customized mappings of samples on an 88-key keyboard controller.
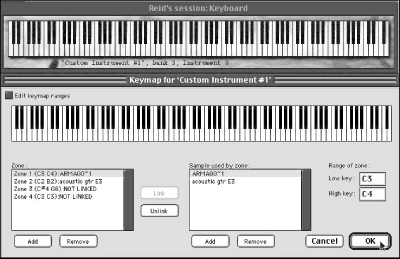
The keymapping tool is easy to use. You simply add as many zones as you need by clicking the Add button below the zone field. Next you add the individual samples of the instrument you are building by clicking the Add button below the samples field. You then link the samples to the various zones, and define the keymap ranges by highlighting the notes of the keyboard graphic in the top of the window. By moving the three small arrows, you can determine to which notes the root pitches for the individual samples and the overall instruments are mapped. When you have finished, you can name the instrument in the Name field at the bottom of the window. You now have a custom instrument containing multiple samples that can be triggered by MIDI note on commands -- just like the standard Beatnik instruments.
After you have brought all the various elements together and have a
song in your session sounding just the way you like it, you should
save your session. After saving the session, you can export your
composition as an .rmf file. To export the song
as a Beatnik file, select the song in the Song
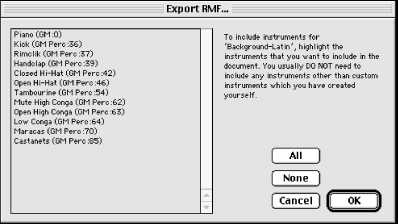
Window and choose File ![]() Export Beatnik. A dialog box (as shown
in Figure 11-12) gives you the option of including
the instruments and samples used in the song as part of the Beatnik
file. If you are not using custom samples, you do not need to include
any instruments because they are already built into the plug-in. If
you are using custom instruments, include them in your Beatnik file.
When you have selected the instruments you want to include, click OK,
and then save your file. Remember that after you create a
.rmf file, it cannot be edited. In order to make
changes, you must go back to the original session document, make
changes, and export a new Beatnik file. Note that after a song is
exported as a .rmf file, it is encrypted and
cannot be re-opened and edited. If you want to make changes to the
file, you must edit the song and re-export it as a
.rmf file.
Export Beatnik. A dialog box (as shown
in Figure 11-12) gives you the option of including
the instruments and samples used in the song as part of the Beatnik
file. If you are not using custom samples, you do not need to include
any instruments because they are already built into the plug-in. If
you are using custom instruments, include them in your Beatnik file.
When you have selected the instruments you want to include, click OK,
and then save your file. Remember that after you create a
.rmf file, it cannot be edited. In order to make
changes, you must go back to the original session document, make
changes, and export a new Beatnik file. Note that after a song is
exported as a .rmf file, it is encrypted and
cannot be re-opened and edited. If you want to make changes to the
file, you must edit the song and re-export it as a
.rmf file.

Copyright © 2002 O'Reilly & Associates. All rights reserved.