
Email Brian
Brian's Website


Email Tom
Tom's Website
|
Email Brian Brian's Website |
|
Email Tom Tom's Website |
Go to the Table Of Contents
Did you read the Preface? Thanks!
In this chapter, we want to start you off with some definitions. The word "terminal" is a generic term that refers to a real or virtual device that provides interactive access to a running computer. Historically, a console terminal is the physical, desk-like machine that incorporates a viewing device (monitor) and an input device (keyboard). In more recent usage, the console is the device by which privileged access to a computer is mediated. A physical terminal is a remote I/O device (like the ADM-3A or VT-100, to name two). A terminal emulation program is used to access the computer in a manner that behaves like a known physical terminal type.
With the onset of modern microcomputers, powerful operating systems were ported (like Unix) or written (like Linux) to take advantage of the features of these personal machines, while providing all the utility of the OS. Virtual consoles allow several different login sessions to take place in a text-only mode, while virtual terminals permit remote login and local graphical terminal window command line sessions to operate, all simultaneously. The characteristic features of consoles and terminals are cataloged in the /etc/termcap file, providing a ready reference for connecting almost any type of real or virtual device. Once logged into a console or terminal session, the shell begins communicating with the user, providing user program services and an operating and file system interface.
Starting from the original meanings of the terms as given above, let's look at consoles first, in the context of Caldera OpenLinux running on a personal computer.
Your PC is the console, a statement both simple and true. When you power on the machine and see the self-test output, then login to OpenLinux, you are working from a position of privilege; able to login as either a normal user or the system administrator, or access the BIOS setup routines.
As configured, OpenLinux has the ability to present a number of different "virtual" consoles, in either text or graphical modes. By default, there are six of each type. Additionally, it is possible to connect a separate physical console device (monitor and keyboard combination) to a serial port to access machines that run in a headless mode (no dedicated keyboard or monitor; a common server configuration).
Virtual consoles are so called because there is more than one available on the physical hardware. See the section Using Virtual Consoles, below, for details on accessing these "imaginary" devices. Virtual terminals are the text-mode windowing programs that provide access to the command line facilities of Linux. These virtual terminals interact with OpenLinux by providing an emulation of a known physical device, as described in the following sidebar:
Sidebar :: The /etc/termcap file
As an exercise, type
cat /etc/termcapat the command line. Nearly 7,000 lines of what appear to be gibberish flash past at a great speed. (Thecatcommand is used for, among other functions, displaying the contents of text files.) /etc/termcap is the file that contains all the codes and definitions required for Linux to communicate with a wide variety of terminal and console devices, real or virtual. Under most circumstances, the termcap file can be safely ignored. However, it is the basis of Linux terminal communication capabilities, and deserves a passing mention. Additionally, a corrupted termcap file can cause odd or potentially calamitous errors. An inconspicuous entry in the termcap file looks something like this (we've broken it up differently to fit the code format for sidebars):Using the manpage for termcap as a legend (type
man termcap), the following information comes to light. The name of this entry as used by the system is ncsa. The next field is the description of the terminal type. Note that, although this entry uses five physical lines, logically (as far as Linux is concerned) there is only one line, since the trailing '\' on lines 1 through 4 suppresses the newline character. The line is broken for readability, and in order to work with the file in a text editor. A colon separates each field. This form of layout is common to many configuration and script files.The various fields represent attributes of the terminal in question. A powerful feature of the termcap file is the ability to chain multiple entries together. Thus, the last field in the termcap entry,
tc=ncsa-m, indicates that the ncsa-m entry attributes should be concatenated to the current entry. This saves a lot of disk space.As it is, the current termcap file takes up some 290K of room on the hard drive. For those users interested in paring down the space requirements for running Linux in an embedded or Internet appliance application, the termcap file can be cut down to almost nothing. Be sure to leave in support for some basic terminals, such as dumb terminals and Linux consoles. xterm, xterm-color, and linux are the most commonly used terminal type definitions in Linux installations. When a new type of terminal appears, the termcap file can be modified, adding the special capabilities of the device to a new entry. This ability demonstrates the strength of Linux: The ability to customize the system to exactly match the needs of user and hardware.
The data contained in termcap is replicated and superceded by a newer database format called terminfo. See the terminfo manpage for all the gory details. We've looked at termcap here only because it's easier to understand, conceptually.
After the boot process is complete, Linux presents one of two modes to the world. Most distributions, including many of Caldera's offerings, currently default into a graphical user interface (GUI) environment like KDE. The second mode is a text-only environment - a virtual console, which mimics the behavior of a physical console, and provides an operating system interface.
Caldera OpenLinux(TM)
Version 2.4 eDesktop
Copyright 1996-2000 Caldera Systems, Inc.

bobo.orbdesigns.com login:
OpenLinux defaults to starting in X Windows and KDE (under most installation selections). From KDE, open a console by typing Ctrl+Alt+F1. This switches from the graphical environment to an initial console screen (virtual console tty1). The text on the screen should look similar to this, following a successful login:
Caldera OpenLinux(TM)
Version 2.4 eDesktop
Copyright 1996-2000 Caldera Systems, Inc.

bobo.orbdesigns.com login: syroid
Password: toms_password

Welcome to your OpenLinux system!

You can start KDE with 'kde' or plain X11 with 'startx'

[syroid@bobo syroid]$ who
bilbrey	:0		Apr  2 13:45 (console)
syroid	tty1		Apr  2 15:23

[syroid@bobo syroid]$
The command line prompt (ending with a $ and waiting for input) reveals quite a bit of information. The previous example shows that syroid (our user) is logged in on the machine called bobo, and is currently in a directory called syroid. The who command outputs a list of users currently on the system. The output includes the login device, as well as the date and time of login.
Note
tty is a contraction of the word teletype. Teletype units were among the earliest console devices for computers.
By default, there are six virtual text consoles (tty1 through tty6) available for use (see the sidebar, "How Virtual Consoles Work," later in this chapter for details). Switching between consoles is possible in two distinct ways. The first method switches to another (numbered) virtual console when the user invokes the chvt command, by typing chvt 4, for example. The screen refreshes, displaying a new login prompt. New users may believe that the prior session has been terminated. This is not the case. After logging in on console 4, typing who reveals that both console sessions are still active.
[syroid@bobo syroid]$ who
bilbrey	:0		Apr  2 13:45 (console)
syroid	tty1		Apr  2 15:23
syroid	tty4		Apr  2 15:35
In the example, Tom is logged in at virtual consoles 1 and 4, while Brian is logged in as the console user (via a graphical login session, which accounts for the :0 on the who listing). This may seem an odd usage of console, but it refers to the initial login user. Sorry for the multiple purposes to which words are sometimes put.
To switch back to console 1, type chvt 1. The second method of changing consoles is achieved by using the left Alt key (hereafter called LeftAlt) in conjunction with the function keys F1 through F6. So, pressing LeftAlt+F4 returns the display to tty4. For switching between virtual consoles, the LeftAlt+Fn sequence is fast, but if the only access is via a terminal without function keys, chvt n is a useful command to keep handy.
Tricks
The man command provides access to the basic documentation of every *NIX system - see Chapter 17 for more information. For now, know that Page Up and Page Down allow vertical navigation, and pressing q terminates a running manual page view. Also, the phrase "manual page" and its contraction, "manpage", are used interchangeably in most Linux documentation, with a slight bias towards the latter.
The setterm command modifies the visual attributes of virtual consoles. This is useful when working on several consoles. Consoles made distinct with different foreground and background colors are notably easier to work with. The full capabilities of setterm can be explored from the command line by typing man setterm. The following example demonstrates two simple setterm calls.
[syroid@bobo syroid]$ setterm -foreground red -background green

[syroid@bobo syroid]$ setterm -store
The first setterm call sets the console foreground (text) color to red, and the background to green. The latter invocation, with the -store option, saves the current terminal configuration as default for that tty. Set holiday colors to tty1 and store them - the colors then return every time tty1 is used, without affecting tty2 through tty6.
To recap, there are normally six virtual consoles. They can be accessed from KDE by pressing Ctrl+ALT+Fn (Fn equals F1-F6). To switch between virtual consoles, use either the chvt command, or press LeftAlt+Fn. Console characteristics can be set by invoking the setterm program.
Good housekeeping rules to follow include logging out of any console sessions that are not needed (just type exit). While it doesn't harm the system in any way to leave a session running unattended, we recommend following good computing habits in a multi-user environment like Linux. That includes releasing unneeded resources to make them available for other processes, as well as removing the temptation of an unsecured running login session from any prying eyes and hands.
Sidebar :: How Virtual Consoles Work
Almost any path to learning Gnu/Linux leads past many interesting concepts. In this case, we pause to acquaint you with the foundations of virtual consoles. To start at the head of the trail, we look to the file /etc/inittab. inittab is the file that controls which services are run, and in which order, as Linux starts up. A sample of typical console initialization entries from inittab follows.
Chapter 19 examines inittab entries in more detail. For our purposes here, we can determine that six console processes are started.
gettyis the system program that monitors a virtual terminal (pointed to by the ttyN portion of each line). respawn is the system action (interpreted as an automatic restart) taken when the getty process dies (crashes) or is killed (usually by alogoutorexit). ttyN is a virtual terminal device - there are 133 various ttys defined in our /dev directory.When a user logs into a virtual console, the getty program starts a virtual console (VC), as defined in /etc/gettytab, and sets the terminal type to be linux, found in /etc/termcap. getty calls login for authentication and session initialization purposes.
Typing
ps -axdisplays a complete listing of the running system processes. Before logging into tty2, the specific process line excerpted from the ps listing looks like this:There is the getty command from /etc/inittab, waiting for something to happen on tty2. Following a successful login, the process numbered 810 now looks like the following.
When syroid logs out of the console, the process dies, then like the phoenix, is reborn (respawns), and the system job with the ID number 810 again has a getty process running, waiting for user input.
By comparison with consoles, virtual terminals are relatively limitless resources, since their connections are dynamically allocated by the operating system. Virtual terminals also differ from consoles in that a terminal is not necessarily a login session. Remote logins do occur on virtual terminals, but the virtual terminals that are executed from within KDE are not login sessions, although the user who is logged into the KDE environment "owns" the terminal processes. Like virtual consoles, virtual terminals provide terminal emulation services, enabling the operating system to communicate with the terminal window as though it were a physical device.
There are three virtual terminal programs available in a full OpenLinux installation:
An xterm is functionally equivalent to a virtual console. Additionally, xterms can be resized, and many xterms can coexist, running in a single X session. xterms are color-enabled by default in OpenLinux. An xterm may be started from the KDE toolbar by selecting K --> Utilities --> Non KDE Applications --> xterm color. xterm configuration options are found by typing man xterm from a command prompt. Command line options can be passed to the new terminal when executing an xterm manually from the command line. For example:
[bilbrey@bobo bilbrey] xterm -sb -sl 100 &
The previous command starts a new instance of xterm with a scrollbar (-sb), which saves the last 100 lines entered (-sl 100). The ampersand at the end of the list of command options tells the operating system to load the xterm as a background process. This displays a new command prompt in the current window while the launched xterm continues to run. See the entry on Job Control in the section "Running Bash, the Bourne-again shell" later in this chapter for more details.
Unlike consoles, there is no login prompt when a terminal is launched from within the KDE environment. When the terminal window opens, the user is presented with a command line prompt. The login step for this type of virtual terminal is skipped because it is the child process of a valid login session. Additionally, you can access runtime configuration options for an xterm by holding down the Ctrl key, and pressing the mouse buttons to bring up option menus.
To open a kvt virtual terminal from inside KDE, click on the toolbar button that depicts a text display. Alternatively, from the toolbar, select K --> Utilities --> Terminal. In the program menu, the icon adjoining "Terminal" is similar to one on the desktop toolbar.
kvt has a couple of advantages over a standard xterm. The scrollbar is on by default. Also, kvt can be dynamically configured more easily by use of dropdown menus and context menus. However, there is a significant drawback to the kvt program. That is, use of kvt is deprecated. Therefore, our instruction about virtual terminals is based upon Konsole.
More information
"Deprecated" is a term that indicates that the program or feature in question has a replacement, thus current usage is not recommended. Programs become deprecated occasionally, in a rapidly evolving software environment like Linux. In this case, looking at the Help --> About KVT menu reveals that Konsole is the recommended terminal utility.
The Konsole program (KDE's latest terminal emulation program) is remarkably capable. It is dynamically configurable, like kvt, by use of dropdown menus and right-click context menus. Passing over the File and Sessions menus momentarily, the Options sub-menu allows configuration of the features listed in Table 15-1.
Table 15-1
| Option | Feature |
| Menubar | Enables or disable the menubar |
| Frame | Enables/disables 3D border effect |
| Scrollbar | Hides/Left/Right |
| BS sends DEL | Sets up Terminal emulation feature |
| Font | Configures Font sizes |
| Size | Selects Terminal size (normal is 80 x 25 characters) |
| Schema | Selects Foreground/background colors |
| Save options | Saves current selections as default |
As an aside, the Help menu offers more than simple version information. A User's Manual and an extensive Technical Reference, both in HTML format, are also accessible from Help.
The major distinguishing feature of Konsole is its session management capability. The normal method for working with terminals is to have several instances running, often with some minimized, spread across several desktops, each terminal running a separate process. By contrast, Konsole permits multiple sessions to be run from within a single terminal window, reducing desktop clutter. Multiple sessions are initiated by selecting from the options available on the File menu: Linux Console, Shell, and Root Console. An exception to the previous "no login" statement, selecting the Root Console option does require a login with the root password, for security reasons. The last File menu option, Exit, terminates all the sessions running in the current Konsole, and ends the Konsole process.
After selecting several different sessions to run from the File menu, choosing which session to view in the terminal window is accomplished by selecting from the Sessions list, as shown in Figure 15-1. One drawback is that sessions are not individually named, making it difficult to differentiate the various open sessions. Put this feature to work while doing system administration work (discussed in Chapter 19), by keeping a Root Console open as a background session. In this manner, work can be done safely as a normal user. Switching to root user mode to complete tasks by selecting the root console session is quick and easy. The drawback of a continuously running root session is that during a bathroom break, for example, anyone could walk up to your machine and have instant root access. Your decision to make.
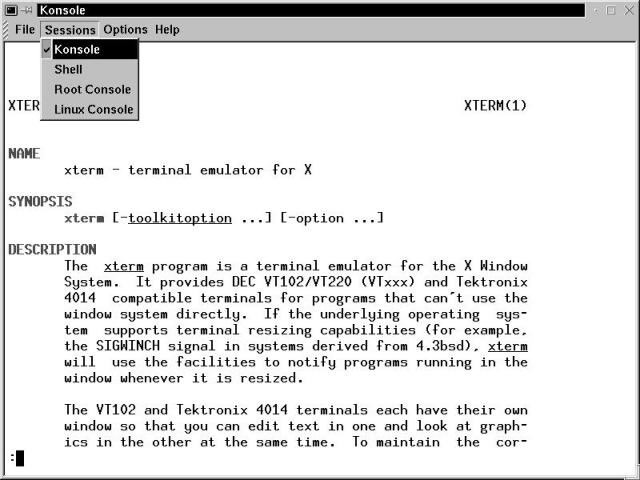
Figure 15-1
A Konsole virtual terminal, shown selecting a running Konsole session
The shell is another name for what is commonly known as a command processor. A command processor that many people are familiar with is called command.com. That DOS program is based upon the functionality of the command interpreter in the older CP/M operating system, which in turn had its foundation in Unix. To see a shell in operation, open a terminal window and type ps. The normal output of the ps command is a listing of the child processes running from the terminal in which ps is run. For example:
[bilbrey@bobo bilbrey] ps
PID TTY           TIME CMD
924 pts/1     00:00:00 bash
924 pts/1     00:00:00 ps
When entering a string of characters on the command line, the information is passed to the command processor, or shell process. The default shell for OpenLinux is called Bash, which stands for Bourne-Again SHell. The shells that are packaged with OpenLinux are listed in the file /etc/shells (as shown in the following listing). The differences between the various shells lie in the programming interface, as well as in the features implemented for interactive use.
[bilbrey@bobo bilbrey] cat /etc/shells
/bin/bash
/bin/bash2
/bin/csh
/bin/ksh
/bin/sh
/bin/tcsh
/bin/zsh
To experiment with various shells, start by looking at the online documentation for each shell listed. There are a variety of reasons for choosing a specific shell, especially when it comes to script programming. To use a shell, type its name at a command prompt. Each shell can (usually) be visually distinguished by the style of command prompt. For instance:
[bilbrey@bobo bilbrey] tcsh
bilbrey@bobo:~>
Should you decide to change your default shell for the long term, use the chsh command. chsh changes a user's shell entry in the /etc/passwd file, without modifying any current login sessions.
chsh - Change your default login shell.
Usage: chsh [options] [username]
-s | --shell Prefaces the new shell specification -l | --list-shells Lists the available shells-u | --help Returns brief command usage-v | --version Returns command version informationchsh -s /bin/zsh chshNo arguments or options are required for the command, although they may be used. As shown in the following listing, execute chsh without options to show interactive prompts for setting a new shell.
[syroid@hydras syroid] chsh
Changing shell for syroid
Password: password
New shell: [/bin/bash]: /bin/zsh
Shell changed.

[syroid@hydras syroid]
At the new shell prompt, the default value is given in square brackets and is accepted by pressing Enter. Otherwise type the full path and name of another shell to change the default shell process. Although it appears to be an option from the command description, normal users may not change the login shell for other users with chsh.
More Shell Resources
System Resources:
Typecat /etc/shellsto list the available shells
Typeman shellnamefor basic shell usage and help (all butshandcsh)
Typeinfo shellnamefor more information about bash and zshOnline Resources:
http://www.linuxdoc.org/LDP/LG/issue14/shells.html
A good command processor has a set of features and functions that promote working interactively from the command line, as well as non-interactively (from scripts, the topic of Chapter 18). The most commonly used shell program in Linux, Bash has a strong complement of features:
Bash is not completely conformant with the POSIX 1003.2. Standard. The major reason for this lack of conformance is retaining compatibility with the older sh shell The differences between standard Bash operation and the POSIX compliant mode can be found at the following URL: http://tns.utk.edu/tech/bash/bashref.html. Additionally, Bash can be made to run in a completely conformant manner by changing the locale environment to POSIX, and running bash with the option --posix.
Usually (from a user's perspective), Bash is run by default when a user logs in to a console or starts an X terminal session. A user's startup shell is given in the /etc/passwd file, as the last entry on the line (substitute your login name in the example that follows). It is this file that is modified when the chsh command is executed.
[bilbrey@bobo bilbrey]$ grep bilbrey /etc/passwd
bilbrey:x:500:100:Brian Bilbrey:/home/bilbrey:/bin/bash
Bash may be executed from the command line, using the following options. Usually, these options are only used when Bash is invoked from a shell script program. Our presentation and formatting is designed to be evocative of the type of listing you'll find in virtually any manual page (manpage) listing on your system...
bash - GNU Bourne-Again SHell.
Usage: bash [options] [arguments]
--norc Ignore ~/.bashrc configuration file--noprofile Ignore other bash configuration files (see below)--rcfile file Initialize with specified, non-standard file as input--version Display version number during startup--quiet Display minimum data while starting (default)--login bash acts as though invoking a login shell--nobraceexpansion No curly brace expansion (see below)--nolineediting Do not use line editing features--posix Make bash run fully POSIX 1003.2 compliant-c string Read arguments from string, often a shell variable-i Start interactive shell environment-s Reads arguments from Standard Input (usually the keyboard)- | -- Marks end of options, all following input is argumentRegarding option usage: The verbose options listed, ending with -posix, must be present on the command line before the one-character options. Additionally, there are a variety of configuration files that affect the operation of Bash. The configuration files that are used by Bash are as follows:
/etc/profile
~/.bash_profile
~/bash_login
~/.profile
~/.bashrc
~/.bash_logout
The ~/ (tilde, followed by a forward slash) indicates a file that resides in a user's home directory (which also implies, truthfully, that each user often has a distinct set of shell profiles). Not all of these files are required in all situations, and they may not all exist on your system. At first glance, Bash might be considered to have an excessive number of configuration files, unnecessarily complicating setup and operation. These are all necessary, however, given the wide variety of circumstances in which Bash may be invoked, as a login or non-login shell, interactive or not - these modes load the configurations in different orders, omitting some, depending upon the invocation. Modifying the Bash configuration files is addressed later in this chapter under "Aliasing," and in the Bash manual page. Also, explore "More Bash Resources" at the end of this section for more details on configuration file precedence.
Command line editing (CLE) is the ability to use cursor and control keys to navigate, correct, and change the contents of a command line. Primitive CLE facilities exist in DOS, using the function keys to echo parts of the previous command to the prompt, but ease of use was not on the list of features. In Bash, CLE is a full-featured line-editing environment that uses a subset of the Emacs command set by default. Alternatively, a vim editor style line-editing mode may be enabled.
The Right and Left Arrow keys provide horizontal movement. Text input is easy; typing is always in insert mode (no overwriting). Deletion to the right or left is done with Backspace and Ctrl+d, respectively. For a complete reference to the CLE functions, type man bash from the command line. Type /^READLINE and press Enter. This uses the search function to locate the first line in the file with "READLINE" at the beginning of a line (marked by a ^). The screen displays the beginning of the READLINE section, where the command line editting characteristics and keymap are documented.
The Tab key is a useful adjunct to command line processing. Using Tab, command name and file name entries can be automatically finished, partially or completely, depending upon whether enough unique data already exists on the command line. Experiments prove useful in gaining some initial familiarity with this feature ( [Tab] indicates pressing Tab):
[syroid@bobo syroid] wh[Tab][Tab]
what	 whatis   whereis   which   while   who   whoami   whois

[syroid@bobo syroid] wh
Typing wh followed by pressing Tab doesn't give the shell enough information to display a unique selection, so the system bell (beep) is sounded to mark an error. However, pressing Tab the second time generates a list of the available commands, using the information given. Then the initial string is placed on the command line again, awaiting further input. If there is more than a full screen of choices available, pressing Tab twice results in a message like this one:
[syroid@bobo syroid] [Tab][Tab]
There are 1803 possibilities. Do you really
wish to see them all? (y or n)
This particular message is the one printed when pressing Tab twice on a blank command line. Reply y to this question to scroll past all of the commands available to an OpenLinux user. Another use of Tab demonstrates filename completion. cat is a commonly used utilty, with many functions. One of the uses of cat is to echo the contents of a file to the console or terminal. In the following example, the second command line replaces the first, when Tab is pressed, completing the filename automatically. The cursor is left at the end of the command line, waiting for further input, or press Enter to execute the program.
[syroid@bobo syroid] cat /etc/te[Tab]
[syroid@bobo syroid] cat /etc/termcap
A common feature of most recent shell programs, the command history function preserves a configurable number of previously executed commands. The filename for history storage defaults to ~/.bash_history in OpenLinux. The depth of the command history store is 100, although it can be changed to any chosen depth by adding the following lines to the ~/.bash_profile file.
HISTSIZE=256
export HISTSIZE
Or, to combine those two operations:
export HISTSIZE=256
The previous command(s) sets the HISTSIZE variable to a depth of 256 commands on the first line. The export command on the second line promotes the revised HISTSIZE to global visibility, so that all other running processes can see the changed value. To change HISTSIZE in the current session, execute the previous from the command line.
On the PC keyboard, traverse the command history by pressing Up Arrow to access previously typed commands, and Down Arrow to move forward once again through the list. In the following listing, a deliberate mistake is introduced into the first line.
[bilbrey@bobo bilbrey]$ catt /etc/shells
bash: catt: command not found
From here, you can press the Up Arrow to re-display the errant command, then use the Right and Left Arrow keys to position, then Delete or Backspace to remove that extra 't', and press enter with the cursor anywhere on the command line to execute:
[bilbrey@bobo bilbrey]$ cat /etc/shells
/bin/bash
/bin/bash2
/bin/csh
/bin/ksh
/bin/sh
/bin/tcsh
/bin/zsh
Use fc as another method of listing, editing and executing commands from the command history. Basic usage of the fc command is displayed by typing help fc.
Sidebar :: The
helpCommandThe help command is a built in facility of the Bash shell. It provides succinct assistance for other Bash built in commands. For example...
[bilbrey@garcia bilbrey]$ help help
help: help [-s] [pattern ...]
    Display helpful information about builtin commands.  If PATTERN is
    specified, gives detailed help on all commands matching PATTERN,
    otherwise a list of the builtins is printed.  The -s option
    restricts the output for each builtin command matching PATTERN to
    a short usage synopsis.
Aliasing is the ability to perform command substitution interactively. Generally, aliases are set up to make commands default to easier or safer operation for interactive use. As a rule, command aliases are placed in ~/.bash_profile, a configuration file that is bypassed when bash is invoked non-interactively. This is a Good Thing (TM), since aliases would make for an unknowable execution environment for scripts. For good examples of aliasing, the following lines can be entered at the command line:
[bilbrey@bobo bilbrey]$ alias rm='rm -i'

[bilbrey@bobo bilbrey]$ alias ll='ls -al'

[bilbrey@bobo bilbrey]$ rm chapter01.txt
rm: remove `chapter01.txt'?
The first alias line specifies that when rm (remove, a command to delete files) is typed at the command prompt, rm -i (which runs rm in an interactive mode, requiring confirmation before each delete) is executed. The second line creates a new command. When ll is typed, the ls (which lists files) program is executed with the -al option, which lists all of the specified files in a long (detailed) style. The last two lines of the listing show an example of the results of running the aliased rm command.
To make an alias a permanent part of the working environment, first make a backup copy of the configuration file by typing cp .bash_profile .bash_profile.old. Always make a backup of configuration files. Then use an editor to add the command(s) to .bash_profile, each on a separate line in the file. After saving the file, all future sessions will have the new alias loaded. Make the new alias immediately useful by typing source .bash_profile. The source command executes the contents of the file(s) in its argument, and makes any changes made to .bash_profile available to the current login session.
Any command that is executed frequently with a specific set of options enabled is a candidate for alias creation. Paying attention to your usage habits and creating aliases as required saves a significant amount of time down the road.
Job control allows processes (programs) to be run in the foreground, in the background, or to be stopped temporarily. When a job is running in the foreground, no other processes may be started in that terminal. The command prompt will not be displayed until a foreground process terminates. Sometimes this is a good thing, as the output of the command may need to be monitored.
A command running in the background has "released" the command prompt back to the user. There are some programs that are better candidates for background operation. A program with virtually no output to interfere with foreground operations is perfect for this purpose. Alternatively, a program can be invoked in such a way that its output is directed to a file, thus making it "quiet" enough for background operation. Programs that require user input are definitely not recommended in the background, as the process (and only that process) hangs up, waiting for user input. However, this doesn't interfere with other operations in the terminal.
End a command line with an ampersand (&) to start a program running as a background process. For example, suppose that a certain compressed file (of type .tar.gz) needs to be expanded, and it is a very large file, taking a long time to unpack. This process can be put into the background of the current terminal:
tar zxf /home/bilbrey/very_large_file.tar.gz &
tar program (which provides file compression services), and returns the command prompt to the user while tar completes.
Additionally, an already running foreground process can be paused (not terminated), then the job may be restarted in background mode. Pressing Ctrl+Z temporarily halts foreground job execution; typing bg places the stopped process in the background and resumes execution, restoring the command prompt as its final action.
There are specific characters that are used as shortcuts for specifying filenames and groups of filenames to the command line. Table 15-2 lists these characters and sequences. The $PWD and $OLDPWD are shell variable names. See "Shell Variables" for more information.
Table 15-2
Characters and Sequences in Filenames
| Character or Sequence | Description |
| * | Matches any string of characters, from length zero up. |
| ? | Matches any single character |
| ~ | Indicates current user's home directory |
| ~user | Identifies home directory of named user |
| [acf-j...] | Matches any single item from the enclosed characters or ranges |
| [!acf-j...] | Matches any single one not from the enclosed characters or ranges |
| ~+ | Specifies current working directory ($PWD) |
| ~- | Specifies previous working directory ($OLDPWD) |
The listings below show the metacharacters in action. The first example, ls C*2?, lists filenames beginning with C, followed by any string of characters, followed by a 2, followed by any single character. If instead the command was typed as ls C*2*, then the additional files Chapter12 and Chapter02 would also have been listed, since C*2 matches both of those, and the trailing * is allowed to be of length zero. The ? requires the presence of a character in the specified location. This is actually less confusing than it sounds. A little experimentation on your part goes a long way.
[bilbrey@bobo bilbrey]$ ls C*2?
Chapter20  Chapter22  Chapter24  Chapter26  Chapter 28
Chapter21  Chapter23  Chapter25  Chapter27  Chapter 29

[bilbrey@bobo bilbrey]$ ls C*[!12]?
Chapter01  Chapter03  Chapter05  Chapter07  Chapter 09
Chapter02  Chapter04  Chapter06  Chapter08
The second listing makes use of the bracketed character matching feature in conjunction with the not character '!'. While this may seem to be a complicated way to get the same results as the command ls C*0?, there are definitely times when it is easier to list items by specifying what they are not.
Aside from the metacharacters that are used in file specification, the special characters listed in Table 15-3 provide enhanced functionality to the command line.
Table 15-3
Special Characters Used in File Specification
| Characters | Description |
| ; | Separator for sequential commands on the CL |
| & | Forces a command to run in the background |
| | | Pipe: chains data from one command to the next |
| < > & | Characters used in I/O redirection |
| * ? [ ] ~ ! | Metacharacters for filename expansion (see previous) |
| ` | Back quote used for command substitution |
| $ | Variable or command substitution |
| # | Denotes a comment |
| ( ) | Initiates sub-shell command grouping |
| { } | Block of commands, executed in current shell |
| ' " \ | Used to quote other characters |
Additionally, the Space and Tab characters are accepted word or command separators. Newline (Enter) can be used as a command separator if the current line ends with a Backslash ('\', indicating a continued line). These special characters are used in many examples throughout this book. The quoting characters, at the bottom of the list, are extra special, since they modify the behavior of the other characters.
Single special and meta-characters can be quoted by prefixing them with a slash. Single and double quotes are used to quote strings. The difference between the two types is that single quotes quote everything within their domain. Double quotes allow variable expansion ($) and command substitution (`) within a contained string.
Suppose that you want to search a configuration file, extract the comments from the file, and print them. We know that comments start with a #, but so does Bash. For example, to search on #, quote the single character with a backslash, displaying the following results. By way of contrast, running the command without quoting the # results in an error, since the unquoted # makes all the text that follows into a comment.
[bilbrey@bobo bilbrey]$ grep \# /etc/hosts.allow
#
# hosts.allow   This file describes the names of the hosts
#               which are allowed to use the local INET
#               services, as decided by the
#               '/usr/sbin/tcpd' server.
#
There are shell variables that are automatically set for every invocation of Bash. For example, typing echo $HOME displays the path to the home directory of the current user. Shell variables are equivalent to the environment variables in DOS. Typing set prints the complete list of default variables for the current Bash configuration. Use the slider bar on the terminal window to view the part of the list that has scrolled off screen. Alternatively, the same data can be displayed by typing set | more. The more program allows you to page through the on-screen display using the spacebar; it automatically terminates when the end-of-file (EOF) is reached.
More Information
Alternatively, shell variables are referred to as environment variables. We think of them as interchangeable. Semantically, however, our preference is for the "shell" version. Coming from the DOS world, environment variables were always global. Calling these "shell variables" emphasizes their ephemeral nature, tied to the specific running instance. You log in to one terminal, set a variable: it's not visible in any other session.
Among the variables in the listing are PWD and OLDPWD. These define the user's current and most recent previous location in the directory tree, respectively. Recall that these variables have keyboard shortcuts to them, described in the previous list of metacharacters. Additionally, ~ is a character substitution shortcut which expands to $HOME.
To expand a shell variable (that is, replace the variable name with the variable contents), preface the variable name with a $. To edit a shell variable, there are two different methods. Some variables, such as PATH, have multiple entries, and can have information appended to the path string. In the following example, the new contents of PATH are set to the string that $PATH currently represents, followed by a colon (as an entry separator) and the new path appendage.
[syroid@bobo syroid]$ echo $PATH
/bin:/usr/bin:/usr/local/bin:/usr/X11R6/bin

[syroid@bobo syroid]$ PATH=$PATH:$HOME/bin

[syroid@bobo syroid]$ export PATH

[syroid@bobo syroid]$ echo $PATH
/bin:/usr/bin:/usr/local/bin:/usr/X11R6/bin:/home/syroid/bin
Other variables are single function specifications. The PAGER variable specifies which system tool is used to display text to a terminal one screen at a time. The default tool is called less. The older paging tool, which is also distributed with OpenLinux, is called more. To use the more paging tool as a default in the current session, type PAGER=more, followed by export PAGER.
As noted previously, export makes the changed variable visible for other programs which are run from the session in which you export the variable. That may deserve yet another explanation, so here goes. Looking back at an older OS, when you set an environment variable in DOS, it was instantly available to every process on the system. But then DOS is a single-user OS. In a multi-user environment like GNU/Linux, we simply can't have Joe User creating or modifying environment variables that cause problems for Jane User, the kernel, you, or even processes that Joe already has running. So each shell process has it's own environment. Contrary to possible intuition, export does not make a variable available to other shells. What export does do is allow processes started as children of the current shell to inherit that variable.
Redirection is the process of changing the input source and/or output destination for programs. Aside from the ability to use files as input and output tools, redirection can also be applied directly to file descriptors, which are numbers that stand in for standard input (0), standard output (1) and standard error (2). File descriptors can be used in conjunction with redirection to send both standard output and standard error to a file (or to different files).
Why the numbers next to each of the stock file descriptors? Well, those are standins used to create extra-cryptic command lines that confuse mere mortals. Thus,
/home/bilbrey/bin/dostats >> /dev/null 2>&1
That little line runs the script dostats, located in /home/bilbrey/bin, appends ('>>') the output to the bit bucket in the form of /dev/null, and takes the standard error (2), and directs it instead to standard output (1). The net effect of this is that the program runs without trace, since neither output nor error is logged, but instead is thrown away.
The most commonly characters that in redirection include those listed in Table 15-4. This is not a comprehensive listing.
Table 15-4
Characters That Provide Redirection Services
| Characters | Description |
| < file | Gets standard input (normally the keyboard) from file |
| > file | Sends standard output (normally the screen) to file |
| >> file | Appends standard output to file, creates file if necessary |
| cmd1 | cmd2 | Sends (pipe) the output of cmd1 to the input of cmd2 |
| <> file | Opens file for both reading and writing |
| n> file | Redirects specific descriptor n (output or error) to file |
| n< file | Sets file descriptor n to file |
| >&n | Duplicates standard output to file descriptor n |
| <&n | Duplicates standard input from file descriptor n |
Figure 15-2 contains a demonstration of many of the features of redirection. The /etc/passwd file contains a list of all the users of the system. The < between "grep false" and /etc/passwd means that the file /etc/passwd is used as the input to the grep command. The grep command searches for the string "false", returning every line from the input that contains the search string. The | character pipes the output from grep into the sort program, which alpha sorts the data, line by line. Finally, the sort output is redirected from standard output to the file false.users.
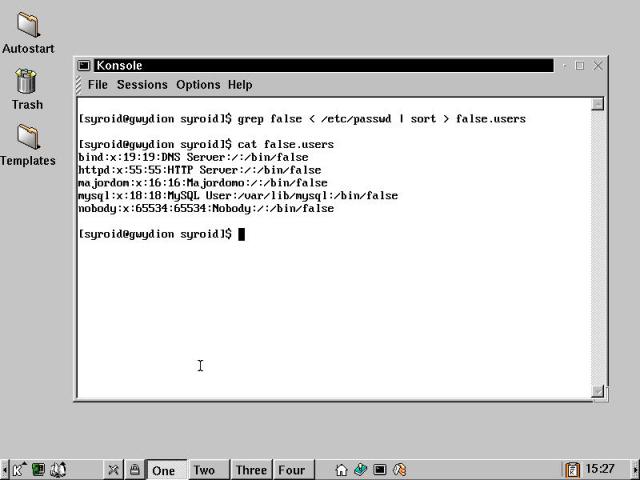
Figure 15-2
A Konsole terminal window showing examples of redirection
The Bash shell has a variety of built-in commands. Some of these are better suited for scripts (programmed solutions for repetitive tasks, similar in nature but more powerful than DOS's batch files). These include programming features and control structures, like branching (if/else/elsif/fi), looping (for, while, and until), and switching (case). These are examined in detail in Chapter 18.
Other Bash commands are also useful interactively on the command line, as well as in scripts. It is these built-in commands that are listed in Table 15-5. We examined many of these commands in the preceding sections. Use the "More Bash Resources" sidebar to learn more about Bash's functions, features, and commands.
More Bash Resources
Bash: System Resources -
Typeman bashfor basic shell usage and help
Typeinfo bashfor more complete documentationBash: Online Resources -
http://www.gnu.org/manual/bash-2.02/html_chapter/bashref_toc.html
http://www.linuxdoc.org/HOWTO/Bash-Prompt-HOWTO.htmlBash: Priint Resources -
Learning The Bash Shell, by Cameron Newham and Bill Rosenblatt (O'Reilly & Associates, 1998)
Table 15-5
Built-in bash Commands
| Command | Description |
| . file [args] | Executes contents of file (same as source command). |
| alias [name[='cmd']] | Supplies shortcut name for a command (see alias previously). Executed alone, lists all current aliases. |
| bg [jobspec] | Puts process into background, optionally specify jobspec (see jobs built-in). |
| bind [options] | Sets and/or displays key and function bindings, type man bash, then /bind for more info. |
| cd cd [dir] |
Changes PWD to user's home directory (without arguments), otherwise changes to specified directory (relative or absolute). |
| declare [opts] [name[='cmd']] | Sets or displays shell variables (see also typeset). |
| echo | This is an alias for print -. |
| enable [-n] [-a|-all] [built-in] | Enables (or with -n disable) built-in functions, -a to list functions and status. |
| eval [args] | Creates command by concatenating arguments, then executes the result. |
| exec [[-] command [args]] | Runs specified command without spawning a new process. Args are passed to command, including leading '-' if given. |
| exit [n] | Terminates current shell, with optional exit value n. |
| export [-nf][name[=word]] export -p |
Makes shell variable available on a global scope (rather than local); -p lists currently exported variables. |
| fc [-e ename][-nlr][first][last] | Enables editing commands in the history list, by default using the vi editor. ename specifies an alternate editor, first and last are either text or numeric indexes variables. Upon exiting the editor, the command is executed. |
| fg [jobspec] | Moves job to foreground operation (from background), or by specifying from list supplied by jobs built-in. |
| hash [-r][commands...] | Searches out and remember paths to commands, reducing time spent searching the path. |
| help [built-in] | Prints listing of built-ins, with argument, prints brief help on the specified command. |
| history [-anrw] [filename] | Prints history list with line numbers. Options allow reading and writing of history, from and to filename. |
| jobs [-lnp] [jobspec...] jobs -x command [args] |
Lists jobs running under current shell. -l lists Process ID numbers(pids) additionally, -p lists pids only, -n lists changed jobs. -x performs substitution of pids for jobspecs found in the command or args (arguments), then executes the command. |
| kill [-s sig | -sig][pid | jobspec] | Terminates (normally) or sends signals (sig) to running jobs and processes as specified. See Chapter 19 for more details on process management. |
| logout | Exits login shells only, use exit otherwise. |
| pwd | Prints current absolute pathname. |
| set [options][args] | Sets runtime Bash characteristics, "-" option enables, "+" option disables, oddly counter-intuitive. See info bash --> bash specific features --> The Set Builtin for complete information. See Chapter 17 for info usage. |
| suspend [-f] | Stops shell process, identical to typing Ctrl+z, -f forces suspend in the case of a login shell. |
| times | Displays user and system CPU time for the current shell, and for processes executed from the shell. |
| type | Displays, from built-ins and path, all possibilities for a specific command. For example, type type -a kill to get a listing of the assorted kill commands. |
| typeset | Executes like "declare". |
| ulimit [options [limit]] | Provides information about and control over resource limits for shells and processes. To list all current limits, type ulimit -a. |
| umask [nnn] [-S] | Lists or sets mask for file permissions at creation. -S lists mask symbolically (rwx), rather than in octal format. |
| unalias [-a] [name...] | Removes name(s) or (-a) all from alias list. |
| wait [jobID] | Waits until all (or specified) background jobs are complete. |
Consoles and terminals are portals into the innards of Linux, making all the power of command line processing available. In this chapter, we examined the fundamentals of consoles, terminals, shells, and Bash. Specifically, this chapter covered the following points:
Go to the Table Of Contents