
Email Brian
Brian's Website


Email Tom
Tom's Website
|
Email Brian Brian's Website |
|
Email Tom Tom's Website |
Go to the Table Of Contents
Did you read the Preface? Thanks!
Our goal in this chapter is to simply get you up and running with Samba, and hopefully provide enough ancillary references to pique your curiosity about what else lies under the covers of this remarkable product. In the pages that follow, we'll show you how to create an initial configuration file and get a "base" server sharing a handful of directories. There's a section on compiling Samba from source, insights on the structure of the "heart and soul" of Samba, smb.conf, and numerous examples that highlight common configurations. We wrap things up by showing you how to mount remote Samba shares on a Linux client, and have a quick look at the key utilities provided with the package.
So pull up a stump, and join us while we show you the footwork necessary to dance the Samba.
Interoperability - it's the catchphrase of our times. There was a day, not so long ago, when networks were built around a single operating system and its underlying filesystems. File sharing was simply a matter of ensuring the vendor's server software and client software were one and the same. Today, things are not so simple. Windows dominates the desktop. UNIX, and with growing frequency Linux, is the filesystem of choice for servers. Factor in a handful of NT domains, sprinkled with some IBM AIX, add a little Solaris for taste, and you have a heterogeneous network cocktail (all with disparate filesystems) that's bound to give even the best system administrators a bad case of heartburn.
Is there a way to provide your Windows clients with secure, reliable access to all these diverse filesystems? Yes, as a matter of fact there is. One option is a program is called Samba.
Simply put, Samba translates SMB/CIFS filesystems - the language of Windows. Next to Apache, it is probably one of the most mature Open Source applications available. Samba is available for a diverse range of platforms (AIX, HP-UX, Linux, Solaris, etc.) in binary form; if your needs are unique, source code can be downloaded and built on just about any machine with an ANSI-C compliant compiler.
So what does all this fanfare mean in practical terms? Well, it means that you can install Samba on any of its many supported platforms and have the underlying filesystem appear as an NT server to your Windows client. You can even go so far as to have Samba masquerade as an NT PDC (Primary Domain Controller) on a network, and as such, handle all Windows client authentication and browsing needs. Pretty powerful stuff, eh?
One of the things that makes Samba so unique is that in spite of all this power and flexibility, the program is amazingly simple. It consists of two daemons: smbd handles the filesystem translation and nmbd manages browsing and election tasks. Samba's configuration is controlled from a single text file, smb.conf, and user authentication can be either outsourced to a separate server (Samba or NT) or verified from a local text file (smbpasswd) containing encrypted passwords. In addition, Samba ships with number of useful command-line utilities to manage passwords, transfer files, monitor server status, and remotely administer the flow of information across a network.
As you might imagine, creating and managing a network utilizing multi-role Samba machines can get a tad... well, complex. There are a number of full-length titles available to assist you with the details of Samba-the-PDC, remote login scripts, browsing elections across subnets, and so on. There's also a wealth of information available on-line, as is common with any Open Source product.
Several steps are required to bring a Samba server online. These include:
First, of course, you need Samba installed on your system. Samba is already installed on your system if you loaded OpenLinux using the All Packages, Recommended, or Business configurations. To confirm this, in a console or terminal window type rpm -q samba. If the program is installed, the output from the preceding command displays the rpm package version. For example:
[tom@velocity tom]# rpm -q samba
samba-2.0.6-2
If Samba is not installed on your system, dig out the OpenLinux distribution CD and follow the instructions provided in Chapter 6 under the section "Adding and Removing Software".
The next step is to create and/or edit /etc/samba.d/smb.conf. There are two approaches to this task. The first is to take the smb.conf.sample file located in the /etc/samba.d directory, copy it to smb.conf, and edit it to your system requirements. The second method is to create a new, rudimentary configuration file from scratch - with just enough information to get the Samba server up and running - and add options in small increments. We prefer the latter approach. Our reasoning here is that it's easier to debug a small, one page configuration file. By adding options and shares one at a time, testing each one before moving onto the next, it's a lot easier to monitor (and backtrack from) the results.
The listing below contains a "stock" configuration file we use to test a new Samba installation. The Samba compilations supplied with all OpenLinux distributions look for the smb.conf file in the /etc/samba.d directory, so either cd to this location before firing up your favorite text editor, or supply a full pathname (for example, type vi /etc/samba.d/smb.conf).
Hint
Once you've created the following smb.conf file, save a copy somewhere for future reference. We've used this basic "test" file on dozens of different systems, running a diverse range of operating systems (RedHat, Mandrake, IBM AIX, RH on SPARC, etc). Providing Samba is installed correctly, and the configuration file is where Samba expects to find it, this configuration has always allowed us to start and test an installation.
Create the configuration file as shown, change the "workgroup =" option to reflect the name of your local Windows workgroup (or make one up if you don't have one yet), and edit any instances of "velocity" to instead reference the name assigned to your Samba server.
; smb.conf
; base configuration file
; modified 6/30/2K, tms
;

[global]
	workgroup = syroidmanor
	socket options = TCP_NODELAY
	netbios name = velocity
	server string = Samba %v on Velocity
	encrypt passwords = yes
	security = user

[tmp]
	comment = TMP Files
	path = /tmp
	read only = no
	public = yes

[homes]
	comment = Home DIR on Velocity
	browseable = yes
	read only = no
While the above configuration file is sparse and limited in functionality, it's enough to get the ball rolling and ensure everything is working as advertised. A detailed explanation of what each grouping and option does is provided later in this chapter under the section titled "Exploring Advanced Configuration Options".
The next step in bringing your Samba server online is to test the syntax of the smb.conf by typing testparm at the command line. If the sample code was entered exactly as shown, testparm should display the message "Loaded services file OK". If you mistyped an entry, the line or lines containing errors are shown; go back and correct these errors and re-run testparm. After the "Loaded services file OK" message, testparm displays another prompt, "Press enter to see a dump of your service definitions". Press Enter, and a complete listing of the server configuration (including the defaults for all the variables that aren't specified in your smb.conf file) is displayed.
Reference
All the Samba utilities referenced in this section are detailed in the Samba utilities section at the end of this chapter.
With a tested and verified smb.conf file in place, it's now time to create the smbpasswd file. This file is used by Samba to authenticate users, and as you'll see, commonly derived from the system password file /etc/passwd. From a command prompt as the root user, type cat /etc/passwd | mksmbpasswd > /etc/samba.d/smbpasswd
This pipes the contents of /etc/passwd (which defines all the user accounts) through the mksmbpasswd utility, which in turn creates the smbpasswd file. Now set the password for any system users that need to connect to Samba shares by typing smbpasswd username
Hint
Yup. Once again we're faced with a program,smbpasswd, that works with a configuration file called by the same name. We've tried to differentiate these with appropriate fonts footwork, but please pay attention to context.
If username doesn't exist as a Linux system user and in the smbpasswd file, then smbpasswd (the program, if you please) displays a descriptive error message, then exits. You'll be prompted to enter a password, and then confirm that password. The password used can be the same as the user's local system password, or different. However, we strongly urge you to adopt a username/password policy that is consistent across all machines on the network. This approach makes it a lot easier for all parties concerned, due to the fact that the username/password entered when logging into Windows is passed to the Samba server when authenticating access to a share.
The final step on the server side of things is to start the Samba daemons. This is accomplished by typing samba start. This generates two messages on the console: "starting smbd", and "starting nmbd". The server should now be running. You can check this by issuing a ps -ef command and looking for the presence of the smbd and nmbd processes in the output displayed. Now it's time to test your handiwork.
Go to a Windows machine on the same local network and login using a username and password as entered on the Linux box with the smbpasswd command. Double-click the Network Neighborhood icon on the desktop, and you should see the Samba share displayed along with any other SMB shares available on the network. Figure 27-1 shows an example from a Windows 2000 workstation, with the "Show Folders" option enabled.
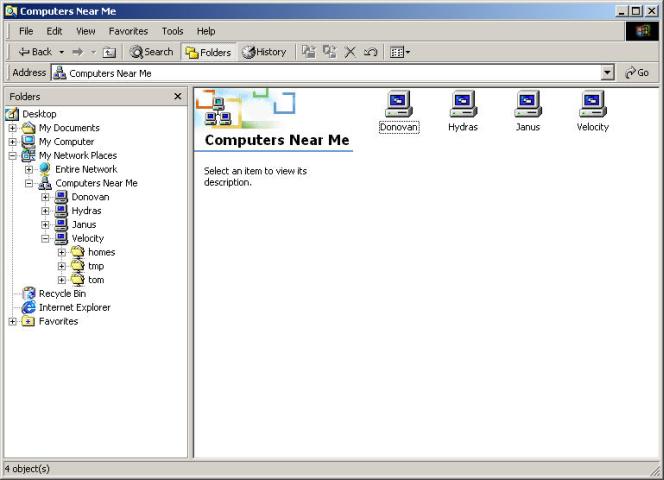
Figure 27-1
Samba shares mapped to a Windows 2000 system, as seen from File Manager
Quickly, now... which machines are running Linux? To satiate your curiosity, Donovan is running eDesktop2.4, Hydras is a file server running IBM AIX, Janus is the system the above screenshot was captured on (running Windows 2000), and Velocity is a Sun UltraSPARC running Red Hat 6.2.
To map a Samba share, open the Windows File Manager and go to the Tools menu. Select Map Network Drive. In the resulting dialog choose a drive letter to represent the share and enter the machine name and share name in the field provided using the notation:
\\MachineName\share
Put a checkmark next to "Reconnect at logon" to make the share persistent across restarts.
There is an alternative approach to configuring Samba for those of you with a distaste (or allergy to) working with a command line text editor. Samba comes bundled with a browser-based administration program called SWAT (the Samba Web Administration Tool). Before you can connect to a Samba server, however, several configuration steps are required.
First, make sure the following line is present in the /etc/services file:
swat 901/tcp
The choice of port number (in this case, 901) is not critical other than the fact it should be less than 1024 to prevent security exploits by an obscure bug in the inetd daemon, and it should not overlap with any other specified service's ports. Next, edit /etc/inetd.conf and uncomment the line that reads (or add it if missing):
swat stream tcp nowait.400 root /usr/sbin/tcpd swat
Finally, restart the inetd daemon by typing killall -HUP inetd You should now be able to access the swat configuration program via any web browser by entering one of two URLs: http://localhost:901/ (if you're connecting from a browser on the server itself), or http://hostname-or-IP:901/ (if you're connecting from a remote system).
Warning
By default, SWAT is protected on the network by a program called TCP Wrappers (the ...tcpdportion of the line from inetd.conf). In the file /etc/hosts.deny, there is a line reading "swat:ALL EXCEPT 127.0.0.1". In order to access swat from another host, you should add the IP address of the remote host to that line in hosts.deny. Be cautious with this capability, especially if you're connected directly to the Internet.
Figure 27-2 shows SWAT in action on a Windows 2000 system using Internet Explorer 5.
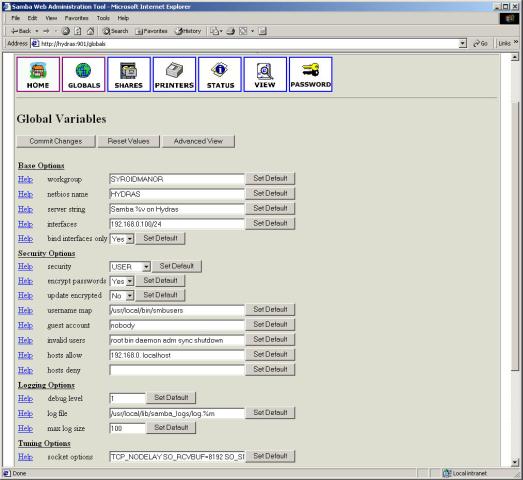
Figure 27-2
The Samba SWAT configuration utility, seen from Internet Explorer 5
SWAT is remarkably simple to use. The large icons across the top of the screen correspond to the main configuration sections of the smb.conf file. Next to each option name is a value field. Click the Help hyperlink next to the option name for more information on what the field does, and the values permitted. When you're finished, select Commit Changes and smb.conf is updated.
SWAT really shines when you are charged with maintaining a so-called "head-less" server running Samba. All you need is a browser and a network connection to the system. We'll leave you to explore the ins and outs of the smb.conf file (along with the guidance provided in the upcoming section, "Exploring Advanced Configuration Options") using this powerful tool. Keep in mind that SWAT is relatively innocuous - until you hit the Commit Changes button.
Using the pre-compiled binaries shipped with a distribution is certainly the most expedient route to getting a Samba server up and running. On the other hand, there are some distinct disadvantages to using a pre-compiled package.
First, Linux distribution packages almost invariably lag behind the latest version. The latest stable builds typically contain performance tweaks, security fixes, compatibility fixes, and, on occasion, expanded feature-sets.
Second, pre-compiled binaries are always built with preset values for file locations, target platforms, selected option modules, and a default configuration. While for the most part these settings work, they might not provide you with the optimum performance and/or features required by your implementation. In addition, some utilities are not included with vendor-created packages that are available when you compile from source.
Third, you will always realize performance gains when compiling your own binaries. Namely:
Extra Info
One of the bonuses of compiling Samba from source is that the complete text (in HTML format) of Eckstein, Collier-Brown and Kelly's seminal work, Using Samba (O'Reilly & Associates) is included in the package. Look for it in the /usr/local/samba/man/using_samba directory.
There's a rather large fly in the ointment, however, when it comes to compiling Samba under most Linux distributions (OpenLinux included). Have a look at the code snippet below which was generated during the make step, using default compile options (that is, a build that began by issuing a ./configure command without any options).
Using FLAGS =  -O -Iinclude -I./include -I./ubiqx -I./smbwrapper
-DLOGFILEBASE="/usr/local/samba/var" -DCONFIGFILE="/usr/local/samba/lib/smb.conf"
-DLMHOSTSFILE="/usr/local/samba/lib/lmhosts"   -DSWATDIR="/usr/local/samba/swat"
-DSBINDIR="/usr/local/samba/bin" -DLOCKDIR="/usr/local/samba/var/locks"
-DSMBRUN="/usr/local/samba/bin/smbrun" -DCODEPAGEDIR="/usr/local/samba/lib/codepages"
-DDRIVERFILE="/usr/local/samba/lib/printers.def" -DBINDIR="/usr/local/samba/bin"
-DFORMSFILE="" -DNTDRIVERSDIR="" -DHAVE_INCLUDES_H
-DPASSWD_PROGRAM="/bin/passwd" -DSMB_PASSWD_FILE="/usr/local/samba/private/smbpasswd"
Observe the filesystem locations where the various components of Samba will be installed. These are not the same locations used by the Samba components bundled with OpenLinux. Installing a compilation built with default configuration options creates three potential problems:
None of these problems are insurmountable, but they do require some forethought and planning. Acceptable solutions are implementation-dependent. In the case of a dedicated server (for example, no direct user access), it's easy enough to start the Samba daemons from the directory they reside in or with a fully qualified path and add the requisite commands to the rc.local file so Samba restarts after a reboot. On a developer's workstation, the best solution might be to edit the Samba startup script and place the location of the binaries on the user's path.
Another solution is to specify the locations you want Samba to install its various file using Makefile configuration options. For example, ./configure --bindir=/usr/bin forces Samba to install all user executables in the /usr/bin directory. We do not recommend this approach. All told, there are four or five separate location options you'd need to supply (plus any module options you're adding or removing) to match a default configuration to an OpenLinux installation. The chance of a typographical error when you have this many options is non-zero, and frankly, about the only thing you'll gain from this is the ability to access Samba's binaries from the command line without prefacing them with a path.
What follows is the procedure we use to upgrade an OpenLinux installation from source. It may not fit your scenario exactly, but there is certainly enough detail to get you pointed in the right direction.
Superuser access is required for most of the following steps, so open a terminal window, type su, and enter the appropriate password.
Next, we're going to ensure that if something goes bump in the night, all Samba's key configuration files are safe from the fallout. Copy the following files to /root:
Now you can always return to a "known-good-state" by reinstalling the Samba RPMs from CD, and copying the files back to their original locations.
Hint
Always keep a copy of all your key configuration files (primarily those located in /etc) on some form of removable media and store it somewhere safe. It's also handy to keep a hardcopy printout of these same files in a three-ring binder and keep it close at hand. Oh yes... and don't forget to update both backups and hardcopy whenever you change a file.
Next, fetch the latest Samba source from ftp://ftp.samba.org. The most recent stable version is located in the /pub/samba directory and has always been named samba-latest.tar.gz (so probably it will continue to be so). Download and move this file to the location you use for storing and compiling source code (typically, /usr/local/src). Uncompress the tarball by typing gzip -d samba-latest*gz | tar xvf samba*tar. Then use cd to get into the new source directory.
Take a few minutes to read through the documentation enclosed with the package. It's located in the topmost directory in the source tree (for example, /usr/local/src/samba-2.0.7/). README contains generic information about Samba, references to mailing lists and newsgroups, and a brief introduction to some of the program's capabilities; WHATSNEW.txt contains a list of program features and changes by revision.
Change to the source directory (cd source). Before compiling any program you should familiarize yourself with the configuration options available. This is accomplished by typing ./configure --help. We typically capture this output to a script file then print it out for careful study. To achieve this, type script followed by a path/filename (for example, script /home/username/build-samba-207). Once the output from the ./configure --help command is displayed, type Ctrl + d to stop the script and save it to the location supplied.
Hint
Use the hardcopy printout generated from the above script file to jot notes about various file locations specific to your filesystem, then highlight the options you decide to compile with. Once the program is successfully built, file this sheet away in your system notebook for future reference.
This step is important. As noted in the introduction to this section, one of the key reasons for building from source is to remove any modules you do not require, and add those you do. Here is a snippet of some of the configuration options available for Samba 2.0.7:
Features and packages:
  --disable-FEATURE       do not include FEATURE (same as --enable-FEATURE=no)
  --enable-FEATURE[=ARG]  include FEATURE [ARG=yes]
  --with-PACKAGE[=ARG]    use PACKAGE [ARG=yes]
  --without-PACKAGE       do not use PACKAGE (same as --with-PACKAGE=no)
  --x-includes=DIR        X include files are in DIR
  --x-libraries=DIR       X library files are in DIR
--enable and --with options recognized:
  --enable-maintainer-mode enable some make rules for maintainers
  --with-smbwrapper     Include SMB wrapper support
  --without-smbwrapper  Don't include SMB wrapper support (default)
  --with-afs     Include AFS support
  --without-afs  Don't include AFS support (default)
  --with-dfs     Include DFS support
  --without-dfs  Don't include DFS support (default)
  --with-krb4=base-dir     Include Kerberos IV support
  --without-krb4          Don't include Kerberos IV support (default)
  --with-krb5=base-dir     Include Kerberos 5 support
  --without-krb5          Don't include Kerberos 5 support (default)
  --with-automount     Include AUTOMOUNT support
  --without-automount  Don't include AUTOMOUNT support (default)
  --with-smbmount     Include SMBMOUNT (Linux only) support
  --without-smbmount  Don't include SMBMOUNT support (default)
  --with-pam     Include PAM password database support
  --without-pam  Don't include PAM password database support (default)
  --with-ldap     Include LDAP support
  --without-ldap  Don't include LDAP support (default)
Options included in a default build are marked with "(default)". To enable a feature or option, append it to the ./configure command. For example, to add automount and smbmount support (neither of which are compiled by default), the command is:
./configure --with-automount --with-smbmount
To disable or remove an option installed by default, use the appropriate --without-option switch to your ./configure line. The key is to keep your Samba daemons as lean as possible without sacrificing functionality.
Now it's time to compile Samba. Again, we suggest you run script to record the output displayed. This is useful for two reasons. First, if errors arise, it's a lot easier to troubleshoot them from a text file than try to remember what the error code was as it scrolls past. Second, it's important to double-check the locations Samba is planning to place binaries and configuration files before you actually install the program. Remember the output we showed you at the beginning of this section? The one generated from the make command that detailed the defaults Samba was using for component locations? script captures this information for you; if you've mistyped a location path, it's easier to re-configure and re-make than sort out the mess after the program is installed.
The following lines first open the script file to log the output of the compile, then run make to compile Samba.
[tom@velocity source] script /home/tom/make-samba207
Script started, file is /home/tom/make-samba207

[tom@velocity source] make
  * * *
When the make process completes, type Ctrl + d or exit to save and terminate the script.
Review the log created by script using less, and search (by using the "/" operator) for the word "Error". You shouldn't find any. If you do, then either the system or the sources are mis-configured. Then the script comes in handy again when you post your questions to the linux.samba newsgroup. Once you've examined the output of the above logfile and you're sure all the rocks are going in the right jars, the next step is to install Samba.
[tom@velocity source] make install
The above command copies the compiled binaries, associated libraries, man pages, and documentation from the source directories to their requisite homes on the filesystem. Existing files and binaries are not overwritten - they are preserved with an .old extension allowing you to revert to a previous version if so desired.
Secre
Tricks of the Trade
Do not delete the source code tree (in our example, /usr/local/src/samba-2.0.7) from your hard drive after the program is installed. Not only is it helpful to have around should you want to add or remove an option down the road, it's also possible to remove an installation from this location. Simply go to the directory the configuration was generated from, and typemake uninstall. This is also a handy way to undo an installation should you end up with the binaries or configuration files in the wrong location.
If your installation is a new one, create the smbpasswd and smb.conf files as described in "Bringing a Samba Server Online," earlier in this chapter. If you're upgrading a previous installation, and you compiled Samba using the default component locations, copy smb.conf to /usr/local/samba/lib, and smbpasswd to /usr/local/samba/private.
Warning
Some Samba compilations fail to create a necessary directory, /usr/local/samba/private . If it doesn't exist, simply create it (as root) by typingmkdir /usr/local/samba/private
Starting Samba
Configure Samba as we discussed in the previous section, then it's time to start Samba. You have two options: Specify the full path to the daemons, or edit the supplied Samba startup script. To start the daemons manually following a default configure/make/make install session, from the command line (as root), type:
[tom@velocity etc] /usr/local/samba/bin/smbd -D
[tom@velocity etc] /usr/local/samba/bin/nmbd -D
If you want Samba to automatically start after a system reboot, add the same two lines to the end of the local boot-time program startup file, /etc/rc.d/rc.local. Modify these lines as necessary to reflect the actual locations that you specified for your Samba binaries during compilation.
As yet another alternative, Caldera provides a rather elegant script file with their distributions (located in /usr/sbin when the Samba RPMs are installed) that allows Samba to be started by simply typing samba start | stop | restart (that is, choose one of the three options). The content of this script is reproduced below for your editing pleasure:
#!/bin/bash
#
# description: Starts and stops the Samba smbd and nmbd daemons
#	       used to provide SMB network services.

NAME_S=smbd
DAEMON_S=/usr/sbin/$NAME_S
NAME_N=nmbd
DAEMON_N=/usr/sbin/$NAME_N

# Source function library.
. /etc/rc.d/init.d/functions

# Source networking configuration.
. /etc/sysconfig/network

# See how we were called.
case "$1" in
 start)
  [ -e $SVIlock ] && exit 1
  [ ${NETWORKING} = "no" ] && exit 2
  [ -x $DAEMON_S -a -x $DAEMON_N ] || exit 2

  #SVIbool true "$CONFIGURED" ||
  SVIemptyConfig /etc/samba.d/smb.conf && {
    echo "$DESCRIPTIVE: not configured! Skipped..."
    exit 2
  }

  echo -n "Starting $IDENT: "
  ssd -S -n $NAME_S -x $DAEMON_S -- $OPTIONS_SMB
  ssd -S -n $NAME_N -x $DAEMON_N -- $OPTIONS_NMB

  echo "."
  touch $SVIlock
  ;;

 stop)
  [ -e $SVIlock ] || exit 0

  echo -n "Stopping $IDENT: "
  ssd -K -p /var/lock/samba.d/$NAME_N.pid -n $NAME_N #-x $DAEMON_N
  ssd -K -p /var/lock/samba.d/$NAME_S.pid -n $NAME_S #-x $DAEMON_S

  echo "."
  rm -f $SVIlock
  ;;

 restart)
  echo "Restarting $IDENT: "
  $0 stop
  $0 start
  exit $?
  ;;

 *)
  echo "Usage: $SVIscript {start|restart|stop}"
  exit 1
  ;;
esac

exit 0
The lines requiring edits are shown in bold. First, enter the path to Samba's two daemons - smbd and nmbd. If you compiled the source using location defaults, this should be /usr/local/samba/bin.
Next, edit the path to smb.conf. The default is /usr/local/samba/lib. Finally - and this step is optional - edit the path where Samba maintains its daemon PID files. These files contain the Process ID's of each of the daemons, which are tracked by the operating system and show in the output of the ps command. You can either leave these lines as they are (/var/lock/samba.d/), or if you'd prefer to keep all of Samba's components in the same program-root location, change this entry to /usr/local/samba/var.
If you have troubles at this point - the daemons do not start, or start and immediately quit again - here's a quick troubleshooting list to run through.
Hint
There are a handful of configuration options that can be specified from the command line if Samba is trying to find a component in a non-existent location - type smbd --help for a listing of available startup options.
Once you're satisfied with your installation, remove the Samba RPMs (rpm -e samba samba-doc). At this stage of the game, you should have a functioning Samba server. Now it's time to look at some advanced configuration options and learn to tweak your configuration for performance and security.
As noted in the introduction to this chapter, the smb.conf file is the "heart and soul" of a Samba installation. Its contents determine what shares are available, who can access them, what interfaces the daemons listen on, and the security of your server. Samba can even take on the role of a Windows PDC (Primary Domain Controller) and authenticate hundreds of users spread over dozens of subnets. This power and flexibility, however, comes at a price.
As you might imagine, the smb.conf file for a Samba server hosting dozens of directory shares, each with unique authentication and security requirements, can get complex in a hurry. Again, this is precisely why we advocate the "one-step-at-a-time" approach to building a solid, trouble-free Samba implementation.
At last count, the number of option statements available for Samba exceeds 200. Factor in a few thousand unique network configurations, and the unknown needs of each individual implementation, and about the best we can do in this section is provide a generic look at some of the key elements of the Samba configuration file. If your deployment is complex, or your security needs unique, take the time to read the smb.conf man page and keep a copy of Eckstein et. al.'s Using Samba book handy. It's available online from http://www.samba.org. It's also a good idea to go to the /etc/samba.d directory (or /usr/local/samba/lib if you installed Samba from source) and print out a hard copy of the smb.conf.default file there. Not only can it serve as a good starting point for configuring a Samba server, it is also an excellent reference document. It provides numerous, well-documented examples to help get you both started, and thinking about possible configurations.
Before we delve into the configuration file itself, note the following general editing rules that apply to smb.conf:
valid users = tom brian leah
valid users = tom, brian, leah
valid users = tom,brian,leah
Is it plugged in?
The most common reason access to share fails is a spelling or capitalization error. Always double-check multi-word values, especially "path =" statements. We tell you three times!
The structure of Samba's configuration file consists of sections and a series of option statements. Each section describes a shared resource (with the exception of "global" described below), and begins with the name in square brackets (for example, [public]) followed by one or more options that control the accessibility of that share or resource. Option statements take the form:
option = value (or value1, value2, value3...)
The layout of smb.conf can be divided into two distinct parts, each tasked with a specific role:
[brian]) prefacing the group. Base options statements these sections include the directory being shared, a comment line, whether or not the share is browseable, and what kind of access is permitted (read only or write). Each block in the shares section appears as a unique filesystem to a Windows client (if it is marked as browseable). Many of the option statements used in the [global] section are also permissible under an individual share. For example, a share can be made browseable to all users, readable by other users, and writable by yet another group of users. This allows the administrator a great deal of flexibility and granularity in who can access a share, and what they can do with the files it contains.The shares section contains two "special" shares: [printers] and [homes]. We'll begin our in depth examination of smb.conf by looking at some of the more common options found in the [global] section, then move on to these two option groups.
[global] sectionThe most important thing to remember about the [global] section is that certain defaults are assumed unless specified otherwise. This is important to keep in mind, because this section runs the Samba server as a whole, and directly (or indirectly) affects the shares it offers.
For example, the "browseable" option for shares is, by default, set to "yes". Meaning that any shares - unless stated otherwise - are viewable from the Network Neighborhood of a Windows client connecting to the server. This does not mean the user can connect to the share (this is determined by whether the user has been granted access to a share or not), but it does mean the share can be "seen". If you do not want any shares offered by Samba to be browseable, simply set the option "browseable = no" in the [global] section of smb.conf. Conversely, you could leave the default as is, and set an individual share to "browseable = no" and only that share would be affected.
In other words, when the server authenticates a client Samba reads the [global] section first, then fine tunes the yes/no/can/can't process by checking the options contained under the specific share being requested.
More Info
To see the current default options being enforced by Samba, typetestparm(see the Samba utilities section later in this chapter for more details). Once smb.conf has been tested for syntax errors, you are prompted to "Press Enter..." to see a dump of current service definitions. Pay attention to the options listed under the displayed[global]section - these are the global defaults (both explicit and implicit) as specified by smb.conf.
Some options are obvious candidates for general server configuration; others obviously have no place in this section. We'll use the following example to highlight some of the command entries found in the [global] service.
;======= Global Declarations ========

[global]
        workgroup = syroidmanor
        socket options = TCP_NODELAY SO_RCVBUF=8192 SO_SNDBUF=8192
        netbios name = hydras
        server string = Samba %v on Hydras

;interface options
        hosts allow = 192.168.0. localhost
        interfaces = 192.168.0.100/24
        bind interfaces only = yes

;security stuff
        encrypt passwords = yes
        security = user
        invalid users = root bin daemon adm sync shutdown

;browsing election options
        local master = yes

;Unix users can map to different SMB User names
        username map = /usr/local/bin/smbusers

;separate log files for each user
        log file = /usr/local/lib/samba_logs/log.%m
        max log size = 100
The first block specifies the workgroup (syroidmanor), and the NetBIOS name used by the server (hydras). The server string option appears as a comment under some supported utilities; the %v is a substitution variable replaced with the Samba version.
Socket options set the parameters Samba uses for the network interface. Always add TCP_NODELAY unless you have a specific reason not to - it tells the server to send even small packets to keep the data transfer delay low and improves performance dramatically. The SO_RCVBUF and SO_SNDBUF options fine tune the send and receive buffer sizes used by the socket. Optimal entries here will depend on your OS and the load it's under.
The interface options block determines the client IPs that are allowed to connect to the server and which interface(s) Samba is to listen for connections. encrypt password = yes is necessary if you're logging into Samba from a Windows 98/NT/2000 client. The security option determines how users are authenticated. The invalid users line specifies any users that are not permitted access to shares. Security issues are examined in more detail later in this chapter.
In the above example, hydras is the master browser for syroidmanor. Again, we'll touch briefly on the topic of browsing and elections shortly.
The username map option points to the file used by Samba for mapping a user name with an alternate entry. The smbuser file - which is a text file - has two uses:
The username map file takes the form UnixUsername = SMBUsername with whitespaces separating the equal sign. You can also map NT groups to a dissimilar, but functionally equivalent, UNIX group. For example:
toms = TomSyroid
bilbrey = BrianBilbrey
user = @accounting
nobody = *
The last line maps any client name that does not have a valid entry in the file to the user nobody.
[homes] sectionIf a [homes] section is present in smb.conf, this allows a client to connect to a user's home directory on a Samba server without an explicit share present. Samba, in effect, creates a new temporary share "on the fly". Here's how this works:
When a connection request is made, the server scans all existing sections for a match. If one is found, the connection is established using the entry provided. If a match is not found, the share portion of entry is parsed and the smbpasswd file is scanned for an equivalent user name. If the user exists, and the correct password has been entered, a share is dynamically created based on the options listed under [homes].
This is an important section to understand (especially in an environment supporting a large number of users), so let's work through a concrete example using the following code block:
[homes]
   comment = Home Directories
   browseable = no
   writable = yes
   preserve case = yes
   create mode = 0750
User janetb sits down at her Windows system and tries to map a share on the network file server by typing \\hydras\janetb. Samba scans all existing share definitions and finds no section titled [janetb]; if it did, a connection would be established to this share providing the correct password was supplied. Next, Samba checks the smbpasswd file for the presence of user janetb. The user exists, and the password matches. A share is created to /home/janetb, browseable by Janet, and writeable by Janet. When a file is saved to this directory, case is preserved (important, as Windows 9X typically pays no attention to case, while Linux does) and file permissions are set to rwx r-x ---.
Obviously, the /home/janetb directory must exist before the connection can be established. However, if your system is set up with a different user directory structure, place a combination pathname/variable in [homes]. The option:
path = /user/data/%S
parses the share portion of the request (in our example above, janetb), and substitutes this name in place of the "%S" resulting in a query to connect to the directory /usr/data/janetb. For a complete list of substitutions supported by Samba, see Appendix C, Table C-1, of Using Samba.
Warning
If guest access is allowed in the[homes]section ("public = yes"), keep in mind that all home directories will be accessible to all clients, without a password. In the unlikely event someone might find this desirable, we strongly advise making this section read-only.
The [printers] section works in much the same way as [homes], except for printers. It defines how printing services are controlled if no specific entries are found in smb.conf. When a printing service is requested, Samba scans the configuration file for a matching entry. If no match is found, the server's /etc/printcap file is read and any defined printers are made available based on the options provided.
[printers]
   comment = All Printers
   browseable = yes
   path = /var/spool/samba
   printable = yes
# set public = yes to allow guests to print
   public = no
   writable = no
   create mode = 0700
The comment, browseable, and create mode entries function the same as discussed in the [homes] section. path = defines where print jobs are spooled. The [printers] share must be set printable = yes or the server will refuse to load the printer definition from /etc/printcap. The public entry determines whether the guest account can print using this share.
There are about as many variations on individual share blocks as there are people using Samba. In this section we look at several common examples that should get you headed in the right direction. For additional ideas, check out /etc/samba.d/smb.conf.default. If you compiled Samba from source, you'll find numerous examples for a wide range of implementations under PathToYourSambaSource/examples.
The following share provides a temporary, writeable (note that read only = no and writable = yes are the same thing) directory for users. Guest access, meaning a user can access the share without providing a password, is permitted.
[temp]
   comment = TMP Files
   path = /tmp
   read only = no
   guest ok = yes
The next example shares the directory /home/tom/webs. The only valid users allowed access are tom and leah. Any files created within this share (including files created in subdirectories) will have permissions set to rwx --- --r and any directories will be set to rwx --- --x.
[webs]
   comment = Tom's Web Pages
   path = /home/tom/webs
   writable = yes
   valid users = tom leah
   create mode = 0704
   directory mode = 0701
Here the /usr/local directory is shared; access is granted to anyone belonging to the group users.
[local]
        comment = User Local on Hydras
        path = /usr/local
        writable = yes
        valid users = @users
If you want to restrict access to specific branches of filesystem's tree, use the dont descend option, like so:
[root]
   comment = Root Dir
   path = /
   read only = yes
   dont descend = /proc /etc /var
Authenticated users are restricted from accessing the /proc, /etc, and /var directories. We include the above example only for illustration - sharing the root filesystem is not advised.
Finally, a printer example:
[lj6]
   comment == Network LaserJet 6L
   browseable = yes
   guest ok = yes
   force group = nobody
   writable = no
   printable = yes
   printer name = lj6
The share is browseable, and can be access without a password. The force group option sets the effective group assigned to all users connecting to the share, and overrides a user's normal group. printer name changes the default name Linux assigns the printer (typically lp; drawn from /etc/printcap) to lj6.
There are three broad means of securing a Samba server:
Each of these security methods are discussed in the pages to follow.
This topic primarily applies to systems that are "dual homed" - that is, they act as both a file server and Internet gateway to a LAN. Most administrators who maintain systems configured in such a role do not want to give the world access to internally offered Samba shares. So how do you maintain gateway services on a server and provide SMB shares to an internal network? Simple, actually - you tell Samba to "listen" for requests on a specified interface. Insert the following lines under the [global] section of smb.conf:
#interface options
        hosts allow = 192.168.0. localhost
        interfaces = 192.168.0.100/24
        bind interfaces only = yes
This tells Samba to bind itself (listen) only on the interface designated as 192.168.0.100 (with a netmask of 255.255.255.0), and only allow host connections originating from the 192.168.0 network to connect to the server. Two points to note here. First, always make sure you include "localhost" in the "hosts allow" option; some of Samba's internal maintenance functions (for example, the smbpasswd utility) require access to this internal address before they function. Second, if you include a specific IP to bind to, you must also include the "bind interfaces only = yes" line to enforce this option.
If you must open your Samba server to "the world", then the safest way to do this (relatively speaking) is to leave the interfaces and bind interfaces only options out of the equation and enforce a "hosts allow" IP for each machine connecting. Keep in mind that the smb protocol is not a secure way to transmit data, so we do not recommend this approach.
DANGER, WILL ROBINSON
Let's be even more clear - Please don't do this. Running an unrestricted SMB server on an Internet connected box is a sure hack. If not today, then tomorrow.
You could also use the hosts allow option to restrict access to the Samba server to a range of IPs, however this is probably easier accomplished using user authentication.
When a user tried to establish a connection to a Samba share that does not allow guest access, that user must be authenticated. Samba currently supports four levels of authentication:
User authentication is specified in the [global] section, using the security = (share | user | server | domain) option. From a technical perspective, there is not a lot of differentiation between share- and user-level security. Superficially, under share-level security there are no user restrictions to share access, as long as the common password is supplied. Under the covers, however, Samba still validates the password supplied against its username/password database except if the guest ok or public option is set (in which case the user specified by the guest account options are used).
Generally speaking, share-level security is not a good authentication method, and should be avoided if at all possible, since it doesn't perform any user validation whatsoever. A share with share-level full permission can be read from or written to by anyone connected to the network. The finer grained control of user-level security is much less vulnerable to abuse.
The Server- and domain-level security options are relatively self-explanatory. To add a Samba server to an existing NT domain, first stop the Samba daemons. Next, you must sync the smbpasswd file with the domains PDC using the command:
smbpasswd -j syroidmanor -r velocity
In the example shown, syroidmanor is the Windows workgroup the Samba server is a member of, and velocity is the NT PDC.
Finally, add the following options to the [global] section of smb.conf:
[global]
   security = domain
   domain logins = yes
   workgroup = syroidmanor
   password server = velocity
Then restart the daemons.
Passwords are a rather prickly issue under Samba, due in large part to how the various flavors of Windows transmits user authentication. A quick glance at Table 27-1 should tell the story.
Table 27-1
Encrypted passwords under Windows?
| Platform | Encyption |
| Windows 95 | Not encrypted |
| Windows 95, SR-1 | Encrypted |
| Windows 98 | Encrypted |
| Windows NT 3.X | Not Encrypted |
| Windows NT 4.0 pre SP3 | Not Encrypted |
| Windows NT 4.0 post SP3 | Encrypted |
| Windows 2000 | Encrypted |
The simple solution is to use Windows 98, NT 4 post SP3, or Windows 2000 for all your clients. This necessitates the addition of encrypt passwords = yes in the [global] section of smb.conf.
If for some reason this solution is not feasible within your organization, or you feel your network is secure and clear-text passwords in conjunction with standard UNIX /etc/passwd authentication is adequate, there are workarounds available. First, however, encrypted passwords must be disabled on the client. The requisite files required are available from the Samba website (http://www.samba.org) and are named NT4_PlainPassword.reg and Win95_PlainPassword.reg (which also works under Windows 98) respectively. After installation, the client must be rebooted.
Now edit the smb.conf file to reflect this change:
[global]
   security = user
   encrypt passwords = no
Secrets of the Linux Masters
Unlike many server processes, Samba's daemons do not need to be restarted after changes are made to smb.conf. The program periodically (by default, every 60 seconds) re-reads the configuration file and institutes any changes it finds.
Once authenticated, Samba provides numerous option statements that allow the administrator to control who can access a share, and what actions they can perform. We've already seen several of these options in the examples section earlier in this chapter, but we'll touch on a few more here to round out this discussion of security.
Consider the following share section:
[sales]
   path = /home/sales
   comment = ACME Sales Staff Home
   writeable = yes
   valid users = joep janed mirtleg
   admin users = toms
Here the fictitious ACME sales staff home directory is shared for read-write access. Note, however, the only users permitted to connect are Joe, Jane, and Mirtle. In addition, Tom has been granted administrative rights to the share, giving him superuser (root) authority on all files contained therein. This example could be further fine-tuned to provide read-only access to all valid users, and write-level access to specific individuals.
[sales]
   path = /home/sales
   comment = ACME Sales Staff Home
   read only = yes
   write list = joep janed mirtleg
   admin users = toms
We'll close this section with a cursory glance at browsing, elections, and several Samba options that pertain to the configuration of these services.
Browsing is the capability for a client machine to see the resources offered by the servers on a network. If a Samba share has the browseable option set (the default), from a Windows client (under Network Neighborhood) it displays as a subdirectory under the icon representing the host server. Generally, you'll want to leave browsing enabled for most shares except those you want hidden from users. For example, the [homes] section is typically set browseable = no so it does not appear as an available resource; only the user's home directory displays after they have been authenticated.
One machine on each subnet maintains a list (called the browse list) of all machines actively offering shares - this machine is called the local master browser. As machines come and go from the network, this browse list is updated by the local master browser and made available to any server requesting it (keep in mind that any system sharing a resource is, in the context of this discussion, a server).
So what determines which machine is the local master browser? There are two methods:
local master = yes option.Here's how elections work. Each machine on a network broadcasts information about itself. Namely:
Based on this information, each machine is assigned a role; each role has a value associated with it. Table 27-2 contains a list of possible roles and their associated value.
Table 27-2
Election roles and their values
| Role | Value |
| Primary Domain Controller (PDC) | 128 |
| WINS Server | 32 |
| Preferred Master Browser | 8 |
| Active Master Browser | 4 |
| Standby Browser | 2 |
| Active Backup Browser | 1 |
Several options exist that force Samba to assume a specific role within a network. For example, you can specify that the server broadcast itself as a particular operating system using the oslevel = option. Sorting and prioritizing the machines on a network can be a tricky juggling act, and space simply does not permit us to do justice to the topic. If you're administering a complex mix of NT and Samba servers, please read the information contain in the smb.conf manual pages. In particular, search on the options oslevel, local master, and preferred master.
The last topic we'll touch on in this section is role of the domain master browser. When you have a network that spans multiple subnets, it is the role of the domain master browser to propagate browser lists across these subnets. Individual local master browsers then synchronize their browse lists with the domain master.
Unlike local master browsers, there is no election to determine which machine is a domain master browser - the network administrator manually specifies this. According to Microsoft design, the PDC and the domain master browser both use the same code to broadcast this role, so one could effectively say that the role and the machine cannot be separated. For this reason, if you have an NT server on your network acting in the role of PDC, do not specify a Samba server as the domain master browser (domain master = yes) - chaos and confuse is likely to ensue.
So far, this chapter has focused primarily on configuring a Samba server and connecting to that server using a Windows client. In this section, we'll look at how to connect to an SMB share from Linux, irrespective of the operating system hosting that share.
There are two distinct methodologies of accessing SMB share from a Linux client. The first involves the smbclient utility, which is packaged with Samba. This program provides the user with a local shell to the Samba server; and files are transferred between client and server using FTP-like commands. The second approach is to "virtually mount" the SMB filesystem similar to the way you map a drive under Windows or mount an NFS filesystem exported by a remote server.
The smbclient program is bit of a chameleon. Not only can it be used to transfer files between client and server, but it can also be used to view shares available on specified system. In the following example, the utility is used to query a server (hydras) for a list (-L) of available shares:
[tom@velocity tom]$ smbclient -L //hydras -U tom
added interace ip=192.168.0.3  bcast=192.168.0.255  nmask=255.255.255.0
Password: xxxxx
Domain=[SYROIDMANOR] OS=[UNIX] Server=[Samba 2.0.7]
   Sharename          Type         Comment
   ----------         ---------    --------------------
   tmp                Disk         Temporary File Space
   tom                Disk         Tom's Home Dir
   storage            Disk         Storage on Hydras

   Server             Comment
   ----------         ----------
   DONOVAN            Deskpro
   HYDRAS             Samba 2.0.7 on AIX
   JANUS              Win2K Workstation
   VELOCITY           Samba 2.0.6 on OpenLinux

   Workgroup          Master
   -----------        ----------
   SYROIDMANOR        HYDRAS
As you can see, the smbclient -L parameter provides a great deal of information about not only the SMB server being queried, but also details pertaining to the workgroup and other machines available on the workgroup.
The line under the "Password" entry displays the workgroup the system named hydras is a member of (Domain=[SYROIDMANOR]), the operating system Samba is running under (OS=[UNIX]), and the version of Samba running on hydras (2.0.7).
Under this are the SMB shares available, the type of share (Disk or Printer), and a comment (which is taken from the "comment =" line from the smb.conf file). Next is a listing of all the machines belonging to the workgroup that are currently providing SMB shares, and again an identifying comment (see now why it's important to put a comment line for all systems and shares in your smb.conf file?). Finally, the last lines show that hydras is the master browser for SYROIDMANOR.
Note that before the user can even receive a listing of available shares, he or she must be authenticated.
To invoke the file transfer capabilities of smbclient, simply drop the -L option as follows:
[tom@velocity tom]$ smbclient //server_name/smb_share -U username
If the username supplied is valid, you'll be prompted to enter a password, and upon authentication, a Samba shell prompt is displayed:
smb: \>
You are now logged into the server, in the root directory of the share specified. The current working directory replaces the backslash as you navigate the remote filesystem.
From the smb prompt numerous FTP-like commands can be entered to change, create, and remove directories (local and remote) transfer files (get/mget, put/mput), list directory contents, and send a file to a Samba-shared printer. Table 27-3 lists the most common smbclient commands; see the manual page for a complete listing or type ? or help from a connected smbclient prompt.
Table 27-3
A partial listing of common smbclient commands
| Command | Parameters | Description |
| ? or help | [command] | Provides a list of available commands or help on a specific command. |
| ! | [shell command] | Executes the supplied shell command using the shell of the local system the smbclient was executed from (under OpenLinux this would typically be the bash shell). |
| cd | [directory] | Changes directories on the SMB server (not the local system). If no directory is supplied, smbclient provides the current working directory (i.e., pwd). |
| lcd | [directory] | Changes to the directory specified on the local machine. If no directory is supplied, smbclient reports the current working local directory. |
| del | [files] | Deletes the files specified from the server, providing the user has appropriate permissions to do so. Typical wildcards (*,?, etc.) are permitted. |
| dir or ls | [files] | Lists the files contained in the server's current working directory. Wildcards are valid. |
| pwd | none | Displays the current working directory on the remote system. |
| exit or quit | none | Exits from the smbclient program. |
| get | [remote file] [local name] | Retrieves the remote file specified from the server and places it on the local client; the get command works on the current working directory for both remote and local systems. If a local name is specified (optional), the file is renamed on the local system as appropriate. Note: get and put retrieve and copy a single file only; use mget and mput for multiple files. |
| mget | [files] | Copies a group of files - indicated by wildcard patterns - from the server to the local machine. |
| prompt | none | Toggles interactive prompting on and off for mget and mput. If prompting is enabled, the user is asked to confirm (Y/N) each file transfer requested. |
| lowercase | ON or OFF | When enabled (ON), smbclient converts all files transfer with get or mget to lowercase (but not put or mput). |
| md or mkdir | [directory] | Creates a new directory on the server; provided the user has permission to do so. |
| rd or rmdir | [directory] | Removes the specified directory from the server, again, given appropriate permissions. |
| put | [file] | Copies the named file from the local machine to the server. |
| mput | [files] | Copies a group of files (using wildcards) from the local machine to the server. |
| setmode | [filename +/- rsha] | Sets a file's attribute bits using Unix-style modes. r is read-only, s is system, h is hidden, and a is archive. Be VERY careful using this command if the file is shared across diverse platforms (e.g., Windows, Unix, NFS). |
| [file] | Prints the specified file on the server, if the remote machine has a shared printer configured. | |
| queue | none | Displays all the print jobs queued on the remote server. |
In addition, smbclient has mask and recursive commands available for large file transfers; again, see the smbclient man page for details.
Samba's smbclient program is a good tool for transferring a file or two between systems, but if you need routine access to a diverse number of files stored on an SMB share, there's a better approach - mount the filesystem. Mounting an SMB share renders it indistinguishable from a local filesystem, whether you're working from the command line or from the X environment. This means that an SMB mounted filesystem will appear as just another directory under KDE's file manger (KFM), and be accessible from an application's Open/Save dialogs.
Warning
A word of warning goes along with the convenience of mounting SMB shares locally - always remember to unmount the share before shutting down your machine. Failure to do so can cause the shutdown process to hang, and occasionally data can be lost that has not yet been written to the remote filesystem.
There are two command forms available for mounting SMB shares. Which you use is dependent on the options your kernel was compiled with, and the options Samba was compiled with. If your kernel was compiled with the smbfs filesystem either as a module or built in to the kernel, you can mount an SMB filesystem completely independent of Samba. The structure of kernel-supported mount command is:
[tom@velocity tom]$ mount -t smbfs -o [options] //server/share /mount_point
An alternative approach - providing Samba was compiled using the --with-smbmount option - is similar, with the requested share and mount point order reversed.
[tom@velocity tom]$ smbmount //server/share /mount_point -o [options]
Either option is available under OpenLinux distributions; both the kernel and Samba package are compiled for SMB mounts.
More Info
The Samba team does not officially support thesmbmountcommand. It is included in the source code as a convenience to users. When thesmbshcommand (discussed later in this chapter) becomes functional, thesmbmountutility will be either deprecated or removed from the source packages entirely.
Before providing a concrete example, please note the following cautions and prerequisites regarding mounting SMB shares:
mount command, without going through a variety of contortions.mount command will succeed, but only root will have access to the share.With that bit of administrative flag waving out of the way, the following example mounts the Samba share "storage" available on hydras (a network file and web server), for access by user tom, on the pre-defined mount point of /home/tom/stor:
[root@velocity tom]$ mount -t smbfs -o \
username=tom,password=xxxxx,uid=tom,gid=users //hydras/storage /home/tom/stor
Let's break down the preceding example; please note that it's split over two lines due to page layout constraints; the actual command is entered on a single line.
The -t switch specifies the mount as filesystem type smbfs.
The -o options are as follows: the username and password supplied are those required by the Samba server (not the local system); the uid (user ID) and gid (group ID) options are those used by the local system (not the server).
Next comes the Samba server name (//hydras, in the example, but this could also be a static IP in the form of xxx.xxx.xxx.xxx) and share name (storage).
Finally, the local filesystem mount point is given - again, the directory must exist before the command is issued.
While at first glance entering such a mount command with a visible password appears to be a gross breach of system security, in fact the password is visible only at the time it is typed. Once the mount is in effect, invoking a ps -ef command shows the password masked by a string of x's. However, you should exercise caution when putting such commands in scripts; also be aware that the mount command appears in your command history file. Figure 27-3 shows a mounted Samba share, displayed under KFM.
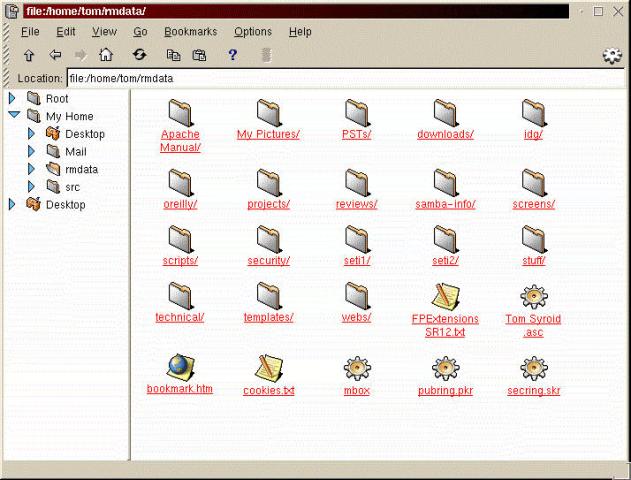
Figure 27-3
A mounted Samba share viewed from KDE's File Manager
Given the length and complexity of the SMB mount command, it would be nice if you could just type it once and have the share (or shares, if you routinely connect to more than one) automatically accessible every time the system is restarted. Like most other things under Linux, it's possible to do so, however it's important to put the entry in the correct file.
You can place the mount line for an smb share into /etc/fstab. However, since it is a remote filesystem, it cannot be auto-mounted at the same time as the local partitions. Putting "noauto" in the options, as shown below, prevents OpenLinux from attempting to mount the share before the network connections are active. The backslash after "smbfs" continues the mount specification onto a second line.
#  added to /etc/fstab by tom, 09/07/2000
#  mount this at end of boot process by adding
#  mount /home/tom/stor
#  to the end of /etc/rc.d/rc.local
//hydras/storage /home/tom/stor smbfs \
        user,noauto,rw,username=tom,password=xxxxx,uid=tom,gid=users 0 0
The advantage of this method is that /etc/fstab is readable and writeable only by root, which makes it a more secure option than putting the whole mount command into the world-readable rc.local file. In addition, by having "user" in the mount options you can manually unmount the share prior to shutdown without having to become the superuser first.
To unmount an SMB share initiated either with the mount -t smbfs... command or via an entry in the /etc/fstab file, simply type umount /path-to-local-mount-point (note there is no 'n' in the umount command). To unmount a share mounted with the smbmount command, use Samba's matching smbumount in a similar manner.
There is a third option on the horizon for mounting remote SMB shares on a local client. Unfortunately, at the time this was written, "door #3" was just that - on the horizon and still under development. We say unfortunately, because when the code is finally functional it will afford the user a fast and flexible means of connecting to and accessing all the filesystems shared by a given workgroup with a single simple command.
The client-side program is smbsh. The options and syntax are outlined in Samba utilities, following this section. When the command is run, the user is authenticated against all SMB servers in the workgroup and given access to shares as appropriate. The servers are displayed under the default local directory /smb, with individual file and printers shares listed as branches of the hierarchy. As near as we can discern, these shares will be visible as psuedo filesystems, and as such, visible from any application on the system (X-applications included).
At this stage of the game, the problem lies not with the smbsh command itself, but with its reliance on the smbwrapper compiler option - which is badly broken (as of Samba 2.2, alpha 0). Hopefully by the time this book hits the shelves the Samba team will have the bugs worked out, and you'll have yet another option in your toolkit for accessing remote shares.
In addition to the smbclient program detailed in the previous section, Samba ships with several additional utilities. Most of the programs detailed here are targeted at administrative tasks. From the causal user's perspective, the only Samba command-line utility of significance in this section is smbpasswd.
Note
Some of the utilities listed in this section are not included in the pre-compiled package bundled with OpenLinux. Some of the program discussed below can be downloaded as individual packages from the Samba site (http://www.samba.org); others are only available when Samba is compiled from source.
smbpasswdsmbpasswd does exactly what its name implies - it changes or sets a user's Samba password. The program has two distinct "personalities", however, governed by who invokes it.
When run by a regular user, smbpasswd changes their encrypted password.
When run by root, smbpasswd updates the encrypted password file. When run by root using the "-a" option, smbpasswd adds a user to the Samba password file.
In addition, the smbpasswd program can also be used to change or update a user's Windows password on a remote primary domain controller.
Note that the smbpasswd command will fail under the following conditions:
Here are several examples of the correct usage of the smbpasswd command:
smbpasswd - used without any options, this command changes the encrypted Samba password for the user who invoked it, prompting for old and new passwords.smbpasswd -r remote_system - changes the user password on a remote system. This machine must be a primary domain controller.smbpasswd -U username - used in conjunction with the "-r" option above to modify a username spelled differently on a remote system.smbpasswd username - (root only) changes the encrypted password for the user specified.smbpasswd -a username - (root only) adds the supplied username to the smbpasswd database.smbpasswd -d username - (root only) disables a user from connecting to Samba shares.smbpasswd -a username - (root only) enables a disabled user.smbpasswd -j domain_name - (root only) adds a Samba server to an NT domain.For more information, type man smbpasswd at the command line.
mksmbpasswdmksmbpasswd is a utility specific to Caldera's distributions; it is not part of the Samba project. It is used to copy the contents of the system passwd file and used as a one-time tool to create building blocks of a working smbpasswd file. Note that mksmbpasswd does not physically add the passwords themselves to the smbpasswd file (there are no passwords contained in the passwd file itself - just pointers to the encrypted shadow password file); it simply transfers the usernames and sets up an appropriate structure for smbpasswd. For details on its use, see our discussion earlier in this chapter under the section, "Bringing a Samba Server Online".
nmblookupThe nmblookup program is a client application that uses the NetBIOS-over-UDP/IP name service to resolve NetBIOS machine names into IP addresses. Think of nmblookup as the Windows equivalent of the Unix nslookup utility.
The command is:
nmblookup [-options] name
This utility is targeted primarily at system administrators who need to troubleshoot and/or manage a network supporting a large number of Samba shares.
rpcclientThe rpcclient program is a new addition to Samba's toolset, and only available when you download and compile from source. As the name suggests, rpcclient uses the RPC (remote procedure call) interface to test an NT client's RPC functions. Information returned includes session, connection, and registry details. The command line is:
rpcclient //server/share [options]
rpcclient is a testing program, primarily targeted at developers. To see a list of available options, type man rpcclient.
smbshAs previously noted, the smbsh command is still a work in progress and will remain as such until the smbwrapper code (which the smbsh command is dependent on) reaches maturity. When the smbsh program becomes available, you will no longer have to use the smbmount command to mount an SMB filesystem. The smbsh command is invoked as follows:
smbsh -U user (or user%password) -W workgroup
After the user is authenticated, a list of shares available from each machine in workgroup is displayed under the directory /smb (the default; use the -P option to specify a different root directory to mount the shares under). Individual shares are shown as sub-branches of this tree.
smbstatusThe smbstatus program lists the current connections on the server. The output is divided into three sections. The first shows the shares in use by user and connection. As you can see from the example output below, the share "tom" is being accessed from three separate machines - janus, velocity, and donovan. This section also shows the process ID of the connection (useful for killing a locked share), the IP of the connected machine, and the time the connection was first made.
The second section lists all the files Samba has locked, and the third section displays Samba's memory usage.
[Hydras:tom]/home/tom> smbstatus

Samba version 2.0.7
Service    uid    gid    pid     machine
----------------------------------------------
tom        tom    usr    14522   donovan  (192.168.0.2) Fri Sep 22 19:47:20 2000
leah       tom    usr    14522   donovan  (192.168.0.2) Fri Sep 22 21:58:10 2000
tom        tom    usr     7912   janus    (192.168.0.1) Tue Sep 26 18:45:13 2000
storage    tom    usr     7912   janus    (192.168.0.1) Tue Sep 26 18:45:18 2000
storage    tom    usr     6912   velocity (192.168.0.3) Wed Sep 27 11:49:55 2000
webs       tom    usr     7912   janus    (192.168.0.1) Tue Sep 26 18:45:22 2000
tom        tom    usr     8890   velocity (192.168.0.3) Wed Sep 27 16:19:01 2000

Locked files:
Pid    DenyMode   R/W        Oplock           Name
--------------------------------------------------
7912   DENY_NONE  RDWR       NONE             /home/tom/idg/OLS/CH27/~WRL1666.tmp   Wed Sep 27 11:03:51 2000
7912   DENY_NONE  RDWR       EXCLUSIVE+BATCH  /home/tom/idg/OLS/CH27/4670-8 ch27.r4a.doc   Wed Sep 27 15:26:13 2000
7912   DENY_NONE  RDWR       NONE             /home/tom/templates/S0004.DOT   Wed Sep 27 08:42:17 2000
7912   DENY_WRITE RDWR       EXCLUSIVE+BATCH  /home/tom/PSTs/outlook.pst   Wed Sep 27 05:54:30 2000
7912   DENY_NONE  RDWR       NONE             /home/tom/idg/OLS/CH27/~WRL1043.tmp   Wed Sep 27 15:26:13 2000

Share mode memory usage (bytes):
1046728(99%) free + 1552(0%) used + 296(0%) overhead = 1048576(100%) total
There are several useful options that can be appended to the smbstatus command, including a brief listing (-b), a list of process IDs only (-p), and a report of a single user's activity (-u username). Type man smbstatus for further details.
smbtarThe smbtar program is actually a shell script that is functionally equivalent to the Linux tar command. It can be used to backup a share on a remote Windows client. The resulting compressed file can then either be stored on the server, or fed to a tape backup device located on the server. The smbtar command takes the following form:
smbtar -s donovan -t /dev/rmt0 -x "My Documents" -p password
This example unconditionally (-x) backs up the "My Documents" share on the client donovan.
There are numerous other options available to allow incremental backups, individual file selection, etc. The smbtar command is most commonly invoked from a custom script to automate nightly or weekly backups of a number of client systems.
testparmThe testparm utility checks the specified smb.conf for syntax errors and internal consistency. The syntax is as follows:
testparm [options] smb_config_file [hostname IP_address]
If a configuration file is not specified, testparm searches the default location specified by Samba's compile-time options (usually base_samba_dir/lib/smb.conf). If a hostname and IP address is included, an additional check is made to ensure the host specified is allowed to connect to the local Samba server. It's recommended that both hostname and IP be included in such cases; a hostname alone will sometimes give misleading results.
The listing below shows the output from running testparm on a system with an error in the smb.conf file.
[tom@velocity tom]$ testparm
Load smb config files from /etc/smb.conf
Processing section "[tmp]"
Processing section "[homes]"
Unknown parameter encountered: "broweable"
Ignoring unknown parameter "broweable"
Loaded services file OK.
Press enter to see a dump of your service definitions
As you can see, the "broweable" parameter under the [homes] section is spelled incorrectly (the correct option is "browseable"). Note, however, that Samba considers the file to be "OK" (meaning it will not restrict the Samba service from running); the unknown parameter is simply ignored. This results in the [homes] share falling back to the Samba default - which is browseable. When the file check is complete, press Enter and the contents of the smb.conf file is displayed on-screen.
testprnstestprns checks the specified printer against the capabilities known by the system's /etc/printcap file. The syntax for the testprns program is:
testprns printer_name [printcap_name]
If a printcap_name is not provided, Samba uses the definition provided in the smb.conf file. If a printer is not defined in the smb.conf file, the program looks in /etc/printcap. If a definition is not found in any of these locations, an error is generated.
tcpdumpThe tcpdump program is a debugging utility used to display the packet headers on a network interface or port. The version bundled with Samba has the capability to understand the SMB protocol (most Unix tcpdump utilities do not; they are TCP/IP specific). In addition to reading and translating the SMB traffic on an interface, tcpdump also contains provisions for filtering traffic based that matches an expression. For example, the following command displays any SMB headers passed by the host server that contain the string "tom" or "brian":
tcpdump host_server and \{ tom or brian \}
The tcpdump utility is a powerful troubleshooting tool; details concerning its full capabilities are beyond the scope of this book. We commend you to the manual pages for more information.
In this chapter we've covered the basic steps involved in configuring and maintaining a Samba server - "basics" being the operative word. Samba is a flexible, powerful, and extensible product. How you implement it depends on the needs of your organization. Suffice to say that just about anything you can do with an NT server, as far as file sharing and user authentication is concerned, you can do with Samba. If you're planning any kind of complex or unique installation, we strongly recommend spending some time with Eckstein, Collier-Brown, and Kelly's Using Samba title (O'Reilly & Associates).
SWAT that allows an administrator to configure smb.conf, locally or remotely, using any web browser. SWAT is an easy to use, powerful, tool and using it guarantees any changes made to the server configuration is syntactically correct. SWAT is a good way to become familiar with the various configuration options available under Samba.[global] controls server defaults, followed by one or more blocks that set the options for the object being shared (directory or printer). Shares can be fine-tuned with a wide range of parameters that determine user access rights, file access rights (read only or writeable), the permission bits new files are created with, and much more.smbclient, or by mounting the share on the client's filesystem. This gives Linux users the ability to access the directories and files contained within a share directly either from the command line, or from a GUI application's file open/save dialogs.smbclient, Samba ships with several command-line utilities. These programs are primarily geared toward administrative tasks like checking a printer configuration, testing the syntax of smb.conf, and monitoring the status of a Samba server. The smbpasswd utility allows an administrator to add users or change an existing user's Samba password; users without administrative rights can also access smbpasswd, but can only change their own password.Go to the Table Of Contents