Chapter 7. Going Native
| If you know HTML, CSS, and JavaScript, you already have the tools you need to develop Android applications. This hands-on book shows you how to use these open source web standards to design and build apps that can be adapted for any Android device -- without having to use Java. Buy the print book or ebook or purchase it in iBooks. |
Our web app can now do many things that a native app can do: launch from the home screen, store data locally on the phone, and operate in offline mode. We’ve formatted it nicely for the device and set up native looking animations to provide feedback and context to the user.
However, there are still two things that it can not do: it can’t access the device features and hardware (e.g. geolocation, accelerometer, sound, and vibration), and it can’t be submitted to the Android Market. In this chapter, you will learn how to extend the reach of your web app beyond the normal confines of the browser using an open source project called PhoneGap.
Intro to PhoneGap
The mobile landscape is littered with devices, platforms, and operating systems. If you are a web developer, you might be familiar with the agony of testing 10 or so browser versions across 10 or so operating system versions. Multiply that by 100 and you have mobile. There is simply no cost effective way to develop and test across all of the possible combinations.
Enter PhoneGap. PhoneGap is an open-source development tool created by Nitobi (http://www.nitobi.com/) that acts as a unified bridge between web apps and mobile devices. It essentially consists of a native app project template for each of the major platforms, where each project is just a chromeless web browser with heightened permissions. What this means in concrete terms is that PhoneGap makes it possible to add a single snippet of JavaScript to your web app that will give you access to the camera on an iPhone, a Nexus One, a Palm Pre, and others.
Furthermore, the resulting app—although written by you with HTML, CSS, and JavaScript—is encased a native app and can be submitted to the respective app store for the platforms in question. Currently, iPhone, Android, BlackBerry, Palm, Symbian (Nokia) and Windows Mobile are supported, and Window Phone 7 is in development.
Of course, different devices have different features. Maybe a particular device doesn’t have a camera, or doesn’t have an accelerometer. Even when devices do have the same features, they each have their own way of exposing these features to the developer. PhoneGap abstracts the APIs for the most widely available mobile phone features so mobile application developers can use the same code everywhere. You still need to deploy your app manually using the SDK (Software Development Kit) provided by the vendor, but you don’t need to change your application code.
Note
There are other projects and products available that serve a similar purpose as PhoneGap such as RhoMobile (http://rhomobile.com/) and Titanium Mobile (http://www.appcelerator.com/), but I prefer PhoneGap because it allows you to write a standard web app and drop it into a native code environment virtually unchanged.
Every other product that I've looked at requires you to write code based on a proprietary framework that only outputs native code—i.e. you aren't writing HTML, CSS, and JavaScript that would run in a browser. I’m not familiar enough with them to do an in depth comparison, so you might want to check them out in case one suits your needs better than PhoneGap.
Since this is an Android book, I’m going to focus on the Android branch of PhoneGap. Just be aware of the fact that you could potentially deploy your app to iPhone, Nokia, Palm, and other popular devices with little or no modification.
Download the Android SDK
PhoneGap works in conjunction with the Android SDK, so before we can get started with PhoneGap, we need to download and install the Android SDK itself. Follow the steps here to do so:
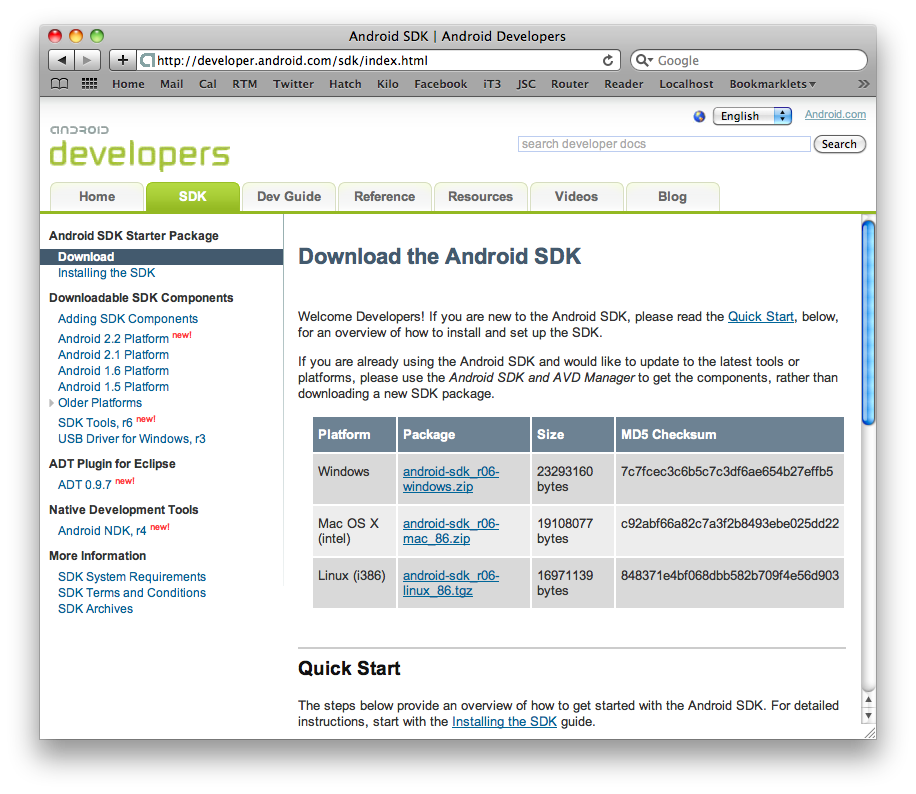
Navigate to the Android SDK download page (http://developer.android.com/sdk/index.html) and download the package appropriate for your platform. If you are on Windows or Linux, you will need to install Java (see http://java.sun.com/javase/downloads) first. My development machine is a MacBook Pro running Mac OS X 10.6 so in my case, the appropriate package is
android-sdk_r06-mac_86.zipfor Mac OS X (Intel) (Figure 7.1, “Download the appropriate Android SDK for your development machine.”). (The 06 in the SDK file name refers to the version of the Android SDK and may be different at the time you read this.)Warning
Java comes preinstalled on Mac OS X and is available in most Linux package managers. If you install it on Windows, you'll need to set your JAVA_HOME environment variable. Follow the instructions in the section called “Setting Up the Environment”, but instead of modifying the PATH environment variable, create a new environment variable called JAVA_HOME and set it to the directory that Java was installed in (such as
C:\Program Files\Java\jdk1.6.0_21).Figure 7.1. Download the appropriate Android SDK for your development machine.
Unzip the downloaded archive to whatever directory you like. I’m going to put mine on the desktop.
Warning
On Windows, you won't be able to use the ~ shortcut for your home directory. Also, you should avoid spaces in the path names, so if you are on Windows XP (which puts at least two spaces in your home directory due to home directories residing in
Documents and Settings), you should create a directory such asC:\Sourceinstead of putting things on your desktop.For simplicity sake, I’m going to rename the unzipped SDK directory to "Android".
Launch the Terminal application and navigate into the tools subdirectory of the Android SDK directory. If you’ve been doing the same thing I’ve done (put it on your desktop and renamed the directory), the command to do this is:
cd ~/Desktop/Android/tools/On Linux, the command will be the same (if you put the
Androiddirectory in theDesktopsubdirectory of your home directory). On Windows, the command would be something like:cd %USERPROFILE%\Desktop\Android\toolsEnter the following command to launch the Android SDK and AVD Manager. On the Mac or on Linux, the command is:
./androidOn Windows, the command is:
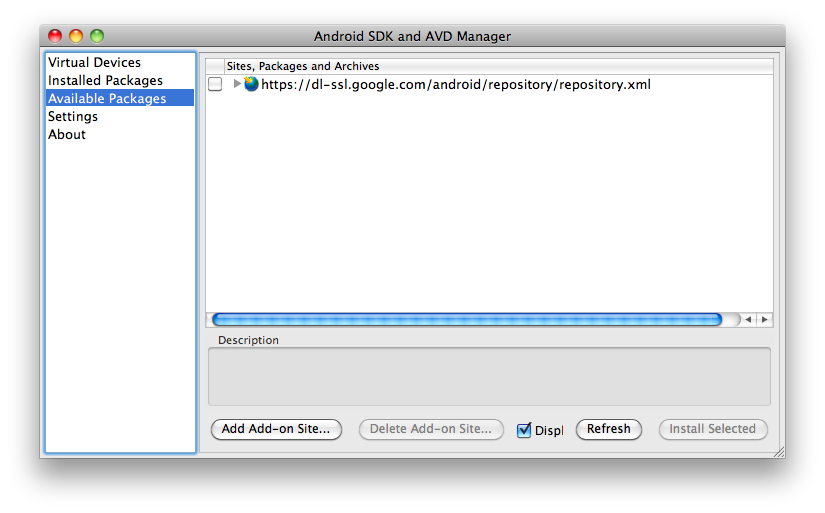
androidWhen the Android SDK and AVD Manager window opens, click on Available Packages in the left sidebar. You should see a single item appear in the Sites, Packages, and Archives panel (Figure 7.2, “The Android SDK and AVD Manager is used to download SDK packages for particular versions of the Android OS.”).
Figure 7.2. The Android SDK and AVD Manager is used to download SDK packages for particular versions of the Android OS.
Check the box next to
https://dl-ssl.google.com/android/repository/repository.htmlto install all of the available packages and archives. (See Figure 7.3, “Check the box next to https://dl-ssl.google.com/android/repository/repository.html and click the Install Selected button.”)Click the Install Selected button in the lower right corner of the window.
Figure 7.3. Check the box next to
https://dl-ssl.google.com/android/repository/repository.htmland click the Install Selected button.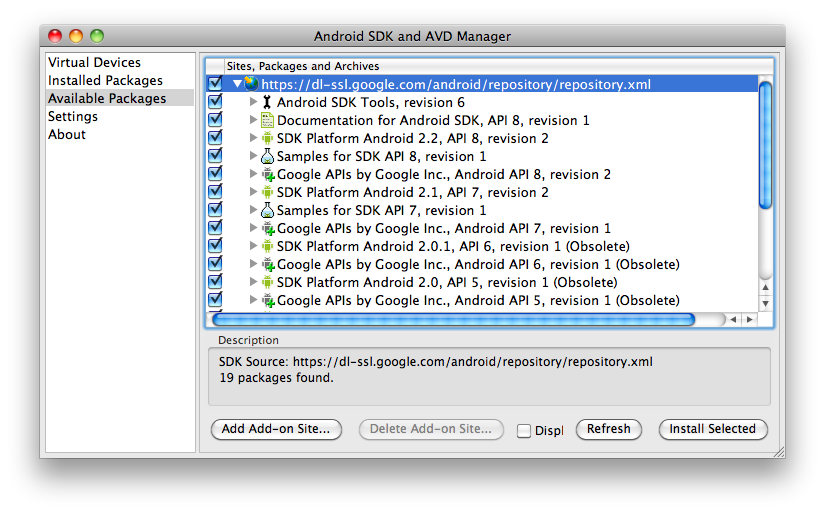
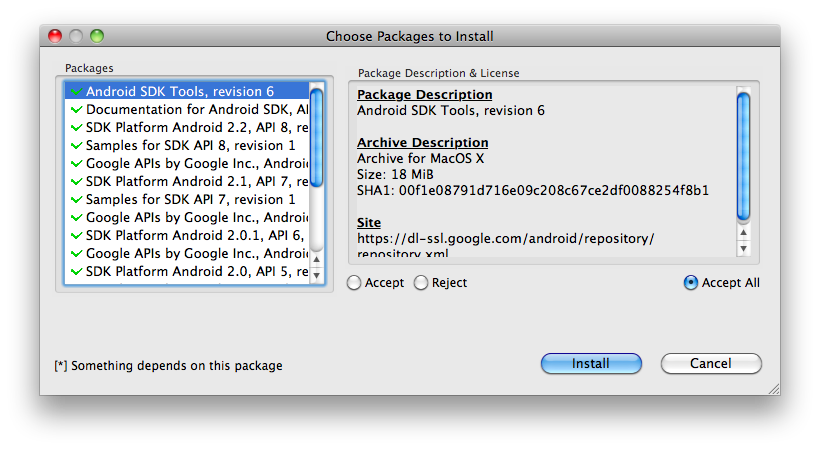
A window will appear asking you to accept the license terms. Read the terms, check the box next to Accept, and click the Install button to begin your download (Figure 7.4, “Read and accept the platform description and license, and click the install button.”).
Figure 7.4. Read and accept the platform description and license, and click the install button.
When your download completes, click Close to close the download window.
On Mac OS X, select Quit Android from the Android menu to leave the Android app. On Windows or Linux, simply close the window.
Download PhoneGap
Now that we have the Android SDK installed, we can use PhoneGap to create an Android project based on our web app.
Note
In order to ensure that the instructions in this book will continue to work long into the future, I have forked the main phonegap-android project and intend to keep a relatively static version. Once you become comfortable using my version of PhoneGap for your Android development, you might want to visit the main page for the PhoneGap project (http://phonegap.com) to see if there is anything new and exciting that you might want to incorporate into your apps.
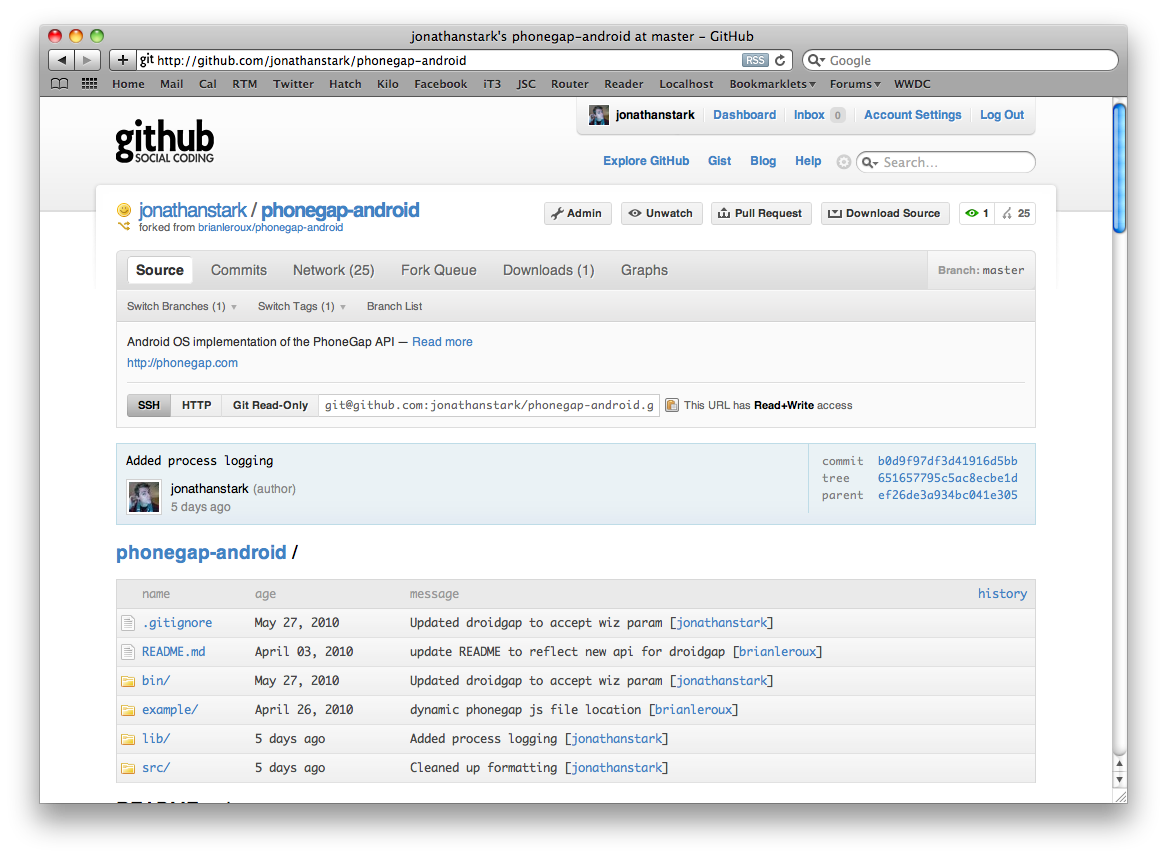
Navigate to my Android PhoneGap download page on GitHub (http://github.com/jonathanstark/phonegap-android) and click on the "Download Source" button in the top right under the search box (Figure 7.5, “My PhoneGap Android page will ensure forward compatibility for the examples in this book.”).
Figure 7.5. My PhoneGap Android page will ensure forward compatibility for the examples in this book.
When prompted to select an archive format, click on the big ".zip" icon. Note that the download graphic will stay open even after the file has been downloaded.
Unzip the downloaded archive to whatever directory you like. I’m going to put mine on the desktop.
I’m going to rename the unzipped SDK directory to "PhoneGap" for the sake of simplicity.
Setting Up the Environment
In order to work together, the Android SDK and PhoneGap need to be able to find each other. To do this, you need to configure your PATH environment variable.
Your computer uses environment variables to store little bits of data that are used by programs that you run. One of these, PATH, is a list of directories that tells programs where to look for other programs. So when you type the name of a command (such as grep or findstr) in the command prompt, your computer looks in each of the directories in your PATH for the command.
On Windows, items in the PATH are separated by a semicolon, as in: C:\Windows\System32;C:\Windows. On Mac and Linux, they are separated by a colon, as in /usr/bin:/usr/local/bin.
To add a directory to your PATH under Windows, open up your computer’s System Properties. You can get to this by left-clicking your Start Menu, right-clicking on Computer (or My Computer), and selecting Properties. On Vista or Windows 7, click the Advanced System Settings link on the left. On Windows XP, click the Advanced tab.
In the dialog that appears, click Environment Variables. Under System Variables, scroll down until you see PATH, and double-click it. Be careful not to modify anything in there yet (if you make a mistake, you can always click Cancel and start over). Move the cursor all the way to the right, and add the following (with no space before the semicolon):
;C:\Android\tools;C:\PhoneGap\binReplace C:\Android with the location you put the Android SDK (such as C:\Users\yourusername\Desktop\Android), and C:\PhoneGap with the location you put PhoneGap. Click OK and dismiss the remaining dialogs.
On Mac OS X or Linux, you should find a .bash_profile file in your home directory. It will be invisible, so try running this command at the command line:
ls -l ~/.bash_profileIf that file exists, edit it by running the nano editor as shown below. If it does not exist, but you have a .profile file (use ls -l ~/.profile to find out), edit that file instead (just replace .bash_profile with .profile):
nano ~/.bash_profileNext, scroll all the way to the bottom of the file using the arrow keys, and add the following line:
PATH=$PATH:~/Android/tools:~/PhoneGap/binReplace ~/Android with the location you put the Android SDK (such as ~/Desktop/Android/tools), and ~/PhoneGap with the location you put PhoneGap. Save the file by pressing Control-O, then pressing Enter. Press Control-X to exit.
Close any open Command Prompts or Terminals, and start them again. You should be able to run commands such as adb or android from the command line. If not, see http://developer.android.com/sdk/installing.html#Installing and review the instructions there.
Note
The utility in the PhoneGap/bin folder requires that Ruby be installed on your computer. It should be installed by default on any Mac or Linux system. If you install it on Windows (see http://www.ruby-lang.org/en/downloads/), you may need to edit your PATH variable again and add the path to Ruby's bin directory (such as C:\Ruby191\bin). Don't forget to add a semicolon before the path entry as you did earlier.
Create an Android Virtual Device (AVD)
Now that we have the Android SDK and PhoneGap installed, (and our PATH variable updated), we need to create a device emulator that will allow us to test our code in a simulated environment.
To see a list of available targets, enter the following:
android list targetsI downloaded all of the SDK platforms so running this command on my machine lists four options:
jsc-mbp:~ jstark$android list targetsAvailable Android targets: id: 1 or "android-3" Name: Android 1.5 Type: Platform API level: 3 Revision: 4 Skins: HVGA (default), HVGA-L, HVGA-P, QVGA-L, QVGA-P id: 2 or "android-4" Name: Android 1.6 Type: Platform API level: 4 Revision: 3 Skins: HVGA (default), QVGA, WVGA800, WVGA854 id: 3 or "android-7" Name: Android 2.1-update1 Type: Platform API level: 7 Revision: 2 Skins: HVGA (default), QVGA, WQVGA400, WQVGA432, WVGA800, WVGA854 id: 4 or "android-8" Name: Android 2.2 Type: Platform API level: 8 Revision: 1 Skins: HVGA (default), QVGA, WQVGA400, WQVGA432, WVGA800, WVGA854Take note of the id string listed in the output for Android 1.6 (i.e. "android-4"). This SDK is the oldest platform that PhoneGap supports. Targeting the oldest platform possible is a good idea because it will allow your app will run on the most phones.
Enter the following command to create your AVD:
android create avd -n mySim -t android-4Here we’re telling Android to create a virtual device (avd) with the name (
-n) "mySim" that targets (-t) theandroid-4platform.When asked if you want to configure custom options, just type
noand press enter. The process should only take a few seconds and when it’s complete, the emulator is installed.To launch the emulator, enter the following command:
emulator -avd mySimHere we’re using the
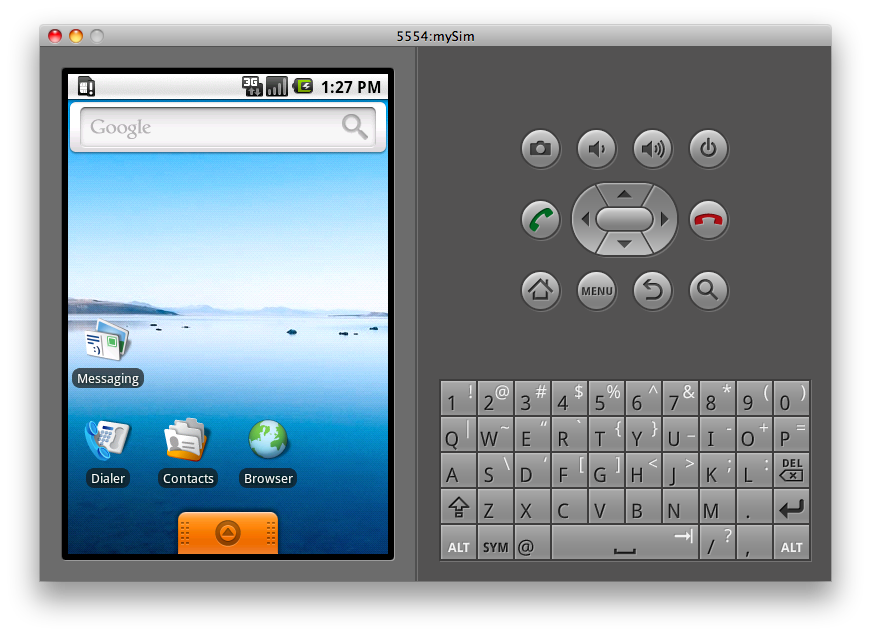
emulatorcommand to launch the Android Virtual Device that we just created. The-avdflag is followed by the name that you chose when creating your AVD in the previous step.Wait while the emulator initializes and eventually displays the phone’s home screen (Figure 7.6, “The Android Virtual Device (AVD) allows you to test and debug your app without using an actual phone.”). The first launch can take a minute or two, so be patient.
Figure 7.6. The Android Virtual Device (AVD) allows you to test and debug your app without using an actual phone.
Build KiloGap
Next, we’re going to convert our web app into a native Android app. The gang at Nitobi have created a little helper application named droidgap to help us with this. When you run droidgap, it’ll ask you a few questions, and insert your answers into a bunch of locations throughout a template to create your project. It’s very cool; in fact, if you ever run into someone from Nitobi, you should buy them a martini.
Note
The Android SDK requires Apache Ant, which is included with Mac OS X and many versions of Linux. If you’re on Windows, see http://ant.apache.org/manual/install.html. You will need to install Ant before you can run droidgap.
To begin the wizard, launch the Terminal application and enter the following command:
droidgap wizThe wizard will ask you for a few pieces of information that will be used to generate your PhoneGap project (Figure 7.7, “The droidgap wizard asks you a few questions and builds a customize Android project based on your answers.”).
Figure 7.7. The droidgap wizard asks you a few questions and builds a customize Android project based on your answers.
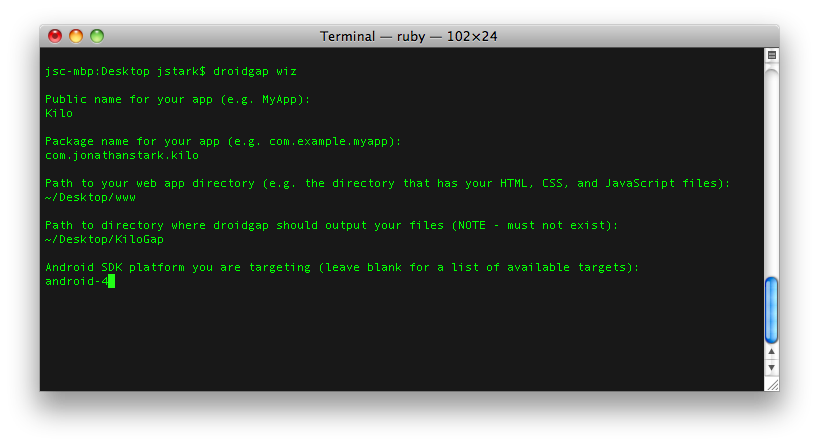
When prompted, enter a name for your app. This is the name that will be displayed to the user in various places on the phone (e.g. beneath the homescreen icon for your app, in the list of applications, etc...). I’m going to enter Kilo.
When prompted, enter a package name for your app. The package name serves as a unique identifier for your app. Typically, people use reverse domain name syntax for app package names. I’m going to enter
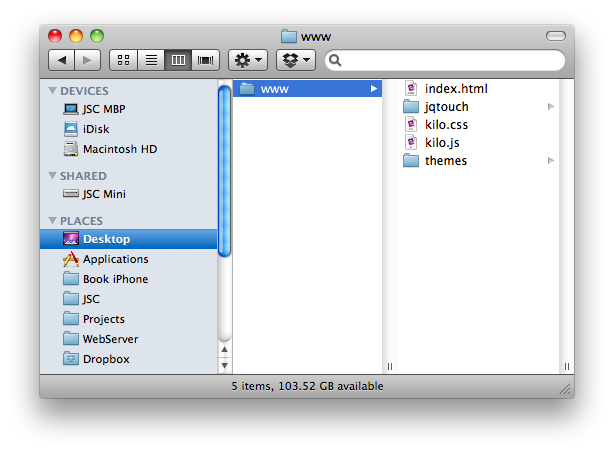
com.jonathanstark.kilobut you should use your own domain name.When prompted, enter the path to the folder on your computer that contains the HTML, CSS, and JavaScript files for your web app. My files are in a folder named www on my desktop (Figure 7.8, “My HTML, CSS, and JavaScript files are in a folder named www on my desktop.”), so I’ll enter:
~/Desktop/wwwFigure 7.8. My HTML, CSS, and JavaScript files are in a folder named www on my desktop.
When prompted, enter a directory path for your project. The directory must not already exist—
droidgapis going to create it for you. If a directory exists at the path you specify,droidgapwill give you an error and ask for a different path. I wantdroidgapto put my PhoneGap project on my desktop in a directory named KiloGap, so I’m going to enter the following:~/Desktop/KiloGapWhen prompted, enter the Android SDK platform you are targeting. If you followed the instructions above to install all Android SDK platforms (including Android 1.6), your target platform id is
android-4.If you want to target a different platform, you can get a list of available platform ids by leaving the platform id blank and pressing enter. In the list that appears, the first line of each entry will have an id displayed as both an integer and string (e.g.
id: 2 or "android-4"). Enter the string version of the id without quotes (i.e.android-4) when thedroidgapprompt returns.
After entering the target SDK id, droidgap will build your project and put the files in the output directory you specified. The process should only take a couple of seconds Figure 7.9, “droidgap will build your project and put the files in the output directory you specified.”.
Figure 7.9. droidgap will build your project and put the files in the output directory you specified.
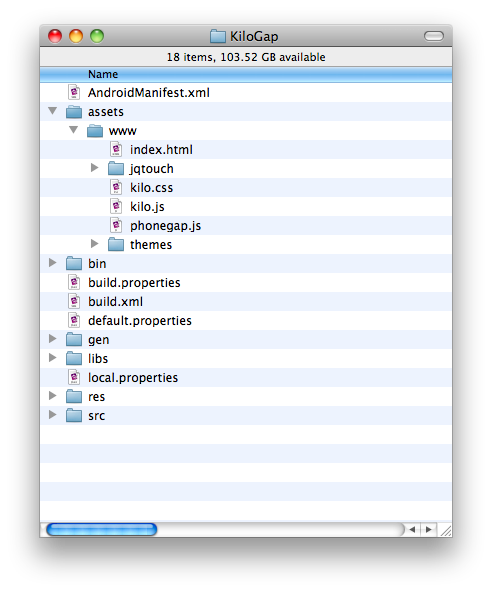 |
If you navigate to the ~/Desktop/KiloGap/assets/www/ directory, you’ll notice that droidgap has deposited a file named phonegap.js alongside your other application files. This is the file that PhoneGap uses to expose certain native device functionality via JavaScript. To make use of phonegap.js, you have to include it in the head section of your index.html file like so:
...
<head>
    <title>Kilo</title>
    <link rel="stylesheet" href="jqtouch/jqtouch.css" type="text/css" media="screen" title="no title" charset="utf-8">
    <link rel="stylesheet" href="themes/jqt/theme.css" type="text/css" media="screen" title="no title" charset="utf-8">
    <link rel="stylesheet" href="kilo.css" type="text/css" media="screen" title="no title" charset="utf-8">
	<script type="text/javascript" src="phonegap.js" charset="utf-8"></script>
    <script type="text/javascript" src="jqtouch/jquery.js" charset="utf-8"></script>
    <script type="text/javascript" src="jqtouch/jqtouch.js" charset="utf-8"></script>
    <script type="text/javascript" src="kilo.js" charset="utf-8"></script>
</head>
...
Installing KiloGap in the Emulator
Now it’s time to test our shiny new native Android app in the emulator.
If your emulator is not running, launch it by entering the following command in the Terminal application (this way, you can let it "warm up" while you’re building the Kilo package):
emulator -avd mySimYou should see the Android emulator window appear after a few seconds. Notice that the command prompt doesn’t return in the terminal window - it will sort of just sit there and hang until you close the emulator. We won’t be interacting with this window, so you can minimize it to get it out of the way.
Open a new terminal window and navigate into the KiloGap directory. In my case, the command to do so is:
cd ~/Desktop/KiloGapEnter the following command to compile your app with debugging enabled:
ant debugIf all goes well, you’ll see a stream of output with
BUILD SUCCESSFULat the end (Figure 7.10, “If the ant debug command finishes without errors, you’ll see BUILD SUCCESSFUL at the end of the output.”). A binary executeable namedKilo-debug.apkwill now be sitting in the~/Desktop/KiloGap/bindirectory (Figure 7.11, “The ant debug command will create the Kilo-debug.apk binary in the KiloGap’s bin directory.”). If the build is not successful, repeat the steps in the section called “Build KiloGap”.Figure 7.10. If the
ant debugcommand finishes without errors, you’ll see BUILD SUCCESSFUL at the end of the output.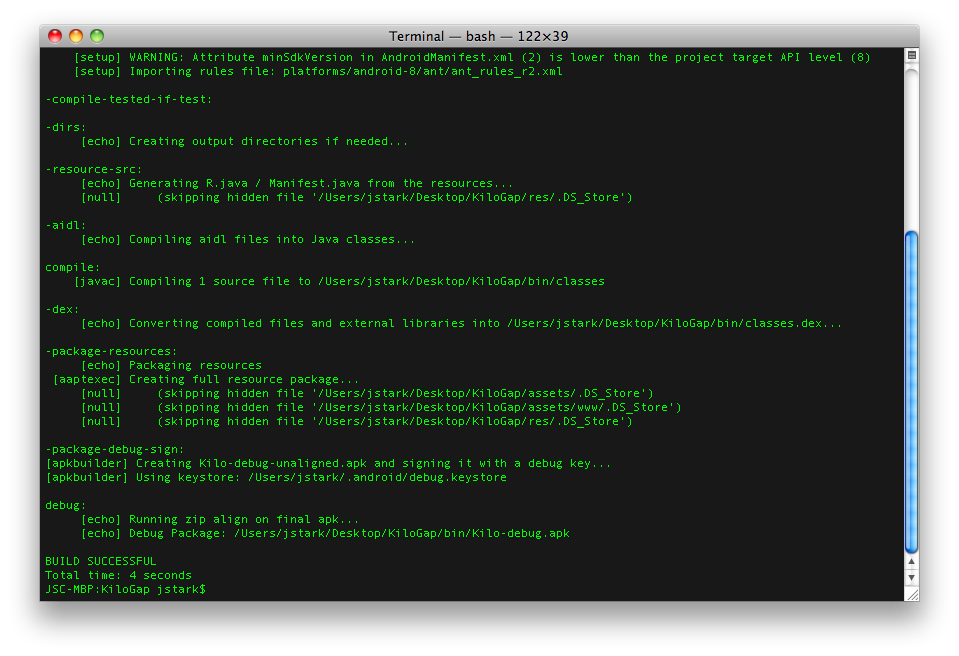
Figure 7.11. The
ant debugcommand will create theKilo-debug.apkbinary in the KiloGap’sbindirectory.
Now that we have a binary, we can install it on the emulator. To do so, enter the following command (if you're using a different location, replace
~/Desktop/KiloGap/bin/with the location of thebinsubdirectory of wherever you told droidgap to create the project back in 5):adb -e install -r ~/Desktop/KiloGap/bin/Kilo-debug.apkadbis short for "Android Debug Bridge" which is a tool that is included in the Android SDK that we installed earlier in the chapter. The-eflag tellsadbto install our binary package (i.e.~/Desktop/KiloGap/bin/Kilo-debug.apk) on the first running emulator that it finds. The-rflag tellsadbto replace the binary on the emulator if it has been installed previously. If you get an error "device offline", go into the emulator and unlock it if it’s locked (for example, on Android 2.2, slide the green lock icon to the right), then try again.
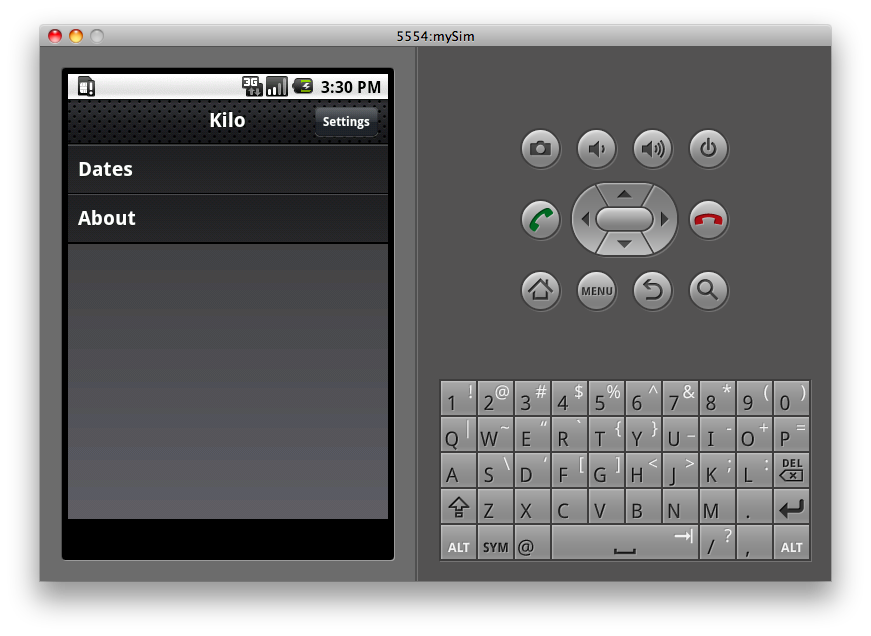
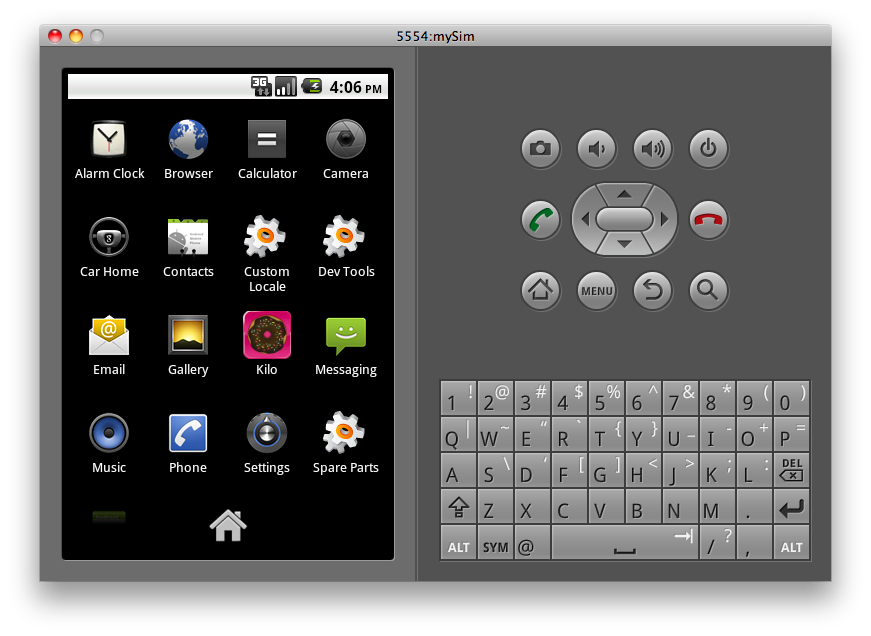
Your app is now available on the emulator just like any other application (Figure 7.12, “Your app is now available on the emulator just like any other application.”). To play around with it, locate Kilo in the application Launcher and tap it to launch the app. You’ll notice right away that there is some clean up that needs to be done. For example, there is an approximately 40px gap at the bottom of the window (Figure 7.13, “Your web app is now running as a native app on the Android Emulator.”).
Figure 7.12. Your app is now available on the emulator just like any other application.
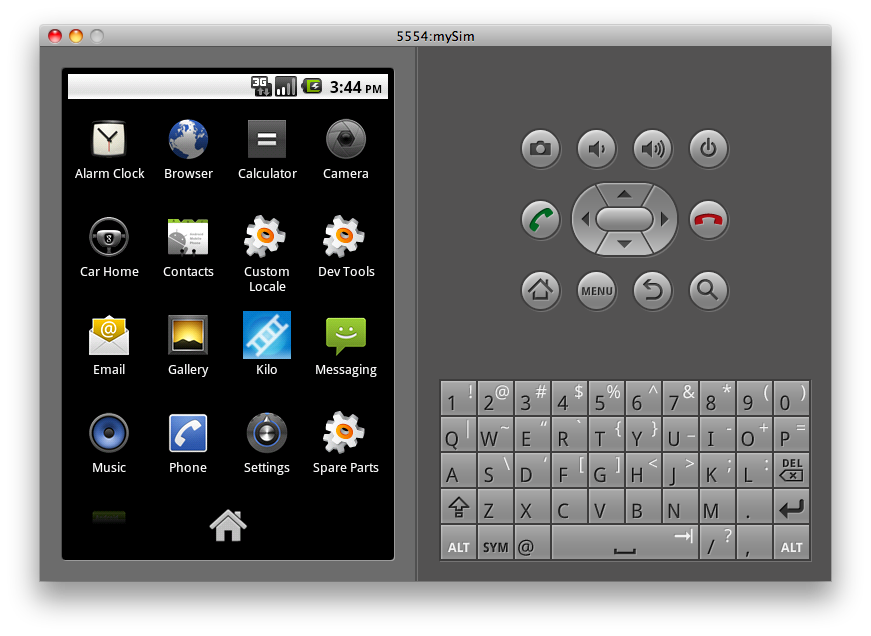 |
Figure 7.13. Your web app is now running as a native app on the Android Emulator.
 |
Using the Screen’s Full Height
This gap is due to the fact that jQTouch does not realize that we are running in outside of a normal web browser, so it’s allowing room for the browser’s toolbar. Fortunately, the fix is easy. Just open ~/Desktop/KiloGap/assets/www/kilo.js and add the following to the document ready function:
if (typeof(PhoneGap) != 'undefined') {
    $('body > *').css({minHeight: window.innerHeight + 'px !important'});
}
This code uses the typeof operator to make sure the PhoneGap object has been defined. If the code is running inside of PhoneGap, this conditional will evaluate to true. If the code is launched as a web app, the PhoneGap object will be undefined and the conditional will evaluate to false.
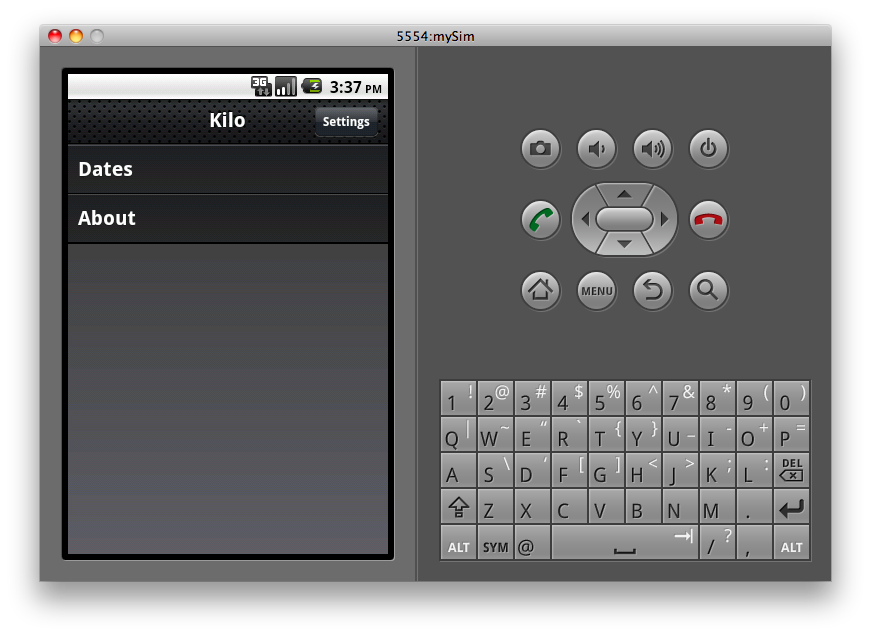
When the app is launched with PhoneGap, the immediate children of the HTML body element will be given a minimum height that matches the height of the window’s content area (455px on emulator, 508px on the Nexus One). To make sure that the declaration takes effect, I’ve added the !important directive to override any conflicting instructions elsewhere in the style sheets. Now, the app will completely fill the window when launched (Figure 7.14, “The body height has been changed from 420px to 455px. Now the app takes up the whole screen.”) .
Figure 7.14. The body height has been changed from 420px to 455px. Now the app takes up the whole screen.
 |
Customizing the App Icon
So far, our app is represented in the emulator using the default PhoneGap icon (a blue square with a ladder on it). To customize this behavior, we need to place our own image in a particular spot in the KiloGap project directory; actually, in three spots.
Navigate to ~/Desktop/KiloGap/res in the Finder and you’ll see three folders that begin with the prefix "drawable": drawable-hdpi, drawable-ldpi, and drawable-mdpi. Because Android supports a wide range of devices with varying screen characteristics, these three folders were created to hold different resolution versions of your icon graphics. ldpi is for 100 to 140 dpi screens, mdpi is for 140 to 180 dpi screens, and hdpi is 190 to 250 dpi screens.
Perfecting the display of your home screen icon across all Android devices is a graphic design issue that falls outside the scope of this book. But don’t worry–for now just replace the default PhoneGap icon.png files with a 56 pixel square .png and Android will do a really good job of rendering it appropriately on various devices. For more details on Launcher icons, please refer back to the section called “Adding an Icon to the Home Screen”. For the examples here, I’ll be using a chocolate frosted donut with jimmies on a pink background.
Once you have replaced the default icons, enter the following commands in the Terminal application to recompile and install the app:
cd ~/Desktop/KiloGap
ant debug
adb -d install -r bin/Kilo-debug.apk
When the process completes, you should see your new icon displayed in the launcher on the phone.
Figure 7.15. You can customize your app’s launcher icon by putting a .png file in each of the three drawable directories in your Android project.
 |
Installing KiloGap on your Phone
If you have an actual Android device at your disposal, you can install Kilo on it directly. The instructions for doing so are similar to the steps for the emulator installation:
Plug your phone into the USB port on your laptop.
Enable debugging on your phone by navigating to Settings > Applications > Development and checking the box next to USB Debugging.
Open a terminal window and navigate into the KiloGap directory. In my case, the command to do so is:
cd ~/Desktop/KiloGapIf you haven’t compiled it already, enter the following command in a terminal window to compile your app with debugging enabled:
ant debugIf all goes well, you’ll see a stream of output with
BUILD SUCCESSFULat the end. A binary executeable namedKilo-debug.apkwill now be sitting in the~/Desktop/KiloGap/bindirectory. If the build is not successful, repeat the steps in the section called “Build KiloGap”.Now that we have a binary, we can install it on the phone. To do so, enter the following command:
adb -d install -r bin/Kilo-debug.apkThe
-dflag tells adb to install our binary package (i.e.bin/Kilo-debug.apk) on the first connected device that it finds.
Your app is now available on the phone just like any other application. To play around with it, locate Kilo in the application list and tap the icon to launch it.
Controlling the Phone with JavaScript
The stage is now set for us to start enhancing our application with calls to the native device features. Thanks to phonegap.js, all you have to do to make the phone vibrate, for example, is to add a bit of JavaScript to your code:
navigator.notification.vibrate();
Pretty simple, right?
Beep, Vibrate, and Alert
PhoneGap makes beep, vibrate, and alert functions so simple that I’m going to lump them together into one example. Specifically, we’ll set up the app to beep, vibrate, and display a custom alert when the user creates an entry that puts them over their daily calorie budget. To do so, add the following function to the end of the kilo.js located in the ~/Desktop/KiloGap/assets/www/ directory:
function checkBudget() { var currentDate = sessionStorage.currentDate;
var dailyBudget = localStorage.budget;
db.transaction(
var currentDate = sessionStorage.currentDate;
var dailyBudget = localStorage.budget;
db.transaction( function(transaction) {
transaction.executeSql(
function(transaction) {
transaction.executeSql( 'SELECT SUM(calories) AS currentTotal FROM entries WHERE date = ?;',
 [currentDate],
  function (transaction, result) {
 var currentTotal = result.rows.item(0).currentTotal;
 if (currentTotal > dailyBudget) {
 var overage = currentTotal - dailyBudget;
 var message = 'You are '+overage+' calories over your daily budget. Better start jogging!';
 try {
try { navigator.notification.beep(1);
navigator.notification.vibrate();
} catch(e){
// No equivalent in web app
}
try {
navigator.notification.beep(1);
navigator.notification.vibrate();
} catch(e){
// No equivalent in web app
}
try { navigator.notification.alert(message, 'Over Budget', 'Dang!');
} catch(e) {
alert(message);
}
}
},
errorHandler
navigator.notification.alert(message, 'Over Budget', 'Dang!');
} catch(e) {
alert(message);
}
}
},
errorHandler );
}
);
}
);
}
);
}
Here’s the blow by blow description:
| This is the beginning of the |
| Start a database transaction in preparation for calculating the total calories for the current date. |
| Run the |
Let’s break down the 4 parameters of the executeSql() method:
| The first parameter is a prepared SQL statement that uses the SUM function to add up all the values in the calories column for the entries that match the current date. |
| The second parameter is a single-value array that will replace the question mark in the prepared statement on the previous line. |
| The third parameter is an anonymous function that will be called if the SQL query completes successfully (we’ll look at this in detail momentarily). |
| The fourth parameter is the name of the generic SQL error handler that will be called in the event of a SQL error. |
Here’s what’s going on in the anonymous function that was passed in as the third parameter:
| It starts off by grabbing the current total from the first row of the result. Since we are just asking for the sum of a column, the database is only going to return one row (i.e. this query will always return one row). Remember that the records of the result set are accessed with the |
| Check to see if the current calorie total for the day is greater than the daily budget specified on the Settings panel. If so, the block that follows will be executed. |
| Calculate how far the user is over his calorie budget. |
| Compose a message to display to the user. |
| This is a try/catch block that attempts to call the |
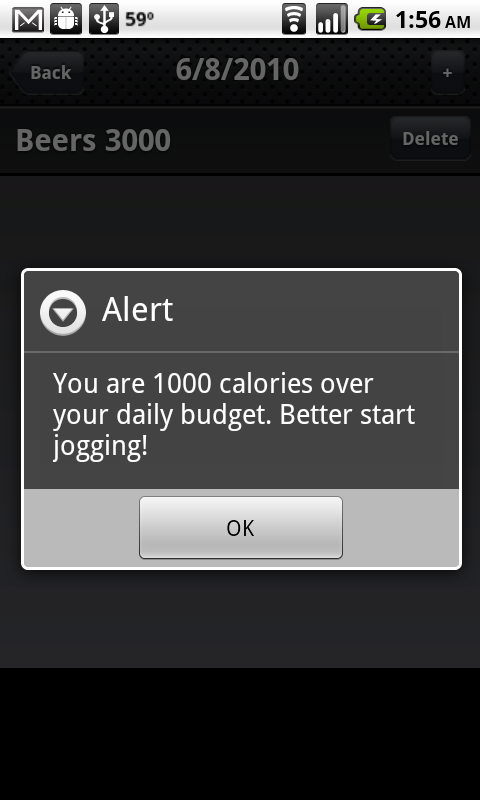
| This is a try/catch block that attempts to call the There are a couple of differences between the PhoneGap alert and the native JavaScript alert. For example, the PhoneGap alert allows you to control the title and the button name (Figure 7.16, “The PhoneGap alert allows you to specify the title and button label.”); the javascript alert does not (Figure 7.17, “A native JavaScript alert does not allow you to specify the title and button label”). There is also a more subtle difference between the two alerts: The native JavaScript alert is modal and the PhoneGap alert is not. In other words, script execution will pause at the point you call a native alert, whereas execution will continue with the PhoneGap version. This may or may not be a big deal depending on the nature of your application, so keep this distinction in mind. |
Figure 7.16. The PhoneGap alert allows you to specify the title and button label.
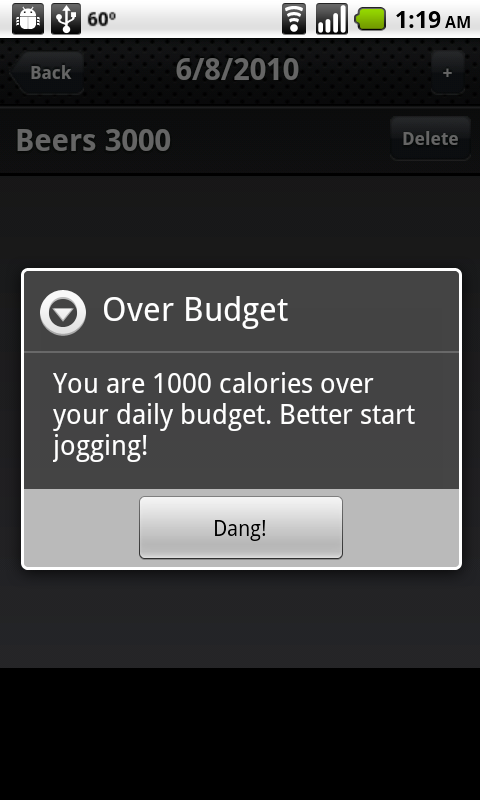 |
Figure 7.17. A native JavaScript alert does not allow you to specify the title and button label
 |
With our checkBudget() function complete, we can now call it by adding a single line to the success callback of our createEntry() function:
function createEntry() {
    var date = sessionStorage.currentDate;
    var calories = $('#calories').val();
    var food = $('#food').val();
    db.transaction(
        function(transaction) {
            transaction.executeSql(
                'INSERT INTO entries (date, calories, food) VALUES (?, ?, ?);',
                [date, calories, food],
                function(){
                  refreshEntries();
                  checkBudget();
                  jQT.goBack();
                },
                errorHandler
            );
        }
    );
    return false;
}
After you’ve made these changes, save the kilo.js file, open up a command line (see Using the Command Line) and run the following commands to recompile and install on your phone (change -d to -e if you’d like to use the emulator instead):
ant debug
adb -d install -r ~/Desktop/KiloGap/bin/Kilo-debug.apk
Geo Location
Let’s update Kilo to save the location when entries are created. Once we have that infomation, we’ll add a “Map Location” button that will open the built in Maps application and drop a pin at the point where the entry was created.
The first step is add latitude and longitude columns to the database to store the information. To do so, replace the CREATE TABLE statement in ~/Desktop/KiloGap/assets/www/kilo.js with the following:
db.transaction(
    function(transaction) {
        transaction.executeSql(
            'CREATE TABLE IF NOT EXISTS entries ' +
            '   (id INTEGER NOT NULL PRIMARY KEY AUTOINCREMENT, ' +
            '    date DATE NOT NULL, food TEXT NOT NULL, ' +
            '    calories INTEGER NOT NULL, ' +
            '    longitude TEXT NOT NULL, latitude TEXT NOT NULL);'
        );
    }
);
Next, we’ll rewrite the createEntry() function that we first saw in Chapter 5 to use the geolocation feature of the phone to determine the current latitude and longitude. Replace the existing createEntry() function in kilo.js with this:
function createEntry() {
    navigator.geolocation.getCurrentPosition(
        function(position){
            var latitude = position.coords.latitude;
            var longitude = position.coords.longitude;
            insertEntry(latitude, longitude);
        },
        function(){
            insertEntry();
        }
    );
    return false;
}
| Begin the |
| Call the |
| This is the beginning of the success callback. Notice that it accepts a single parameter (i.e. |
| These two lines grab the |
| Pass the |
| This is the beginning of the error callback. |
| Because we’re in the error callback, this will only be called if geolocation failed (perhaps the user did not allow the application to access his location when prompted), so call the |
| Return |
Wondering where the SQL INSERT statement got to? Let’s take a look at the insertEntry() function. This new function is what creates the entry in the database. Add the following to kilo.js:
function insertEntry(latitude, longitude) {
    var date = sessionStorage.currentDate;
    var calories = $('#calories').val();
    var food = $('#food').val();
    db.transaction(
        function(transaction) {
            transaction.executeSql(
                'INSERT INTO entries (date, calories, food, latitude, longitude) ' +
                    'VALUES (?, ?, ?, ?, ?);',
                [date, calories, food, latitude, longitude],
                function(){
                    refreshEntries();
                    checkBudget();
                    jQT.goBack();
                },
                errorHandler
            );
        }
    );
}
| The beginning of the |
| Get the currentDate out of sessionStorage. Remember that its value will be set when the user taps an item on the Dates panel to navigate to the Date panel. When he taps the + button to reveal the New Entry panel, this value will still be set to the currently selected Date panel item. |
| Get the calories value out of the |
| Get the food value out of the |
| Begin a database transaction. |
| Pass a callback function into the transaction, with the transaction object as its sole parameter. |
| Call the |
| Define the SQL prepared statement with question marks as data placeholders. |
| Pass an array of values for the placeholders. If |
| Define the success callback function. |
| Define the error callback function. |
In order to confirm that Kilo is actually saving these location values, we’ll want to display them somewhere in the interface. Let’s add an Inspect Entry panel to display the stored values. We’ll include a “Map Location” button on the panel that will display where the entry was created. Add the following to index.html, right before the closing body tag (</body>):
<div id="inspectEntry">
    <div class="toolbar">
        <h1>Inspect Entry</h1>
        <a class="button cancel" href="#">Cancel</a>
    </div>
    <form method="post">
        <ul class="rounded">
            <li><input type="text" placeholder="Food" name="food" value="" /></li>
            <li><input type="tel" placeholder="Calories" name="calories" value="" /></li>
            <li><input type="submit" value="Save Changes" /></li>
        </ul>
        <ul class="rounded">
            <li><input type="text" name="latitude" value="" /></li>
            <li><input type="text" name="longitude" value="" /></li>
            <li><p class="whiteButton" id="mapLocation">Map Location</p></li>
        </ul>
    </form>
</div>
This should look very similar to the New Entry panel that we first saw in Example 4.5, “The HTML for the New Entry panel”, so I’ll just call out a couple of things.
| The input type has been set to |
| The latitude and longitude fields are editable and contained within the form, which means that the user would be able to edit them. This probably would not make sense in the final application, but it makes it a lot easier to test during development because you can enter location values manually to test the mapping button. |
| This Map Location button won’t do anything when clicked at this point; we’ll add a click hander to it momentarily. |
Now we need to give the user a way to navigate to this Inspect Entry panel, so we’ll modify the behavior of the Date panel such that when the user taps an entry in the list, the Inspect Entry panel will slide up from the bottom of the screen.
The first step is to wire up the click event handler (which we’ll create next), and also modify the way clicks on the delete button are processed. Add the three highlighted changes below to the refreshEntries() function in kilo.js:
function refreshEntries() {
    var currentDate = sessionStorage.currentDate;
    $('#date h1').text(currentDate);
    $('#date ul li:gt(0)').remove();
    db.transaction(
        function(transaction) {
            transaction.executeSql(
                'SELECT * FROM entries WHERE date = ? ORDER BY food;',
                [currentDate],
                function (transaction, result) {
                    for (var i=0; i < result.rows.length; i++) {
                        var row = result.rows.item(i);
                        var newEntryRow = $('#entryTemplate').clone();
                        newEntryRow.removeAttr('id');
                        newEntryRow.removeAttr('style');
                        newEntryRow.data('entryId', row.id);
                        newEntryRow.appendTo('#date ul');
                        newEntryRow.find('.label').text(row.food);
                        newEntryRow.find('.calories').text(row.calories);
                        newEntryRow.find('.delete').click(function(e){
                            var clickedEntry = $(this).parent();
                            var clickedEntryId = clickedEntry.data('entryId');
                            deleteEntryById(clickedEntryId);
                            clickedEntry.slideUp();
                            e.stopPropagation();
                        });
                        newEntryRow.click(entryClickHandler);
                    }
                },
                errorHandler
            );
        }
    );
}
| Note that we have to add the |
| The |
| The |
Now let’s add the entryClickHandler() function to kilo.js:
function entryClickHandler(e){
    sessionStorage.entryId = $(this).data('entryId');
    db.transaction(
        function(transaction) {
            transaction.executeSql(
                'SELECT * FROM entries WHERE id = ?;',
                [sessionStorage.entryId],
                function (transaction, result) {
                    var row = result.rows.item(0);
                    var food = row.food;
                    var calories = row.calories;
                    var latitude = row.latitude;
                    var longitude = row.longitude;
                    $('#inspectEntry input[name="food"]').val(food);
                    $('#inspectEntry input[name="calories"]').val(calories);
                    $('#inspectEntry input[name="latitude"]').val(latitude);
                    $('#inspectEntry input[name="longitude"]').val(longitude);
                    $('#mapLocation').click(function(){
                        window.location = 'http://maps.google.com/maps?z=15&q='+
                            food+'@'+latitude+','+longitude;
                    });
                    jQT.goTo('#inspectEntry', 'slideup');
                },
                errorHandler
            );
        }
    );
}
| Get the entryId from the entry that the user tapped and store it in session storage. |
| Begin a database transaction. |
| Pass a callback function into the transaction, with the transaction object as its sole parameter. |
| Call the |
| Define the SQL prepared statement with a question mark as data placeholder. |
| Pass a single element array for the placeholder. |
| Begin the success callback function. |
| Get the first (and only, since we’re just querying for one entry) row of the result. |
| Set some variables based on the values from the row. |
| Set values of the form fields based on the variables. |
| Attach a click handler to the |
| Call the |
| Define the error callback function. |
To test your changes, open a command prompt, cd into the KiloGap directory, and run the following commands to recompile and install the app on your phone:
ant debug
adb -d install -r ~/Desktop/KiloGap/bin/Kilo-debug.apk
Accelerometer
Next, let’s set up Kilo to duplicate the last entry in the list by shaking the phone. Add the following to function to the end of kilo.js:
function dupeEntryById(entryId) {
    if (entryId == undefined) {
        alert('You have to have at least one entry in the list to shake a dupe.');
    } else {
        db.transaction(
            function(transaction) {
                transaction.executeSql(
                    'INSERT INTO entries (date, food, calories, latitude, longitude) ' +
                        'SELECT date, food, calories, latitude, longitude ' +
                        'FROM entries WHERE id = ?;',
                    [entryId],
                    function() {
                        refreshEntries();
                    },
                    errorHandler
                );
            }
        );
    }
}
| This line makes sure that an entryId was passed to the function. If not, the user is notified. |
| Begin the usual database transaction steps. |
| Define an INSERT statement that copies the values from the specified entryId. This is a type of query you haven’t seen before. Instead of using a list of values for the INSERT, this takes the values from the results of a SELECT query for the the specified entryId. |
| Pass the entryId into the prepared statement, replacing the |
| On success, call |
| On error, call the standard SQL error handler. |
Now we need to tell the application when to start and stop watching the accelerometer. We’ll set it up to start watching when the Date panel finishes sliding into view, and to stop listening when it starts sliding out. To do this, we just need to add the following lines to the document ready function in kilo.js:
$('#date').bind('pageAnimationEnd', function(e, info){
    if (info.direction == 'in') {
        startWatchingShake();
    }
});
$('#date').bind('pageAnimationStart', function(e, info){
    if (info.direction == 'out') {
        stopWatchingShake();
    }
});
| Bind an anonymous handler to the |
| Check to see if the |
| Bind an anonymous handler to the |
| Check to see if the |
Note
Technically, we could have bound to just one of the page animation events, like so:
$('#date').bind('pageAnimationEnd', function(e, info){
    if (info.direction == 'in') {
        startWatchingShake();
    } else {
        stopWatchingShake();
    }
});
The reason I didn’t do this is that stopWatchingShake() would not get called until after the page animation was complete. Therefore, the accelerometer would be actively watched during the page transition which can sometimes result in choppy animation.
All that’s left for us to do is write the startWatchingShake() and stopWatchingShake() functions. Add the following functions to the end of kilo.js:
function startWatchingShake() {
    var success = function(coords){
        var max = 2;
        if (Math.abs(coords.x) > max
            || Math.abs(coords.y) > max
            || Math.abs(coords.z) > max) {
            var entryId = $('#date ul li:last').data('entryId');
            dupeEntryById(entryId);
        }
    };
    var error = function(){};
    var options = {};
    options.frequency = 100;
    sessionStorage.watchId =
      navigator.accelerometer.watchAcceleration(success, error, options);
}
function stopWatchingShake() {
    navigator.accelerometer.clearWatch(sessionStorage.watchId);
}
| Begin the |
| Begin defining the success handler. Note that it accepts a |
| Define the threshold for the shake. The higher the number, the harder the user will have to shake. |
| Check to see if any of the coordinates has exceeded the threshold. |
| Get the |
| Call the |
| Define an empty error handler. |
| Define an options object to pass into the |
| Set the |
| Call the |
| Begin the |
| Call the |
What You’ve Learned
In this chapter, you’ve learned how to load your web app into PhoneGap, how to install your app on your phone, and how to access five device features that are unavailable to browser-based web apps (beep, alert, vibrate, geolocation, and accelerometer).
In the next chapter, you’ll learn how to package your app as an executable and submit it to the Android Market.