7.2. Anatomy of a Binding
The best way to understand a binding is to watch one evolve from start to finish. This section examines a binding from its inception, into the construction of the binding, and through its use in a XUL document. At the end of the section, you should be able to take the pieces and construct your own binding, so try to follow it like a step-by-step guide.
Design is important in XBL. The implementation can sometimes be tricky; for example, when you intend to reuse the binding elsewhere or when others use it in a way you don't foresee. Ideally, a binding should be as small as possible to facilitate reuse. And it's a good idea to separate your binding into smaller pieces -- perhaps smaller "subbindings" -- so you can recombine when necessary. You could design the <datafield/> widget mentioned in the introduction -- for example, as a combination of the XUL <textfield/> widget and your own new binding, <validator/>, which you could then use elsewhere.
The widget constructed in this section is a good example of a small, reusable binding. It is a special text input widget called inputfield -- a self-contained extension to a XUL textbox that can be used on its own or as part of another binding. The binding combines a <label> and a <textbox>, allows child elements, and offers functions that work with the data and style of the <textbox>.
7.2.1. CSS Attachment
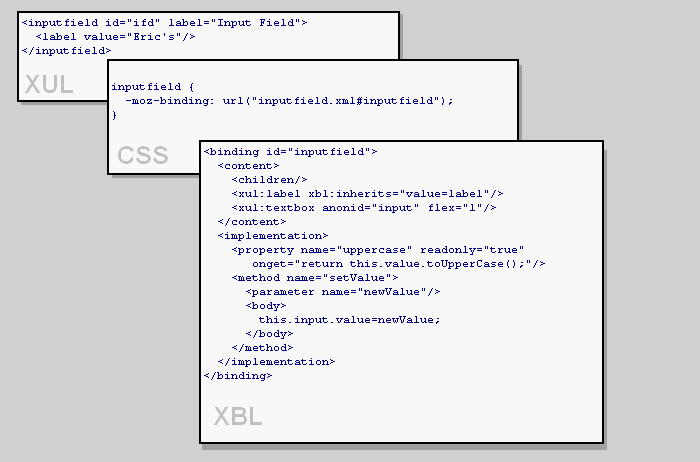
Attachment is the process through which the binding is connected to the bound document that uses it. This process is most commonly achieved through CSS, but can also be done by using the DOM. The section Section 7.4, later in this chapter, details the interaction between XBL and the document object model. The CSS connection begins where the bound element is placed in the XUL file:
<inputfield/>
Remember that XML ignores elements it doesn't recognize, so this new element won't be rendered until you add information to the stylesheet; a binding is attached with the special -moz-binding attribute. The style selector must be associated with the bound element in the XUL file. In the following example, the binding is attached to every <inputfield> tag because the element name itself is used as the style selector. However, -moz-binding can also be inside a class selector, an ID selector, or any other CSS selector you wish to use:
inputfield {
  -moz-binding: url("inputfield.xml#inputfield");
}
It also can be from an inline style:
<inputfield
  id="ifd"
  style="-moz-binding: url("inputfield.xml#inputfield")"/>
The constituent parts of this style rule are the -moz-binding property, the url binding locator that takes the bindings file (and possibly the path to it) as a parameter, and the id of the binding denoted with the # notation. For the binding to take, the XBL file must contain a binding with the same id.
<binding id="inputfield">
  <!-- binding content / behavior / handlers -->
</binding>
The ID of inputfield matches the value specified in the URL after the # symbol. When the UI is drawn in Mozilla, the binding content, behavior, and handlers are applied to the bound document at the point where the <inputfield> element appears in the document. Figure 7-2 shows a visual representation of the constituent parts of a binding attachment occurring via CSS.
In this example, we use our own new element name called <inputfield>, but you can also extend existing XUL widgets by including:
<box id="inputfield" flex="1"/>
Because they are bound through CSS, bindings cannot be guaranteed to be loaded until the whole document is loaded, which means that any inline scripts accessing bindings should be considered incorrect because you cannot guarantee that the binding is loaded.
XBL content is considered "invisible" in the context of the document object because it is not contained directly in the XUL document. Refer to the later section Section 7.4 for more information on this concept.
 | Because a document binding can have multiple instances, something must happen to make the content unique in each one. When a binding is attached to a document, its content is automatically cloned in memory. Every instance of a binding shares the same fields, properties, methods, and event handlers because separate copies of those are simply not necessary. These elements cannot be changed dynamically, but the content document model can. |
7.2.2. The XBL Content Element
The <binding> element requires an id attribute to make the binding unique within the entire document. In the general XML specification, there can only be one element in a document that has a certain ID string. As in XUL, if you use an ID twice, the last one parsed is the only one seen. This situation can lead to unexpected behavior. Figure 7-3 shows the appearance of an inputfield binding.
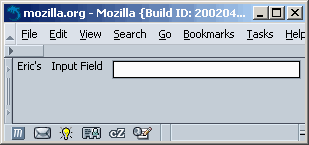
An <inputfield> has a <label> attached to it, shown here as "Input Field." It also has a regular <textbox>. The "Eric's" label is not part of the binding, but is still displayed inside of it as a child. Child content is discussed later in the section "Extra Binding Content and Insertion Points." The binding content is defined as:
    <content>
      <children/>
      <xul:label xbl:inherits="value=label"/>
      <xul:textbox anonid="input" flex="1"/>
</content><children/>, the first element in the binding, lets any elements that existed in the original XUL document pass through the binding's display if it exists inside the <inputfield> tag.
  <inputfield id="ifd" label="Input Field">
    <label value="Eric's"/>
  </inputfield>
In this case, the XUL label is inserted into the anonymous content at the point of the <children/> element when the binding is rendered. This ability is useful for changing the ordering of content and adding extra content within a binding.

<children includes="treehead|treechildren"/>
The next content element is <xul:label/>. Notice how the XML namespace of xul is used in the content. Using this notation is the most common way to apply namespace XUL elements in bindings.
The label element has an XBL-namespaced inherits attribute. This code translates an attribute used on the original bounded tag into something usable by a content element:
<inputfield id="ifd" label="Input Field">
The final element in the content is a typical XUL textbox that has a namespace like the label. The anonid attribute on the textbox is fabricated and used here to avoid bugs and scope issues with the id attribute in content. The id attribute should be used only on the <binding> and <bindings> tags, but anonid works well as direct DOM access to this element and is shown in the next section.
7.2.3. The Implementation Element
The next part of the binding, and also the most complex, is the behavior. The <implementation> element contains the <constructor>, <destructor>, <field>, <property>, and <method> -- all of which handle the binding's implementation features.
All elements can contain JavaScript, which changes the binding into a dynamic widget that does more than display content on the screen. The binding implementation accepts user input, dynamically changes the UI, interacts with remote sites through web protocols, and surfaces Mozilla library functions in widgets.
7.2.3.1. Constructor
In the example binding, some variables and style rules are set up for access by the rest of the binding to make the code cleaner. These rules are set up by using the constructor:
 <constructor><![CDATA[
    this.input=document.getAnonymousElementByAttribute
      (this,"anonid","input");
 // Initialize color and backgroundColor to something besides a "" value
    this.input.inputField.style.backgroundColor="white";
    this.input.inputField.style.color="black";
    this.input.inputField.setAttribute("onchange","");
 ]]></constructor>
The first JavaScript command accesses the <textbox> with the anonid label and puts it into the this.input variable. getAnonymousElementByAttribute is a custom DOM method used to access anonymous content. The section Section 7.4.1, later in this chapter, talks more about the XBL DOM methods.
The use of the this keyword and the "dot notation" comes from Java. If you have programmed in Java, these bindings can be considered similar to Java classes. They are self-contained and can be extended. Using this is not necessary but it's common practice and clarifies that the variable or property is a member of the binding, especially if you define elements in the binding's constructor.
In the next two commands, an object called inputField contains the style object property. You may be familiar with this structure in HTML elements, and in fact, this inputField is a version of the HTML <input> textbox. The <textbox> in XUL derives from that HTML element.
The color and backgroundColor are set here manually to return something other than the initial value of a blank string when they are accessed. The last line in the <constructor> sets up the onchange event handler for the textbox. This event handler is also used in a property for this binding.
7.2.3.2. Destructor
This section of a binding executes anything that needs to be done immediately before a binding is unloaded. Here is an example:
<destructor>
  this.input=null;
</destructor>
The code you see here is not necessary in this binding, but it shows you the format for executing code in the destructor. Destructors are great to use when you have loaded a component in the binding and want to set the variable representing the component to null to avoid memory leaks. If you have a lot of bindings that load and then unload components while a Mozilla session is still running, a significant amount of memory can be eaten up unless you take this kind of step.
7.2.3.3. Properties
Like Java properties, an XBL <property> has getters and setters, so they can behave differently when you read or write data. Here is a subset of properties used in this binding:
<property name="value" readonly="true">
  <getter>
    return this.input.value;
  </getter>
</property>
<property name="uppercase" readonly="true"
          onget="return this.value.toUpperCase( );"/>
<property name="backgroundColor">
  <getter>
    return this.input.inputField.style.backgroundColor;
  </getter>
  <setter>
    this.input.inputField.style.backgroundColor=val;
    return val;
  </setter>
</property>
At this point, the characteristics of properties to watch out for include the readonly attribute, the getter and setter elements, and the existence of a val keyword that is used internally for accessing a property's current value. For your reference, this binding's property extracts are used for getting the value of the input field, returning an uppercase version of the inputted text, and getting or setting the input field's background color.
7.2.3.4. Methods
Methods in XBL are self-contained functions represented by the <method> tag and encapsulated within the <implementation> element. They usually provide a binding object with a specific function like copying and saving some data or showing and hiding widget controls. Like properties, they can be called from within the binding, from another binding that subclasses that binding, and directly from the bound element.
<method name="clear">
  <body>
    this.input.value='';
  </body>
</method>
<method name="setValue">
  <parameter name="newValue"/>
  <body>
    this.input.value=newValue;
  </body>
</method>
The method code is contained in a <body> tag, and each method can have 0 or more parameters, which gather the values passed into the method when called.
7.2.4. Handlers
Handlers in XBL mimic regular document events like onclick and onmousedown, and provide a means for trapping them within your binding and carrying out tasks associated with them.
<handlers>
  <handler event="mouseover">
    this.input.focus( );
  </handler>
</handlers>
Each handler is contained in a <handler> tag and the event name is placed in the event attribute -- minus the "on" prefix. The handler in the code shown above places the focus in the inputfield when the mouse goes over it. See the section "Event Handling," later in this chapter, for more details.
7.2.5. Style
The sample binding's last piece of the puzzle is style. Any XUL elements used in the content inherit the default styles for those widgets, but if you want to add more, you can include your own stylesheet like this:
<resources>
  <stylesheet src="inputfield.css"/>
</resources>
Notice the <resources> container element, which is a prerequisite for this feature. The use of stylesheets in bindings is covered more thoroughly at the end of the chapter in the section Section 7.7.
At this point, you should be familiar with the pieces that make up a binding, which, at the top level, are the content, implementation, event handlers, and extra resources. The binding that you have constructed is small, yet it shows all the main concepts involved in structuring a binding. With some personalizing, it could be included in potentially any application.