Chapter 23. Networking configuration
- Table of Contents
- 23.1. Hardware
- 23.2. Configuration of interfaces
- 23.3. Configuration of interfaces (IPv6)
- 23.4. Wireless interfaces
- 23.5. Resolving
- 23.6. IPv4 Forwarding
23.1. Hardware
Network cards (NICs)
Drivers for NICs are installed as kernel modules. The module for your NIC has to be loaded during the initialization of Slackware Linux. On most systems the NIC is automatically detected and configured during the installation of Slackware Linux. You can reconfigure your NIC with the netconfig command. netconfig adds the driver (module) for the detected card to /etc/rc.d/rc.netdevice.
It is also possible to manually configure which modules should be loaded during the initialization of the system. This can be done by adding a modprobe line to /etc/rc.d/rc.modules. For example, if you want to load the module for 3Com 59x NICs (3c59x.o), add the following line to /etc/rc.d/rc.modules
/sbin/modprobe 3c59x
PCMCIA cards
Supported PCMCIA cards are detected automatically by the PCMCIA software. The pcmcia-cs packages from the "a" disk set provides PCMCIA functionality for Slackware Linux.
23.2. Configuration of interfaces
Network cards are available under Linux through so-called "interfaces". The ifconfig(8) command can be used to display the available interfaces:
# ifconfig -a
eth0      Link encap:Ethernet  HWaddr 00:20:AF:F6:D4:AD
          inet addr:192.168.1.1  Bcast:192.168.1.255  Mask:255.255.255.0
          UP BROADCAST RUNNING MULTICAST  MTU:1500  Metric:1
          RX packets:1301 errors:0 dropped:0 overruns:0 frame:0
          TX packets:1529 errors:0 dropped:0 overruns:0 carrier:0
          collisions:1 txqueuelen:100
          RX bytes:472116 (461.0 Kb)  TX bytes:280355 (273.7 Kb)
          Interrupt:10 Base address:0xdc00

lo        Link encap:Local Loopback
          inet addr:127.0.0.1  Mask:255.0.0.0
          UP LOOPBACK RUNNING  MTU:16436  Metric:1
          RX packets:77 errors:0 dropped:0 overruns:0 frame:0
          TX packets:77 errors:0 dropped:0 overruns:0 carrier:0
          collisions:0 txqueuelen:0
          RX bytes:8482 (8.2 Kb)  TX bytes:8482 (8.2 Kb)
Network cards get the name ethn, in which n is a number, starting with 0. In the example above, the first network card (eth0) already has an IP address. But unconfigured interfaces have no IP address, the ifconfig will not show IP addresses for unconfigured interfaces. Interfaces can be configured in the /etc/rc.d/rc.inet1.conf file. You can simply read the comments, and fill in the required information. For example:
# Config information for eth0:
IPADDR[0]="192.168.1.1"
NETMASK[0]="255.255.255.0"
USE_DHCP[0]=""
DHCP_HOSTNAME[0]=""
In this example the IP address 192.168.1.1 with the 255.255.255.0 netmask is assigned to the first ethernet interface (eth0). If you are using a DHCP server you can change the USE_DHCP="" line to USE_DHP[n]="yes" (swap "n" with the interface number). Other variables, except DHCP_HOSTNAME are ignored when using DHCP. For example:
IPADDR[1]=""
NETMASK[1]=""
USE_DHCP[1]="yes"
DHCP_HOSTNAME[1]=""
The same applies to other interfaces. You can activate the settings by rebooting the system or by executing /etc/rc.d/rc.inet1. It is also possible to reconfigure only one interface with /etc/rc.d/rc.inet1 ethX_restart, in which ethX should be replaced by the name of the interface that you would like to reconfigure.
23.3. Configuration of interfaces (IPv6)
23.3.1. Introduction
IPv6 is the next generation internet protocol. One of the advantages is that it has a much larger address space. In IPv4 (the internet protocol that is commonly used today) addresses are 32-bit, this address space is almost completely used right now, and there is a lack of IPv4 addresses. IPv6 uses 128-bit addresses, which provides an unimaginable huge address space (2^128 addresses). IPv6 uses another address notation, first of all hex numbers are used instead of decimal numbers, and the address is noted in pairs of 16-bits, separated by a colon (":"). Let's have a look at an example address:
fec0:ffff:a300:2312:0:0:0:1
A block of zeroes can be replaced by two colons ("::"). Thus, thee address above can be written as:
fec0:ffff:a300:2312::1
Each IPv6 address has a prefix. Normally this consists of two elements: 32 bits identifying the address space the provider provides you, and a 16-bit number that specifies the network. These two elements form the prefix, and in this case the prefixlength is 32 + 16 = 48 bits. Thus, if you have a /48 prefix you can make 2^16 subnets and have 2^80 hosts on each subnet. The image below shows the structure of an IPv6 address with a 48-bit prefix.

There are a some specially reserved prefixes, most notable include:
23.3.2. Slackware Linux IPv6 support
The Linux kernel binaries included in Slackware Linux do not support IPv6 by default, but support is included as a kernel module. This module can be loaded using modprobe:
# modprobe ipv6
You can verify if IPv6 support is loaded correctly by looking at the kernel output using the dmesg:
$ dmesg
[..]
IPv6 v0.8 for NET4.0
IPv6 support can be enabled permanently by adding the following line to /etc/rc.d/rc.modules:
/sbin/modprobe ipv6
Interfaces can be configured using ifconfig. But it is recommended to make IPv6 settings using the ip command, which is part of the "iputils" package that can be found in the extra/ directory of the Slackware Linux tree.
23.3.3. Adding an IPv6 address to an interface
If there are any router advertisers on a network there is a chance that the interfaces on that network already received an IPv6 address when the IPv6 kernel support was loaded. If this is not the case an IPv6 address can be added to an interface using the ip utility. Suppose we want to add the address "fec0:0:0:bebe::1" with a prefix length of 64 (meaning "fec0:0:0:bebe" is the prefix). This can be done with the following command syntax:
# ip -6 addr add <ip6addr>/<prefixlen> dev <device>
For example:
# ip -6 addr add fec0:0:0:bebe::1/64 dev eth0
23.4. Wireless interfaces
Wireless interfaces usually require some additional configuration, like setting the ESSID, WEP keys and the wireless mode. Interface settings that are specific to wireless interfaces can be set in the /etc/rc.d/rc.wireless.conf file. The /etc/rc.d/rc.wireless script configures wireless interfaces based on descriptions from /etc/rc.d/rc.wireless.conf. In rc.wireless.conf settings are made per interface MAC address. By default this file has a section that matches any interface:
## NOTE : Comment out the following five lines to activate the samples below ...
## --------- START SECTION TO REMOVE -----------
## Pick up any Access Point, should work on most 802.11 cards
*)
    INFO="Any ESSID"
    ESSID="any"
    ;;
## ---------- END SECTION TO REMOVE ------------
It is generally a good idea to remove this section to make per-card settings. If you are lazy and only have one wireless card, you can leave this section in and add any configuration parameters you need. Since this section matches any wireless interface the wireless card you have will be matched and configured. You can now add a sections for your wireless interfaces. Each section has the following format:
<MAC address>)
    <settings>
;;
You can find the MAC address of an interface by looking at the ifconfig output for the interface. For example, if a wireless card has the eth1 interface name, you can find the MAC address the following way:
# ifconfig eth1
eth1      Link encap:Ethernet  HWaddr 00:01:F4:EC:A5:32
          inet addr:192.168.2.2  Bcast:192.168.2.255  Mask:255.255.255.0
          UP BROADCAST RUNNING MULTICAST  MTU:1500  Metric:1
          RX packets:0 errors:0 dropped:0 overruns:0 frame:0
          TX packets:4 errors:1 dropped:0 overruns:0 carrier:0
          collisions:0 txqueuelen:1000
          RX bytes:0 (0.0 b)  TX bytes:504 (504.0 b)
          Interrupt:5 Base address:0x100
The hexadecimal address that is printed after HWaddr is the MAC address, in this case 00:01:F4:EC:A5:32. When you have found the MAC address of the interface you can add a section for the device to /etc/rc.d/rc.wireless.conf. For example:
00:01:F4:EC:A5:32)
    INFO="Cabletron Roamabout WLAN NIC"
    ESSID="home"
    CHANNEL="8"
    MODE="Managed"
    KEY="1234-5678-AB"
    ;;
This will set the interface with MAC address 00:01:F4:EC:A5:32 to use the ESSID home, work in Managed mode on channel 8. The key used for WEP encryption is 1234-5678-AB. There are many other parameters that can be set. For an overview of all parameters, refer to the last example in rc.wireless.conf.
After configuring a wireless interface, you can activate the changes by executing the network initialization script /etc/rc.d/rc.inet1. You can see the current wireless settings with the iwconfig command:
eth1      IEEE 802.11-DS  ESSID:"home"  Nickname:"HERMES I"
          Mode:Managed  Frequency:2.447 GHz  Access Point: 02:20:6B:75:0C:56
          Bit Rate:2 Mb/s   Tx-Power=15 dBm   Sensitivity:1/3
          Retry limit:4   RTS thr:off   Fragment thr:off
          Encryption key:1234-5678-AB
          Power Management:off
          Link Quality=0/92  Signal level=134/153  Noise level=134/153
          Rx invalid nwid:0  Rx invalid crypt:0  Rx invalid frag:0
          Tx excessive retries:27  Invalid misc:0   Missed beacon:0
23.5. Resolving
Hostname
Each computer on the internet has a hostname. If you do not have a hostname that is resolvable with DNS, it is still a good idea to configure your hostname, because some software uses it. You can configure the hostname in /etc/HOSTNAME. A single line with the hostname of the machine will suffice. Normally a hostname has the following form: host.domain.tld, for example darkstar.slackfans.org. Be aware that the hostname has to be resolvable, meaning that GNU/Linux should be able to convert the hostname to an IP address. You can make sure the hostname is resolvable by adding it to /etc/hosts. Read the following section for more information about this file.
/etc/hosts
/etc/hosts is a table of IP addresses with associated hostnames. This file can be used to name computers in a small network. Let's look at an example of the /etc/hosts file:
127.0.0.1               localhost
192.168.1.1             tazzy.slackfans.org tazzy
192.168.1.169           flux.slackfans.org
The localhost line should always be present. It assigns the name localhost to a special interface, the loopback. In this example the names tazzy.slackfans.org and tazzy are assigned to the IP address 192.168.1.1, and the name flux.slackfans.org is assigned to the IP address 192.168.1.169. On the system with this file both computers are available via the mentioned hostnames.
It is also possible to add IPv6 addresses, which will be used if your system is configured for IPv6. This is an example of a /etc/hosts file with IPv4 and IPv6 entries:
# IPv4 entries
127.0.0.1               localhost
192.168.1.1             tazzy.slackfans.org tazzy
192.168.1.169           gideon.slackfans.org

# IPv6 entries
::1                     localhost
fec0:0:0:bebe::2        flux.slackfans.org
Please note that "::1" is the default IPv6 loopback.
/etc/resolv.conf
The /etc/resolv.conf file is used to specify which nameservers the system should use. A nameserver converts hostnames to IP addresses. Your provider should have given you at least two name name server addresses (DNS servers). You can add these nameservers to /etc/resolv.conf by adding the line nameserver ipaddress for each nameserver. For example:
nameserver 192.168.1.1
nameserver 192.168.1.169
You can check wether the hostnames are tranlated correctly or not with the host hostname command. Swap hostname with an existing hostname, for example the website of your internet service provider.
23.6. IPv4 Forwarding
IPv4 forwarding connects two or more networks by sending packets which arrive on one interface to another interface. This makes it possible to let a GNU/Linux machine act as a router. For example, you can connect multiple networks, or your home network with the internet. Let's have a look at an example:
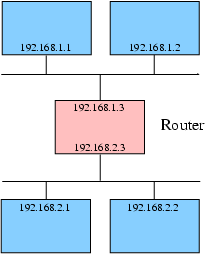
In dit example there are two networks, 192.168.1.0 and 192.168.2.0. Three hosts are connected to both network. One of these hosts is connected to both networks with interfaces. The interface on the 192.168.1.0 network has IP address 192.168.1.3, the interface on the 192.168.2.0 network has IP address 192.168.2.3. If the host acts as a router between both networks it forwards packets from the 192.168.1.0 network to the 192.168.2.0 network and vise versa. Routing of normal IPv4 TCP/IP packages can be enabled by enabling IPv4 forwarding.
IPv4 forwarding can be enabled or disabled under Slackware Linux by changing the executable bit of the /etc/rc.d/rc.ip_forward file. If the executable bit is set on this file, IP forwarding will be enabled during the system boot, otherwise it will not. You can check whether the executable bit is enabled with ls -l (a description of the ls command can be found in Section 8.2.2).
It is also possible to enable IPv4 forwarding on a running system with the following command (0 disables forwarding, 1 enables forwarding):
# echo 0 > /proc/sys/net/ipv4/ip_forward
Be cautious! By default there are no active packet filters. This means that anyone can access other networks. Traffic can be filtered and logged with the iptables kernel packet filter. Iptables can be administrated through the iptables command. NAT (Network Address Translation) is also a subset of iptables, and can be controlled and enabled through the iptables command. NAT makes it possible to "hide" a network behind one IP address. This allows you to use the internet on a complete network with only one IP address.