Gdk-pixbuf
Libart is designed to manipulate graphics buffers, but it contains no functions to help load existing images into those buffers. It leaves the buffer creation and loading up to you. The gdk-pixbuf library is a toolkit for image loading and pixel buffer manipulation that you can use in conjunction with libart. Gdk-pixbuf also provides convenience functions for progressive image loading, animation (which we won't cover here), and rendering the libart image buffer to a GdkDrawable instance.
Gdk-pixbuf has a fairly large API. We'll discuss it briefly as we go, and then we'll wrap up the chapter with a sample application. The fundamental currency in the gdk-pixbuf library is the GdkPixbuf structure, a private, opaque data structure that mirrors many of the same concepts that ArtPixBuf supports. In fact, most of GdkPixbuf's private data fields have the same names and data types as the corresponding ones in ArtPixBuf. This similarity dates back to the earlier days when gdk-pixbuf was a wrapper around libart. Since that time, the libart dependency has been stripped out, and gdk-pixbuf is now scheduled to be merged into the GTK+ 2.0 code base. As such, gdk-pixbuf's days as a standalone library are limited to the GNOME 1.x release.
Creating
To get started, you will have to create a new GdkPixbuf instance. If you're planning on populating the RGB buffer from scratch, or if you want to load several smaller pixel buffers into a larger one, you may want to use gdk_pixbuf_new( ), which creates an uninitialized pixel buffer of guchar elements:
GdkPixbuf *gdk_pixbuf_new(GdkColorspace colorspace,
    gboolean has_alpha, int bits_per_sample,
    int width, int height);
|
The guchar type is essentially the same data type as libart's art_u8 type, so you can use libart to manipulate the raw pixel buffers in gdk-pixbuf. Given gdk-pixbuf's history with libart, this should come as no surprise.
The first parameter is a value in the GdkColorspace enumeration, analogous to libart's ArtPixFormat enumeration. For now, you can specify only the value GDK_COLORSPACE_RGB, but other types of color spaces may be supported in the future:
typedef enum
{
  GDK_COLORSPACE_RGB
} GdkColorspace;
|
You can request an optional alpha channel for determining image opacity with the has_alpha parameter. The bits_per_sample parameter behaves just like the bits_per_sample field in the ArtPixBuf structure. For the time being, you should always pass in an 8. In the future, gdk-pixbuf might support additional channel depths, but currently it supports only 8-bit channels (just like libart). Finally, you must pass in the width and height of your desired buffer; gdk-pixbuf uses these parameters to calculate the best possible row stride for the new buffer.
After you've created and initialized your GdkPixbuf structure, you can retrieve information about it with the following set of accessor functions:
GdkColorspace gdk_pixbuf_get_colorspace(
    const GdkPixbuf *pixbuf);
int gdk_pixbuf_get_n_channels(const GdkPixbuf *pixbuf);
gboolean gdk_pixbuf_get_has_alpha(const GdkPixbuf *pixbuf);
int gdk_pixbuf_get_bits_per_sample(const GdkPixbuf *pixbuf);
guchar *gdk_pixbuf_get_pixels(const GdkPixbuf *pixbuf);
int gdk_pixbuf_get_width(const GdkPixbuf *pixbuf);
int gdk_pixbuf_get_height(const GdkPixbuf *pixbuf);
int gdk_pixbuf_get_rowstride(const GdkPixbuf *pixbuf);
|
You can also create a GdkPixbuf structure from an existing image or buffer. One approach is to load it up with a graphics file. You can give the gdk_pixbuf_new_from_file( ) function the path to a graphics file. Gdk-pixbuf will automatically invoke one of a handful of its image format loaders to convert the graphics file into an RGB buffer. A second function, gdk_pixbuf_new_from_xpm_data( ), loads inline XPM data:
GdkPixbuf *gdk_pixbuf_new_from_file(const char *filename);
GdkPixbuf *gdk_pixbuf_new_from_xpm_data(const char **data);
|
Gdk-pixbuf currently supports PNG, XPM, JPEG, TIFF, PNM, RAS, BMP, and even the patented GIF format. The loaders are easy to write and very modular, so gdk-pixbuf is well equipped to keep pace with new and old image formats alike.
Gdk-pixbuf even lets you create a pixel buffer from an existing raw data buffer. The gdk_pixbuf_new_from_data( ) function is similar to gdk_pixbuf_new( ), except it has four extra parameters: data to pass in your RGB buffer, destroy_fn and destroy_fn_data to register a callback function to clean up the data buffer when the GdkPixbuf is destroyed, and rowstride:
typedef void (* GdkPixbufDestroyNotify) (guchar *pixels,
    gpointer data);
GdkPixbuf *gdk_pixbuf_new_from_data(const guchar *data,
    GdkColorspace colorspace, gboolean has_alpha,
    int bits_per_sample, int width, int height, int rowstride,
    GdkPixbufDestroyNotify destroy_fn,
    gpointer destroy_fn_data);
|
You must calculate and pass in a rational row stride for the pixel buffer you've created. The pixel buffer is really only a one-dimensional array of guchar elements, so gdk-pixbuf can't guess from the height and width parameters what your intended row stride should be. In the case of gdk_pixbuf_new( ), gdk-pixbuf creates its own pixel buffer and can make its own decision about the row stride.
You should use this function only if you know what you're doing. Gdk-pixbuf does very little safety checking on the imported buffer, so if your rowstride value doesn't properly match the rows of pixels in your buffer, your image will end up scrambled. Gdk-pixbuf unquestioningly accepts your values, trusting you not to make any mistakes.
Sometimes you end up with a three-channel RGB pixel buffer that you later need to convert into a four-channel RGBA buffer. The most common example of such a situation occurs when you load a three-channel image from a file but need to use the alpha channel for masking. The file-loading modules create whichever style of GdkPixbuf best matches the image file. You can't tell it ahead of time that you need four-channel pixel buffers, so you're forced to convert it to RGBA after the fact.
Although it may seem simple at first to tack the extra channel onto each pixel, you'll find that things are a little more complicated if you try this by hand. First you have to create a new GdkPixbuf and copy the pixels into it one by one, adding the extra alpha channel byte to each one as you go. An added twist is the fact that your row stride will always change, so the number of unused padding bytes at the end of each row will change as well. You can't just do a simple byte-by-byte transfer.
Recall our row stride example from Section 10.3.1, in which an image with a width of 25 pixels had a row stride of 76 (25 3 = 75), which amounts to a single byte of padding per row. Adding an alpha channel to this image will result in a row stride of 100 (25 4), which means that the new buffer will have no padding bytes. Every time you copy over a row of pixels, you will have to drop a byte.
To save you the effort of reimplementing this algorithm in each application that needs it, gdk-pixbuf offers the gdk_pixbuf_add_alpha( ) convenience function. Simply pass in your three-channel pixel buffer, and this function will generate a new four-channel copy. If you want, you can preload the new alpha channel on the basis of the contents of the image. Set the substitute_color parameter to TRUE and fill the r, g, and b parameters with target color values. The function will turn on the corresponding pixels in the alpha channel each time it finds the target color. This feature is great for transparency, when the backgrounds of your three-channel images have been set to a special masking color. Conversely, if you set substitute_color to FALSE, the function will ignore the three color parameters and initialize the alpha channel to show the full image:
GdkPixbuf *gdk_pixbuf_add_alpha(const GdkPixbuf *pixbuf,
    gboolean substitute_color, guchar r, guchar g, guchar b);
|
To make it easier to share and manage RGB buffers, gdk-pixbuf implements the familiar reference-counting scheme (see Section 2.2.5). All newly created pixbufs start out with a reference count of 1, so you should need to call gdk_pixbuf_ref( ) for only the second and later owners. When you're done with the pixbuf, always call gdk_pixbuf_unref( ), which automatically destroys the pixbuf when the reference count reaches 0, but not before. For this reason gdk-pixbuf doesn't have an explicit destroy function.
void gdk_pixbuf_ref(GdkPixbuf *pixbuf);
void gdk_pixbuf_unref(GdkPixbuf *pixbuf);
|
If you need a physically separate copy of a pixel buffer, and not just a shared reference to an existing one, you can use gdk_pixbuf_copy( ) to create a new pixbuf identical to the one you pass in:
GdkPixbuf* gdk_pixbuf_copy(const GdkPixbuf *pixbuf);
|
Rendering
After you have tweaked your image buffer and loaded it into a GdkPixbuf structure, you'll probably want to display it on the screen. GNOME offers various ways to do this, particularly within the GnomeCanvas widget (see Section 11.4.6). In this chapter we'll focus on displaying the buffer in a GdkDrawable instance.
One of the most frustrating limitations of the current incarnation of the X Window System is its lack of support for a full-fledged alpha channel. In X you cannot perform all the alpha blending that libart and gdk-pixbuf support. You can only use alpha blending and anti-aliasing on local image buffers, and then transfer those buffers as a whole to the X drawables. There are tentative plans for an alpha channel extension to X, but those hopes are off in the future.
The basic rendering tools of X support only binary masks: Either copy a pixel in its original color, or don't copy it at all. X does not allow you to perform color blending during an image copy. You can render shaped images to a drawable by specifying a 1-bit mask (a GdkBitmap), but those images will have sharp edges. You won't be able to smoothly blend your new image into the old image residing in the GdkDrawable. Thus if you want anti-aliased drop shadows, you must take care of them within the RGB buffer, before you render the image to the X drawable. Internally, gdk-pixbuf uses GdkRGB to handle the complexities of color maps, visuals, and dithering.
To express the nature of the mask it will use when rendering to a drawable, gdk-pixbuf declares the GdkPixbufAlphaMode enumeration:
typedef enum
{
	GDK_PIXBUF_ALPHA_BILEVEL,
	GDK_PIXBUF_ALPHA_FULL
} GdkPixbufAlphaMode;
|
For the time being, for the reasons already stated, you must always use GDK_PIXBUF_ALPHA_BILEVEL. This value tells gdk-pixbuf to convert the pixel buffer's alpha channel (if any) into a 1-bit bilevel mask. When full alpha blending finally becomes part of the X Window System, you can start using GDK_PIXBUF_ALPHA_FULL.
So, to render a nonrectangular shape to a drawable, you need to pass X11 a GdkBitmap instance in addition to your pixel buffer. If your RGB buffer has an alpha channel, gdk-pixbuf can take care of the bitmask creation itself, behind the scenes, using the contents of the alpha channel as a guide. Sometimes, however, you might want to create the bitmap yourself, from scratch; perhaps your pixbuf doesn't have an alpha channel, or you need to do some special postprocessing to the mask before you render it to a drawable. If you leave the bitmask creation up to gdk-pixbuf, you won't be able to step in and alter it be- fore gdk-pixbuf passes it to X11.
The gdk_pixbuf_render_threshold_alpha( ) function converts a portion of the pixel buffer's alpha channel into a GdkBitmap mask provided by you (see Figure 10.8 for a visual representation of this function):
void gdk_pixbuf_render_threshold_alpha(GdkPixbuf *pixbuf,
    GdkBitmap *bitmap, int src_x, int src_y,
    int dest_x, int dest_y, int width, int height,
    int alpha_threshold);
|
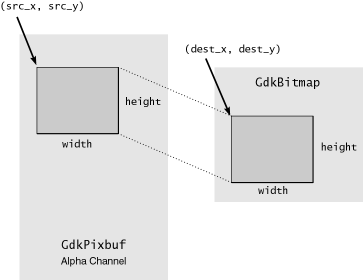
The src_x and src_y parameters determine where to start in the source GdkPixbuf; width and height determine the size of the area to transfer. The dest_x and dest_y parameters describe where in the destination GdkBitmap to render the chosen region. If the src coordinates do not match the dest coordinates, the bitmask will be offset within GdkBitmap. The GdkBitmap mask can be a different size from the original pixel buffer, but it must be large enough to contain the complete mask, including any offsets.
With a little juggling of coordinates, you can take any rectangular area from the pixel buffer and translate it into a 1-bit mask of the same size, and then store it anywhere within GdkBitmap. However, make sure that the bitmap you pass in is at least (dest_x + width) pixels wide and (dest_y + height) pixels tall.
The alpha_threshold parameter gives you the critical control over which pixels to turn on in the bitmask and which to turn off. As gdk-pixbuf scans through pixels in your alpha channel, it compares each value to alpha_threshold. If the alpha channel value is greater than or equal to alpha_threshold, gdk-pixbuf turns on (sets to 1) the corresponding bit in the GdkBitmap; any values less than alpha_threshold are turned off (set to 0). When the time comes to render an image with that bitmask, X11 copies only pixels that are masked to a 1 and ignores the rest. In a manner of speaking, all areas of the alpha channel that meet or exceed the threshold are rendered. The higher you set the alpha_threshold, the less of the image will be rendered.
When your pixel buffer does not contain an alpha channel, gdk_pixbuf_render_threshold_alpha( ) pretends that the entire alpha channel is set to 254. Thus if the alpha_threshold parameter is 0 to 254, the mask will consist of only 1's, since the alpha channel will be equal to or above the threshold; everything under that mask will be visible. If you set alpha_threshold to 255, the mask will be all 0's, which will hide the entire masked area from view.
When you are done creating your bitmask-which could conceivably amount to multiple calls to gdk_pixbuf_render_threshold_alpha( )-you should register it with the GDK graphics context as a clipping mask, using the gdk_gc_set_clip_mask( ) function. Later, when GdkRGB renders the image to the target drawable, it will pull your mask from the GdkGC structure and use it as a stencil for the image.
Now that you have a GdkPixbuf structure and a 1-bit mask, you are ready to transfer the image to a drawable. Gdk-pixbuf has two functions for rendering to drawables. The first one, gdk_pixbuf_render_to_drawable( ), requires that you place the bitmask into a GdkGC structure beforehand, as already described. The second rendering function, gdk_pixbuf_render_to_drawable_alpha( ), creates the bitmask from the alpha channel in the pixel buffer, internally using gdk_pixbuf_render_threshold_alpha( ):
void gdk_pixbuf_render_to_drawable(GdkPixbuf *pixbuf,
    GdkDrawable *drawable, GdkGC *gc, int src_x, int src_y,
    int dest_x, int dest_y, int width, int height,
    GdkRgbDither dither, int x_dither, int y_dither);
void gdk_pixbuf_render_to_drawable_alpha(GdkPixbuf *pixbuf,
    GdkDrawable *drawable, int src_x, int src_y,
    int dest_x, int dest_y, int width, int height,
    GdkPixbufAlphaMode alpha_mode, int alpha_threshold,
    GdkRgbDither dither, int x_dither, int y_dither);
|
The former function gives you more flexibility at the risk of greater complexity. You must know how to set up your bitmask and how to set up a GdkGC structure. The second function is easier to use but requires a four-channel RGBA buffer.
For completeness, gdk-pixbuf can transfer images both ways. Not only can it push a pixel buffer out to a drawable, but it can also pull a drawable image into a pixel buffer. This reciprocal capability is perfect for making screen shots or managing special effects such as zooming in on another window. The parameters are fairly straightforward, except for cmap, which is needed only when the drawable is a GdkPixmap instance, since unlike GdkWindow structures, pixmaps don't carry their own color maps:
GdkPixbuf *gdk_pixbuf_get_from_drawable(GdkPixbuf *dest,
    GdkDrawable *src, GdkColormap *cmap, int src_x, int src_y,
    int dest_x, int dest_y, int width, int height);
|
Scaling
If you're lucky, the images you load from graphics files will be exactly the correct size for what you need. In the real world, however, you will eventually have to shrink or enlarge some of your images to a more manageable size. Per- haps you need a thumbnail of a graphics file or want to stretch a background to fill a window. Or maybe you just want to display a collection of images all at the same size and need to tweak a few of them to fit. Whatever the reason, image scaling is not something you'll want to tackle from scratch, unless you are very well versed in graphics programming. A poorly designed algorithm is guaranteed to produce noticeable scaling artifacts. Image scaling is a highly mathematical, deeply researched field of study, and we are fortunate to have the algorithms for it already coded and easily accessible in gdk-pixbuf.
The primary scaling function in gdk-pixbuf is gdk_pixbuf_scale( ), an extremely flexible function that should cover most, if not all, of your scaling needs. It has quite a few parameters and can be confusing at first to use:
void gdk_pixbuf_scale(const GdkPixbuf *src, GdkPixbuf *dest,
    int dest_x, int dest_y, int dest_width, int dest_height,
    double offset_x, double offset_y, double scale_x,
    double scale_y, GdkInterpType interp_type);
|
See Figure 10.9 for a visual representation of what the parameters control.
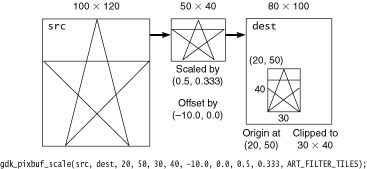
The src pixbuf is the base unscaled image-for example, the graphics file you just loaded into memory. The dest pixbuf is the preexisting target for rendering the scaled image. The scale_x and scale_y parameters are the scaling multipliers; a value less than 1.0 will shrink the image, and a value greater than 1.0 will enlarge it. A (scale_x, scale_y) value of (2.0, 0.5) will make the src pixel buffer twice as wide and only half as tall. Gdk-pixbuf will scale the entire src pixbuf by these multipliers. You can then use offset_x and offset_y to move the scaled image in relation to the destination origin at (dest_x, dest_y).
In its final step, gdk_pixbuf_scale( ) copies the area defined by the four dest_* parameters to the dest pixbuf. In other words, gdk_pixbuf_scale( ) scales src by (scale_x, scale_y), moves it to (offset_x, offset_y), and takes a snapshot of it using the rectangle defined by (dest_x, dest_y, dest_width, dest_height). By cleverly manipulating the size and position parameters, you can selectively copy any portion of the scaled src pixbuf. In Figure 10.9 we pass in an offset_x of -10.0 to shift the image 10 pixels to the left so that it's centered in the 30-pixel-wide clipping region in the destination pixbuf.
You must create the dest pixbuf beforehand. You should be careful to create one large enough to hold the scaled image. Always make dest at least (dest_x + dest_width) pixels wide and (dest_y + dest_height) pixels tall.
The last parameter, interp_type, determines which scaling algorithm you want to use. Each of the four algorithms varies in quality, speed, and appearance, so you should pick the filtering style that best suits your needs. GdkIn- terpType is an enumeration of the available algorithms:
typedef enum
{
  GDK_INTERP_NEAREST,
  GDK_INTERP_TILES,
  GDK_INTERP_BILINEAR,
  GDK_INTERP_HYPER
} GdkInterpType;
|
The enumeration represents the order of increasing quality (and increased rendering time) of the filter operations. GDK_INTERP_NEAREST is by far the quickest, but it ends up rather pixelated for enlargements. GDK_INTERP_BILINEAR uses bilinear interpolation to produce smooth, antialiased scaled images, even when you magnify the image to many times its original size. Between NEAREST and BILINEAR is GDK_INTERP_TILES, which looks pixelated like NEAREST when you enlarge but is smoother when you shrink the image, like BILINEAR. GDK_INTERP_HYPER is the highest-quality filter, and of course the slowest. In most cases, TILES and BILINEAR will be good enough.
Often you won't need to use all the various parameters in gdk_pixbuf_scale( ), and they will just get in the way. Fortunately, gdk-pixbuf also has a streamlined version: gdk_pixbuf_scale_simple( ). Gone are the offsets and scaling factors, which are either set to 0 or calculated from the size of the src pixbuf. This function will scale the entire src image to the new size of dest_width dest_height and create a GdkPixbuf instance containing the scaled image, saving you from creating a properly sized dest pixbuf yourself:
GdkPixbuf *gdk_pixbuf_scale_simple(const GdkPixbuf *src,
    int dest_width, int dest_height,
    GdkInterpType interp_type);
|
The two scaling functions we've covered so far will erase the previous contents of the destination pixel buffer (although technically the internally created destination pixel buffer in gdk_pixbuf_scale_simple( ) will always be initially empty, making this a moot point). Sometimes you'll need to overlay the scaled image on top of an existing image without entirely overwriting it, a process known as compositing. The gdk-pixbuf function to do alpha blending like this is gdk_pixbuf_composite( ). It is similar to gdk_pixbuf_scale( ) except for the extra parameter, overall_alpha, which it uses to determine the opacity of the scaled image:
void gdk_pixbuf_composite(const GdkPixbuf *src, GdkPixbuf *dest,
    int dest_x, int dest_y, int dest_width, int dest_height,
    double offset_x, double offset_y, double scale_x,
    double scale_y, GdkInterpType interp_type,
    int overall_alpha);
|
The dest pixbuf should already have image data in it; otherwise, what's the point of compositing the scaled src image on top of it?
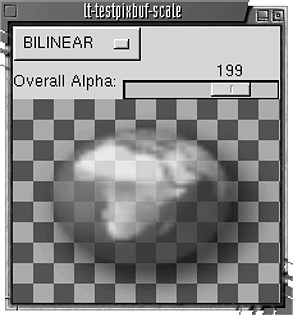
Incidentally, gdk-pixbuf has a couple of other more specialized scaling and compositing functions: gdk_pixbuf_composite_color( ) and the slimmer version, gdk_pixbuf_composite_color_simple( ). Rather than compositing the scaled image onto another image, these functions will composite it onto a generated checkerboard pattern. This functionality is probably not useful to you unless you are writing an application for viewing or editing anti-aliased images. The checkerboard pattern helps emphasize the anti-aliasing. Figure 10.10 shows testpixbuf-scale, one of the test programs that comes with gdk-pixbuf, using gdk_pixbuf_composite_color( ) to display gnome-globe.png, an icon packaged with gnome-libs.
A specialization of the scaling operation is the copy operation, in which the scaling multipliers are both 1.0. Rather than forcing you to call gdk_pixbuf_scale( ) with a one-to-one scaling ratio, gdk-pixbuf offers a con- venience function to do it in a more rational way: gdk_pixbuf_copy_area( ). This function copies the region defined by src_x, src_y, width, and height in the source pixel buffer, into the destination pixel buffer at (dest_x, dest_y):
void gdk_pixbuf_copy_area(const GdkPixbuf *src_pixbuf,
    int src_x, int src_y, int width, int height,
    GdkPixbuf *dest_pixbuf, int dest_x, int dest_y);
|
Progressive Loading
Gdk-pixbuf's image-loading facilities make it very easy for you to load a variety of graphics file formats without doing any extra work. All you have to do is supply the file name, and gdk-pixbuf will handle the rest. However, the file- loading system has one potentially limiting flaw: It blocks until it's finished. With icons and smaller images, this temporary stall is not noticeable enough to matter, but when the file is particularly large, or is loading from a remote site with a slow connection, your application may flounder in an input/output loop, unable to update itself. The resulting slowness gives your application a buggy, unresponsive appearance, even though it has a good reason for stalling.
To address this problem, the gdk-pixbuf library offers the GdkPixbufLoader API. GdkPixbufLoader is a derivative of GtkObject that allows the loading process to be controlled by your application rather than by gdk-pixbuf's image-loading code. Because it's derived from GtkObject, GdkPixbufLoader can notify you through GTK+ signals when something interesting happens.
The interface is simple and straightforward. You create a loader object, write chunks of raw image data to it, and then close it when you're done. As soon as the loader receives enough of the graphics file to determine what sort of image it's loading, it creates a GdkPixbuf structure in which to store the image data. When you close the loader, it unreferences that GdkPixbuf, so if you want the pixbuf still to exist after you're done with the loader, your appli- cation will need to explicitly call gdk_pixbuf_ref( ) on it (and of course release it when you're done). The best place to reference the pixbuf is inside an area_prepared signal callback, which we'll discuss in a moment.
The loader uses the same code to load images into GdkPixbufLoader that gdk-pixbuf uses inside gdk_pixbuf_new_from_file( ). Here's the basic GdkPixbufLoader API:
GdkPixbufLoader* gdk_pixbuf_loader_new(  );
gboolean gdk_pixbuf_loader_write(GdkPixbufLoader *loader,
    const guchar *buf, size_t count);
GdkPixbuf* gdk_pixbuf_loader_get_pixbuf(
    GdkPixbufLoader *loader);
void gdk_pixbuf_loader_close(GdkPixbufLoader *loader);
|
The loader has three signals of interest to us here.3 Here are the prototypes for these signals, from the GdkPixbufLoaderClass structure:
void (* area_prepared) (GdkPixbufLoader *loader);
void (* area_updated) (GdkPixbufLoader *loader,
    guint x, guint y, guint width, guint height);
void (* closed) (GdkPixbufLoader *loader);
|
The aforementioned area_prepared signal indicates that the loader has read enough of the file to calculate the size and color depth of the image. Until the loader has this information, it makes no sense to create the target GdkPixbuf. This first milestone is important enough to merit a special signal emission because it means that your application can allocate space in the display for the image. If you connect to the area_prepared signal, you should take the opportunity in your callback to call gdk_pixbuf_ref( ) on the supplied pixbuf. Also, you are guaranteed at this point that the loader has not started writing into the new pixel buffer, so you can fill it with whatever background you want, whether it's a solid color or a placeholder image. As image data continues to pour into the loader, your background image will slowly be written over, line by line, until the full image arrives.
You'll receive only one area_prepared signal per loader, but altogether you'll end up receiving several area_updated signals. In fact, each time you call gdk_pixbuf_loader_write( ), the loader will fire off another area_updated signal. If you're displaying the progressive image to a drawable-which, after all, is largely the point of using GdkPixbufLoader- you should use this opportunity to update the display. In the sample application at the end of this chapter, we do this by copying the currently loaded portion of the image to a GdkPixmap drawable with gdk_pixbuf_render_to_drawable_alpha( ) and then triggering a refresh with gtk_widget_draw( ).
The final signal, closed, is useful if you want to know when the image is completely loaded. If other parts of your application, such as a Web browser window, need to be notified when the image is complete, you can connect them to the loader's closed signal, rather than blocking until then.
Autoconf Support
To facilitate its integration with the GNOME build system, the gdk-pixbuf package contains an autoconf macro, a gdk-pixbuf-config tool, and a drop-in extension for gnome-config.
You can use the macro AM_PATH_GDK_PIXBUF in your configure.in file to run a series of checks for gdk-pixbuf. It works just as you would expect: You give it the minimum version of gdk-pixbuf your application requires, followed by an optional shell-scripted action to perform if the target system has a valid gdk-pixbuf installation, and a second action to perform if the target system fails the test:
AM_PATH_GDK_PIXBUF([MINIMUM-VERSION, [ACTION-IF-FOUND
  [, ACTION-IF-NOT-FOUND]]])
|
The macro will call AC_SUBST on the GDK_PIXBUF_CFLAGS and GDK_PIXBUF_LIBS variables, which you can then reference from your Makefile.am file. It also runs some safety checks to alert the administrator of any strange behavior in the current gdk-pixbuf installation. Finally, it adds the options --with-gdk-pixbuf-prefix and --with-gdk-pixbuf-exec-prefix to the configure script to handle cases in which gdk-pixbuf is installed in a nonstandard place on the target system.
Gdk-pixbuf supplies its own version of gnome-config, called gdk-pixbuf-config, for retrieving path and version information at the command line. It also installs a plug-in extension so that you can get the same information from gnome-config. You can run either one of these commands to obtain the necessary CFLAGS parameters for gdk-pixbuf:
gnome-config gdk_pixbuf --cflags
gdk-pixbuf-config --cflags
|
Gdk-pixbuf Application Example
In our sample graphics application, we will touch on many points related to what we've just been discussing. We will see how to create a GdkPixbuf structure from a file and from an existing raw buffer. We will see how to copy image data from buffer to buffer, and from buffer to GDK drawable. We'll dip into image scaling and compositing, event handling, and even progressive image loading. To top things off, we'll include double buffering with a GdkPixmap.
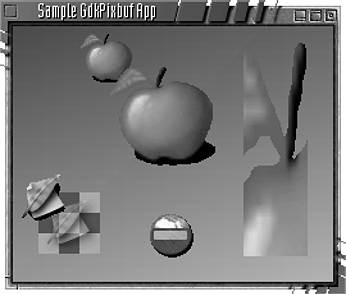
Although this example is technically a GNOME application, most of it consists of calls to GDK and gdk-pixbuf. You can click on two of the icons (see Figure 10.11). Clicking on the feather will change the alpha blending level and make the feather fade in and out of view; clicking on the icon for gnome-error.png will load an image of a globe, a few scan lines at a time. Figure 10.11 shows a screen shot of the sample application. Listings 10.1 and 10.2 contain the makefile and the source code.
Listing 10.1 Makefile for Sample Gdk-pixbuf Application

CC = gcc
CFLAGS = `gnome-config --cflags gnomeui gdk_pixbuf`
LDFLAGS = `gnome-config --libs gnomeui gdk_pixbuf`

rgbtest: rgbtest.c
        $(CC) rgbtest.c -o rgbtest $(CFLAGS) $(LDFLAGS)
|
Listing 10.2 Source Code for Sample Gdk-pixbuf Application

/* rgbtest.c - Sample gdk-pixbuf Application */

#include <gnome.h>
#include <gdk-pixbuf/gdk-pixbuf.h>
#include <gdk-pixbuf/gdk-pixbuf-loader.h>

#include <unistd.h>
#include <sys/stat.h>

#define PACKAGE "rgbtest"
#define VERSION "0.0.1"

/* Size of drawing area */
#define WIDTH 250
#define HEIGHT 200

/* Coordinates of progressive loader image */
#define LOADER_X 100
#define LOADER_Y 140

/* Visible drawing surface */
GtkWidget *drawing_area;

/* Raw pixel buffer */
static guchar drawbuf[WIDTH * HEIGHT * 6];

/* Double-buffer pixmap */
GdkPixmap *dbuf_pixmap = NULL;

/* Feather opacity */
static gint opacity = 127;

/* Loader stuff */
GdkPixbufLoader *loader = NULL;
GdkPixbuf *loader_pixbuf = NULL;
guchar *filebuf = NULL;
guint filesize = 0;
guint curpos = 0;

/* Create a colorful background gradient */
static void init_drawing_buffer(  )
{
  gint x, y;
  gint pixel_offset;
  gint rowstride = WIDTH * 3;

  for (y = 0; y < HEIGHT; y++)
  {
    for (x = 0; x < WIDTH; x++)
    {
      pixel_offset = y * rowstride + x * 3;

      drawbuf[pixel_offset] = y * 255 / HEIGHT;
      drawbuf[pixel_offset + 1] = 128 - (x + y) * 255 /
        (WIDTH * HEIGHT);
      drawbuf[pixel_offset + 2] = x * 255 / WIDTH;
    }
  }
}

/* Render our images to the double-buffered pixmap */
static void render_apples(  )
{
  gint width;
  gint height;
  GdkPixbuf *pixbuf1, *pixbuf2, *pixbuf3;

  gchar *applefile = gnome_pixmap_file ("apple-red.png");

  if(applefile)
  {
    g_message ("Rendering apple: %s", applefile);
    pixbuf1 = gdk_pixbuf_new_from_file(applefile);
    width = gdk_pixbuf_get_width(pixbuf1);
    height = gdk_pixbuf_get_height(pixbuf1);

    /* Scale second apple to double size */
    pixbuf2 = gdk_pixbuf_scale_simple(pixbuf1, width * 2,
      height * 2, GDK_INTERP_BILINEAR);

    /* Create a 50 x 180 GdkPixbuf to display our distorted
     * apple. Set the dest parameters to copy into the full
     * area of pixbuf3. Offset the chunk of pixbuf1 that we're
     * scaling by (-50.0, -60.0) so that we see an interesting
     * bit of the stem, and not just the upper left-hand corner
     * of the apple. Finally, stretch the apple by 4 in the
     * horizontal and 12 in the vertical.
     */
    pixbuf3 = gdk_pixbuf_new (GDK_COLORSPACE_RGB, TRUE, 8,
      50, 180);
    gdk_pixbuf_scale(pixbuf1, pixbuf3,
      0, 0, 50, 180,
      -50.0, -60.0,
      4.0, 12.0,
      GDK_INTERP_BILINEAR);

    gdk_pixbuf_render_to_drawable_alpha(pixbuf1, dbuf_pixmap,
      0, 0, 50, 0, width, height,
      GDK_PIXBUF_ALPHA_BILEVEL, 128,
      GDK_RGB_DITHER_NORMAL, 0, 0);
    gdk_pixbuf_render_to_drawable_alpha(pixbuf2, dbuf_pixmap,
      0, 0, 70, 20, width * 2, height * 2,
      GDK_PIXBUF_ALPHA_BILEVEL, 128,
      GDK_RGB_DITHER_NORMAL, 0, 0);
    gdk_pixbuf_render_to_drawable_alpha(pixbuf3, dbuf_pixmap,
      0, 0, WIDTH - 70, 0, 50, 180,
      GDK_PIXBUF_ALPHA_BILEVEL, 128,
      GDK_RGB_DITHER_NORMAL, 0, 0);

    gdk_pixbuf_unref(pixbuf1);
    gdk_pixbuf_unref(pixbuf2);
    gdk_pixbuf_unref(pixbuf3);
    g_free(applefile);
  }
}

static void render_feathers(  )
{
  gint width;
  gint height;
  GdkPixbuf *pixbuf1, *pixbuf2;

  gchar *featherfile = gnome_pixmap_file ("gnome-word.png");

  if(featherfile)
  {
    g_message ("Rendering feather: %s", featherfile);
    pixbuf1 = gdk_pixbuf_new_from_file(featherfile);
    width = gdk_pixbuf_get_width(pixbuf1);
    height = gdk_pixbuf_get_height(pixbuf1);

    /* Create a feather composited onto a checkerboard */
    pixbuf2 = gdk_pixbuf_composite_color_simple(pixbuf1,
      width, height, GDK_INTERP_TILES, opacity, 16,
      0xaaaaaa, 0x555555);

    /* Render checkerboard feather first, so the overlapping
     * normal feather (pixbuf1) will come out on top
     */
    gdk_pixbuf_render_to_drawable_alpha(pixbuf2, dbuf_pixmap,
      0, 0, 20, 130,
      width * 1, height * 1,
      GDK_PIXBUF_ALPHA_BILEVEL, 128,
      GDK_RGB_DITHER_NORMAL, 0, 0);
    gdk_pixbuf_render_to_drawable_alpha(pixbuf1, dbuf_pixmap,
      0, 0, 0, 110,
      width, height,
      GDK_PIXBUF_ALPHA_BILEVEL, 128,
      GDK_RGB_DITHER_NORMAL, 0, 0);

    gdk_pixbuf_unref(pixbuf1);
    gdk_pixbuf_unref(pixbuf2);
    g_free(featherfile);
  }
}

void expose_event_cb(GtkWidget *widget, GdkEventExpose *event,
    gpointer data)
{
  /* Don't repaint entire window upon each exposure */
  gdk_window_set_back_pixmap (widget->window, NULL, FALSE);

  /* Refresh double buffer, then copy the "dirtied" area to
   * the on-screen GdkWindow
   */
  gdk_window_copy_area(widget->window,
    widget->style->fg_gc[GTK_STATE_NORMAL],
    event->area.x, event->area.y,
    dbuf_pixmap,
    event->area.x, event->area.y,
    event->area.width, event->area.height);
}

static void area_prepared_cb(GdkPixbufLoader *loader,
    gint x, gint y, gint width, gint height, gpointer data)
{
  gchar *bkgd_file;
  GdkPixbuf *pixbuf;

  loader_pixbuf = gdk_pixbuf_loader_get_pixbuf(loader);
  gdk_pixbuf_ref(loader_pixbuf);

  bkgd_file = gnome_pixmap_file ("gnome-error.png");
  pixbuf = gdk_pixbuf_new_from_file(bkgd_file);
  g_free(bkgd_file);

  /* Copy placeholder image to loader_pixbuf */
  gdk_pixbuf_copy_area(pixbuf, 0, 0,
    gdk_pixbuf_get_width(pixbuf),
    gdk_pixbuf_get_height(pixbuf),
    loader_pixbuf,
    0, 0);
}

static void area_updated_cb(GdkPixbufLoader *loader,
    gpointer data)
{
  gint height, width;
  GdkRectangle rect = { LOADER_X, LOADER_Y, 48, 48 };

  g_message("Rendering Loader Pixbuf");
  width = gdk_pixbuf_get_width(loader_pixbuf);
  height = gdk_pixbuf_get_height(loader_pixbuf);

  /* Copy latest version of progressive image to the double
   * buffer
   */
  gdk_pixbuf_render_to_drawable_alpha(loader_pixbuf,
    dbuf_pixmap,
    0, 0, LOADER_X, LOADER_Y,
    width, height,
    GDK_PIXBUF_ALPHA_BILEVEL, 128,
    GDK_RGB_DITHER_NORMAL, 0, 0);

  /* Trigger an expose_event to flush the changes to the
   * drawing area
   */
  gtk_widget_draw(drawing_area, ▭);
}

static void nudge_loader(  )
{
  guint bitesize = 256;
  guint writesize = bitesize;

  if (curpos >= filesize)
    return;

  /* Trim writesize if it extends past the end of the file */
  if (curpos + bitesize >= filesize)
    writesize = filesize - curpos;

  /* Send next chunk of image */
  if (!gdk_pixbuf_loader_write(loader, &filebuf[curpos],
      writesize))
    g_warning("Loader write failed!!");

  curpos += writesize;

  /* Clean up loader when we're finished writing the entire
   * file; loader_pixbuf is still around because we referenced it
   */
  if (curpos >= filesize)
    gdk_pixbuf_loader_close(loader);
}

static void init_loader(  )
{
  FILE *file;
  gchar *loadfile;

  loader = gdk_pixbuf_loader_new(  );

  gtk_signal_connect(GTK_OBJECT(loader), "area_prepared",
    GTK_SIGNAL_FUNC(area_prepared_cb), NULL);
  gtk_signal_connect(GTK_OBJECT(loader), "area_updated",
    GTK_SIGNAL_FUNC(area_updated_cb), NULL);

  /* Load file into memory for easier cycling */
  loadfile = gnome_pixmap_file ("gnome-globe.png");
  file = fopen (loadfile, "r");
  if (file)
  {
    struct stat statbuf;

    if (stat(loadfile, &statbuf) == 0)
    {
      filesize = statbuf.st_size;
      g_message("Found file %s, size=%d", loadfile, filesize);

      filebuf = g_malloc(filesize);
      fread(filebuf, sizeof(char), filesize, file);
    }
    fclose(file);
  }
  else
    g_warning("Failed to find file %s", loadfile);

  /* Load the first small chunk, i.e., enough to trigger an
   * area_prepared event
   */
  nudge_loader(  );

  g_free(loadfile);
}

gint event_cb(GtkWidget *widget, GdkEvent *event, gpointer data)
{
  GdkEventButton *bevent = (GdkEventButton *)event;

  switch ((gint)event->type)
  {
  case GDK_BUTTON_PRESS:
    /* Handle mouse button press */

    /* For clicks on the feather icon */
    if (bevent->x >= 20 && bevent->x <= 68 &&
      bevent->y >= 130 && bevent->y <= 178)
    {
      GdkRectangle rect = { 20, 130, 48, 48 };

      opacity += 63;
      if (opacity > 255)
        opacity = 0;

      render_feathers(  );
      gtk_widget_draw(widget, &rect);
    }

    /* For clicks on the globe loader icon */
    if (bevent->x >= 100 && bevent->x <= 148 &&
      bevent->y >= 140 && bevent->y <= 188)
    {
      nudge_loader(  );
    }
    return TRUE;
  }

  /* Event not handled; try parent item */
  return FALSE;
}

void quit_cb (GtkWidget *widget)
{
  gdk_pixbuf_unref(loader_pixbuf);
  g_free(filebuf);
  gtk_main_quit (  );
}

int main (int argc, char **argv)
{
  GtkWidget *app;
  GdkPixbuf *pixbuf;

  /* Includes a call to gdk_rgb_init(  ) */
  gnome_init (PACKAGE, VERSION, argc, argv);

  gtk_widget_push_visual(gdk_rgb_get_visual(  ));
  gtk_widget_push_colormap(gdk_rgb_get_cmap(  ));
  app = gnome_app_new(PACKAGE, "Sample GdkPixbuf App");
  gtk_widget_pop_visual(  );
  gtk_widget_pop_colormap(  );

  /* Restrict window resizing to size of drawing buffer */
  gtk_widget_set_usize(GTK_WIDGET(app), WIDTH, HEIGHT);
  gtk_window_set_policy(GTK_WINDOW(app), TRUE, FALSE, FALSE);

  /* Handle window manager closing */
  gtk_signal_connect(GTK_OBJECT(app), "delete_event",
    GTK_SIGNAL_FUNC(quit_cb), NULL);

  /* Create drawing-area widget */
  drawing_area = gtk_drawing_area_new (  );
  gtk_widget_add_events(GTK_WIDGET(drawing_area),
    GDK_BUTTON_PRESS_MASK);
  gtk_signal_connect(GTK_OBJECT(drawing_area), "expose_event",
    GTK_SIGNAL_FUNC(expose_event_cb), NULL);
  gtk_signal_connect(GTK_OBJECT(drawing_area), "event",
    GTK_SIGNAL_FUNC(event_cb), NULL);

  gnome_app_set_contents(GNOME_APP(app), drawing_area);

  gtk_widget_show_all(app);

  /* Create double-buffered pixmap; must do it here, after
   * app->window is created. Inherits color map and visual
   * from app.
   */
  dbuf_pixmap = gdk_pixmap_new(app->window, WIDTH, HEIGHT, -1);

  /* Create a GdkPixbuf out of our background gradient, then
   * copy it to our double-buffered pixmap */
  init_drawing_buffer(  );
  pixbuf = gdk_pixbuf_new_from_data(drawbuf, GDK_COLORSPACE_RGB,
    FALSE, 8, WIDTH, HEIGHT, WIDTH * 3, NULL, NULL);
  gdk_pixbuf_render_to_drawable(pixbuf, dbuf_pixmap,
    app->style->fg_gc[GTK_STATE_NORMAL],
    0, 0, 0, 0, WIDTH, HEIGHT,
    GDK_RGB_DITHER_NORMAL, 0, 0);

  init_loader(  );
  render_apples(  );
  render_feathers(  );

  gtk_main (  );

  return 0;
}
|
This sample application works by creating a GdkPixmap resource to hold our double buffer and a GtkDrawingArea widget to display our graphical images. We use instances of GdkPixbuf to create and load smaller parts of the main image, which we then copy into our GdkPixmap with gdk_pixbuf_render_to_drawable_alpha( ). Each time we get an expose_event signal, we copy to the drawing-area widget only the portion that needs refreshing. When we change the double buffer, we must trigger an expose_event signal for that region with a call to gtk_widget_draw( ).
The action starts in main( ). We create a GnomeApp widget for our top-level window, pushing the GdkRGB visual and color map while we do so. This extra step ensures that we have a compatible color setup for gdk-pixbuf. Next we set the resizing policy so that the user can't resize the main window to larger than our drawing area. After that, we connect GTK+ signal handlers for the delete_event signal (to clean up on exit), the event signal (to handle mouse button presses), and the expose_event signal (to copy "dirty" areas from the double buffer to the drawing area). Finally, we create our GdkPixmap double buffer and load it with various icon images from the gnome-core package.
Our expose_event handler is quite simple. All it does is copy a rectangular area from the double buffer into the drawing area. It uses the coordinates passed in with event->area to avoid copying more than it has to, to restore the window after a resize or exposure.
After rendering the background gradient and the apple icons the first time, we don't have to worry about them again for the life of the application. Their images will continue to reside in the double buffer because we never do anything to overwrite them. The only areas we need to update after the initial rendering are the two areas we set up as clickable regions, in the event handler. To minimize the amount of extra work we do and increase the performance of our application, we set up a clipping region for these two areas by passing a GdkRectangle instance into gtk_widget_draw( ) when we update their images in the double buffer.
The way we handle mouse clicks is a little heavy-handed. We end up hardcoding the coordinates for the two clickable regions. If the user clicks inside the region we define for the feather icon, we increase the opacity and redraw the feather. If the mouse click lands on the globe icon, we update that icon through the progressive loader. We ignore mouse clicks everywhere else. This approach is fairly manageable for a couple of small icons that never move, but it isn't scalable at all. If we had movable objects, we would have to add a lot of extra code to keep track of the clickable "hot spots." This type of code can become complex very quickly, and it probably isn't something you'll want to attempt if you don't have to. The GNOME Canvas (see Chapter 11) addresses exactly these issues and abstracts away a great deal of the complexity of dealing with movable graphics. If you're doing anything more complex than displaying static images, you should consider using the Canvas instead of GtkDrawingArea.
The progressive loader updates the globe icon. Inside our init_loader( ) function, we set up the callbacks for the loader, load the entire gnome-globe.png file into filebuf, and then call nudge_loader( ) once to write the first bit of the file into the loader's pixel buffer. This action loads enough image data to determine the size and color depth of the image, which in turn triggers the area_prepared signal. In the area_prepared callback, we set up a tempo- rary placeholder icon, using the gnome-error.png graphic. We use the gdk_pixbuf_copy_area( ) function to copy the image from one pixel buffer to another.
Each time you click on this icon, the application calls nudge_loader( ) again, which writes out another few scan lines, slowly replacing the background gnome-error.png placeholder image with the foreground gnome-globe.png image. When the image is completely loaded, we call gdk_pixbuf_loader_close( ) to free up the loader. At this point, if we hadn't referenced loader_pixbuf in the area_prepared callback, that pixbuf would have been destroyed along with the loader. As it is, the loader_pixbuf will remain until we unreference it in the delete_event callback.
You may have noticed from the code or from the jagged edges in the screen shot that we are not achieving the best graphics quality possible. Even though the graphics are all four-channel RGBA images, fully capable of alpha blending, we fail to take advantage of the alpha channel because our double buffer is an X11 pixmap, not a GdkPixbuf instance. Because we render each image separately to the server-side pixmap, the alpha channel is reduced to a 1-bit mask for each copy operation. If we had used GdkPixbuf for the double buffer instead of GdkPixmap, we could have kept the full range of the alpha channel intact, leading to smoother edges on the apples and better blending with the background gradient. Consider this a challenge to modify the sample application to use full alpha blending.