 Using
SeaIO Hardware and Software with Labview Using
SeaIO Hardware and Software with Labview
Download the PDF file to view the complete installation instructions including
pictures.
 Download PDF (160K) Download PDF (160K)
LabVIEW is a program development application that uses a
graphical programming language, G, to create programs in block diagram form. These
instructions assume a high degree of familiarity with Labview. Labview is very easy and
intuitive, and comes with an excellent tutorial and a good help file. If the user is not
yet familiar with Labview, the tutorial is highly recommended.
First, install and configure the hardware and software of
your SeaIO product. This example uses an 8205, a 96 bit Programmable USB product. The
first port is set as an output, and the effect of the program is to turn on/off an LED
connected to the first port.
Open a new VI project. Use Windows->Show Diagram to show
the diagram. When you select the diagram, the Functions pallete will appear. The
‘Advanced’ functions are marked with an exclamation mark in an orange circle.
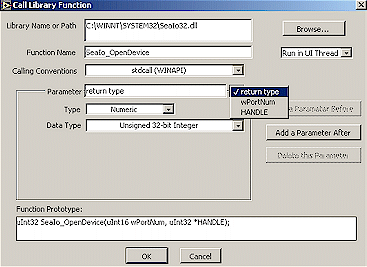
Select this, and from the pull down menu choose the icon for ‘Call Library
function.’
Insert one of this function onto your diagram, and
double-click it to edit it. Browse to find the SeaIO DLL. It will be named
"seaio32.dll" and will be in the Windows System Directory. (In NT 4.0 and
Windows 2000 this will be C:\Winnt\System32, in Windows 98 this will be
C:\Windows\System.) A DLL is a "Dynamic Link Library" and is a file containing
executable code as functions that user mode programs can use. The option "Run in UI
Thread" will be default and is correct. Under Function Name, type
"SeaIo_OpenDevice". It must have the correct spelling, capitalization, and the
underscore. The Calling Convention must be changed to "stdcall (WINAPI)." (This
is an easy place to miss, and leads to confusing errors.)

Now input the parameters. There are three needed on
this call. The first is "return type," set to "Numeric," "32 bit
unsigned Integer." The return value for this and most SeaIO calls is an error code,
with zero meaning no error. Use the button "Add a Parameter After" to create
another parameter. In this example, its called "wPortNum," and it must be set to
"Numeric," "unsigned 16 bit Integer," and passed as a value. Passing
as a value means that the DLL gets the value sent to it, and does not try to modify the
result. This value is the "Card Number" of your SeaIO card.
The last parameter is named "HANDLE," and must be a "Numeric,"
"Unsigned 32-bit Integer," and is passed as a "Pointer to Value." This
means that Labview passes the location of this variable, and the DLL then fills it with a
value and returns. The HANDLE is the "device handle" of the SeaIO card. This
value must be used (as a value, not a pointer,) by all other SeaIO calls.

Open the SeaIO example now. In the example, the
inputs to this library call are provided by Constant boxes, and "wired" to the
inputs of the function. The return value is sent to a Display box, and presents the error
code from the function. Note that a value is wired as an input on the left, and as an
output on the right of the "Call Library Function." This allows the next
function to use the same input, or to use the results of a value that was passed as a
pointer. Note that "Handle" is passed to each of the next functions.
All of the functions available are fully described in the SeaIO32.h file, found in
"C:\Program Files\Seaio\Includes." This file will describe how many and what
type of parameters are needed. The notation UCHAR means unsigned 8-bit, DWORD means signed
32-bit, etc. Parameters described as pointers, such as "PBYTE pBuffer," in
SeaIo_GetData, are passed as "pointer to value" in Labview.
The next function added is a SeaIo_WriteReg function. Note that Constant boxes give the
port number and the output value, but that your program could easily accept the inputs of
some other operation here. Note that Handle, which was acquired in the Open function is
wired as an input here, and then wired to the next function. The next function is
SeaIo_CloseDevice. Your program should perform a close for every open. If you have a
device connected with an output on it, then input the card number and try this example.
|


