
Email Brian
Brian's Website


Email Tom
Tom's Website
|
Email Brian Brian's Website |
|
Email Tom Tom's Website |
Go to the Table Of Contents
Did you read the Preface? Thanks!
"Use Linux. It's open source. You can compile your own kernel ..." Whoa!
This is a fantastic feature, once you get used to the concept. It does scare off many casual and application-oriented rather than technical users, though. Don't worry - you don't have to compile a kernel, ever, if you don't want to. However, you're probably reading this chapter precisely because you do want to build a new kernel, or at least are interested in what's involved. As an added bonus, it's really quite easy, taken one byte at a time.
We'll lead off with the quick start: a 22-step kernel fetch, configure, compile, install, and test routine - no explanations, and no fluff. Then we'll take a pace back and have a look at the Linux kernel: what it is, what roles it plays in running your computer, and how it accomplishes these tasks. We'll discuss reasons for upgrading the kernel, then get into the configuration utilities. Once the kernel is configured, then we'll look again at the steps necessary for compiling, then installing and testing, in some additional detail. First, though, the fast version (we'll use a complete set of fresh kernel sources, version 2.2.16, in our examples):
mv linux linux-2.2.16).ln -sf linux-2.2.16 linux)make oldconfig to use all your previous choices as automatic defaults; make config for a long session of Q & A, one option at a time, for hundreds of options; make menuconfig for a text-based menu configuration routine; or make xconfig, to use a Tcl/Tk front end to the configuration process if you're running X.make depmake clean. It doesn't hurt to run this step even if it isn't needed, so do it anyway.make bzImagemake modules ; make modules_installcp /usr/src/linux/System.map /boot/System.map-2.2.16cp bzImage /boot/vmlinuz-2.2.16ln -sf vmlinuz-2.2.16 vmlinuz ; ln -sf System.map-2.2.16 System.maplilo after editing /etc/lilo.conf, otherwise your changes will have no effect. For Grub, editing the /boot/grub/menu.lst file is all that's necessary.The Linux kernel is the core of the operating system. The kernel abstracts the hardware and presents a virtual machine to the processes that run above. It accomplishes this via a set of system calls (or APIs) which programs use to interact with the virtual machine. An understanding of the tasks performed by the kernel is very useful, when preparing to compile one of your own.
The first version of the Linux kernel was written by Linus Torvalds in 1991. Linus wanted to have a Unix-workalike kernel he could use for his studies, and there were restrictions on the manner of changes he could make to the Minix system (written by Professor Andrew Tanenbaum at Amsterdam Free University) that was available for i386 machines at that time. Linus designed what is termed a monolithic kernel - that is, the kernel keeps all of its code in memory all of the time. The other, more "modern" alternative is called a microkernel-based architecture, with major OS functionality run as separate, swappable processes. Linux appears to be doing well despite its Paleolithic roots.
In the intervening decade, Linux has evolved rather dramatically, although Linus retains full control over the formal releases of the Linux kernel (he is often referred to in the press as an extraordinarily benevolent dictator). The kernel now incorporates dynamically, automatically loadable (and unloadable) modules as well as a host of other features. However, this does not change the fact that Linux still is a monolithic kernel. Except in single-user (aka maintenance) mode, the Linux kernel provides a multi-user, multi-tasking (or multi-processing) environment. The kernel takes care of many tasks, including those listed in Table 7-1.
Table 7-1
Some Linux Kernel Features
| Task | Description |
| Memory Management | The kernel presents a virtual address space that can be much larger than physical memory. Up to 2GB of installed RAM can be used with a default kernel (up to 4GB and perhaps more with special kernel patches from Andrea Arcangeli) in the 2.2.x series. Processes are allocated memory on request (amounts within limits based on available memory - no one process is allowed to hog all the resources). Memory is also shared. This trait is frequently seen in executable space, such as dynamic libraries, as well as multiple instances of a single executable, such as Bash. |
| Process Management | Linux is a multi-processing environment. Many simultaneous processes are allocated shared resources by the kernel such that each process "believes" that it is in sole control of the computer. Process management not only means doling out the computing assets, but also preserving the state of each process and its context as it is switched in and out of run mode. Processes are scheduled according to their system priority (also referred to as the "nice" value) and dynamic priorities based upon current system usage. |
| Process Communications | The system communicates with processes through a variety of tools. The most common are called signals, which can be sent by processes with the appropriate system privileges, or by the kernel. These include terminate (SIGHUP: 1), and SIGKILL (signal 9, stop). All signals may be listed by typing kill -l; the generated list of signals will vary across architectures. An alternative way of looking at signals is to think of them as similar to software interrupts, driving one of four default responses by the OS: terminate, core, stop, or ignore. Terminate allows a process to end in an orderly fashion. Core indicates that a memory snapshot should be left behind if possible, following an execution failure. Stop instructs a process to end execution preemptively. Ignore has a reasonably obvious effect. |
| Data Structures | The Linux kernel uses linked lists (where each "item" points to the next in line, as a part of its structure), hash tables (a type of fast access data lookup structure) and virtual filesystems to maintain its state, and coordinate the various and sundry activities. This last feature, virtual filesystems, has its most significant example in the /proc filesystem, which contains mostly read-only data about the state of aspects of the running kernel. Some parts may be written to, however, which leads directly to the potential for live kernel tuning (see the Performance Tuning sidebar at the end of this chapter). |
| Modular Drivers | A key development in recent stable versions is dynamically loadable modules as an adjunct to the kernel. With kmod (the kernel module handler), driver, filesystem, executable formats, and other modules are loaded on demand, and unloaded by a cron job when they've been unused for a specified time (maximum five minutes by default, set in /etc/crontab). |
As we'll discuss shortly, the major portion of kernel configuration involves deciding which features and drivers should be enabled, either as modules or built directly into the kernel. But first, let's discuss why we suggest that you work with the very heart of Linux.
These are four major reasons for recompiling:
This reason is usually very important in a corporate network environment, and on boxes that are connected directly to the Internet. The reason we chose to use 2.2.16 as our target for a kernel upgrade is precisely because it addresses vulnerabilities that were in the 2.2.14 and 2.2.15 Linux kernels. The details of the security update and feature upgrades present on 2.2.16 are available at http://www.linux.org.uk/VERSION/relnotes.2216.html.
Note
Linux.org.uk (http://www.linux.org.uk/) is an online home of Alan Cox, kernel hacker and generally regarded as the number two guy behind Linus in the Linux kernel development chain of command. Alan posts important updates and information about current kernels, updates, and patches. This is a good place to visit on a regular basis when you work with Linux. Additionally, visit Kernel Traffic frequently at http://kt.linuxcare.com/kernel-traffic/ - it summarizes the linux-kernel mailing list, a good thing since the list averages over 1000 messages per week.
Next, many kernel upgrades also add upgraded capabilities for existing hardware, as well as drivers for newer hardware. If you go to the URL listed in the previous paragraph, you find that there are several pages worth of driver and network code updates, in addition to changes in the filesystem, core kernel, and miscellaneous other bits. These are often repairs to existing problems that are found and reported to the kernel maintainers by people just like you and us. A properly reported bug can turn into a kernel patch within days, if not hours. To learn more about how that process works, you can start by researching the development process on the main kernel site, http://www.kernel.org/, then follow the links to your closest mirror site.
The third reason for upgrading or simply recompiling the Linux kernel is to "personalize" it to your machine. You'll note if you look at the OpenLinux Binaries and Installation CD-ROM, in the /mnt/cdrom/Packages/RPMS directory, all of the packages are of the format xxxxxx.i386.rpm. This means the binary packages have been compiled against lowest common denominator hardware. The kernel is the only exception to this (type uname -a to see that a processor specific kernel is running). However, by leaving out all the bits and pieces that you don't need, you create a kernel with a smaller memory footprint, leaving more room for user and server applications.
The fourth and final reason for recompiling the Linux kernel is to learn. It is our opinion that one of the outstanding features of the Linux phenomenon is its intrinsic openness. We can pop the hood and look at and tinker with the engine all we want. Many people don't want to do that, and that's OK, too. To use an analogy, many of us know how to change our own oil in the car. Mostly we choose not to, preferring to pay others to get grubby, and properly recycle the oil. But the very point is that we can do so. In just such a manner, people can happily run Linux without ever knowing anything except that it works, it works well, and it crashes hardly ever. Or you can tweak and tune to your heart's content, if that floats your boat. We like having choices, and think that you're reading this because you do, too.
Now that we've looked at an overview of the kernel, and justified our activities (grin), it's time to get to work. Now we acquire and install the source code we're going to use.
There are a variety of ways to get kernel sources. We could head over to the Caldera Web site, pick up the latest kernel upgrade, and install the binary directly. Or we can get the source RPM, install that, and recompile from there. For the examples here, however, we're going to go to the source, kernel.org, as well as visit Alan Cox's pages, to get the code we want.
Hint
The full Linux kernel sources are only installed with the Developer Workstation and All Packages installation selections. If you need to, add the following packages from the Binaries and Installation disc using RPM: linux-kernel-doc, linux-source-common, linux-kernel-include, and linux-source-i386 (or your architecture specific version).
First let's prepare the source directory for a new kernel tree. Start by becoming the root user, then changing to the /usr/src [CT5]directory, since that's where we'll be working. Then we get a listing of a standard OpenLinux /usr/src directory:
[bilbrey@gryphon bilbrey]# su
password: root_password_here

[root@gryphon bilbrey]# cd /usr/src

[root@gryphon src]# ls -l
total 73149
drwxr-xr-x   7 root     root       1024 Aug 13 03:13 OpenLinux
lrwxrwxrwx   1 root     root         12 Aug 23 17:58 linux -> linux-2.2.14
drwxr-xr-x  15 root     root       1024 Aug 22 16:35 linux-2.2.14
drwxr-xr-x   2 root     root       1024 Aug 13 03:13 sox
Using the ls command (with the -l option, to get the long detailed listing), we see that there are three directories and one symbolic link. That symbolic link, linux, is important. Currently it points to the 2.2.14 sources that were installed when we loaded OpenLinux eDesktop. Whenever we compile other programs, they look to including the running kernel headers, by looking in /usr/src/linux/include/.... The symlink provides a path to the current kernel sources. Right now, we want to remove that link entirely, as we are going to get and install fresh sources. The decompression of that code will go into a directory called linux, and would overwrite our existing kernel sources unless we remove the link. So with that:
[root@gryphon src]# rm linux
Note that we didn't actually remove any data; just a directory entry that pointed to the linux-2.2.14 directory. Now we want to fetch the kernel source code. We are getting ours for this example directly from the main kernel site - there are a variety of mirrors in various countries around the world - for a listing of these, go to http://www.kernel.org/mirrors/. Using FTP, we'll get what we need, though you can also select these files and download them with most browsers by pointing to the same location.
[root@gryphon src]# ftp -i ftp.kernel.org
Connected to zeus.kernel.org.
220 ProFTPD 1.2.0pre10 Server (ProFTPD) [zeus.kernel.org]
Name (ftp.kernel.org:root): anonymous
331 Anonymous login ok, send your complete e-mail address as password.
Password: email@address.here
230-			    Welcome to the

 			LINUX KERNEL ARCHIVES
 			    ftp.kernel.org

 		    "Much more than just kernels"
 * * *
230 Anonymous access granted, restrictions apply.
Remote system type is UNIX.
Using binary mode to transfer files.

ftp> cd /pub/linux/kernel/v2.2
250 CWD command successful.
ftp> ls linux-2.2.16*
200 PORT command successful.
150 Opening ASCII mode data connection for file list.
-rw-r--r--   1 korg     korg   13827767 Jun  7 14:34 linux-2.2.16.tar.bz2
-rw-r--r--   1 korg     korg        248 Jun  7 14:34 linux-2.2.16.tar.bz2.sign
-rw-r--r--   1 korg     korg   17106471 Jun  7 14:34 linux-2.2.16.tar.gz
-rw-r--r--   1 korg     korg        248 Jun  7 14:34 linux-2.2.16.tar.gz.sign
226 Transfer complete.
ftp> get linux-2.2.16.tar.bz2
local: linux-2.2.16.tar.bz2 remote: linux-2.2.16.tar.bz2
200 PORT command successful.
150 Opening BINARY mode data connection for linux-2.2.16.tar.bz2 (13827767 bytes).
226 Transfer complete.
13827767 bytes received in 114 secs (1.2e+02 Kbytes/sec)
ftp> get linux-2.2.16.tar.bz2.sign
local: linux-2.2.16.tar.bz2.sign remote: linux-2.2.16.tar.bz2.sign
200 PORT command successful.
150 Opening BINARY mode data connection for linux-2.2.16.tar.bz2.sign (248 bytes).
226 Transfer complete.
248 bytes received in 0.0135 secs (18 Kbytes/sec)
ftp> exit
221 Goodbye.
Observe that we not only got the kernel sources in bz2 format (an extremely high density compression format that's 14 MB above, 20 MB for the 2.4 kernels, neither a trivial download at dialup speeds), but we also downloaded the signature for the code. By pointing your browser at http://www.kernel.org/signature.html, you can get a copy of the latest cryptographic signature, install it on the root user's GnuPG key ring (see Chapter 22 for data about GPG), and check the validity of the kernel file, shown in the following listing:
[root@gryphon src]# gpg --verify linux-2.2.16.tar.bz2.sign linux-2.2.16.tar.bz2
gpg: Signature made Wed Jun 28 10:52:14 2000 PDT using DSA key ID 1E1A8782
gpg: Good signature from "Linux Kernel Archives Verification Key <ftpadmin@kernel.org>"
It is still remotely possible that both the kernel.org Web and ftp servers were hacked simultaneously. The possibility of a trojan horse version of the kernel is frequently checked. By downloading kernels from a mirror location, and the signature from the main site, your potential for problems is virtually nil.
Next, after checking Alan's kernel pages, we find that there is indeed a patch for the 2.2.16 kernel fixing a few minor bits that slipped by after the release. The patch can be downloaded directly from your browser, or with the following command (or a variant thereupon):
[root@gryphon src]# lynx -source http://www.linux.org.uk/VERSION/2.2.16combo > 2.2.16combo.patch
Granted, this is a bit cryptic, but it's also an easy and efficient way to download a file from the command line using the http protocol. Lynx is a terminal-based, text-only Web browser. It has many capabilities, aside from being blindingly fast, because it doesn't retrieve images. Additionally, Lynx may be used to download single pages onto the local machine, as shown previously. First we start Lynx, we give it the source option, meaning that it is not to do HTML interpretation on the data, but to just put out the actual bytes to STDOUT (the screen). The address is given, then we use the greater than character (>) to redirect STDOUT to a file, which we named 2.2.16combo.patch. The actual filename is unimportant; just remember what you call it for later reference. An alternative file retrieval method, using the wget program, follows. For exact details on wget and lynx usage, consult the manual pages and other system documentation.
[root@gryphon src]# wget http://www.linux.org.uk/VERSION/2.2.16combo > 2.2.16combo.patch
Having gotten all the required sources, we decompress then un-archive [CT9]the kernel sources. Looking at the short directory listing in the FTP session, previously, you can see that downloading the .bz2 (Bzip2) format file saves a shade over 3MB, not trivial if you're connecting on a dialup line. The drawback of Bzip2 is that it is somewhat more computationally intensive, and compression/decompression isn't available through the tar command in the manner that Gzip is. So now for the two-step decompress and un-archive, followed by a new directory listing:
[root@gryphon src]# bunzip2 linux-2.2.16.tar.bz2

[root@gryphon src]# tar xf linux-2.2.16.tar

[root@gryphon src]# ls -l
total 73148
-rw-r--r--   1 root     root      44546 Aug 26 16:22 2.2.16combo.patch
drwxr-xr-x   7 root     root       1024 Aug 13 03:13 OpenLinux
drwxr-xr-x  14 1026     101        1024 Jun  7 14:26 linux
drwxr-xr-x  15 root     root       1024 Aug 22 16:35 linux-2.2.14
-rw-r--r--   1 root     root   74557440 Aug 26 16:18 linux-2.2.16.tar
-rw-r--r--   1 root     root        248 Aug 26 16:21 linux-2.2.16.tar.bz2.sign
drwxr-xr-x   2 root     root       1024 Aug 13 03:13 sox
Warning
Both of these steps can take some considerable time and space. The bunzip2 operation works in place, leaving a 73 MB file in place of the original 13 MB. Then un-tarring the file takes that data and allocates it in a new directory structure. By the time you're done with these steps, you've used 150 MB of disk space and run for anywhere from 5 to 30 minutes depending on the speed of your system.
First, note that the original .bz2 file is gone. Bzip2 compresses and decompresses in place, an especially handy trait when working with smaller partitions. Then the tar command, with the "x" (for extract) and "f" (to denote a file for input specified on the command line, as opposed to input from STDIN) operates on linux-2.2.16.tar, unpacking its contents into the linux sub-tree. Now you can see what would have happened had we not deleted that link - the original 2.2.14 sources that were installed with the rest of eDesktop would have been overwritten. Now we'll rename the source tree and recreate the linux symbolic link.
[root@gryphon src]# mv linux linux-2.2.16

[root@gryphon src]# ln -s linux-2.2.16 linux

[root@gryphon src]# ls -l
total 73148
-rw-r--r--   1 root     root      44546 Aug 26 16:22 2.2.16combo.patch
drwxr-xr-x   7 root     root       1024 Aug 13 03:13 OpenLinux
lrwxrwxrwx   1 root     root         12 Aug 26 16:44 linux -> linux-2.2.16
drwxr-xr-x  15 root     root       1024 Aug 22 16:35 linux-2.2.14
drwxr-xr-x  14 1026     101        1024 Jun  7 14:26 linux-2.2.16
-rw-r--r--   1 root     root   74557440 Aug 26 16:18 linux-2.2.16.tar
-rw-r--r--   1 root     root        248 Aug 26 16:21 linux-2.2.16.tar.bz2.sign
drwxr-xr-x   2 root     root       1024 Aug 13 03:13 sox
First we use the mv command to rename the directory from linux to linux-2.2.16. Next is a slightly tricky bit, creating the symbolic link [I've gotten this one backwards more times than I can count -- BB]. The directory listing shows that we've negotiated this particular shoal successfully, with a linux symbolic link pointing to the linux-2.2.16 sub-directory.
Info
Although we look at the ln command in detail in Chapter 17, here's a quick overview. For the most part, ln is used to create symbolic (or soft) links, by adding the -s option to the command, as shown. The first argument is the target, that is, the thing to which the link will point. The second argument is the name of the link itself, which must be different only if the link and target are in the same directory. The potential confusion comes from thinking about the flow of things: the arrow points towards the right as you create a link from a target, but when using the link, the arrow heads left, with the link pointing to the target.
Now to apply the patch from Alan Cox's site. First, change into the linux directory, then use the patch command as shown:
[root@gryphon src]# cd linux

[root@gryphon linux]# patch -p1 < ../2.2.16combo.patch
patching file arch/alpha/mm/fault.c
patching file drivers/block/ide-cd.c
patching file drivers/block/ide-cd.h
patching file drivers/block/md.c
patching file drivers/cdrom/cdrom.c
patching file drivers/i2o/i2o_core.c
patching file drivers/i2o/i2o_scsi.h
patching file drivers/scsi/hosts.c
patching file drivers/scsi/ini9100u.c
patching file drivers/scsi/ini9100u.h
patching file drivers/scsi/inia100.c
patching file drivers/scsi/inia100.h
patching file drivers/scsi/sr_ioctl.c
patching file drivers/sound/es1371.c
patching file drivers/sound/ymf_sb.c
patching file fs/lockd/svc.c
patching file include/linux/cdrom.h
patching file net/ipv4/tcp_ipv4.c
The patch command seems a particularly arcane tool. Why not just fix all the bits that need fixing, and then offer up the latest kernel as a new revision? There is one primary answer. Most of the connected world still hooks up to the net by dialup. The load on small bandwidth connections is lessened greatly by just downloading one base kernel, then getting small patch files as necessary. An excerpt from a patch file looks like this:
diff -u --new-file --recursive --exclude-from /usr/src/exclude linux.vanilla
/drivers/block/ide-cd.c linux.17p1/drivers/block/ide-cd.c
--- linux.vanilla/drivers/block/ide-cd.c        Sun Jun 11 21:44:11 2000
+++ linux.17p1/drivers/block/ide-cd.c   Sun Jun 11 22:05:48 2000
@@ -1,8 +1,9 @@
 /*
- * linux/drivers/block/ide-cd.c
+ * linux/drivers/ide/ide-cd.c
+ *
  * Copyright (C) 1994, 1995, 1996  scott snyder  <snyder@fnald0.fnal.gov>
  * Copyright (C) 1996-1998  Erik Andersen <andersee@debian.org>
- * Copyright (C) 1998-2000 Jens Axboe <axboe@suse.de>
+ * Copyright (C) 1998-2000  Jens Axboe <axboe@suse.de>
  *
  * May be copied or modified under the terms of the GNU General Public
  * License.  See linux/COPYING for more information.
The patch utility, written by Perl creator Larry Wall, takes such input, figures out which file to apply it to, goes to the lines in question (demarked by "@@" in the listing), then deletes and adds material in the file at the location on the basis of the "-" and "+" characters, respectively. One thing to take note of in the previous listing: lines three and four contain filenames that read linux.vanilla/drivers/block/ide-cd.c and linux.17p1/drivers/block/ide-cd.c. These directories don't exist on our local machine. Running the patch program with the -p1 option strips the leading directory off of every file reference in the patch file (-p2 would strip two levels off and so on). By starting the patch command from inside the top-level linux source directory, the patches will be applied properly, even though the local directory names don't match those of the developer releasing the patch.
Patches must by applied in revision number order, one at a time. Linux kernel patches are not cumulative, as the base kernel level is not known. So upgrading from kernel 2.2.14 to 2.2.16, as we've done here, can be done by getting and applying the 2.2.15 patch, then the 2.2.16 patch, and finally the errata patch from Alan Cox.
We're done setting up the source code - it's time to configure the Linux kernel, the subject of the next section.
Configuration of the Linux kernel is regarded as the most daunting task in this entire process. Of course, it needn't be, but there are a couple of secrets that were not obvious to us as we started our journey. In this section, we'll take a swing at re-using our old kernel configuration file, then look at each of the four methods of accomplishing the configuration. Finally, we'll provide a listing of all the major kernel configuration sections, along with a discussion of their contents.
Once a kernel has been configured, the configuration is saved. Unless measures are taken, that configuration is overwritten with each pass. Additionally, it isn't obvious that the prior configuration is applied as the default in each ensuing run. Here's how we take advantage of this knowledge.
The configuration is a "hidden" file, called .config (the leading period prevents it from being listed in standard directory queries), which lives in the root of the linux source tree. So there could be a configuration from the original 2.2.14 kernel available for us to use as a basis in setting up 2.2.16, if you've configured the 2.2.14 previously. However, the first time through the process, you either need to locate the configuration that Caldera used for building the stock kernel, or work without it. In the former case, a good configuration file to use is /usr/src/linux-2.2.14/arch/i386/defconfig, as we show:
[root@gryphon linux]# cp ../linux-2.2.14/arch/i386/defconfig .config
make oldconfigNow, of what use is a 2.2.14 configuration with a patched 2.2.16 kernel? The answer is, of very great utility, indeed! If we started a configuration from scratch, without copying over our prior configuration, then the kernel defaults are applied. When a prior configuration from the same kernel is present, all the previous selections are applied as defaults. When a prior revision .config file is available, then the bits that overlap (usually 98% to 99% or better) are directly applied. Configuration data that is not relevant is discarded, and where there is no previous direction, the kernel defaults are offered. This is extraordinarily handy, and leads directly into our first kernel configuration example.
[root@gryphon linux-2.2.16]# make oldconfig
rm -f include/asm
( cd include ; ln -sf asm-i386 asm)
/bin/sh scripts/Configure -d arch/i386/config.in
#
# Using defaults found in .config
#
*
* Code maturity level options
*
Prompt for development and/or incomplete code/drivers (CONFIG_EXPERIMENTAL)
[Y/n/?]

 * * *

 Tekram TRM290 chipset support (EXPERIMENTAL) (CONFIG_BLK_DEV_TRM290) [N/y/?]
 NS87415 chipset support (EXPERIMENTAL) (CONFIG_BLK_DEV_NS87415) [N/y/?]
 VIA82C586 chipset support (EXPERIMENTAL) (CONFIG_BLK_DEV_VIA82C586) [N/y/?] (NEW) ? n

 * * *
Typing make oldconfig is the first (and easiest) of four different ways to configure the Linux kernel. After doing it the long way once or perhaps twice, using the old configuration is clearly the best way to go. It only makes sense in the presence of an existing configuration file, usually as created by working through configuration the hard way at least once.
make configThe second method of kernel configuration is by typing make config at the command prompt, which yields fundamentally the same output as make oldconfig, except that every question is asked, and there are hundreds:
[root@gryphon linux-2.2.16]# make config
rm -f include/asm
( cd include ; ln -sf asm-i386 asm)
/bin/sh scripts/Configure arch/i386/config.in
#
# Using defaults found in .config
#
*
* Code maturity level options
*
Prompt for development and/or incomplete code/drivers (CONFIG_EXPERIMENTAL)
[Y/n/?] n
*
* Processor type and features
*
Processor family (386, 486/Cx486, 586/K5/5x86/6x86, Pentium/K6/TSC, PPro/6x8
6MX) [386] 586
  defined CONFIG_M586
Maximum Physical Memory (1GB, 2GB) [2GB] 1GB
  defined CONFIG_1GB
Math emulation (CONFIG_MATH_EMULATION) [Y/n/?] n
MTRR (Memory Type Range Register) support (CONFIG_MTRR) [Y/n/?]
Symmetric multi-processing support (CONFIG_SMP) [Y/n/?] n

 * * *
As with make oldconfig, the defaults from .config are applied. However, they are not applied automatically. Each question must be answered, one at a time, and there are hundreds of configuration options that need to be addressed (though many are covered in blocks, as we shall see in a moment). A point of interest here - observe that the original configuration was for a 386 processor. We're going to want to tune this configuration.
The major drawbacks of make config are twofold. First, it takes a long time to go through all the options. A long, long time. Secondly, there's no going back and changing your mind - this is a one-way process from start to finish. So now let's head into ease-of-use territory and have a brief look at a text-based menu version of kernel configuration.
make menuconfigFrom the command line, or in a terminal window or virtual console, type make menuconfig. You'll see a display very similar to that in Figure 7-1, which shows the initial screen from the utility.
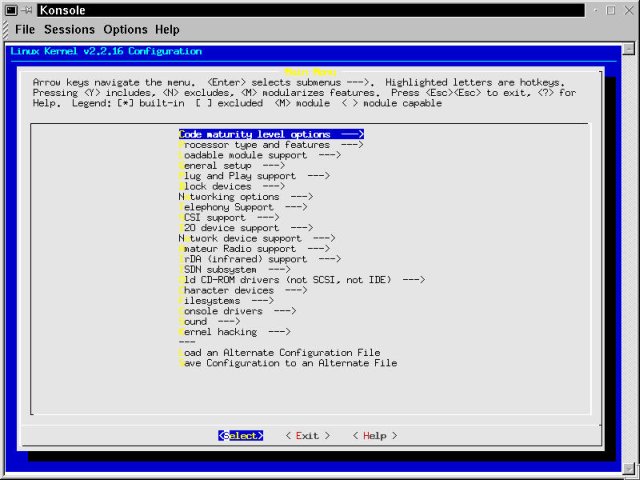
Figure 7-1
Linux Kernel v2.2.16 Configuration using make menuconfig.
Using these text menus is simple and straightforward. The Right and Left Arrow keys move the cursor through the selections at the bottom of the screen. The Up and Down Arrow keys scroll through the list in the main menu window. Pressing Enter selects sub-menus (which are shown with a trailing "--->"). Figure 7-2 shows the General Setup kernel option screen.
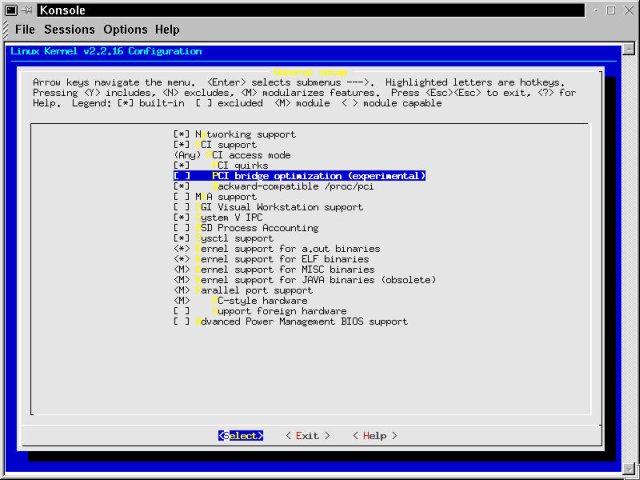
Figure 7-2
General Setup option screen in kernel configuration using text menus.
For most options, the possible entries are "Y" to include the code in the kernel, "N" to exclude the code, and "M" to compile the code as a loadable module (which is available if the brackets are shown as "< >" on the specific option line). Very few kernel options are choices for code configuration, such as the third item on the menu shown in Figure 7-2, where the selection is "(ANY)." Choosing this option brings up another sub-menu where the various entries are listed.
The major advantage that make menuconfig has over make config is that you can select which items you are going to edit, and you can do them in any particular order. This includes going back and changing your mind. Fundamentally, this is a far more useful tool than make config, which is rarely used today except over slow dialup or serial connections. However, for sheer point and click convenience, nothing beats the fourth and last configuration utility.
make xconfigIf you're running the X Window System, then make sure you're logged into KDE as root, and type make xconfig. The result is a Tcl/Tk graphical application for kernel configuration that is easy to use, and intuitive enough that it gets right out of your way letting you (and us) be confused by the plethora of configuration options, rather than bewildered by the interface to the options. A shot of the opening screen is shown in Figure 7-3.
Warning
When the root user tries to start an X application from an su session in a terminal, the application fails. This is because no one except the owning user can access the X display, including root. As the normal user, typexhost +localhostto give anyone on the local machine permission to connect.
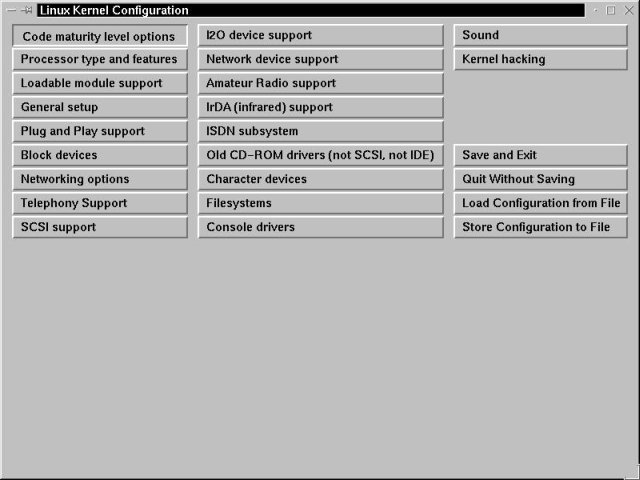
Figure 7-3
Linux Kernel Configuration, using the Tcl/Tk interface under X.
Using the mouse, each major section can be selected and opened; the same for sub-menus. These all open in separate windows, and carry as their window title the text from the button that opened the window, providing a simple and logical chain of configuration. A distinct enhancement that appears in this graphical version of kernel configuration is that named configurations can be saved and loaded (using the buttons in the lower right corner of the array). This is especially handy when compiling kernels on one machine for a variety of different platforms, a common administrator's or developer's chore.
An example of an option selection dialog box is shown in Figure 7-4.
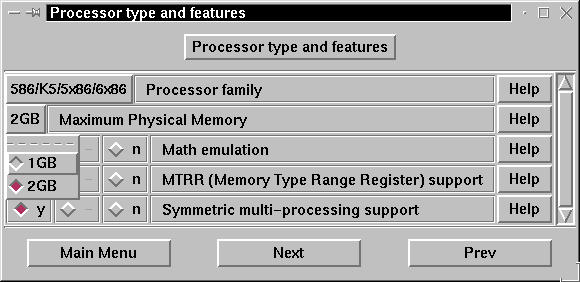
Figure 7-4
Kernel configuration - Processor type and features dialog box: The physical memory selection menu is displayed.
Figure 7-4 shows the Processor type and features dialog box. In comparison with the text-based menu configuration, all of the possibilities for each option are also readily accessible within make xconfig. In Figure 7-4, we've already set the processor family to the PII/PIII choice that's right for our hardware. Additionally, the laptop that we're configuring in this example can't be fitted with more than 512MB of RAM, so setting the Maximum Physical Memory to 1GB should make address translation run a tad bit faster. An added bonus for the GUI configuration tool is the Next and Previous buttons. These allow you to walk through the menus, sub-menus, and sub-sub-menus in order, without ever having to work with the main menu again, until (or unless) you opt to save a configuration.
Now that we've shown you each of the configuration tools, it's time to look at the major and minor options, and the features that can be set for each. To review, in most cases, the configuration answers are: "Y" or Yes, for compiling the option or code directly into the kernel, "N" or No to disable the feature or not use the code, and "M" or Module to indicate that the element should be used, but compiled as a loadable module.
There are 20 major sections to kernel configuration in version 2.2.16, and many options and sub-menus within each section. We'll preview each one for you, provide advice on which ones are important, and how to decide what to select. For more information than you can shake a stick at, click the help button on every option you have a question about - it's a great way to learn a little about what's going on at the kernel level. Generally, it's safe to stay with the recommended (by the make xconfig help text) choices, except that we always try to specifically not include drivers for hardware we don't have.
There's only one option to set in this section: "Prompt for development and/or incomplete code/drivers." This tells the configuration utility whether or not to display the experimental and partially tested features of this kernel. We generally choose Y at this juncture, just to see what's coming down the pike. Only rarely do we actually enable an experimental feature, though, as some are experimental enough to make for an unstable operating environment.
This sub-menu allows us to set the processor (use the Help button for guidance on which chips are covered by which selection - there is no PIII option in 2.2.16) and related information. We usually set the Maximum Physical Memory to 1GB unless we know the machine is capable of handling more memory than that, and that the potential exists for it to actually one day be populated out to that size. With less than 1GB, the memory management features of Linux run more efficiently.
Turn off Math Emulation unless you're running a 386SX or another lobotomized CPU. We enable the MTRR option, as it can increase the performance of certain popular Intel processors in communicating with PCI and AGP buses. And we disable SMP except for dual- or multi-processor boxes.
Note
SMP is the acronym for Symmetric Multi-Processing. The Linux kernel has additional features which come into play when scheduling processes for more than one CPU at a time. Under the 2.2.x kernels, SMP scales out to about four processors. There are improvements in this arena for the 2.4 kernel, coming out soon.
These are the features that enable module support and dynamically loadable modules. Agree to everything here, especially the "Set version information..." option. This makes it both possible and safe to use the compiled modules in a new kernel, as well as permitting the kernel to more easily load third-party binary modules (if absolutely necessary).
There are a variety of choices to make here, and we'll put the options and commentary in Table 7-2 to better show you what's available in this important part of the configuration.
Table 7-2
Linux Kernel Features
| Option | Our Comments |
| Networking support | Enable this option (choose Yes). Some programs expect kernel networking support even if the machine is not on a network. |
| PCI support | Yes, unless your computer is an old ISA-only machine. |
| PCI access mode | Start with "Any." If the machine falls over on boot, then try changing this value to "BIOS." |
| PCI quirks | Yes. |
| PCI bridge optimization (experimental) | Designed to speed access to the PCI bus on specific hardware configurations. Choosing Yes might be faster (depending on your hardware, read the option help for more details), or it might be unstable. No is a safe answer. |
| Backward-compatible /proc/pci | Yes. It doesn't hurt, and it might help. |
| MCA support | If you're on a Micro Channel Architecture machine (aka IBM PS/2), then you need this option: click Help and start reading. |
| SGI Visual Workstation support | This option can be used to build a kernel for this special hardware on a standard PC. The compiled kernel can then be transferred to an SGI box. Usually the answer here is No. |
| System IV IPC | Yes. |
| BSD Process Accounting | Yes. |
| Sysctl support | Upside: this is a very good thing; it enables dynamically modifiable parameters for the running kernel. Needed for advanced features like firewalls. Yes, unless extremely small RAM system. |
| Kernel support for a.out binaries | a.out is the old Unix/Linux executable format. Eventually this will go away, but choose Yes anyway. |
| Kernel support for ELF binaries | Yes. ELF is the default Linux executable binary format. |
| Kernel support for MISC binaries | Module. Eventually this may overtake other kernel binary support. |
| Kernel support for JAVA binaries (obsolete) | No. This option is not needed since MISC is enabled as a module. |
| Parallel port support | Yes, if any device is going to be connected to the parallel port. |
| PC-style hardware | Yes, unless you're sure that the hardware is not PC. |
| Support foreign hardware | No, unless you know you need this option, as there is a performance hit attendant upon enabling it. |
| Advanced Power Management BIOS support. | Select Yes on battery-powered devices, No otherwise. This is important on laptop systems where the power savings can mean a world of difference in battery life. Bonus time: there is some really good machine debugging and troubleshooting advice in the help dialog for this option. If you choose No, then the following options in this table are not available. |
| Ignore USER SUSPEND | Choose No, except on a NEC Versa M machine. |
| Enable PM at boot time | No. |
| Make CPU Idle calls when idle | Yes. Again, this is an extra-good idea for laptop and other battery-powered hardware. |
| Enable console blanking using APM | On some laptops, this turns off the backlight when running in console mode and the APM kicks in. Doesn't do anything when running X, and might cause lots of error messages. Usually, choose No. |
| Ignore multiple suspend/resume cycles | Yes. This prevents accidental fast return to a suspend state. |
| RTC stores time in GMT | Yes or No, depending on your CMOS clock setup. To quote from the help on this option: "The only reason not to use GMT in your RTC is if you also run a broken OS that doesn't understand GMT." [It is possible that by "broken OS", the help file writer was referring to an OS from Redmond... bpb, 04/2001] |
| Allow interrupts during APM BIOS calls | Choose No here, unless suspending hangs the machine, forcing a hard reboot. |
| Use real mode APM BIOS call to power off | Yes. |
Although Linux support for Plug and Play (PnP) is not as complete as that of Windows, there are a variety of devices that benefit from PnP support in the kernel. Say Yes, and also enable (Yes or Module) the Auto-probe for parallel devices option.
In this portion of the kernel configuration, we tend to accept all the defaults that come with the kernel. We do go through and disable hardware we're sure isn't on the machine being configured, which reduces the kernel size. If unsure, leave all of these options alone when starting from a working default configuration. If you've actually started from scratch, then you might really need to know your hardware to enable the right options. For most recent computers, Intel- and AMD-based, the default options should stand you in good stead.
Turn on SCSI emulation if you have an IDE CD-ROM/CD-RW device. Along with generic SCSI support, this enables using the device as a burner as well as a CD reader.
Do explicitly turn off the option Multiple devices driver support unless you are planning on running software RAID setups. Also turn off IDE-related options if you're on SCSI-only hardware.
Accept the defaults (or read the help for each option very carefully) in this dialog box. The main exception to this is the "IP: advanced router feature" which has a variety of questions pertinent to multi-homing (having more than one network card) your machine for firewall, routing, Internet connection sharing or other, similar purposes.
If your machine is safely behind a firewall, then you can turn off "IP: firewalling" as well. To run a firewall, you'll need this option, in addition to the Sysctl support (from General setup). Read up on firewalls and read the IP-Chains HOWTO. Be aware that there is a successor to IP-Chains coming up in Linux version 2.4, called IP-Tables, which promises to be a far more capable firewalling and routing tool. For users that plan on connecting via DSL or Cable modem, these are important options to enable.
There is one sub-dialog box: QoS and/or fair queueing [sic]. Unless you are trying specialty multi-interface message queuing and scheduling, turn all these options off.
Currently only IP Telephony cards from QuickNet are supported under Linux. If you don't have this hardware, turn off these features.
If you have no SCSI devices (and no IDE CD-ROM/CD-RW), then chose No and be done with this section. For the IDE CD-ROM/CD-RW devices, say Yes to SCSI support, and select SCSI CD-ROM support and SCSI generic support as modules.
In this section, turn off all the options that your system doesn't use. In the SCSI low-level drivers sub-dialog, disable drivers for hardware not in your system. They aren't needed, so why compile them or have them installed in your running kernel?
I2O is a nascent standard for Intelligent Input/Output (I/O) bus mastering devices. There is very little hardware currently available for use under this standard, and the kernel support is also just becoming available. Say No unless you know you need this.
You are going to need a network device unless you are running a standalone machine that basically doesn't connect to anything. General network device support includes the TCP/IP stack necessary for most normal connections to the Internet. Say Yes here, and accept the top defaults. On the options for specific devices, we tend to include not only our current hardware in the machine the kernel is being built for, but also drivers for any other network cards in our possession, as well as a few more common types. NICs (Network Interface Cards) do seem to be a little more fragile than most other hardware, and a healthy variety of pre-built Ethernet (10/100Mbit) driver modules is handy to have around.
Our short list of drivers to keep includes most of the 3Com ISA cards. On the PCI side of things, we enable as modules the AMD PCnet32, DECchip Tulip and old DECchip Tulip, Intel EEPro/100 and PCI NE2000. All of these are in addition to the driver(s) for the existing hardware, if not already on that list.
Note
Our T.E. Kurt Wall chimed in with his vote for only having drivers for the card currently in the system. That also has merit since it reduces compile times and kernel memory footprint. We tend to swap cards around quite a bit, and like not having to recompile because of a NIC card switch. Disable all the Ethernet (1000Mbit) drivers unless you actually have a Gigabit Networking setup. The same holds true for the Appletalk, Token Ring, and WAN device sub-dialog boxes.
Saying Yes to the first question in this dialog box enables a wide variety of options pertinent to connecting a computer to a network over amateur radio (Ham) equipment. We have no experience or opinion to offer in this arena - Say Yes if you know what you're doing, otherwise choose No. See the information on using Linux in conjunction with amateur radio at http://www.linuxdoc.org/HOWTO/AX25-HOWTO.html.
IrDA, or infrared communications support, is enabled and initially configured in this section. More information on this topic can be found in the IR-HOWTO, located at http://www.linuxdoc.org/HOWTO/IR-HOWTO.html.
Unlike standard modem communications, the ISDN sub-system is partially in kernel space, and configured here. Disable the whole section if you don't connect via ISDN. If you do, then there are a variety of features from Fax through Audio that can be enabled, in addition to a wealth of specific device drivers in the main ISDN configuration and three sub-dialog boxes. Neither author uses or has used ISDN, and we cannot provide any guidance or specific recommendations.
This is an unusual hardware option to find in most modern machines, and is more common in systems dating from the late 1980s through the early 1990s. In order to determine what kind of CD-ROM device you have, you may need to pull the drive in order to identify it. Alternatively, as root, type lsmod, which lists the running and loaded modules. The output should tell you what drivers are running, including the one loaded to work with your CD-ROM device.
These options primarily address actual (serial ports) and virtual (terminal sessions) character devices on the system. Our pass through this section leaves the defaults for non-hardware devices alone, and we turn off drivers for any hardware that's not in the machine. There are also sub-menus for mice, joysticks, watchdog cards, video for Linux, and Ftape. The mice and joystick selections are clear and straightforward. Watchdog cards provide a serial connection system monitoring service, and this menu adds support for a variety of these. Video for Linux is a collection of drivers to support port-connected cameras, as well as some tuner cards, either video or FM. Ftape is the kernel configuration area for most non-SCSI tape backup devices connected via the floppy controller.
Filesystems is an important part of the kernel - without any of these options selected, the machine doesn't run. For most uses, we leave Quota support off (most often useful in a corporate multi-user environment aka file server), and turn the Kernel automounter support on. We enable the following filesystems: VFAT (Win95), ISO9660 CD-ROM, Microsoft Joliet CD-ROM extensions, /proc, /dev/pts, and Second extended fs (e2fs). All the others we install as modules if we are likely to need them; otherwise we leave them out.
Additionally, there are sub-menus for Network File Systems, Partition Types and Native Language Support. Network filesystems include NFS, SMB (Session Message Block - Windows shares), and NCP, which supports mounting Netware Volumes. We usually enable SMB and NFS, reserving NCP only when we're connecting to a Netware network. Partition types are reserved for special forms of local disk volumes, and Native Language Support adds code pages for specified regional character sets.
In Console drivers, we enable the VGA text console and Video mode selection support. The latter permits graphical boot screens such as that provided by OpenLinux. All the other options in this section pertain to Framebuffer devices, special video cards, and modes that enable them to operate properly. If these are needed, then carefully specify the hardware, and read the option help to confirm that the right choices are made.
Sound support is an area that Linux has been lacking. Like most other specialty devices, if the manufacturers do not provide drivers or hardware specifications, then support is challenging to provide. However, great strides have been made recently. Sound driver modules can be selected for the following types of hardware: Creative SoundBlaster (and compatible) cards, Turtle Beach (Voyetra), Yamaha, and others. There are new drivers arriving on the scene every day, in addition to add-in third-party drivers like ALSA (see http://www.alsa-project.org/ for more details). Use the configuration help and the Linux Sound HOWTO at http://www.linuxdoc.org/HOWTO/Sound-HOWTO.html to assist in choosing the correct options to properly support your sound hardware.
The Kernel hacking dialog box contains just one feature, called Magic Sysrq key. This option enables the Sysrq key to initiate a variety of special actions, including dumping buffer caches, dumping status information (to screen or file), or immediate system reboots. Generally this is only a useful option for developers working on the kernel code. We keep this option turned off.
There are four options shown in the lower-right section of the main GUI Kernel Configuration dialog box: Save and Exit, Quit without Saving, Load Configuration from File, and Store Configuration to File. The last two options we find most useful in the situation where named configurations (such as compiling to a target machine other than the current one) are appropriate. The Quit without Saving selection we make with surprising frequency, as we spelunk about in the configuration routines, reading the help text and learning new things. The recommended option is Save and Exit. This brings up the short dialog box shown in Figure 7-5.
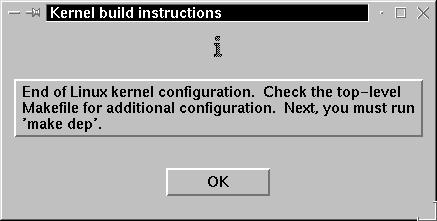
Figure 7-5
The Kernel build instructions dialog box, displayed when exiting Kernel Configuration.
Note that the dialog box provides us with the very next instruction to run in the process of building a new Linux kernel, and with that we're off into the actual routines of compiling.
There are a short few steps left to the process, as configuration is the challenging bit (in our opinion). First we follow the directions proffered as we exited from the GUI configuration utility.
[root@gryphon linux]# make dep
gcc -Wall -Wstrict-prototypes -O2 -fomit-frame-pointer -o scripts/mkdep scripts/mkdep.c
make[1]: Entering directory `/usr/src/linux-2.2.16/arch/i386/boot'
make[1]: Nothing to be done for `dep'.
make[1]: Leaving directory `/usr/src/linux-2.2.16/arch/i386/boot'
scripts/mkdep init/*.c > .depend

 * * *
This command builds a utility to gather the dependencies for each source file, and update the various sub-directory Makefiles, putting all the bits and bytes in place prior to beginning the compile run itself. This process usually takes a couple of minutes. To see what is actually happening when you type make dep, open up the file Makefile, and search on the term "dep." For more detail on the make command, what it is, and how it works, read the manual page for make in another terminal window (while your compile is running and you've nothing better to do).
When the dependency process completes, type make clean. This sweeps through the kernel source tree, removing any leftover files and other detritus from prior compilations. All of these steps take about the same amount of time on most recent hardware (roughly a minute or two each on Pentium-equivalent machines or better). On older, slower hardware, compile times climb dramatically, up to potentially a few hours on older 386 machines.
Hint
There is a make command for a more thorough cleaning, usually only used in preparation for archiving a kernel. Typing make mrproper runs this deep cleaning, one part of which is deleting the existing configuration file. Make a copy of .config to another location if you want it to survive.
Now comes the time to build the kernel. Below, we provide a slightly larger window into the compile process with the listing that follows the command to compile the kernel, make bzImage. Take note of the upper case "I" in the previous make argument (make bzimage only generates error messages). Running a kernel compile on your machine looks similar to the code snippet below.
[root@gryphon linux]# make bzImage
gcc -Wall -Wstrict-prototypes -O2 -fomit-frame-pointer -o scripts/split-include scripts/split-include.c
scripts/split-include include/linux/autoconf.h include/config
gcc -D__KERNEL__ -I/usr/src/linux-2.2.16/include -Wall -Wstrict-prototypes -O2 -fomit-frame-pointer -fno-strict-aliasing -D__SMP__ -pipe -fno-strength-reduce -m486 -DCPU=686  -c -o init/main.o init/main.c
gcc -D__KERNEL__ -I/usr/src/linux-2.2.16/include -Wall -Wstrict-prototypes -O2 -fomit-frame-pointer -fno-strict-aliasing -D__SMP__ -pipe -fno-strength-reduce -m486 -DCPU=686 -DUTS_MACHINE='"i386"' -c -o init/version.o init/version.c
make -C  kernel
make[1]: Entering directory `/usr/src/linux-2.2.16/kernel'
make all_targets
make[2]: Entering directory `/usr/src/linux-2.2.16/kernel'
gcc -D__KERNEL__ -I/usr/src/linux-2.2.16/include -Wall -Wstrict-prototypes -O2 -fomit-frame-pointer -fno-strict-aliasing -D__SMP__ -pipe -fno-strength-reduce -m486 -DCPU=686   -DEXPORT_SYMTAB -c signal.c

 * * *

gcc -D__KERNEL__ -I/usr/src/linux-2.2.16/include -O2 -DSTDC_HEADERS   -c -o misc.o misc.c
ld -m elf_i386 -Ttext 0x100000 -e startup_32 -o bvmlinux head.o misc.o piggy.o
make[2]: Leaving directory `/usr/src/linux-2.2.16/arch/i386/boot/compressed'
gcc -Wall -Wstrict-prototypes -O2 -fomit-frame-pointer -o tools/build tools/build.c -I/usr/src/linux-2.2.16/include
objcopy -O binary -R .note -R .comment -S compressed/bvmlinux compressed/bvmlinux.out
tools/build -b bbootsect bsetup compressed/bvmlinux.out CURRENT > bzImage
Root device is (3, 4)
Boot sector 512 bytes.
Setup is 3440 bytes.
System is 573 kB
make[1]: Leaving directory `/usr/src/linux-2.2.16/arch/i386/boot'
As the compile begins, we see make shifting into a subdirectory and begin (with the gcc... lines) to actually compile code. When the kernel compile is done, several key pieces of information are given, the most pertinent being that last line, which tells you where the completed kernel is located (/usr/src/linux-2.2.16/arch/i386/boot for Intel systems, other architectures are also represented).
Next, we want to first build and then install the modules that we enabled during configuration:
[root@gryphon linux]# make modules
make -C  kernel CFLAGS="-Wall -Wstrict-prototypes -O2 -fomit-frame-pointer -fno-strict-aliasing -D__SMP__ -pipe -fno-strength-reduce -m386 -DCPU=386 -DMODULE -DMODVERSIONS -include /usr/src/linux-2.2.16/include/linux/modversions.h" MAKING_MODULES=1 modules
make[1]: Entering directory `/usr/src/linux-2.2.6/kernel'
make[1]: Nothing to be done for `modules'.
make[1]: Leaving directory `/usr/src/linux-2.2.16/kernel'
make -C  drivers CFLAGS="-Wall -Wstrict-prototypes -O2 -fomit-frame-pointer -fno-strict-aliasing -D__SMP__ -pipe -fno-strength-reduce -m386 -DCPU=386 -DMODULE -DMODVERSIONS -include /usr/src/linux-2.2.16/include/linux/modversions.h" MAKING_MODULES=1 modules
make[1]: Entering directory `/usr/src/linux-2.2.16/drivers'
make -C block modules
make[2]: Entering directory `/usr/src/linux-2.2.16/drivers/block'
gcc -D__KERNEL__ -I/usr/src/linux-2.2.16/include -Wall -Wstrict-prototypes -O2 -fomit-frame-pointer -fno-strict-aliasing -D__SMP__ -pipe -fno-strength-reduce -m486 -DCPU=686 -DMODULE -DMODVERSIONS -include /usr/src/linux-2.2.16/include/linux/modversions.h   -DEXPORT_SYMTAB -c loop.c
 * * *

[root@gryphon linux]# make modules_install
Installing modules under /lib/modules/2.2.16/block
Installing modules under /lib/modules/2.2.16/net
Installing modules under /lib/modules/2.2.16/ipv4
Installing modules under /lib/modules/2.2.16/ipv6
Installing modules under /lib/modules/2.2.16/scsi
Installing modules under /lib/modules/2.2.16/fs
Installing modules under /lib/modules/2.2.16/fs
Installing modules under /lib/modules/2.2.16/cdrom
Installing modules under /lib/modules/2.2.16/net
Installing modules under /lib/modules/2.2.16/video
Installing modules under /lib/modules/2.2.16/net
Installing modules under /lib/modules/2.2.16/net
Installing modules under /lib/modules/2.2.16/misc
The compile step for the kernel modules, accomplished by typing make modules, is visually similar to the kernel compile step. The difference here is in time. Since we went through and pruned out almost every bit of code our hardware and configuration wasn't using, the make modules step is completed in a matter of three to four minutes. When we accept the stock configuration that came with OpenLinux, the make modules portion of the compile runs for over half an hour on a PIII-600 machine with fast disks.
The make modules_install step properly belongs in the next section, but we were loath to break up the pair of commands, especially since they are both managed by the Makefile. However, it's time to install our new kernel, make it bootable, and test it.
When getting ready to install, we work with the directories in a specific order. You needn't follow all of these steps in precisely this order, but they must all be accomplished prior to rebooting the machine.
First, we have a look at all of the files in the /usr/src/linux directory, then make a copy of the current configuration to a safe place, in this case, the root user's home directory.
[root@gryphon linux]# ls -a
.                .version       REPORTING-BUGS  init            modules
..               COPYING        Rules.make      ipc             net
.config          CREDITS        System.map      kernel          scripts
.config.old      Documentation  arch            kernelrun1.txt  vmlinux
.depend          MAINTAINERS    drivers         kernelrun2.txt
.hdepend         Makefile       fs              lib
.menuconfig.log  README         include         mm

[root@gryphon linux]# cp .config /root/2.2.16_initconfig
There's another file to deal with here, the System.map. We want a copy of that in the /boot directory, but we don't risk overwriting our current configuration. So we copy the file over as follows:
[root@gryphon linux]# cp System.map /boot/System.map-2.2.16
Now we'll go fetch the kernel that was built in the previous section, and make a version-named copy of it to the boot directory in exactly the same manner.
[root@gryphon linux]# cd arch/i386/boot/

[root@gryphon boot]# cp bzImage /boot/vmlinuz-2.2.16
Why is the running kernel named vmlinuz (or a variant thereupon)? Good question. It seems to be tradition more than anything else, that a compressed kernel in the /boot directory is called vmlinuz[-nnn] (note the "z" instead of "x" that's hard to type sometimes).Once that's done, then our work in the Linux kernel source tree is complete. Now we need to set up the boot directory and the boot loader to recognize the new kernel.
[root@gryphon boot]# cd /boot

[root@gryphon /boot]# ls -al
total 2510
lrwxrwxrwx   1 root     root       32 Aug 13 03:18 System.map-2.2.14 -> /usr/src/linux-2.2.14/System.map
-rw-r--r--   1 root     root   205366 Aug 28 09:20 System.map-2.2.16
-rw-r--r--   1 root     root    50282 Feb 17  2000 WHATSIN-2.2.14-modular
-rw-r--r--   1 root     root    51738 Feb 17  2000 WHATSIN-pc97-2.2.14-modular
lrwxrwxrwx   1 root     root        1 Aug 13 06:06 boot -> .
-rw-r--r--   1 root     root     4580 Feb 17  2000 boot.b
-rwxr-xr-x   1 root     root     4560 Feb 17  2000 boot.b.orig
-rw-r--r--   1 root     root      624 Feb 17  2000 chain.b
drwxr-xr-x   3 root     root     1024 Aug 28 09:22 grub
-rw-r--r--   1 root     root   306720 Aug 13 06:06 initrd-2.2.14.gz
drwxr-xr-x   2 root     root    12288 Aug 13 02:36 lost+found
lrwxrwxrwx   1 root     root       13 Aug 13 03:09 message -> message.col24
-r--r--r--   1 root     root    43777 Feb 17  2000 message.col24
-rw-r--r--   1 root     root      632 Feb 17  2000 os2_d.b
-r--------   1 root     root    39755 Feb 17  2000 stage3.pcx
-rw-r--r--   1 root     root      512 Mar 15  1999 virgin.mbr
lrwxrwxrwx   1 root     root       14 Aug 28 09:22 vmlinuz -> vmlinuz-2.2.16
-rw-r--r--   1 root     root   610825 Feb 17  2000 vmlinuz-2.2.14-modular
-rw-r--r--   1 root     root   599943 Aug 28 09:21 vmlinuz-2.2.16
-rw-r--r--   1 root     root   611322 Feb 17  2000 vmlinuz-pc97-2.2.14-modular
We can see from the /boot directory listing that we already have symbolic links pointing to the original booting kernel and map file. Now we'll reset these to point to the files we moved here from the new kernel. Using the ln (link) command with the "f" option forces an overwrite of the existing symbolic link.
[root@gryphon /boot]# ln -sf System.map-2.2.16 System.map

[root@gryphon /boot]# ln -sf vmlinuz-2.2.16 vmlinuz
The next step is to configure the default boot loader to find the new kernel. We strongly advised keeping the old kernel around (and its matching boot loader configuration) as a backup in case an error arises from the compile run. Use any text editor (vi, joe or vim, for example) to modify the menu.lst file. The end result is shown in the output of the cat command - we have added the lines shown in bold.
[root@gryphon /boot]# cd grub

[root@gryphon grub]# vi menu.lst

   * * *

[root@gryphon grub]# cat menu.lst
#
# /boot/grub/menu.lst - generated by Lizard
#
# modified by bilbrey 8/23/2k
# Linux (2.2.14) --> OldLinux
# 2.2.16 patched installed as Linux

# options

timeout = 5
splashscreen = (hd0,1)/boot/message.col24

default = 0

title  = Linux
root   = (hd0,1)
kernel = /boot/vmlinuz noapic nosmp debug=2 root=/dev/hda4

title  = OldLinux
root   = (hd0,1)
kernel = /boot/vmlinuz-pc97-2.2.14-modular vga=274  noapic nosmp debug=2 root=/dev/hda4

title = Windows
	chainloader = (hd0,0)+1
In addition to adding a new boot stanza and renaming the old one to work as a backup, there are two further changes we've made to the menu.lst above. Note the comments at the top of the Grub menu file to indicate the changes made, when, and for what reason. This is always a good practice. Additionally, in the new kernel stanza, the vga=274 option has been removed. This allows us to watch the actual boot process in action, making it easier to debug should an error occur. If we were using Lilo (the older bootloader utility, also installed by OpenLinux, though unused by default) then we would need to edit the file /etc/lilo.conf, and install the revised bootloader by typing lilo from the command prompt. This step is unnecessary with Grub, which simply reads the menu.lst file on each boot.
[root@gryphon grub]# reboot
We assume that the kernel at least boots fine for you. If not, then take notes on the error messages, reset and boot into the OldLinux kernel (as we made it in Grub's menu.lst file). Things to check include the items on the following list. Any problems in specific areas should provide a strong indication of what needs to be changed in the kernel configuration. The good news is that once you've got a booting kernel, you can recompile without booting into the OldLinux kernel (but keep an old reliable kernel around, just in case). Do the following steps as the root user:
lsmod, which lists the modules that have been loaded by the kernel. Scrutinize the output to confirm that the modules you selected (because they were needed by the hardware) are all loaded.If all of these tests pass with flying colors, then congratulations, your new kernel is a success. If not, then there are two routes to repair. One is to go back into the configuration routine, make changes that seem appropriate for the problems experienced, rinse, and repeat. The second option is to start with the basic .config file from the prior working kernel, and carefully edit out specific configuration features - possibly in a step-wise manner - with multiple compile, install, and test passes to confirm key changes.
We suggest that you leave the prior version kernel as a boot option at least through the next major kernel upgrade cycle - in case some problem crops up with the latest installation, you'll have a known good fallback that doesn't require reinstalling OpenLinux from scratch.
Before we get into the subject of administrative performance tuning, there are two critical pieces of information you should be aware of. First (and this is the good news), the Linux kernel is self-tuning to a certain extent. Upon booting, the available cache memory and swap space are analyzed, then virtual memory and process cache areas are configured accordingly. The second useful bit of knowledge we have to impart is this: Be Careful! The kernel is a reasonably stable running environment. Give it a strong enough push from one side or the other, though, and it will probably tip over.
Your knowledge of the actual system workload is critical in making kernel adjustments. For example, increasing disk load tolerances has very little effect on a system that is performing as a router (in which case networking and TCP/IP stack adjustments may be indicated).
In the section Kernel Configuration, we recommended that you enable (or leave enabled) the Sysctl support and /proc filesystem options. These are the two keys to live kernel tuning. Sysctl is a system function (type man sysctl for more information) used to set or read values in the /proc filesystem. Alternatively, values can be written directly to the appropriate location in /proc. For example, to enable IP forwarding (allowing packets to get from one interface to another), the following command does the job: echo "1" > /proc/sys/net/ipv4/ip_forward. The equivalent sysctl line reads: sysctl ip_forward=1.
That's easy for single parameter files, but multiple parameter files like /proc/sys/vm/bdflush encompass nine distinct values. To set these, use the sysctl command to echo the output to a file, edit the file, then "cat" the new data back into the file as follows: first execute sysctl -n vm.bdflush > bdf_temp, then run vi bdf_temp to edit the data, and finally cat bdf_temp > /proc/sys/vm/bdflush to write the revised data into the specific kernel data structure represented by bdflush.
Some key kernel tuning options to be aware of are the first three parameters of bdflush, along with those of freepages, located in the /proc/sys/vm directory - these provide some control over the behavior of the virtual memory and page swapping features. In the /proc/sys/fs (for filesystems) directory, file-max represents the number of files and devices which can be open at one time, and can be increased if necessary. inode-max should be set to between three and four times the value of file-max.
Networking parameters can be set by addressing the structures found in /proc/sys/net. Most of today's networks run on Internet Protocol Version 4, so the tunable parameters we care about are found in the ipv4 directory, like the ip_forward entry, discussed previously. Many of the 35 or so entries under ipv4 are familiar from the network portion of the kernel configuration routine. One recommendation we've read says to turn off (type echo "0" ...) the icmp_echo_ignore_all and icmp_echo_ignore_broadcasts options to enhance system security. ipfrag_high_thresh is a value indicating how much memory is committed to reassembling IP packets. Increase this value to reduce error rates from discarded packets in systems that frequently encounter large quantities of fragmented packets.
As we said before, caution is recommended in modifying the runtime kernel data structure values. Small changes, followed by careful observation, are the correct path to fine-tuning the kernel to a specific role or purpose. Some important and irreverent documentation of these and other features can be found in the /usr/src/linux/Documentation/sysctl/ directory. Another excellent source of information for the Linux kernel as a whole, including tuning parameters, is the book Linux Internals (McGraw Hill, 2000), by our friend Moshe Bar.
The kernel is the heart and circulatory system of a computer running Linux. However, it's much easier than performing surgery to modify and recompile the kernel, reinstall it, and have a faster, better Linux box as a result. This chapter covered the following points:
Go to the Table Of Contents