
Email Brian
Brian's Website


Email Tom
Tom's Website
|
Email Brian Brian's Website |
|
Email Tom Tom's Website |
Go to the Table Of Contents
Did you read the Preface? Thanks!
An office suite is defined in at least as many ways as there are individual users. For most people, the productivity software they use is a reflection of their computing experience. We believe that a productivity suite must minimally provide the following capabilities: Word/document processing, spreadsheet, and presentation capabilities. These should share a unifying and intuitive interface along with other included utilities, such as database software, e-mail, drawing or paint packages, schedule, or calendar management. Ideally, the main applications should be capable of sharing data with each other, and incorporate object embedding features. And of course, we'd like to see simple, complete, bi-directional data interchange with the file formats of other, more dominant programs, like the Office 2000 suite from Microsoft.
The often-rumored version of Microsoft Office for Linux would drive Linux right into the corporate desktop at high velocity, at the expense of many sales of the Windows operating system. For that reason alone, we don't expect to see this offering soon, if ever. However, Microsoft Office is clearly the 800-pound gorilla of productivity software. Any vendor wishing to play in this space under Linux has to genuflect before the altar, and provide as much data file compatibility as possible with the Microsoft's key applications. We'll be looking extra hard at these interchange facilities and filters throughout this chapter.
There are three major players in the desktop productivity suite arena under Linux: VistaSource (Applixware Office for Linux, currently in Version 5.0), Corel (WordPerfect Office 2000 for Linux), and Sun (StarOffice 5.2). As of this writing, each of these vendors has put out a major revision. These latest incarnations are the topic of this chapter.
The cost of Linux suites ranges from free to inexpensive (compared to MS Office 2000 Standard, at a retail cost of $500 US from the Microsoft site). Sun's StarOffice is free to download; the VistaSource and Corel offerings are both less than $100 US at retail.
Clearly, there is no way we can provide anything but the bare minimum of coverage of these large, complex products. Each is capable and useful, each deserving of a book unto themselves. We don't have that kind of space. What we do provide is a brief overview and our initial impressions.
For each of the three packages, we evaluated a specific (and limited) set of characteristics:
We used a single set of MS Office documents for testing: two chapters from this book in Word 2000 format, a simple Excel 2000 spreadsheet with an integrated 3D chart, and a five-slide PowerPoint presentation with simple transition animations.
Our goal was to provide you with an answer to one question, and give an opinion on a second. The first question is, "Can documents be interchanged with colleagues who are using Microsoft Office tools?" The second is, "Can the same tasks be accomplished under Linux as in the Windows environment?"
Applixware Office for Linux, Version 5.0 is the product of the newly re-branded company, VistaSource. Their Web site is located at http://www.vistasource.com/. The Applixware package contains the following programs: Words, Spreadsheets, Graphics, Presents, Data, and Mail.
We tested the full retail version of Applixware Office 5.0, which costs about $90 US. The box contains a single installation CD-ROM for Linux (Intel platforms only), a registration form, a 40-page Office Installation and Release Notes, Version 5.0 booklet, and a spiral-bound 300+ page user's manual called Make It Happen. Let's take Applixware out for a spin.
There is a whole half page of documentation devoted to installing Applixware, which according to the vendor, consists of four steps. Before we went forth to do battle, we checked both the support pages of VistaSource, as well as the Caldera Knowledge Base. Good thing, too, as the instructions for installing Applixware 5.0 at Caldera are different than those in the Applixware documentation, and are correct. (Browse to http://support.calderasystems.com/caldera/search, select the Incident # radio button, and enter 000820-0010 in the search field to see the original). Here are the correct directions for installing Applixware Office 5.0, all done from the command line:
[bilbrey@gwydion bilbrey]$ su
password: root_password

[root@gwydion bilbrey]# script /root/applix_install
Script started, file is /root/applix_install

[root@gwydion bilbrey]# mount -r -t iso9660 /dev/cdrom /mnt/cdrom

[root@gwydion bilbrey]# cd /mnt/cdrom/GTKRPMS/

[root@gwydion bilbrey]# rpm -Uvh --force *rpm
  * * *

[root@gwydion bilbrey]# cd RPMS

[root@gwydion bilbrey]# ./install.bsh
  * * *
Done.
To install Applixware, become the root user, open a script file (more on that in a moment), and mount the CD-ROM. Then change directories to /mnt/cdrom/GTKRPMS/OpenLinux24/ and install the updated libraries there, forcing the update. Finally shift to the Applixware RPMS directory and install the suite. That's it!
It's a good rule of thumb anytime you install large, complex, or potentially problematic programs to use a little trick commonly practiced by system administrators - create a text file (applix_install), using the script command, that automatically records any and all output generated during the process. Type script /root/applix_install, which opens a new file, /root/applix_install. From that point forward, everything that you type, and the installation routine echoes to the virtual terminal is copied to the aforementioned file. This provides two major benefits. First, you can use the saved output that is usually several pages long to help in debugging any problems with the install process. Secondly, a record of what was installed and where is very useful in removing the program later, should that be necessary or advisable.
Hint
Applixware is a commercial package, and installation support is part of the purchase price. Please consult your Applixware documentation for support contact information.
The output of the Applix install script is minimal - a one-per-line list of RPM files, and a set of hash marks ("#") indicating installation progress for each file. The final line is merely "Done;" the installer then returns to the command prompt. Type exit (or press Ctrl + D) to terminate the script file, then umount /mnt/cdrom so that the CD-ROM can be ejected, then type exit to leave the root session.
The next step is to add the Applixware programs to the KDE menu system. Right click on the KPanel, and select Restart. When the refresh completes, there's a new main menu entry, Applications, with a single sub-menu on it, Applixware, as shown in Figure 11-1.
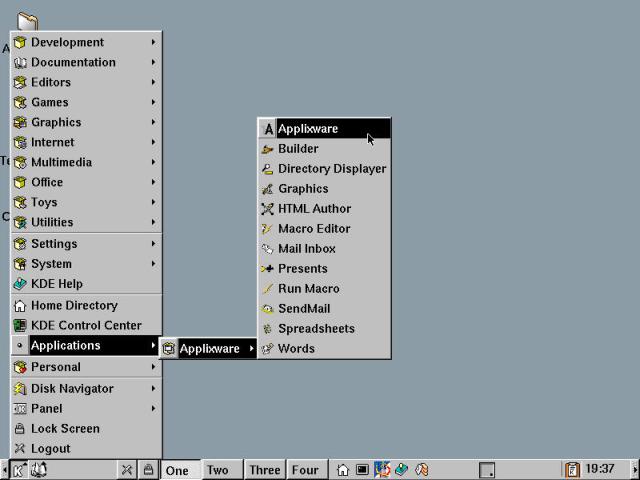
Figure 11-1
The Applixware Menu under in KDE, following Applixware Office 5.0 installation.
For better or worse, the Applixware manuals don't begin to describe locating their product on the menus in the desktop. Of course, we've shown you where and how with KDE on an RPM-based system like OpenLinux. In the Linux world, there are so many different window managers and menu systems that it would be a Herculean exercise, doomed to failure since the environment changes as quickly as it can be documented.
The Make It Happen manual is started from the Applixware icon bar by selecting K --> Applications --> Applixware --> Applixware, as shown in Figure 11-1. After a delay of several seconds while the software loads in the background, the Applixware splash screen displays, then gives way to the Iconbar and a first time user's helper, both shown in Figure 11-2.
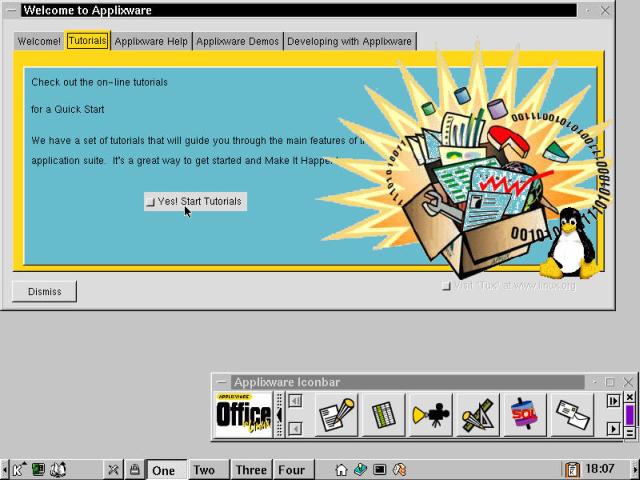
Figure 11-2
Start the Applixware Iconbar for the first time, and a Welcome to Applixware dialog appears.
The Applixware e-mail component has two buttons on the Iconbar. The first, Applixware Mail Inbox (SendMail, not to be confused with the sendmail MTA discussed in Chapter 26), is shown as the two-envelope icon button to the right side of the Iconbar.
We had an initial, sinking (but incorrect, as it turns out) suspicion about this component, from the "SendMail" in the component tooltip. The implication is that this is an e-mail tool for use with Linux system mail only. In fact, local mail is the default configuration. A quick stroll through the help files, however, reveals that there is support present for both POP and APOP mailboxes. This is configured by selecting * --> Mail Preferences... from the Mail component menu. Select the POP tab to configure the servers as demonstrated in Figure 11-3.
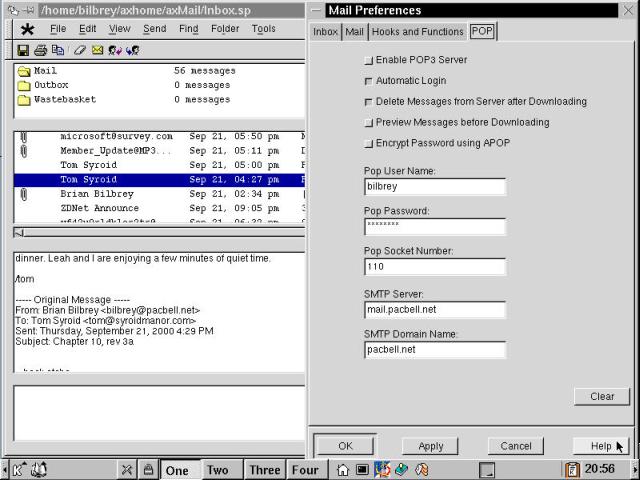
Figure 11-3
The Applixware Mail component behind, configuring POP mail.
Caution
Use Applixware mail as your only POP client, or don't use it for POP mail at all. One of our common modes of operation involves retrieving mail (non-destructively) from several different sites during the working day, and fetching them again for sorting and filing each evening. This means that every client but one is set up to not "Delete Messages from Server after Downloading." Most clients are designed to recognize messages they've already retrieved once. When we set this up, Mail downloaded eight copies each of seven messages, in a four-minute span. Recommendation: Let Mail delete messages if you use POP with Applixware Mail.
On the upside, Applixware Mail has a very complete set of tools for working with and sorting complex sets of shared and private local mailboxes and message folders. There are clear, intuitive features for creating rules (message filters) and complex, multi-item message selection queries. Working against Applix Mail, there is no IMAP support and no real address book (although there is a feature called Personal List, which is a set of e-mail addresses and optional aliases).
The Applixware Words user interface is quite similar to the equivalent Microsoft product. As such, it is an easy package to begin to use productively. In the Release Notes portion of the Applix documentation, we find only one group of related issues that impact our ability to use this component: highlighting, comments, and tracked changes are not supported.
Moving forward, we open our first test document, a copy of an old revision of Chapter 1. It's small and contains no embedded graphics. When we select the file to open, an Import Wizard dialog box is displayed. Accepting all the defaults (no reason to change them that we can see), we choose the Finish button. Seconds later, the document is imported... with most of the text displayed in bright green.
Clearly there's an interesting import challenge. It turns out that the original Word 2000 DOC file has normal text defined as green. In a sensible interpretation of "cascading styles," Applixware Words has determined that since the main body text style doesn't specify a color, it should follow the lead of the Normal style. This turns out to be good logic that garners inaccurate results. That's easily fixed, leading to the screenshot in Figure 11-4. Additionally, we got a bit of a chuckle out of the Words automatic spell checker not recognizing "Linux."
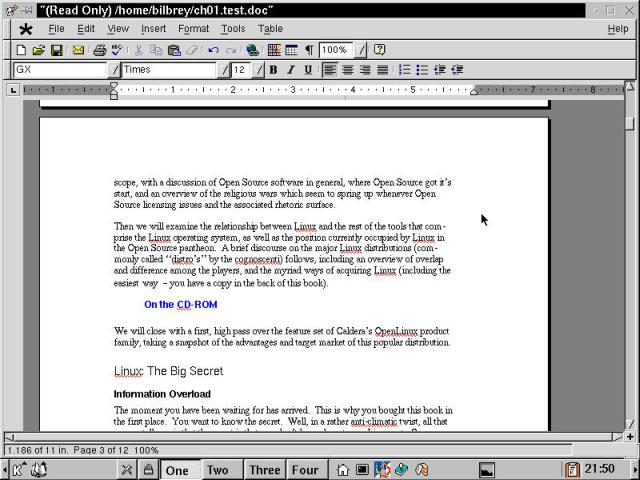
Figure 11-4
Applixware Words component, with an imported Word 2000 document loaded.
Making a few changes to the document and sending it back across the boundary works. Exporting is via RTF (Rich Text Format), which is a mostly public format, less malleable and prone to change than the DOC format (although, as usual, there are some MS specific "enhancements" in RTF output from Word). Features from the original document that didn't import properly are simply gone. Footnotes are supported across the import/export process.
Hidden Feature
In conversation with an Applixware engineer at the Linux World Conference and Expo this summer, we determined that the "replacement" for the revisioning/track changes features of Microsoft Word is called Change Bars. These provide a graphical representation of areas of changed text between two different versions of a document, which can be stepped through. This feature only works for native Applixware Words format documents. This is only a secret because we wouldn't have known where to start looking without this hint.
Loading our second test document into Words was an interesting exercise. This version of Chapter 3 is a challenging bit of text, with 37 embedded TIFF images, and all sorts of features that Applix Words doesn't like much. Following an import process that took about one minute, we were able to select all of the contents of the file and start a formatting process that killed all of Applixware (Words and Iconbar) dead. There was no core file left behind, and when we attempted to restart Words, the X Server restarted instead. This was our fault. We skipped the installation of the updated GTKRPMS/OpenLinux/ library RPM files (as discussed in the Installation section, previously) on our first pass with this software. Applixware doesn't quite get along with the default library version provided by OpenLinux, making the interface unstable in a number of the Applixware components.
There is good news about Applix Words. The interface is close enough to that of Microsoft Word that migrating users face a shallow learning curve. Many of the features that business users rely on are present. On the downside: Save often, in case the program dumps out.
We're impressed with the honesty of VistaSource. There are four pages, 37 items worth, of errata for importing Excel worksheets into Applixware Spreadsheets. We did not encounter any import problems with our simple example, a set of Web site statistics, with a graph and a few running averages, shown in Figure 11-5.
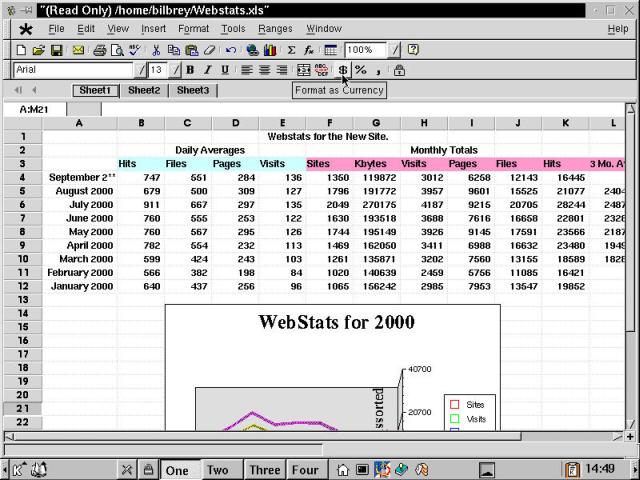
Figure 11-5
Applixware Spreadsheets successfully imports a simple Excel 2000 file.
Our one real challenge for importing to the Applix Spreadsheets component was sending it a 3D graph. While all of the chart's features are present, they are jumbled, with the Y Axis title ("Assorted") appearing in the middle of the graph. The top of the graph can just be seen in the figure. We'll count that as a single, but not a home run.
Printing and exporting also went smoothly, with the exceptions that we found already in the Release Notes. Charts are not exported at all (a known bug), and exports to the XLS format are actually to the Excel 5 format, which is easily (and flawlessly) read by Excel 2000.
A possibly crucial lack in this product for some users: Pivot Tables are not supported nor imported by Applixware. Overall, we were impressed with the level of document interchange, stability, and feature set of this component of Applixware Office 5.0.
We found Applixware Presents to be a very capable tool. Oddly, when starting the component, you cannot start by importing a file. Start the program with a blank template, as though creating a new presentation from scratch. Then import the PowerPoint file into this blank document. Initially, the graphics and text come across from PowerPoint 97/2000 virtually unharmed, as shown in Figure 11-6.
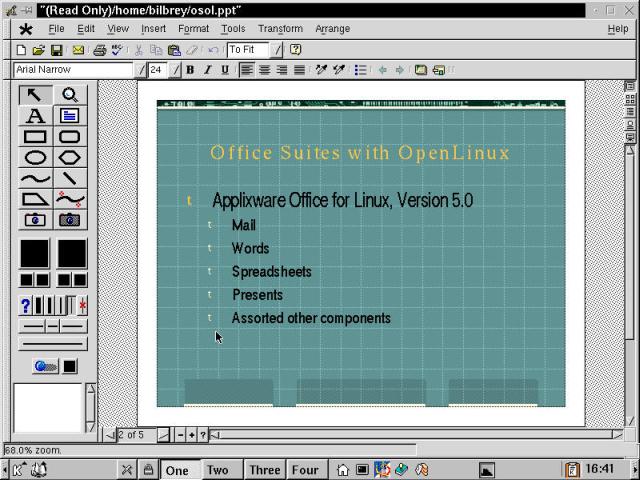
Figure 11-6
A PowerPoint file opened in Applixware 5.0's Presents component.
The cursor is pointing at one error - the bullet symbol is changed to a letter "t." This is the result of a font translation error. Use the Presents menus: View --> Presentation --> Slidemaster, then choose Format --> Bullets, change the font family to Symbol, and select a better marker for each indent level.
Additionally, the slide transitions specification didn't make it through the import process. It is easy to add new transitions, either slide-by-slide, or to the whole show at once. Selecting Tools --> Slide Transitions... opens an intuitive dialog box for configuring this aspect of the presentation.
The array of graphic tools is reasonably complete for a tool of this nature. The drawing tools use an interface shared with the other graphically oriented components of Applixware.
Moving data in the other direction - exporting a revised set of slides from Presents into PPT format and opening in PowerPoint - was less successful. The text imported properly, but the underlying graphics did not. For converting from one tool to the other, the best rule to follow is to keep your documents as simple as possible.
There are several other components to the Applixware Office 5.0 suite. For instructions on each of these, see the Applixware documentation and online help files.
Applixware makes it easy to uninstall their software, either graphically, or via the command line. As root, mount the Applixware CD-ROM, then change to the /mnt/cdrom directory and run ./setup. This starts the installer, which offers, as one of its options, to remove Applixware from the system. User data remains untouched.
From the command line, type cd /mnt/cdrom/RPMS, then ./remove.bsh. The Applixware specific RPMS are removed from the system. Some remnants are left to be cleaned up after the fact: modified configuration files are left in the /opt/applix directory, and all user directories (of the form /home/username/axhome) are untouched. Preserve data files as necessary, then these directories may be safely removed.
WordPerfect Office 2000 (WPO2K) has the right name for the job. There are still enclaves of WordPerfect users in the Windows environment - for example, WP is the document processing software of choice for the legal profession. The brand is a strong one and this ultimately sets high expectations for the software. The following insights are based on WordPerfect Office 2000 for Linux Deluxe, which runs about $150 US at retail.
The box contains a small stuffed Corel penguin, three CD-ROM discs, a User Manual, a Libraries Catalog, and assorted other paperwork, like the Product Authenticity Card with the serial number printed on it (used for online registration and technical support). The three discs are Disc 1 (suite programs) and Disc 2 (galleries of clip art, etc.), and a copy of Corel Linux OS, the Open Circulation CD-ROM.
WPO2K for Linux looks and works just like the Windows-based version of the suite. This is because it runs on a customized version of the Windows API emulation layer provided by the Wine project (http://www.winehq.com/). This also adds a layer of complexity to the product, as we shall see.
WordPerfect Office 2000 is a product initially designed for installation in the Corel Linux distribution, which is based on Debian GNU/Linux. We strongly recommend that before installing WPO2K under OpenLinux, you spend some time with the online resources available from both Corel (http://linux.corel.com) and Caldera (http://www.calderasystems.com). The setup process is not the easiest or smoothest we've ever worked with, and there may well be updates by the time you read this.
Before beginning the actual installation, go to the following site: http://linux.corel.com/support/script.htm. From here, you are directed to a Corel FTP site to retrieve, install, and setup scripts for use in getting WordPerfect running on a non-Corel distribution. The Caldera Knowledge Base refers to the same FTP site.
After retrieving the install and setup scripts, use the less program to review the README files that accompany the scripts. Having done so, here is the process we followed to install WPO2K under OpenLinux eDesktop.
First, run su to become the root user, then initialize a script file to record the installation activities (as described earlier under installing Applixware). Following the instructions in install_README.txt, un-tar the file install.tar. Then insert Disc 1 into the drive, and mount it. Execute the install script and answer the prompts. For the following example, the CD-ROM is mounted at /mnt/cdrom, and we have chosen the full install option. Most of the installation lines are the output of running RPM to install the package noted, followed by hash marks to indicate progress.
[bilbrey@gwydion bilbrey]$ su
Password: root_password

[root@gwydion bilbrey]# script WP_inst
Script started, file is WP_inst

[root@gwydion bilbrey]# tar xvf install.tar
install
install_README.txt

[root@gwydion bilbrey]# mount /mnt/cdrom

[root@gwydion bilbrey]# ./install
Enter the location where the installation CD is mounted
(e.g. /mnt/cdrom): /mnt/cdrom
Select install option:
1 - Full install
2 - Minimal install
1
Doing full install of WordPerfect Office 2000 deluxe edition for glibc 2.1
Press <Enter> to proceed or <Ctrl>-C to cancel install.

wine-wpo2000-glibc-2.1      ##################################################
wpo2000-fonts-core          ##################################################
Stopping the font server (if any)
fonttastic-glibc-2.1        ##################################################
Configuring for SysV-style init
Starting the font server
Starting FontTastic Font Server:  fonttasticNotice: Using config file: /etc/fonttastic/config

libaps                      ##################################################
wpo2000-icons-minimal       ##################################################
wpo2000-help-wordperfect    ##################################################
wpo2000-help-macros-wordperfect ##################################################
wpo2000-help-quattropro     ##################################################
wpo2000-help-macros-quattropro ##################################################
wpo2000-help-minimal        ##################################################
wpo2000-show-on-the-go      ##################################################
wpo2000-icons-full-std      ##################################################
wpo2000-help-corelcentral   ##################################################
wpo2000-help-presentations  ##################################################
wpo2000-help-macros-presentations ##################################################
wpo2000-help-utilities      ##################################################
wpo2000-help-macros-utilities##################################################
wpo2000-help-full-std       ##################################################
wpo2000-minimal             ##################################################
user builder does not exist - using root
user builder does not exist - using root
 * * *
There are lots of repeating lines about the user and group "builder" not existing. Apparently this is normal. We didn't notice any specific problems resulting from this issue.
wpo2000-full                ##################################################
wpo2000-icons-full-dlx      ##################################################
wpo2000-help-paradox        ##################################################
wpo2000-help-macros-paradox ##################################################
wpo2000-help-full-dlx       ##################################################
wpo2000-full-dlx            ##################################################
Now review the instructions for the setup script, setupWPO2000_README.txt. The critical portion of this file notes that the original setupWP02000 file shipped with WordPerfect Office 2000 does not run properly on Linux distributions that do not include the program run-parts (for example, OpenLinux). Continuing with the setup process....
[root@gwydion bilbrey]# tar xvf setupWPO2000.tar
setupWPO2000
setupWPO2000_README.txt

[root@gwydion bilbrey]# cp setupWPO2000 /usr/lib/corel/bin/setupWPO2000

[root@gwydion bilbrey]# exit
Script done, file is WP_inst

[root@gwydion bilbrey]# exit
exit

[bilbrey@gwydion bilbrey]$ setupWPO2000
The entire installation process, while cumbersome, appears to work effectively. If you've already installed WordPerfect and are encountering problems (such as applications that don't start or run properly), we recommend reinstalling using the instructions above. Change the last command to setupWPO2000 --force, to correct remaining problems with the earlier install.
When the smoke clears from the installation, we find that there are no menu entries in KDE. Not immediately, nor after a restart of the X Server. To incorporate them, you'll need to manually create new menu entries using the commands detailed in the WordPerfect program launching summary (see Chapter 10 for details on adding a menu entry under KDE).
[bilbrey@gwydion bilbrey]$ wpo2000-list
Corel WordPerfect Office 2000 Program Launching Summary
To run:                         Type:
WordPerfect 9                   wordperfect
Quattro Pro 9                   quattropro
Corel Presentations 9           presentations
Corel Presentations 9 Player    prplayer
Paradox 9                       paradox
CorelCENTRAL Address book       ccaddressbook
CorelCENTRAL Memos              ccmemos
CorelCENTRAL Cardfile           cccardfile
CorelCENTRAL Calendar           cccalendar
CorelCENTRAL Database Repair    ccrepair
PerfectExpert                   perfectexpert
PerfectScript                   perfectscript

BDE Administrator               bdeadmin
Third Party Registry Editor     tphreg
All of these programs are symbolic links inserted into /usr/bin by the WordPerfect installation routine. As an alternative to creating menu entries, you can also simply start the programs by typing the command name as given in the second column of the listing.
One other little hitch we ran into early is that the HTML help files are all in GZip (compressed) format (filename.htm.gz). When we select help from any of the WordPerfect Office applications, up pops the Netscape browser, and a File Save dialog, wanting to preserve the compressed file.
WordPerfect Office 2000 for Linux does not provide a mail client.
The centerpiece of WPO2K is WordPerfect 9. When the program is first run, either from a manually created new menu entry or from the command line, you are first greeted with a small information box informing you the system is building font metrics. This is a one-time activity, and takes less than two minutes.
The bad news is that both the Microsoft Word 2000 test files we used (97/2000 DOC format) could not be opened by WordPerfect. The Open File dialog box offers an option to open files of type "Microsoft Word (*.doc)." Selecting a file and pressing the Open button starts the document conversion process (a small animation in a new dialog box). This conversion takes a variable length of time that seems to correlate to file size. It terminates in both cases with a warning dialog which merely states "! Unknown file format."
We presume (a dangerous activity, don't try this at home) that the file format is actually known, or the conversions would have terminated almost immediately. However, we do believe that an element in the format unknown to the WP document filter prevents the document from importing properly. Therefore, WordPerfect imports nothing.
When we export the chapter files from Word in RTF (Rich Text Format), both files import, including the defined text format styles. There are several drawbacks, though. Revisioning and comments do not survive the transition to RTF followed by conversion into WordPerfect format. Secondly, the converted RTF files can be substantially larger than their *.doc progenitors: ch03_test.doc is a 1.6MB file; the corresponding RTF file is 74MB (yes, that's seventy four megabytes), which takes more than 20 minutes to convert! Lastly, the images in the imported Chapter 3 file didn't survive the process either. We are left with 37 picture-sized black boxes in the document.
To be fair, we created yet another test file, a plain vanilla DOC file, copied it over to OpenLinux, and gave WordPerfect another shot at opening the Word 2000 document format. It worked like a charm. Given that experience, we tried to simplify our existing Chapter 3 document. This is difficult, since the conversion dialog gave us no indication of the type of element it choked on.
However, our first (and correct) guess was that the document revisioning features (aka Track Changes in Word parlance) were causing the problem. In Word, choose Tools --> Track Changes --> Accept or Reject Changes... and work through any remaining revisions until there are none left. Then save the document normally. This time around, the large and complex Chapter 3 file - sans revision marks - converted in about three minutes and all other formatting elements imported correctly (see Figure 11-7).
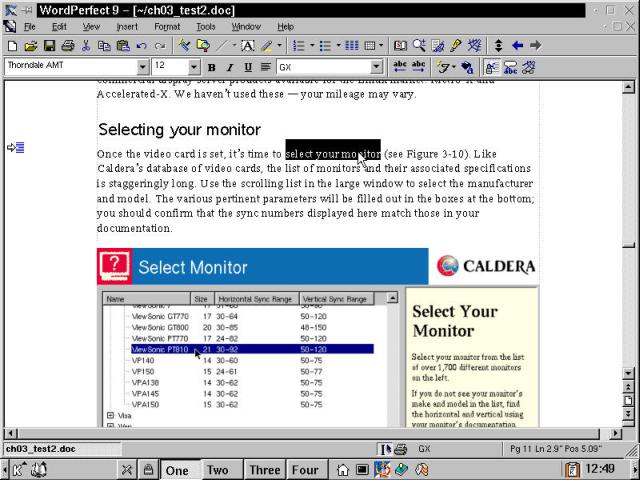
Figure 11-7
Word Documents (without tracked changes) import into WordPerfect 9.
Corel's Quattro Pro 9 spreadsheet program behaves like a champ. There's very little to say about this tool, precisely because it just plain does its job. Importing from and exporting to XLS format files is just about flawless - the results of importing our Webstats.xls test file are shown in Figure 11-8.
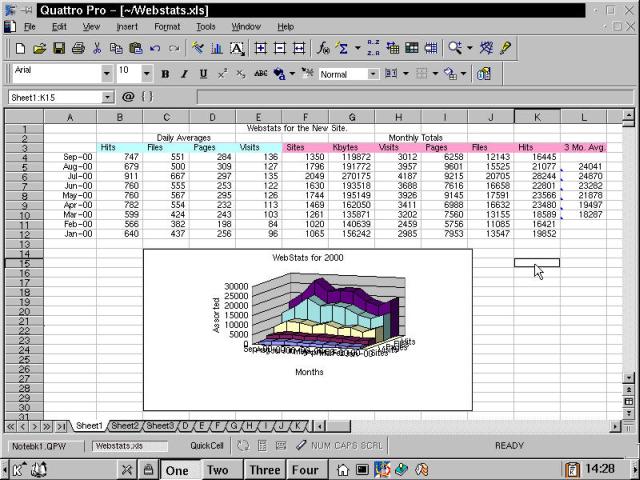
Figure 11-8
Quattro Pro 9 spreadsheet program works well with imported Excel files.
While the initial physical layout of the graph requires some adjustment, all of the styles and information is present. Moving cells, with and without formulas, works as anticipated. Charts are easy to re-format. Exporting a modified file and reloading in Excel shows all the changes that were introduced (on purpose) in Quattro.
Like Applixware Presents, your only choices when starting up Corel Presentations 9 are to create a new presentation or to open an existing native project. After navigating our way to a blank new presentation, we're able to open our sample file, osol.ppt. The results of the import can be seen in Figure 11-9.
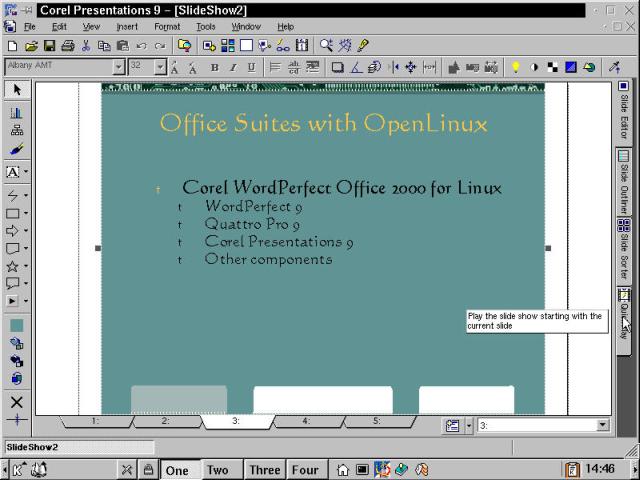
Figure 11-9
Importing a sample PowerPoint file into Corel Presentations 9.
Again, slide transitions didn't make it across the import/export border. The fonts have been changed, and the bulleting is actually deleted. The text looks similar to the style as it was imported into Applixware Presents above, right down to the bullet symbol being replaced by a "t." However, this is now simply tab-indented text, and the "t" characters are actually editable text, rather than badly translated bullet symbols. Lastly, the background graphics are changed, the gridwork is gone, and our tabs for small text boxes at the bottom of each slide have lost their shading and underline feature.
On the plus side, the text is fully selectable, allowing quick and easy modification (using cut and paste) to create elegant slide shows in a native Presentations 9 format. Slide shows can be exported into PowerPoint 95 format, which is easily readable by PowerPoint. Going in that direction, the font translation is lost, but the graphics translate quite well.
There are other components in the WordPerfect Office 2000 for Linux suite. These are documented in the user manual unless otherwise noted.
WordPerfect Office 2000 ships with no uninstallation script, nor is there a "Remove" button in the graphical setup routine. There is one simple way to clear out most of the installation: remove the RPM files. In no case does removing the RPM packages for WordPerfect Office endanger the data in user home directories. This is a simple process, run as root. Using KPackage, the RPMS to be removed can be found in the RPM --> Converted --> Debian portion of the KPackage tree. Select all of the files, then choose Uninstall.
In the summer of 1999, Sun Microsystems purchased Star Division, a German software publisher recently relocated to California. Along with the acquisition came the flagship product, StarOffice, version 5.1. Since then, Sun has released version 5.2, which features improved product stability and better document import filters. Additionally, in July of 2000, Sun announced that StarOffice 6.0 - scheduled for release in the Fall of 2000 - will be licensed under the GNU GPL. For now, let's have a look at StarOffice 5.2.
There are several different ways to get StarOffice. It can be downloaded from Sun: the starting point is http://www.sun.com/products/staroffice/get.html. It can be purchased as a combo package with a companion book for about $40 US, or as a bare CD-ROM for about $10. Having the CD-ROM around is useful. StarOffice is multi-platform, and each type (Windows, Linux, Solaris) is a separate 100MB download - all of the versions are on the disc.
Warning
There are a several differences between installing from the CD-ROM and from the downloaded files available from Sun's site. For details, please refer to the instructions that are linked off the download site.
The installation details that follow are based on an official Sun StarOffice 5.2 CD-ROM. Mount the disc (mount /mnt/cdrom). Then, head over to the documentation directory (cd /mnt/cdrom/documentation) and read the setup file (acroread SETUP.PDF; alternatively xpdf SETUP.PDF, if you haven't loaded the Acrobat Reader that is packaged with OpenLinux). The documentation is well written and useful; we recommend spending some time with it before you begin. Among all of the office suite software, StarOffice has the most complex installation routine, although it is completely GUI-driven.
Here is a recommendation and some quick-start instructions. Do not install for Single User. This puts all of the StarOffice program executables in your home directory and makes the program unavailable to any other users (including root). We prefer having program code in system directories, and data in user directories. For this reason, we recommend a Network Installation for StarOffice, even on single user machines.
When we're working in OpenLinux to add software and change configurations, we tend to login directly as root. This saves repeated typing of the root password when lots of configuration changes need to be completed. But for single task purposes, it can be better to type su to become root, take care of the chore, and exit. One problem with this is that OpenLinux is secured by default in such a way that even the root user doesn't have access to a normal user's X display. The following code demonstrates this failure mode, and a way to give root access to the display.
[root@gwydion documentation]# cd /mnt/cdrom/linux/office52

[root@gwydion office52]# ./setup -net
glibc version 2.1.2
Xlib: connection to "0.0' refused by server
Xlib: Client is not authorized to connect to server
./setup: cannot connect to X server :0

[root@gwydion office52]# exit

[bilbrey@gwydion documentation]$ xhost +localhost
localhost being added to access control list

[bilbrey@gwydion documentation]$ su
password: root_password

[root@gwydion documentation]# cd /mnt/cdrom/linux/office52

[root@gwydion office52]# ./setup -net
glibc version 2.1.2
This time, the setup command works. As a normal user, we've used the xhost command to give permission for others on the local machine to access the current X display. Then, as root, we can successfully run programs that require connection to the X server. This permission only lasts until revoked (by typing xhost -localhost as the normal user), or until the end of the current login session.
Hidden Feature
This is also done automatically by selectingK --> System --> File Manager (Super User Mode). The initial mini-terminal session sets permission for localhost connections to the X Server, then prompts for the root password to start KFM in superuser mode. In the case of StarOffice installation, we don't take this route because we want to start the StarOffice setup routine with the -net option.
There are several steps to installation, all reasonably intuitive. An important part of the process is to choose the installation type: Standard, Custom, or Minimum. Standard provides all of the program components and the help files, as well as a selection of the most common data import filters. Custom permits picking and choosing among the various components and features. Minimum doesn't install the help files, sample data files, or templates.
For a Network-based installation, the Sun documentation recommends a Custom installation with all components and files selected since it is unknown which components will be needed by which user. Given the required space involved (less than 300MB), this is good advice for most users.
The following screen allows you to enter the directory where StarOffice files will be installed. Oddly, the documentation refers to the default location as /opt/office52, and the actual default in the Select Installation Directory dialog is /root/office52. We recommend the former; program files do not belong under the root directory. Select Next, accept the creation of the new directory, then proceed to the Select StarOffice 5.2 modules dialog box shown in Figure 11-10.
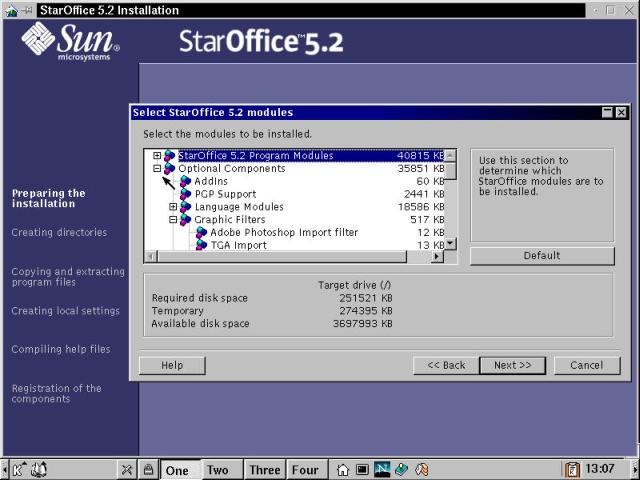
Figure 11-10
Choosing the modules and components for a StarOffice 5.2 Custom Installation.
Clicking on the "little boxes" icons next to each component changes its installation state. If all of the boxes are shown in full color, then everything is installed. Finally, choose Next once again, then Complete to finish the Network-based Custom installation. This takes approximately five minutes on most systems.
Following the actual program installation is an option to install the Adabas D database program components. The routine is roughly the same as the main installation routine for the StarOffice package. If you don't need database capabilities, feel free to conserve your disk space and decline this opportunity.
[root@gwydion office52]# cd ../adabas

[root@gwydion office52]# ./adabas
Tip
The Adabas D database software is also available as a free download from the same location on Sun's Web site as the StarOffice program. Look below the StarOffice 93MB file, in the Multiple Download List to find the StarOffice 5.2 Adabas Preview. Note that if you download the StarOffice binary from Sun, the Adabas software is not bundled with the package and must be fetched separately.
Finally, unmount the CD-ROM and eject it. The next step in StarOffice configuration is to install a third-party Java Runtime Environment from Blackdown. The Knowledge Base instructs you to go to http://www.blackdown.org/, and retrieve a JRE package, version 1.1.7v3 or later. Choose a download link off the Blackdown site to receive a listing of FTP sites, and use command line FTP to retrieve and install the appropriate file as shown in the following listing.
Warning
We have only been successful with JRE versions 1.1.7v3 and 1.1.8v3. The latest revisions apparently are not recognized by StarOffice. Fortunately, the old versions are available on every FTP site we checked out.
[bilbrey@gwydion bilbrey]$ su
Password: root_password

[root@gwydion bilbrey]# cd /usr/local

[root@gwydion local]# ftp -i iodynamics.com
Connected to iodynamics.com.
220 ftp.iodynamics.com FTP server (Version wu-2.6.0(1) Fri Jun 23 09:17:44 EDT 2000) ready.
Name (iodynamics.com:bilbrey): anonymous
331 Guest login ok, send your complete e-mail address as password.
Password: your_email@address.here
230-~~~~~~~~~~~~~~~~~~~~~~~~~~~~~~~~~~~~~~~~~~~~~~~~~~~~~~~~~~~~~~~~~~~~~~~~
230-Welcome to the Iodynamics anonymous FTP server. We're proud to be a
230-supporter of several open-source projects such as Apache, Red Hat Linux,
230-and the Linux Java Development Kit.
230-
230-If you're located in the the western United States of America, check out
230-our website at <URL: http://www.iodynamics.com/ > and learn about our
230-products and services to help businesses use the Internet better.
230-
230-Iodynamics: Internetworking the masses.
230-
230-All FTP activity is logged. If you do not like this policy, log off
230-now.
230-
230-You are user #23 of 40 allowed users.
230-~~~~~~~~~~~~~~~~~~~~~~~~~~~~~~~~~~~~~~~~~~~~~~~~~~~~~~~~~~~~~~~~~~~~~~~~
230-
230 Guest login ok, access restrictions apply.
Remote system type is UNIX.
Using binary mode to transfer files.
ftp> cd pub/mirror/linux-jdk/JDK-1.1.8/i386/v3/
250 CWD command successful.
ftp> ls
200 PORT command successful.
150 Opening ASCII mode data connection for directory listing.
total 76880
-r--r--r--   1 102   10    11944096 Sep 21 00:36 jdk118_v3-glibc-2.1.3-DYNMOTIF.tar.bz2
-r--r--r--   1 102   10    14118801 Sep 21 00:38 jdk118_v3-glibc-2.1.3.tar.bz2
-r--r--r--   1 102   10     6072770 Sep 21 00:39 jre118_v3-glibc-2.1.3-DYNMOTIF.tar.bz2
-r--r--r--   1 102   10     7156122 Sep 21 00:41 jre118_v3-glibc-2.1.3.tar.bz2
226 Transfer complete.
ftp> get jre118_v3-glibc-2.1.3.tar.bz2
local: jre118_v3-glibc-2.1.3.tar.bz2 remote: jre118_v3-glibc-2.1.3.tar.bz2
200 PORT command successful.
150 Opening BINARY mode data connection for jre118_v3-glibc-2.1.3.tar.bz2 (7156122 bytes).
226 Transfer complete.
7156122 bytes received in 59.3 secs (1.2e+02 Kbytes/sec)
ftp> exit
221-You have transferred 7156122 bytes in 1 files.
221-Total traffic for this session was 7157639 bytes in 1 transfers.
221-Thank you for using the FTP service on ftp.iodynamics.com.
221 Goodbye.

[root@gwydion local]# bunzip2 jre118_v3-glibc-2.1.3.tar.bz2

[root@gwydion local]# tar xf jre118_v3-glibc-2.1.3.tar

[root@gwydion local]# cd jre118_v3

[root@gwydion jre118_v3]# pwd
/usr/local/jre118_v3
Note the last command in the above listing: pwd. This is important information to take note of, as later in the installation process you may have to manually point StarOffice to the location of the JRE files. In the example given, this is /usr/local/jre118_v3.
Once the Network Installation is complete, the next step is to install StarOffice for individual access. This only loads about 5MB of program code into the user's home directory, as opposed to the full 250MB load-out of a Single User Installation. The following steps start the User Installation process.
[bilbrey@gwydion documentation]$ cd /opt/office52/program

[bilbrey@gwydion documentation]$ ./setup
While the dialogs appear to imply that you're starting a new, full installation from scratch, this is not the case. After reviewing the "Important Information" dialog, then reading and accepting the software license, an Enter User Data dialog box is displayed. This is shown in Figure 11-11; the data entered here is used for default field entries in document templates such as letters and faxes.
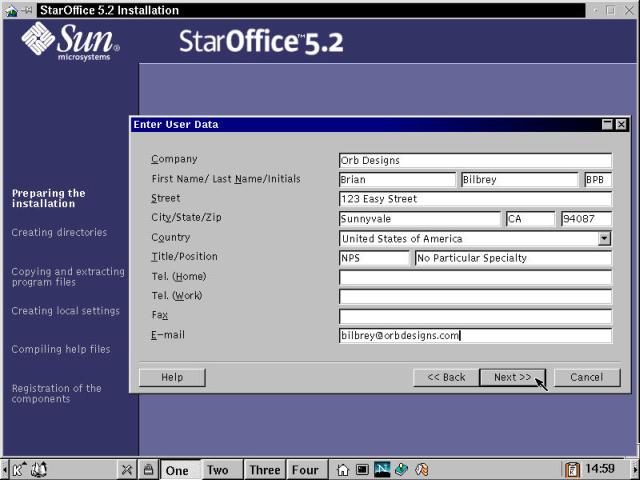
Figure 11-11
StarOffice User Installation following a Network Installation: Enter User Data.
In the dialog that follows, there are two options: Standard Workstation Installation and Standard Installation (local). The latter copies all of the executables, samples, templates, and help files to the local home directory, just what we're trying to avoid. Choose the default which is Standard Workstation Installation. Then choose a working directory. This time, it needs to be in the home directory. In this run, accept the default /home/user_name/office52, and allow Setup to create the directory. Then select Complete to start the setup routine.
A few seconds later, a dialog appears announcing that the Java Runtime Environment (JRE) is available for use. If the installer cannot, for whatever reason, find the Java libraries, try using the Browse function to point directly to the JRE installation location. StarOffice setup found the directory automatically in our trial runs. Simply choose OK to continue with the setup routine.
User Installation closes with three dialog boxes. First, even though we've installed the Adabas D database, the user installation can't find it. Ignore this warning for the moment. Next, a dialog notifies us that "StarOffice was added to the CDE Frontpanel ... Please restart...." You can safely ignore this warning as well - CDE is included by default in a "full" Custom installation, and is only applicable when accessing StarOffice from a remote system utilizing CDE as a desktop environment. Finally, a notice is displayed indicating that StarOffice has been added to the KDE Panel.
Now to fix the condition referred to in the Adabas D warning dialog. In the terminal window, type the following:
[bilbrey@gwydion documentation]$ cd /opt/adabas/adabas

[bilbrey@gwydion documentation]$ ./setup
This copies the Adabas program files to your home directory, and removes future "missing component" warnings.
Our first impression was that installation is too much work, especially the requirement for an external, third-party Java component. We're not sure why this isn't included with the suite. It may be in the next (GPL) incarnation of StarOffice.
You may need to logout and back in again, or simply restart the KPanel, to register the StarOffice additions to the KDE Menu. Once you do, navigate the KDE menus: K --> Personal --> StarOffice 5.2 --> StarOffice. After 15 to 30 seconds of program loading and initialization, the first StarOffice screen appears, as shown in Figure 11-12.
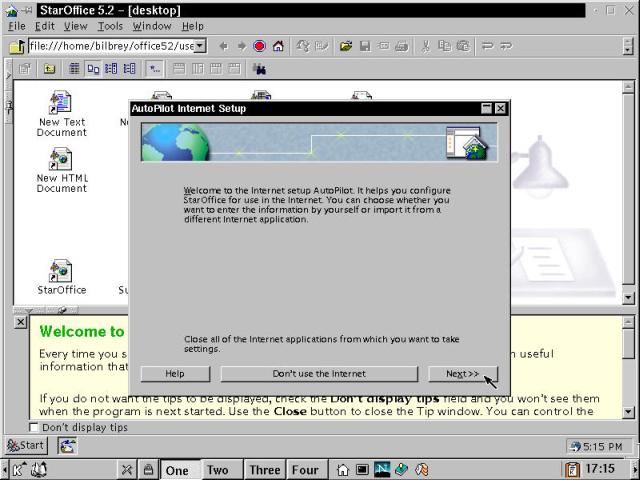
Figure 11-12
A look at Sun's StarOffice 5.2, starting up for the first time.
Walking through the AutoPilot Internet Setup, which is visible in the screenshot, is easy. It finds the already configured Netscape settings and offers to import them: bookmarks, mail configuration, and all. Observe, near the upper left corner of the main StarOffice Window, in the grey frame, a right-pointing arrow above a thumbtack button. This indicates a window that may be opened, and "tacked" down onto the StarOffice desktop.
Our only general complaint about StarOffice is the screen fonts support. We're using big, high resolution monitors, and these screen fonts look like they're designed and executed by mentally challenged space amoeba. We can read the screens just fine, but it's fatiguing for the eyes. That's not good for us 16-hours-a-day computer junkies.
To generate the overview of StarOffice shot shown in Figure 11-13, we closed (with the X button) the Tips ("Welcome...") window, then opened and tacked the Explorer window, which is the left pane. Both the Explorer and the main desktop windows give access to either existing documents and resources, or links for creating new documents. There is a third main feature of the StarOffice 5.2 operating environment, called Beamer. Clearly this is a software feature, rather than a German automobile (although, for just a moment... <grin>). The Beamer is a powerful file management utility that allows you to preview the contents of selected files, open files, and insert files into active documents. For more information on this utility, see the StarOffice online Help system.
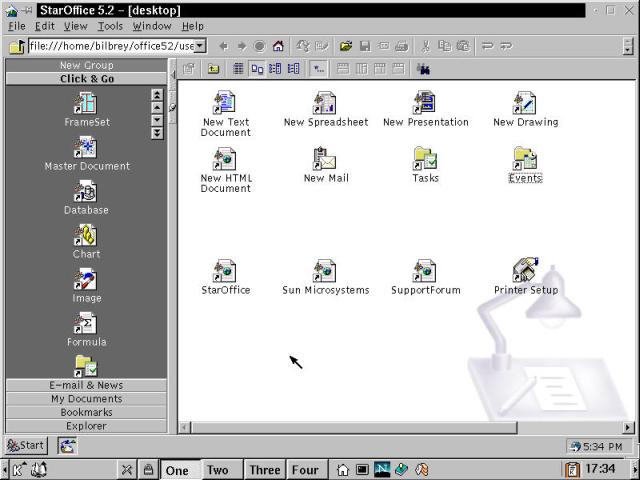
Figure 11-13
StarOffice 5.2, the main desktop, with the Explorer window open to the left.
Unlike the other office productivity suites in this review, StarOffice 5.2 runs all of its programs under the umbrella of the StarOffice desktop. The help facilities are accessed either via the Help pull-down menu, or by pressing F1 to bring up context-sensitive help references. Now let's have a walk through some of the major StarOffice 5.2 components.
StarOffice 5.2 puts a capable performer into this slot, with POP3, IMAP, and VIM (Vendor Independent Messaging) accounts all available. Open the E-mail & News bar in the Explorer, then right click in the bar and select New to create new accounts. Each account can send and receive mail via separate servers - it's possible and easy to work with several POP3 accounts. The context menu is shown in Figure 11-14, along with another nice feature - opening attached documents inline. In this example, we are looking at an imported Excel 2000 file.
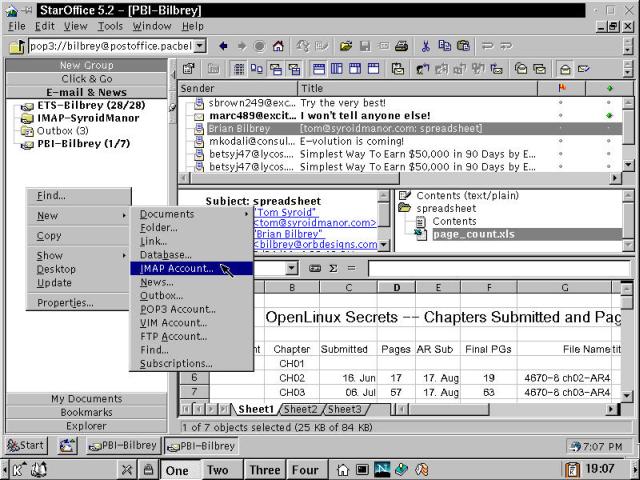
Figure 11-14
E-mail in StarOffice 5.2: create new accounts using context menus, open documents inline.
Additional features include the ability to add anonymous and named/protected FTP accounts, as well as Internet News accounts. Depending on the function in the main window (read or new message), the toolbar immediately above the window shows component-specific icons.
Hidden Feature
First, set up a news account. Then try to figure out how to subscribe to specific newsgroups. Easy if you remember all the tabs in the setup screen. After creating the account, select Synchronize from the context menu to download all the newsgroup names. Then, select Properties from the account's context menu, and open the Subscribe tab. In a moment, the newsgroups will appear in the window, along with a Filter field to cull the list down to the groups you're interested in subscribing to. Click to check the box next to each group, and OK to finish.
An added bonus is that StarOffice incorporates an address book that works and integrates well with the mail client. The sender of an incoming mail message can be added to the address book with a single right click to open the context menu, then by choosing Add to Address Book. To work with the address book directly, select Edit --> Address Book from the StarOffice main menus (at the top of the window). Additionally, StarOffice 5.2 e-mail is the only tool (aside from Netscape) we've encountered that can handle HTML mail.
We want to like the word processor component of StarOffice 5.2 (formerly known as Star Writer). As shown in Figure 11-15, the complex document (our sample version of Chapter 3) loads completely, with no visible errors. StarOffice 5.2 earns kudos for not only properly importing the track changes features, but also providing a decent tool for working with the changed text. Applix and WordPerfect fell down on this particular hurdle.
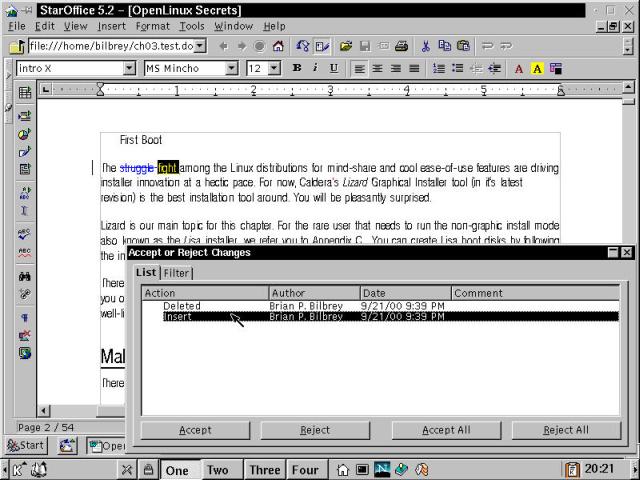
Figure 11-15
StarOffice 5.2 word processing component, with document track changes imported.
Unfortunately, we encountered three problems that make this program unfriendly to our particular mode of working. The second toolbar, left field (containing "introX") is the formatting styles selection list box. The problem is that only styles that are actively used in the document are imported.
The second problem is twofold, and worrisome. The ch03.test.doc file, from Word 2000, is 1,626,624 bytes long. The StarOffice output file, the result of loading the original then saving out in Word 97/2000 format, is only 1,267,200 bytes long. Where did the extra 351KB go? We don't know!
This second problem turned out to be fatal. The exported document, ch03.outSO.doc, appears to load into Word 2000 just fine, but then Word locks up, "This program is not responding." This problem was repeatable over several exports of the document from StarOffice. The smaller, simpler Chapter 1 sample made the crossing back to Word just fine, and all of the styles were still there!
Warning
StarOffice's word processing component contains a highlight feature similar to Microsoft Word. If you're moving documents between these two products, however, be careful. While highlighting applied to a word or paragraph under StarOffice is visible under Word, there is no way to remove the highlight from the latter program - you have to physically delete and re-enter the text to remove the formatting.
The third problem is more annoying than anything else. Create a moderately complex document in Word 2000, with several images in it. Then import the document into StarOffice and do some editing (but save often, using file names revisions, as StarOffice has crashed on us, more than once). Save the document, exporting back to Word 97/2000 format. When the document is opened in Word, the images appear to not be present. Save and close the file, then re-open. The images are there. Hmmm. Something funny is going on here.
StarOffice word processing is "close, but no cigar," for these two authors.
The spreadsheet component of StarOffice 5.2 works like a charm. Other than our perennial gripe about the horrid screen fonts, every feature of the Excel file imported correctly. The perspective on the 3D graph is a little skewed, but that's acceptable. Additionally, re-exporting and reading the file back into Excel worked equally well. A view of the Webstats.xls file, imported into StarOffice 5.2, is shown in Figure 11-16 with the cursor hovering over the Function Reference feature ("AutoPilot: Functions"). Like our other two suites, StarOffice 5.2 declines on Pivot Table importing.
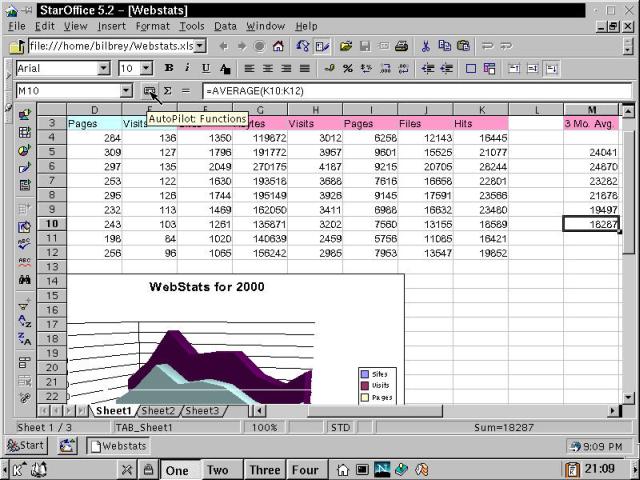
Figure 11-16
StarOffice 5.2 spreadsheet component with imported data, graph from Excel.
The StarOffice presentation tool lost a little bit of detail in the background graphic (the faint yellow gridwork is gone), but the fonts imported perfectly, bullet symbols and all. Most impressively, the slide-to-slide transition mode survived crossing over from PowerPoint format into StarOffice. The presentation component of StarOffice is shown in Figure 11-17.
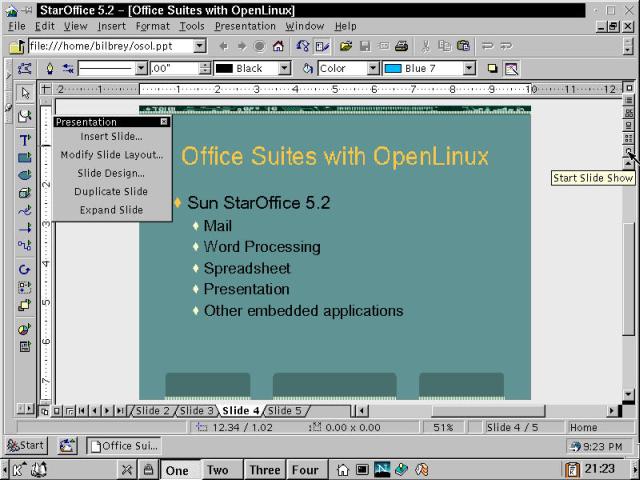
Figure 11-17
The presentation component of StarOffice 5.2, importing a PowerPoint 2000 file.
Exporting from StarOffice and back to PowerPoint 2000 is flawless. This component earns top marks.
StarOffice 5.2 incorporates several other features.
We searched the StarOffice documentation and the Sun Solve site and came up empty-handed. There's no formal information to be had regarding the removal of StarOffice. So we did this one the quick and dirty way. As root, remove the two directories (adabas and office52) created in the /opt directory. Also remove the Java Runtime Environment - no purpose in keeping unused software around. Then, preserve any data files from each user's ~/office52 directory, and delete that directory.
Warning
The command rm -rf filename is extraordinarily powerful. It can remove directories, files, everything that the invoking user has permission to write to. As root, a system can be wiped clean by typingrm -rf /. So don't do that. Pay attention to the command you type, read it three times and be sure before you hit return. Of course, if you make a mistake, then at least there's the learning experience of a fresh installation to look forward to.
[root@gwydion /opt]# rm -rf adabas

[root@gwydion /opt]# rm -rf office52

[root@gwydion /opt]# cd /usr/local

[root@gwydion /opt]# rm -rf jre*

 * * *

[bilbrey@gwydion bilbrey]$ rm -rf office52/
That last command wipes everything StarOffice from the home directory, including documents that had been worked on, unless you store them outside of the default SO structure. Save your data first if you need to - we don't because we're just testing. Finally, each user that installed StarOffice can use the Menu Editor (K --> Utilities --> Menu Editor) to remove StarOffice and all its sub-menus from their Personal menu. StarOffice 5.2 is now banished from the system.
All three of these suites are almost there. We both could work in each of them happily, if all we had to do was work in Linux. The problem is that in a world of proprietary data formats, where the biggest player is the most proprietary, all the small fish are going to forever be playing catch up.
Exchanging Word documents with colleagues and business contacts is an integral part of our work day. None of these tools do a good enough job for us to receive a Word file, import it into the office suite tool of our choice, work with it, and export it for external use. The processing is nearly right, but that isn't good enough. Each suite falls down on different bits of functionality.
Frankly, StarOffice is closest to the mark, and would be perfect if it weren't for the Styles import issues, and especially the problems we found with exported files. Working some, or even most of the time, just doesn't cut it for us. Look for more improvements in StarOffice 6.0, due out about the time that this book hits the shelves. It'll be free, or nearly so, and worth checking out. Also keep your eye on newer releases of Vista Source and Corel products. These products are both solid Linux citizens with great strengths to recommend them.
If we could disregard the Windows world altogether, here are a few opinions to consider. For all around product stability, a consistent, solid set of native applications, and a good application linkage and RAD environment, we'd head towards VistaSource's Applixware Office for Linux, Version 5.0. This would be the choice of a small company heading full steam into Linux.
For authors and other people whose job it is to craft words for a living, we'd have to go with WordPerfect Office 2000 for Linux from Corel. WordPerfect is nearly the equal of Word in capabilities and feature set, the user interface is clean and familiar, and the font rendering works wonders (very easy on the eyes) for long spans of typing and editing. The other WPO2K tools are also strong.
Finally there's StarOffice 5.2 from Sun. Clearly SO has the best mail tool of the bunch, best integration, plus excellent presentation and spreadsheet capabilities. These strengths are offset by some real problems with the Word format export features, and the worst fonts in the business. Even so, for the casual home user and many corporate environments, we can see that StarOffice is a great fit.
We wanted to know if we could fully replace our Windows desktop, and work solely in Linux. To get an answer to this question, we took a look at Applixware Office 5.0, Corel WordPerfect Office 2000, and Sun's StarOffice 5.2. After all the shouting was over, we could work full time in just about any one of these suites - as long as we didn't have to frequently exchange complex documents with Microsoft Office users. Of course, we do have this requirement. So, for us, today, the answer is "No." The good news is that these are all solid tools that are close to good enough. This chapter covered the following points:
Go to the Table Of Contents