
Email Brian
Brian's Website


Email Tom
Tom's Website
|
Email Brian Brian's Website |
|
Email Tom Tom's Website |
Go to the Table Of Contents
Did you read the Preface? Thanks!
The menu system of KDE is cosmetically and structurally similar to that of virtually every GUI menu system that we've worked with in recent years. Cascading menu items, icon and text menu entries, visual indicators of further sub-menus - all of these features are familiar to anyone who's used a computer in the last few years. The learning curve is relatively slight and a real joy for most newcomers to the OpenLinux environment.
Figure 9-1 shows the longest true menu path we were able to find. Why "true" menu path? The KDE menu structure grew organically, rather like an old castle that's been remodeled several times. While the top levels and many of the surfaces appear shiny and new, there are still hidden passages leading to the older parts of the structure.
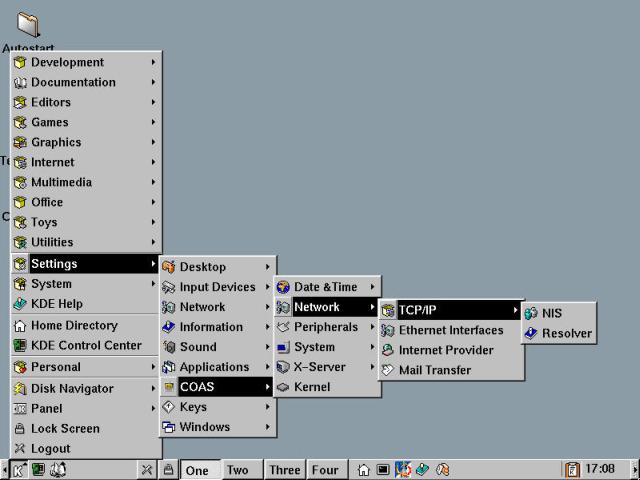
Figure 9-1
Demonstrating the cascading menu structure of KDE.
For instance, looking at the second tier menu (with the lead item: Desktop), you can see that all of the functionality that was encapsulated by the KDE Control Center from Chapter 8 is available by individual modules under the Settings menu.
Navigating KDE's menus starts with a single click on the "K" button on the KPanel. Sub-menus open automatically when the cursor is paused on a menu entry that includes a right-pointing arrowhead. Click on any entry without the arrow, as these are terminal points in the menu structure, most often links to programs. As we demonstrate shortly, direct document links also appear in the KDE menus.
Note
In this chapter, as well as the others, our notation for descending the KDE menu structure follows a set format. To demonstrate, the path shown in Figure 9-1 is rendered textually as K --> Settings --> COAS --> Network --> TCP/IP --> Resolver (to choose one of the two programs at that menu level).
In the pages that follow, we'll look through the KDE menus with you. We'll start with the root destinations, like Logout and Lock Screen, and progress upwards through the root menu, one step at a time. Then we'll plumb the depths of the file structure that underlies the menu system. Finally we'll take you on a tour of the KDE menu configuration utility, the aptly-named Menu Editor.
The root menu is like the entry in our hypothetical castle. Some nice, airy rooms lead off of it, including a nice parlor or two. More darkly, there are several mazes of small, twisting passages, in which the unwary can wander for days (though not to their doom, unlike the original Adventure).
We've used KDE off and on for over a year now. The way that we first got comfortable with all of the content and paths was to simply set aside some time and explore. This had two benefits. First, we were able to learn how the menus worked in a logical sense; that is, we could figure out (after a while) what we were liable to find if we went down that particular branch. The second bonus was that with each ensuing edition of KDE, with each new distribution leading up to the current OpenLinux 2.4, we were able to use the menu to find new gems in the Open Source programs that are included.
In the following sections, we'll take a brief glimpse at all of the functions that are available via the KDE menus. In Chapter 10, we'll single out specific KDE applications for some more detailed explorations. Now join us as we romp through the KDE menus.
Working from the bottom up, there are several actions that are selectable directly from the "K" root menu. The first is Logout. The stylized "X" is replicated on the button in the KPanel which provides the same function. When either route is used, the screen is darkened, and a dialog box displays asking for confirmation of logout. Additionally, a checkbox is offered, to save the current desktop window configuration. This is depicted in Figure 9-2.
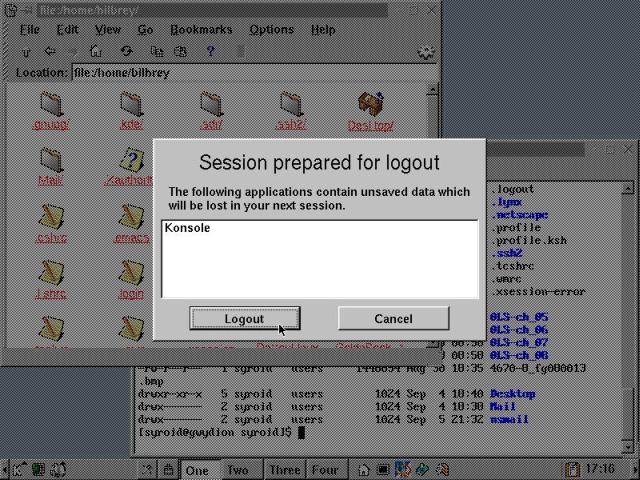
Figure 9-2
KDE displays a confirmation dialog box prior to a logout.
Lock Screen is another action quickly accessible from both the root menu and from the KPanel. The function of Lock Screen is to start the KDE screensaver and block access to the machine in this login session, protected by the password of the current user. This is another good reason not to use your own name as a password. Now, do you wonder why we have menu entries that duplicate functionality on the Panel? So did we, but only briefly. The panel can be hidden, using either of the directional arrow buttons (one at each end). This is done to maximize screen real estate for large windows, and in place of the panel, a three button mini-panel is displayed in the upper left hand corner of the screen.
This operation is demonstrated in Figure 9-3, which also shows the pending selection of the next root menu action item, KDE Control Center. Note that even in the menus, which have a text entry accompanying the icon, the tooltip still displays.
Hint
While tooltips are quite useful for identifying unlabeled icons like those in the KPanel. However, we found their application in the menus to be fairly annoying. If you also find this to be true, then you can disable tooltips by selecting K --> Settings --> Applications --> Panel. Choose the Options tab from the resulting KPanel Configuration dialog box, and uncheck the "Show Menu Tooltips" box. Apply the change, and select OK to close the dialog box.
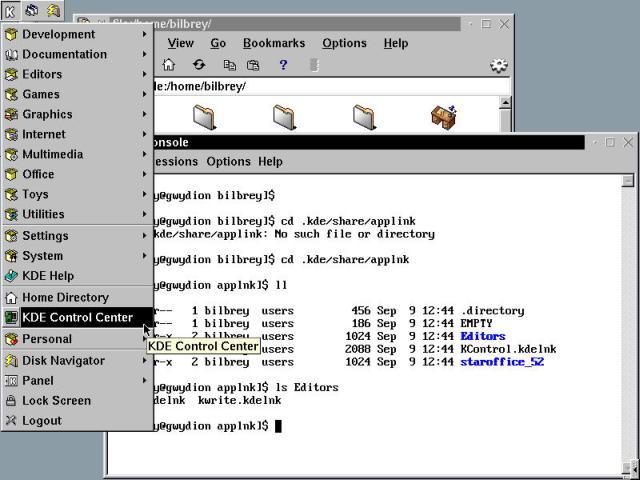
Figure 9-3
With KPanel hidden, the KDE Menus are accessible from the alternate mini-panel.
We'll pass on making you suffer through another picture of the KDE Control Center - it's likely you got your fill in Chapter 8. The final direct root menu selections are Home Directory and KDE Help. Home Directory opens an instance of KDE File Manager (there can be multiple KFM windows open simultaneously). We'll have a close look at the KDE File Manager in Chapter 10.
KDE Help looks like very much like a KFM window, as shown in Figure 9-4. The resemblance is strong enough that if you type a file or location into the location bar, KDE Help politely opens a KFM window and forwards the request on across, as demonstrated in the illustration.
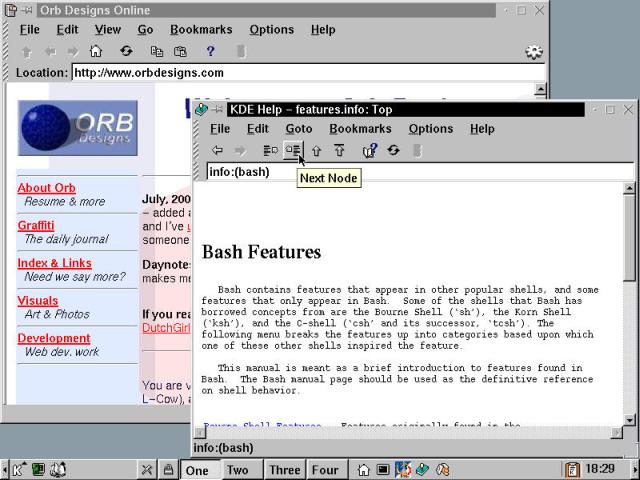
Figure 9-4
The KDE Help browser, with features very similar to the KDE File Manager.
The opening screen of KDE Help is quite attractive, with a nicely designed graphic, and links for KDE-specific information, as well as access to the system manual pages and the GNU Info manual. Additionally, there are access links for several KDE guides, including A Quick Start Guide to the Desktop, Desktop Panel, Control Center, File Manager, and Window Manager. Reading these resources gives you access to the same base of information we have for doing our work. Although the writing is occasionally grammatically challenged - the KDE project has strong German roots - the information presented is absolutely top notch. If we disagree with these resources, it's likely that the mistake is ours.
In Figure 9-4, KDE Help is displaying the GNU Info page for the Bash shell. Inside the Info environment, the icons in the toolbar come to life. The grouping of four icons, Previous Node, Next Node, Up One Node, and Top Node, makes navigating the occasionally confusing structure of Info quite easy. Additionally, you can bookmark frequently referenced help locations, and maneuver through your most recent help forays via a Web browser-like interface that is extraordinarily simple and intuitive to use. We recommend that you become friends with KDE Help, not only for the assistance in the KDE environment, but for the broad range of general system help functionality which it presents.
Now we'll do a brief survey of the top-level sub-menus, describing their contents in what can only be described as a most cursory survey.
Panel contains a small suite of entries for making changes to the KPanel (Figure 9-5). Restart stops then reloads the kpanel application, allowing fundamental changes (like fonts and menu entries) to be re-read from the configuration files. Edit Menus is another route to the utility that we'll examine in "Using the KDE Menu Editor", later in this chapter. There's more than one route to that tool, this is just the first we've encountered.
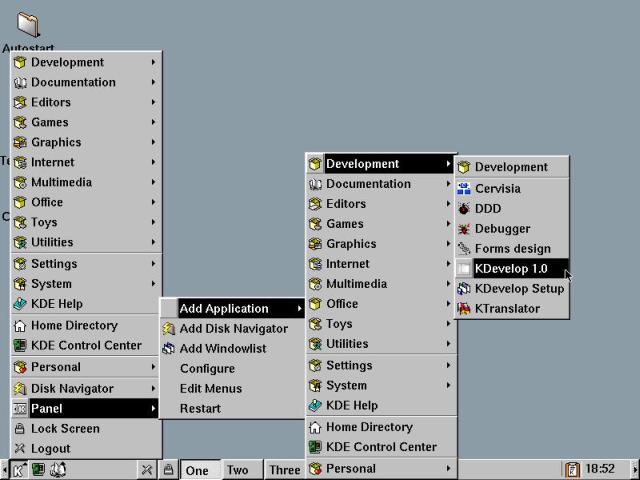
Figure 9-5
The Panel sub-menu, demonstrating the way to add an application to the KPanel.
Configure opens the KPanel Configuration dialog box we discussed near the beginning of Chapter 8 (see the section titled, "KPanel setup"). The Add Application menu item, is an ease-of-use feature for popping any application off the menu and onto the KPanel. This is a quick configuration feature for those items that you are most likely to work with. Very handy.
The Add Windowlist and Add Disk Navigator items each place multi-function sub-menus directly on the panel. These, along with the K menu button, constitute the minimum functionality provided by the mini-Panel when the main KPanel is hidden (as seen in Figure 9-3, in the upper left-hand corner). Window list is a dynamic listing of all the open windows on all the desktops. Disk Navigator provides menu access to the entire directory structure, right down to the file level. We found ourselves using the file manager much more frequently than this method.
Hint
Aside from the formal KPanel Configuration dialog box, which you encountered in Chapter 8, there are a variety of fast, simple activities that you can perform to customize the Panel to your working style. Right-clicking on an empty area of the Panel brings up the Configure and Restart options. Right-click on a current icon to display the following options in the context menu: Move, Remove, and Properties. We used these, along with the Add Application menu item, to delete KVT (the original KDE Virtual Terminal application), and replace it with an icon for the Konsole.
As noted briefly before, the Disk Navigator provides an alternate route into the file structure of your OpenLinux system. Figure 9-6 shows a KDE File Manager window open in the background, and the Disk Navigator path to the same location in the foreground.
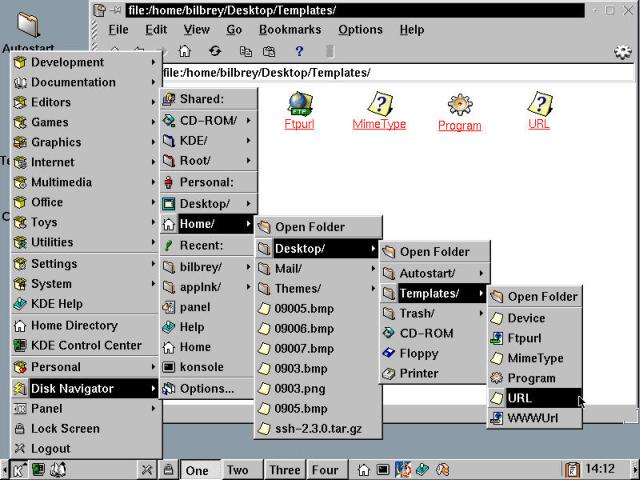
Figure 9-6
The Disk Navigator duplicating the destination shown in the underlying KFM window.
A confusing feature of the Disk Navigator is found in the "Recent:" section of that menu. Not only are links to recent programs listed, but also links to recently visited directories. This aspect seems to lead to the possibility of a file system Hall of Mirrors. For instance, in Figure 9-6, the Home entry (which is on the followed route through the menu) is identical to the directory pointed to the bilbrey/ entry immediately below Recent. It is possible to fill a large screen with cascaded menus using this tool.
Choosing the first menu item (at the bottom), Options, opens a reduced-function KPanel Configuration dialog box, with a single tab view in it for the Disk Navigator. There is a button to open the Personal portion of the Disk Navigator menu for configuration. There's also a control for editing the shared portion of the menu. Oddly, this button isn't grayed-out, even though it is only editable by the root user.
Folder and file entry counts can be set (these default to four each); there are two folders and four files in the Recent section shown in the figure. Also, the maximum files displayed from a directory can be set. The default value in this field is 200.
There are also a variety of checkbox options. It is significant that the default for "Show dot files" is disabled. Dot files are perhaps better known as hidden files, and their appearance in the Disk Navigator clutters up a screen very quickly. The options and entries on this screen are also well supported by the system help, accessible by choosing the Help button in the lower left corner of the dialog box.
The major choices at the top of the menu, under Shared, are CD-ROM/, KDE/, and Root/. Please note that in this context, Root means the origin of the filesystem, rather than the root user. KDE/ links into the file structure at the /opt/kde/ directory. This is an interesting area to spelunk around in, but normal users cannot modify anything here.
The Personal portion of the KDE menus is the user-editable portion of the KDE menu - it starts in an empty state, and is modified using the Menu Editor tool which we'll discuss under "Using the KDE Menu Editor" later in this chapter.
The System sub-menu contains a grab bag of useful utilities. These are listed in Table 9-1. Our most common destination in this menu is Webmin - a browser-based Linux configuration utility that we'll cover extensively in Chapter 13.
Table 9-1
KDE Menus - The System Sub-Menu
| Menu Item | Description |
| Arrange Icons | Arrange Icons is a one-trick pony - select the menu item, and a dialog box is displayed which asks for confirmation of icon rearrangement. When you choose Yes, the desktop icons are placed on a regular grid, in columns, starting at the left and working right. |
| Desktop Pager | The Pager is a wonderful, useful tool, and we're not sure why it's hidden away from the top-level menu. Shown in the upper left of Figure 9-7, the resizable Pager can be placed anywhere on the desktop and it displays, in miniature, the contents of the defined desktops. The Desktop Pager provides two key pieces of functionality. First, double-clicking in any window changes the view to the selected desktop. Second, as demonstrated by the illustration, windows may be moved from one desktop to another, including from an inactive desktop to the current view. While it clearly cramps the real estate in an 800x600 screen, it's extraordinarily useful when you can spare the space. The only drawback of the Pager is that it slows down the display responsiveness dramatically on slower systems, due to processing and monitoring requirements. |
| File manager (Super User Mode) | From its name, you can figure out that this is KFM, operating with full system permissions as the root user. Prior to the File Manager opening, a console window called KFMSU2 displays, prints two or three lines of system messages, and prompts you for a root password. This appears to be a cruder, earlier version of the COAS su wrapper we encountered when invoking KPackage. |
| Fontmanager | The KDE Font Manager (version 0.3.1) is an alpha-quality utility for making X11 fonts (as registered with the X Server) available for use with KDE applications. Our major use for this tool is to remove fonts that look particularly ugly (for instance, ledfixed, although this is just our opinion) from the KDE list, so that we don't ever have to see them. |
| HP LaserJet Control Panel | There are options for the highly popular HP LaserJet family of printers that require more setup than most inkjet devices. The configuration items, all familiar, are broken out by the tabbed views: Paper, Printer, Operations, and Fonts. |
| International Keyboard Layout | When selected, this has no apparent effect. A small green icon is opened in the system tray area of the KPanel (next to the clock in a default configuration). When the icon right-clicked, the options in the Context menu are Quit, Setup, and a list of the currently loaded International character sets. The setup option displays the International Keyboard configuration dialog box (identical to that found under Input Devices in the KDE Control Center) as a standalone application. |
| KDE Configuration Wizard | We've encountered this tool at the end of Chapter 3, and the beginning of Chapter 8. It provides some limited, broad-strokes configuration of the KDE environment. |
| KFloppy | KFloppy, the KDE Floppy Formatter, can format diskettes with either DOS or e2fs (Linux native) file systems. In this utility, choosing the help button brings up a manual which basically says "This is easy, figure it out." The manual is right. |
| KPackage | KPackage is the KDE RPM package management utility, addressed in Chapter 13. KPackage is a superuser (root user)-only utility, and if invoked from a normal account, a dialog box called COAS su wrapper displays, prompting you for the root password. |
| Printer Queue | This program, klpq, provides a GUI interface to the lpq command line printer queue manager. It's a little clunky, and apparently the automatic queue monitoring doesn't work properly. But if there are lots of print jobs, and you need to remove or shift them about the queue, this tool is quite useful, and a quick study to boot. |
| Task Manager | This is the entry for the ktop program, a utility to display running system processes and the resources they're using. Additionally, processes owned by the current user can be killed from this utility, and there's a nice colorful graphical view of some system parameters on the Performance Meter tab view. |
| Webmin | An excellent browser-based Linux administration and configuration utility. Highly recommended. See Chapter 13 for all the details. |
| XVidTune | This is a utility to make fine (or coarse) adjustments to the operation of your video card/monitor subsystem. Over the utility, an extreme "WARNING" dialog box appears. This warns of possible permanent, physical damage you can do to your video sub-system with this tool. Use with care, if at all. |
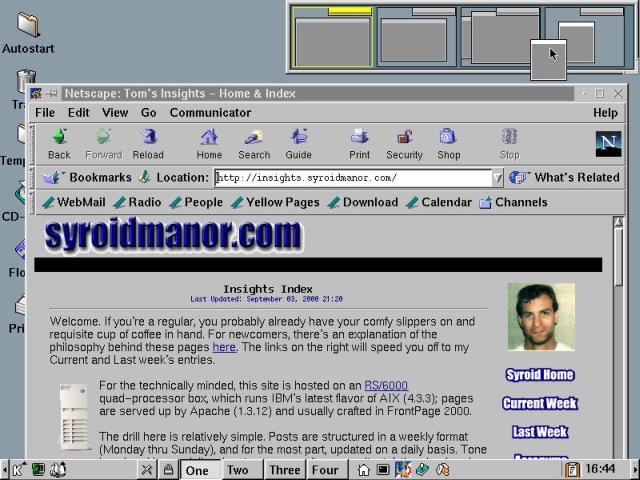
Figure 9-7
Using the Desktop Pager, shown in the upper left corner of the KDE desktop.
The Settings menu provides access to all of the modules that are available through the KDE Control Center, on a modular basis. Using the Control Center makes sense when making lots of sweeping changes to the user environment. We've found that accessing the tools individually via this menu, as we fine-tuned the environment to our tastes, worked very well indeed. For details on all of the various tools, refer to Chapter 8.
The Utilities sub-menus strongly reflects the Unix/Linux ethos of designing small tools to do specific chores (cheek by jowl with programs like the Acrobat Reader, just to keep you on your toes). In Table 9-2, we briefly review each of the menu entries available.
Table 9-2
KDE Menus - The Utilities Sub-Menu
| Menu Item | Description |
| Non KDE Applications | This sub-menu includes 11 different legacy X-windows applications, from a color xterm (virtual terminal) to an X-based Calculator application. Most of these tools have been superceded by recent KDE additions. However, the tools are incorporated for the convenience of those users who are comfortable with them, as well as compatibility with other user applications that may invoke these utilities indirectly. |
| Acrobat Reader | While the Acrobat Reader from Adobe is not Open Source software, the binary executable reader is freely available on nearly every common business operating platform, including Linux. PDF files are one of several popular standards of document exchange on the Internet. Caldera includes the Acrobat Reader with permission, as a convenience for OpenLinux users. |
| Archiver | Reads a variety of archive and compressed archive file formats, from zip and tar, to gzip and bzip2 files. The archive is often only seen when invoked from within the KDE File Manager. Clicking on an archive-formatted file in KFM opens that file in the Archiver utility. |
| Calculator | kCalc is a fairly stock GUI calculator tool, offering hexadecimal, decimal, octal, and binary formats, as befits an environment until recently more friendly to programmers than end users. |
| CD AutoRun | CD AutoRun is a monitoring tool that keeps a (figurative) eye on the CD drive. This utility requires that the automount system daemon (amd, see K --> Settings -->COAS --> System --> Daemons) is loaded and running. Upon detecting a disc in the player, it either starts the CD Player utility for audio discs, or auto-mounts a data CD and tries to locate and execute a file in the CD root called autorun.sh (if it exists). CD AutoRun creates an icon in the system tray in the KPanel, and may be configured by selecting Setup from the icon's context menu. |
| Cut and paste history (klipper) | This is the KDE clipboard, a component of the applications interoperability that Linux needs to penetrate the desktop environment. |
| Find Files | A utility for locating files in the OpenLinux directory structures. This tool fronts for a pair of command line tools, find and grep, hiding them all behind an interface that is strikingly similar to the equivalent tool in the MS Windows world. Find Files is intuitive and easy to use, although it may take a while to run if you're searching through the entire file tree. Within the home directories, it is quite responsive. |
| gv | gv provides a GUI interface to the ghostscript interpreter - it allows the viewing and navigation in PostScript and PDF-formatted files. |
| Hex Editor | The Hex Editor is a simple utility to edit binary files in hexadecimal format. |
| KJots | KJots is a small text database application. |
| KNotes | KNotes is a virtual sticky notes utility for the KDE desktop. In addition to the notational features, notes may have alarm times easily attached to them providing a reminder function. |
| Konsole | Konsole is the next-generation KDE virtual terminal application. For details on using Konsole, consult Chapter 14. |
| KPilot & KPilotDaemon | These utilities feature connectivity functionality with the popular Palm Pilot line of handheld computers. KPilot is the client application, and KpilotDaemon is a background hot sync client. |
| Menu Editor | This application is the primary configuration tool for the KDE menus. It is described in detail in the section "Using the KDE Menu Editor." |
| Process Management | This is a process monitoring tool, basically a GUI front-end to the command line top utility. It is distinct from the Task Manager (ktop) application, and has much more functionality - it closely correlates with the features of top. |
| Refresh Desktop | This utility restarts the KDE desktop, cleaning up graphical artifacts (droppings) left behind by ill-behaved applications. |
| Terminal | This opens the older KVT virtual terminal application. In the KDE documentation, this utility is deprecated (meaning that it is no longer under development, and is being replaced). Oddly, this is the default terminal application on the KPanel. We replaced it with Konsole. |
| Trashcan | This menu item opens the KDE desktop trashcan folder in a KFM window. |
| Tree Browser | This tool is a pretty, though essentially useless application for graphically viewing the Linux file tree. |
| Toys | The Toys menu contains a small collection of gee-gaws and other active screen decorations. Under OpenLinux, there are five entries in this menu, and all of them are demonstrated in Figure 9-8. |
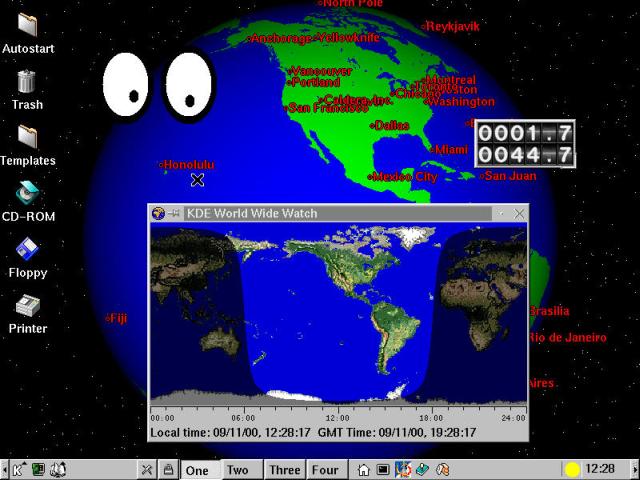
Figure 9-8
All of the KDE "toys" are shown in this one screenshot.
The first of the five is called XEyes, displayed in the upper left quadrant of the screen. The pupils of the eyes follow the cursor around the screen (currently the cursor is on approach into Honolulu). The next "toy" is MoonPhase. This informational mini-application automatically docks itself in the KPanel beside the clock. In our trial, the bright circle next to the clock indicates the moon is full, and hovering the cursor over the icon displays a tooltip that says, "The moon is 14 days old." This correlates with the image.
Mousepeometa is the third item on the Toys menu. This features the dual digital counter, shown in the upper right screen quadrant. These track single trip (travel in one direction) and continuing distance moved (mouse-wise). This mouse motion odometer has a small set of configurations, as well as reset actions, available from the context menu.
The last pair of toys are both views of the third planet of an unremarkable yellow star, way out along one of the spiral arms of this galaxy. KDE World Wide Watch, started by selecting World Watch from the menu, gives local and GMT (UTC) times, as well as a graphical view of which parts of the world are in daylight at any given time in a Mercator Projection that slides by under the light bands. The screen centers on high noon, wherever that may be on the globe. A useful feature is getting the local time by hovering the cursor over any given point.The last entry, XEarth, is a dynamic screensaver / desktop background utility. XEarth is highly configurable - type man xearth in a terminal window to read the system documentation. Viewpoints, magnification, even the passage of time can be modified. This fun utility takes more time to master than just a few minutes, but it can be entrancing and a real time sink.
The Office menu is full of hope. Well, more hope than true office functionality in this version, anyway. The following tools are available:
The Address Book (also invoked by typing kab in a terminal) is a small utility with a simple interface. It provides basic functionality for keeping track of a variety of personal information; virtually every field that can be tracked with a vCard, for instance. The current version of the K Address Book does not yet accept vCard data, but promises increased compatibility as the KDE environment matures. This tool works as a resource and exchanges data for the KDE Organizer.
Grok (tip o' the hat to Robert Heinlein) is a free-form database which is based on an index card metaphor. We haven't time to explore this interesting application in any detail, but there is extensive help (available from the pull-down menu) and an online reference found at http://me.in-berlin.de/~bitrot/grok.html. On the downside, the data is stored in an ASCII file which must be imported into other applications. However, the documentation is clear and simple.
KLyx is a GUI front end for the LaTeX text processing language, offering you the ability to work with LaTeX documents in a hauntingly familiar, yet totally foreign interface. The documentation is all in Lyx format, and accessible by choosing from the options in the help menu. A KLyx window, with help open, is shown in Figure 9-9.
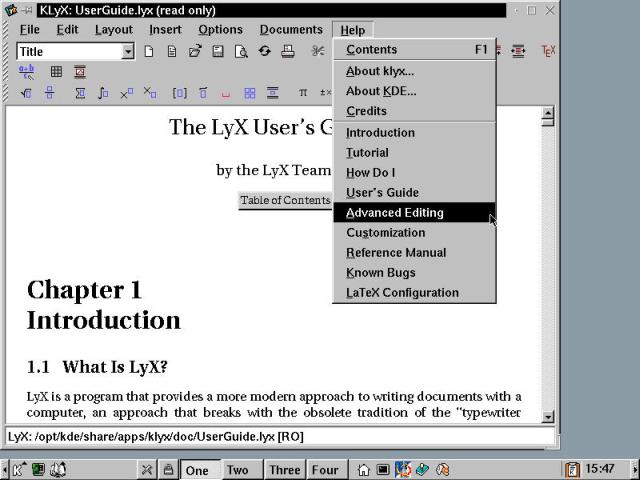
Figure 9-9
The KLyx LaTeX editing environment, with formatted help files open.
The main advantage of working with the KLyx is in the authoring game. Many commercial publishers in this modern age have standardized on MS Word-formatted documents. However, the LaTeX formatting language and associated tools allow a writer to maintain complete control over the presentation and structure of the material, with final output of camera-ready artwork for the printers. This has the most application in academic and student publishing circles.
KOrganizer is a calendar utility that bears a striking resemblance to the calendar functionality in Microsoft's Outlook utility. Multiple calendar views, a to-do list, an audible reminder function. All of these features work well, and are familiar as well as easy to use. When KOrganizer is invoked, an alarm-monitoring applet is opened on the KPanel at the same time as the program opens on screen. The applet stays behind, and opens on each ensuing session so long as you don't explicitly quit out of the monitor icon. In addition, the scheduling facet of this program works in conjunction with the KDE Address Book, permitting the addition of data into meeting setup forms, and providing a link to KMail for sending notifications out. Figure 9-10 shows the KOrganizer in action.
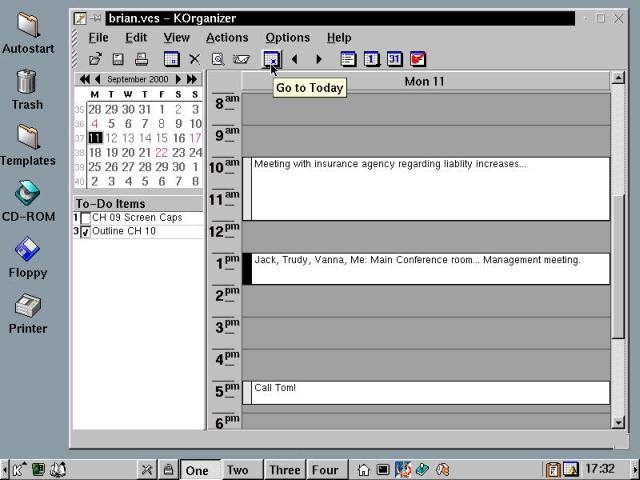
Figure 9-10
The KDE Organizer - a capable calendar, to-do and scheduling application.
Warning
When first using the KOrganizer, when you try to close the application, dire warnings about non-existent directories and files appear in confirming dialog boxes. Due to a design flaw in this version, the required data directory is not created when the application starts. Type mkdir /home/bilbrey/.kde/share/apps/korganizer prior to running the KDE Organizer and all of the error messages cease. Then, when saving calendars, this newly created application directory is given as default.
Personal Time Tracker is an unobtrusive utility for keeping track of your working time on a set of defined tasks. There are just a few functions: create, edit, or delete task, and start or stop timer. There is a basic idle detector that can be enabled if your work involves keyboarding, stopping the timer after a defined idle period. Personal Time Tracker appears as the background application in Figure 9-11.
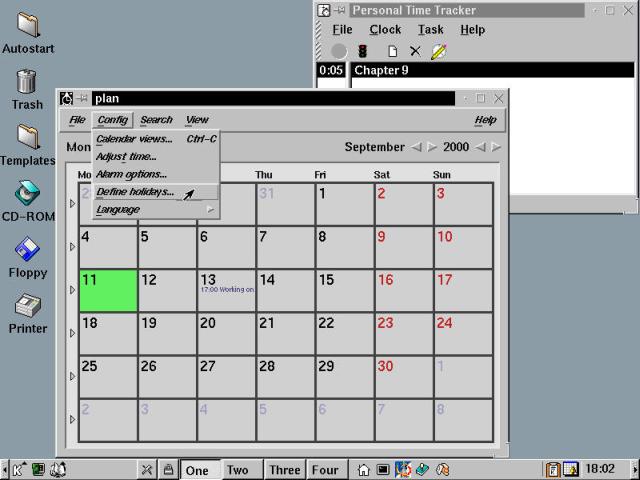
Figure 9-11
The Plan application in the foreground, Personal Time Tracker bringing up the rear.
The Multimedia menu contains a variety of tools for dealing with video and audio sources, plus two interesting entries that ended up here for some odd reason. Figure 9-12 shows the Multimedia menu open, along with three of our more frequently used utilities: (from the top) CD Player, Sound Mixer, and XMMS, the Open Source MP3 player of choice.
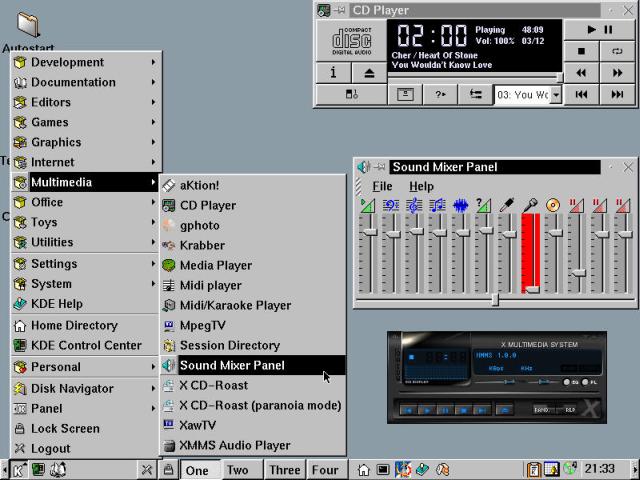
Figure 9-12
The Multimedia menu joins CD Player, Sound Mixer, and XMMS on the desktop.
Starting at the top of the menu, we have aKtion!, which is a video player utility. It can handle a variety of computer animation formats, as well as most common AVI and Quicktime files.
The next entry is CD Player, which is shown in the upper left corner of the screen. This utility includes optional remote access to configurable CDDB (CD-ROM databases) servers on the Internet. To make our players work, we opened the preferences dialog box (the button to the left of the white track window), and set the CDDB database to us.cddb.com:8880 (formatted as the examples in the player, please). When you are properly configured and connected live to the Internet, drop a CD into the drive, and up pops the title and track information.
Caution
Don't use KSCD Magic. It has a voracious appetite for CPU cycles and brings even a high-performance system to a standstill.
gphoto, as shipped with OpenLinux, is alpha-quality digital camera support software. It is strongly supported and growing quickly in capabilities and features. If you have a digital camera with a serial interface, we strongly recommend you go get the most recent version from http://www.gphoto.org/. It has a few image editing functions, like most modern camera software. The centerpiece of this code is the broad range of hardware that it connects with. The list of camera manufacturers includes Agfa, Apple, Canon, Casio, Epson, Fuji, HP, Kodak, Konica, Minolta, Mustek, Nikon, Olympus, Panasonic, Philips, Polaroid, Ricoh, Sanyo, Sony, and Toshiba. In at least some cases, gphoto supports functions, like computer-controlled shots, that the Windows-based software packaged with the camera was incapable of.
Warning
In order to operate gphoto, one of two changes must be made. One option is to set the application to operate as though run by the root user by typingchmod +s /usr/bin/gphoto(as root). The alternative is to set the permissions to read/write for the serial port used for camera communications by typingchmod a+rw /dev/ttySn(also as root), where n denotes the serial port, with ttyS0 = COM1, ttyS1=COM2, etc. Our recommendation: use the second method, as it will still work after you upgrade and install a new version of gphoto.
Krabber is an application that provides a GUI front end for a variety of CD ripping and MP3 encoding software packages, as well as helping to burn the resulting collection onto a CDR disc. OpenLinux, with reasonable concerns about the intellectual property issues which keep the MP3 world topsy-turvy, does not include any encoding software, although the application names several packages that you can search out at http://www.freshmeat.net/, and install on your own. There are many options and several operations to coordinate inside this package, so take your time and read the help files and documentation available within the application if you choose to work with it.
The Media Player (KMedia) is a front-end for modules that play various audio format files. The sole default format is WAV, and full documentation is present, allowing other people to write modules for other file types. Midi Player looks almost identical to the CD Player, using most of the same button icons and other UI code to put a pretty face on a MIDI codec. It works. Midi/Karaoke is a different MIDI player, with adjustable tempo controls and support for two kinds of lyric coordination formats.
MpegTV is a trial-ware version of a software MPEG video player. It hides behind a click-wrap license, and we've never gone behind the veil to check it out. The license terms don't appear onerous, but there are so many different things to work on in OpenLinux, so many things to show you - we'll leave this one to you. Session Directory is a tool for offering and finding IP (Internet Protocol) video broadcasts. These sessions happen on the MBONE (short for Multicast Backbone). For a quick reference on the topic, check out http://www.live.com/mbone/ and use the help button in the Session Directory application.
The Sound Mixer Panel (aka kmix) is illustrated in Figure 9-12. There is a horizontal balance slider across the bottom of the application. The vertical controls are (from left to right) Volume, Bass, Treble, Synth, Pcm (?) Speaker, Line, Microphone, CD, Mix, IGain, and Ogain. PCM is a digital audio stream available from some high-end audio cards; the last two channels are Input and Output Gain, respectively. These can be twiddled to get cleaner signals out of the sound card. Then it's up to your speakers to do clear re-amplification.
X CD-Roast and X CD-Roast (paranoia mode) are slightly different modes of a utility to make IMG files (ISO 9660 CD images, also found as ISO files) and burn them to CD-R media. Both modes provide convenient GUI access to a pair of command line programs: cdrecord and mkisofs for the former, cdparanoia and mkisofs in the case of the latter. X CD-Roast is meaningful only to users who have CD-R/RW drives (ATAPI or SCSI). For good information about setting up a Linux system to burn CD-R discs, see http://www.linuxdoc.org/HOWTO/CD-Writing-HOWTO.html.
Sidebar - Special Access: The setuid Bit
In the same manner that gphoto needs special access to the serial port, the various CD writing applications need write access to the CD-R/RW device. The method used by X CD-Roast and its cousin is to pop up a dialog box telling you that it needs to run as root, and telling you how to do that. We'll repeat the instructions below, with a couple of caveats.
First, making programs run as though they are being operated by the root user is generally regarded as a security no-no. It's fine if there's just you and people you know, like, and trust on the machine. Second, public machines should not have any programs set to run as root, unless that is necessary for the proper operation of the computer. In most cases, only root can run those programs, anyway.To make a program run with the permissions of the user who owns the binary requires enabling the setuid bit. This is done by typing the command
chmod +s filename, where filename is the path and name of the binary or script executable. At the risk of being repetitive, setting the setuid bit is not a panacea - do not use this feature with abandon, unless you plan on having a broken, insecure implementation at some point down the road. OK, sorry, enough lecturing on the topic. Here's how we located and changed the execution permissions on the CD-burning program. The which command tells us the directory path for the file, and the chmod utility applies the change to the file.
In most cases, if you happen to be migrating from the Windows world, you probably would expect to know what would be found in a sub-menu called Internet. Hmmm. The top entry is a thing called Archie client? Then there's something else entitled Biff??? What is this, the Twilight Zone?
Luckily, no. Instead you've wandered into one of the more mature (aka deeper in choices and functionality) areas of the Linux arena. OpenLinux includes a wide variety of connectivity tools and clients, in a valiant effort to meet every need. Of course, it's up to you to decide what you want to work with. Let's review the various menu items.
Off the top, we have an Archie client. This utility accesses (big surprise!) Archie servers, out on the Internet. Archie servers are the librarians of the anonymous FTP server space. To put it another way, Archie servers are the search engines for freely downloadable files, in just the way that mainstream search engines catalog Web pages in searchable databases. There is a default Archie server entered into the client; you should use Internet resources (search on the term "Archie Server") to locate a server close to you on the Internet.
Biff is a KDE application for monitoring your OpenLinux system mailbox. It doesn't check outside mail at all. However, in a multi-user or networked Linux environment, this can be a useful applet. In Figure 9-13, KBiff is shown as the small envelope sticking out of a box icon in the tray next to the clock. When mail is detected, a dialog box automatically displays (shown in the upper right corner of the illustration). KBiff can be configured to open a mailer utility automatically, or it can be invoked by pressing the Mailer button.
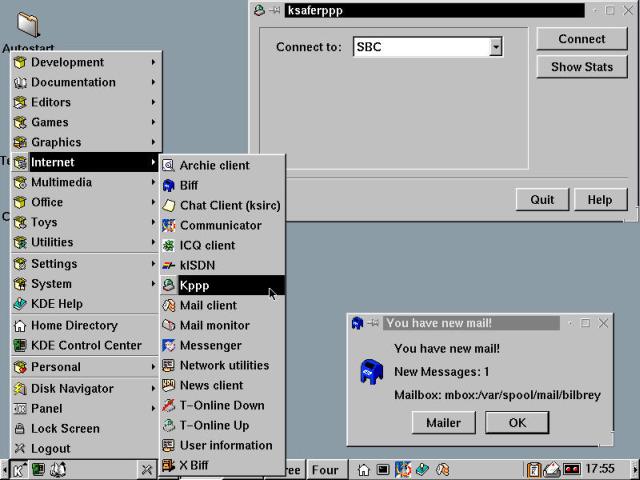
Figure 9-13
The Internet sub-menu and a pair of tools: Kppp and KBiff.
The next entry is Chat Client (ksirc). IRC stands for Internet Relay Chat, and is independent of any single company or organization. There are tens of thousands of IRC servers worldwide, hosting millions of wildly varied "channels" (the IRC equivalent of a conversation pit). Ksirc is a standard graphical IRC application, with the ability to connect to multiple IRC servers and channels, in a convenient tabbed-window format. For more information about IRC, there's a good introduction at http://www.irchelp.org.
Communicator starts Netscape's Communicator browser/mail/newsreader/html composer software package, in browser mode. OpenLinux packaged the then-current version, 4.73, with eDesktop. For both stability and security reasons, you should immediately upgrade the package to version 4.75, found at ftp://ftp.caldera.com/pub/eDesktop/updates/current/RPMS/. Messenger (found farther down the menu), opens the Communicator program in its Messenger (mail and news) incarnation.
Warning
The actual latest 4.x Netscape version is 4.77, the most recent version in the eDesktop archives as of this formatting (04/2000) is 4.75. We'd recommend uninstalling all the Communicator RPM packages, and installing more recent software from Netscape.
ICQ client is a KDE utility for accessing the ICQ chat service now owned by AOL. Unlike IRC, the ICQ servers provide a registry of users, and facilitate connecting user clients directly. However, chat traffic normally does not pass through the server, but directly from client to client. If you've used the Windows or Mac ICQ clients, you'll be right at home in this application. This may not work, depending on the current activities of AOL to prevent non-AOL utilities from accessing their servers.
kISDN is a tool for controlling access to an ISDN modem. Prior to running kISDN, the program kcmkisdn must be executed (from a terminal window) to configure the line, equipment, and accounts. There is extensive instruction available by choosing the Help button inside the application.
Kppp is the modem control client for the KDE environment. The actual program is called ksaferppp, which is a modification of the original kppp utility. The new version is packaged with OpenLinux by Caldera because it is a considerably more secure version of the program, apparently at the cost of some (unspecified) functionality. Figure 9-13 shows the Kppp window open in the upper right quadrant of the screen, and the two colored dots are used to indicate connectivity and traffic when Kppp is operating.
Mail client is the menu entry for KMail, a competent POP3 and local mail client. The KMail main window, and a composition window are featured in Figure 9-14. Many of the features that you'd expect in a mail program are present in KMail. Oddly, the Address book functionality is standalone - it doesn't tie into the Address Book application data from the Office sub-menu. We'll give KMail a thorough going over in Chapter 10.
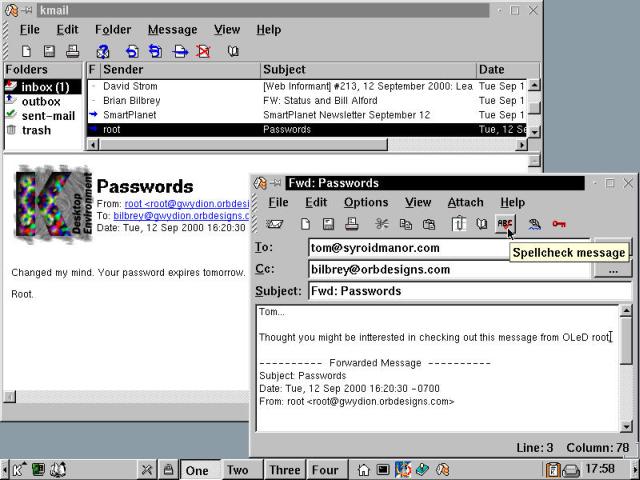
Figure 9-14
The KMail application, accompanied by a message composition window.
Mail monitor (korn) is a KDE-compliant mailbox monitoring utility similar to KBiff. However, korn has the ability to monitor several different mailboxes, which is handy when you have rules set up to presort your incoming mail. Open KFM and enter file:/opt/kde/share/doc/HTML/en/korn in the location bar to read the documentation on the korn utility. (Note: this tool is unrelated to the Korn shell.)
Network utilities starts the program knu. This is a front end for several network investigative tools, shown in a tabbed format. These are Ping, Traceroute, Host resolution, Finger, and mtr. Ping sends a query to a named server, and measures response times. Traceroute lists the hops (server to server) that TCP packets take to get from your location to a specified host. Host resolution returns the IP address of a recognized hostname. Finger returns information about users on specified hosts, if the host server is running the finger daemon (otherwise the connection is refused). The mtr tab is not configured properly (apparently the program isn't installed) and it isn't shown in the knu Help file.
Hidden
MTR is a combination Ping/Traceroute program that we tracked down online. The program's homepage is http://www.bitwizard.nl/mtr/. We found this link at http://www.slac.stanford.edu/~cottrell/tcom/nmtf-tools.html, which has an astonishingly complete listing of enterprise, commercial, and free network monitoring applications and utilities. Put this in your bookmark file for a rainy day.
News client invokes KRN, a newsreader. KRN is a dual window (groups and articles) Internet News Group reader with minimal added functionality. The search facilities are non-existent, and the program itself is unstable in this version - 0.6.0, according to the About KRN box. We'll look for the more capable client to come when KDE 2.0 is released this fall.
T-Online is a German online service provider. The T-Online Down and Up entries are apparently legacy menu items from the initial German release of KDE. If you are using OpenLinux in the operating area of T-Online, then select T-Online Up for some minimal information on how to proceed.
User information provides a KDE interface to the finger command, yielding the same information as the finger tab view of the knu program. Lastly, XBiff is yet another mail notification tool, of the X/Motif, non-KDE aware variety. It parks a small window on the desktop, with a closed mailbox image in it. This version needs to be configured to work with the standard OpenLinux mailbox environment. If you want to learn more about this tool, a good starting point is to type man xbiff at a command prompt and read the documentation.
There are a wide variety of graphics tools available with the OpenLinux distribution, including a couple of remarkable gems, Gimp and Snapshot. Most of the tools herein are viewers for various file types, there are four tools that have editing as a fundamental feature, while others provide some functionality, depending on the utility. That said, let's dive into the Graphics sub-menu.
Cameleo is a trial-ware version of the commercial Cameleo image management software available from Caldera Graphics, France. It looks like a potentially very useful tool. We've shown the screen capture and image editing tools in Figure 9-15. Unfortunately, the work and image are all watermarked to prevent unlicensed use of the product. So we spent very little time looking at its capabilities. If you are interested, then check out this Cameleo Lite version, and head over to http://www.caldera.fr/en/cameleo/cameleo.html for more details.
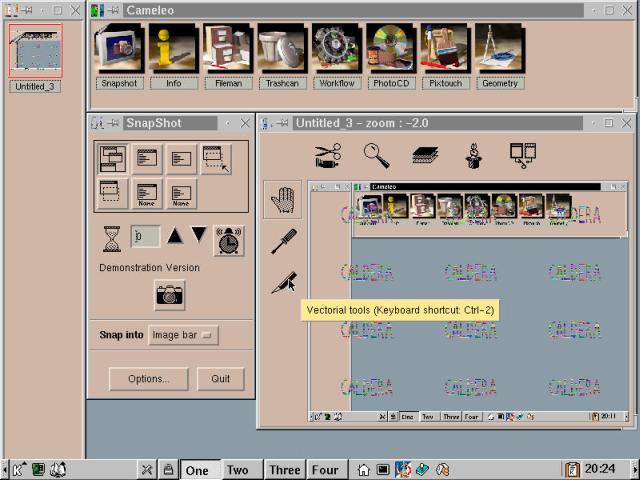
Figure 9-15
The Cameleo Lite image management program, a trial version from Caldera.
DVI Viewer (kdvi) is a viewer for documents formatted by TeX, LaTeX, and TeTeX. Be warned, importing DVI files into a graphical viewer takes time and horsepower, so be patient. Fax Viewer opens "g3" fax data files (by default; other formats may be specified). The program, KFax, does not support faxing or receiving faxes. Its only function is to view the files received (or converted before sending).
Hint
For fax functionality, the KFax Handbook (accessible by choosing Help --> Contents from the KFax menu) recommends a combination of mgetty (a fax modem control package) and Hylafax (fax send and receive software). These utilities can be found by searching on http://www.freshmeat.net/.
Fractals Generator is a time sink of the first water. This dynamic mathematical art tool permits exploration of the Mandelbrot set, as well as a fully configurable range of Julia sets. If you don't know what these are, fire up KFract and have a ball. Read the help, learn about self-similar shapes, and enjoy the pretty pictures. Additionally, you can save the images you generate and edit them with a variety of tools, including the Gimp.
The Gimp is the poster child of a successful Linux application. It is an image editing program which is good enough that when the salespeople from an unspecified vendor of PC image editing software are asked about a Linux version, they just refer the questioner to http://www.gimp.org/. Although people have complained about the potential for misinterpretation of the program's acronym, the Gnu Image Manipulation Program project is not planning on changing the name anytime soon. A sample of the Gimp in action can be found in Figure 9-16.
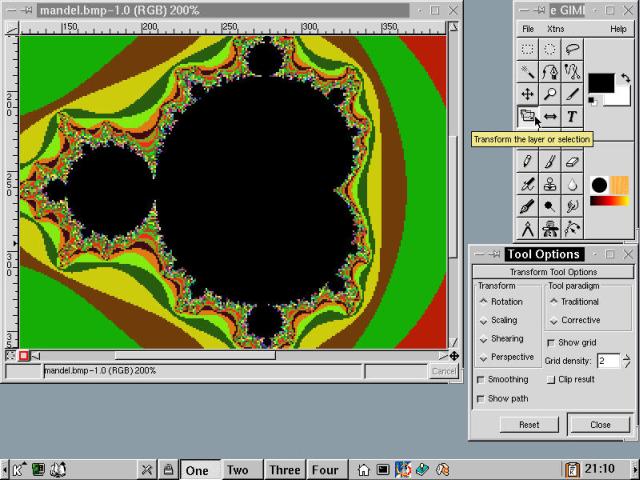
Figure 9-16
The Gimp (Gnu Image Manipulation Program) editing a Mandelbrot image.
We can't even begin to do this extensive program justice. Every image in this book that wasn't a straight screen capture was edited with the Gimp. Aside from all of the standard and non-standard tools an image editing professional could want, there's Script-Fu. Script-Fu is the Gimp's open specification for writing image manipulation scripts, which may be incorporated into the program. Many of the neatest effects are generated by user-contributed scripts. There is an excellent book for this program, called Grokking the Gimp (New Riders) by Carey Bunks. It is freely available online at http://gimp-savvy.com/BOOK/index.html, and the book can be purchased online or at finer brick-and-mortar booksellers.
Icon Editor is a very complete icon creation tool for use in the KDE environment. Building usable icons is tough business, what with the small size and limited color palettes. The KDE Icon Editor offers a wider than normal range of tools and features for this often only occasionally used tool. Image Viewer opens a variety of stock image format files, and can crop, rotate, provide fundamental filtering features, and save the images out to disk. Unfortunately, every page of the documentation has just one word on it: "TODO."
KIllustrator is an excellent vector drawing program, following in the footprints of the commercial namesake program out of Adobe. It's clearly headed in the right direction - what we really miss is the type handling features that are the forte of Adobe products. Without that group of features, completing the same job is a lot more work. We'll revisit this program in Chapter 10.
Paint is a very basic painting program, with all the common features: spray, pen, basic shapes, and a nice color palette. It can save files in GIF, JPEG, BMP, XBM, XPM, and PNM formats. Although KPaint doesn't have printing abilities built in, you can open from and (with proper permissions) save to Web locations.
Warning
In a recent change of policy, Unisys began aggressively enforcing its patent on the compression scheme used to create GIF images. We strongly advise not saving images created by free software in GIF format.
Pixmap is an editor for XPM formatted images. XPM is an ASCII mode image definition file format, and is commonly used to define widget images (for controls, buttons, and such in programs). A good starting point for learning more about XPM is http://www-sop.inria.fr/koala/lehors/xpm.html. The Pixmap program appears to have all the functionality required for the format, and is an X/Motif program (rather than a KDE native application).
PS Viewer is a well-named utility for viewing PostScript-formatted files. Additionally, it can handle some forms of Encapsulated PostScript (EPS) and Portable Document Format (PDF) files. A standard PDF file, created with Adobe Acrobat 4.0 (but without any document security enabled) is shown in the PS Viewer window in the background of Figure 9-17.
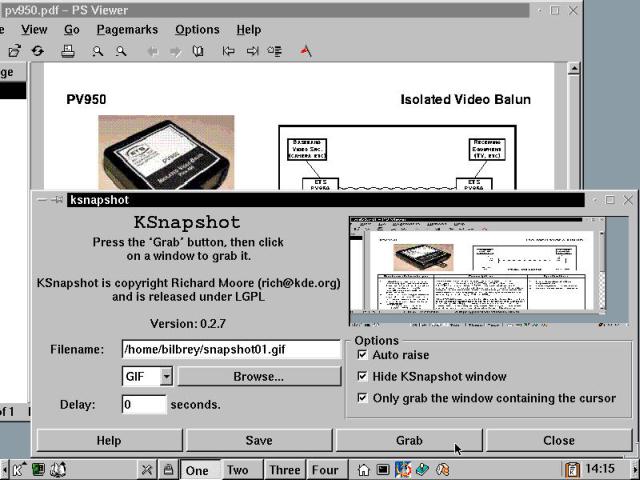
Figure 9-17
On the KDE desktop, PS Viewer with a PDF file in the background, KSnapshot up front.
Snapshot (ksnapshot) is a simple, yet stable and functional screen and window capture program. Several of the images in this book were caught in this shutter. As seen in the foreground of Figure 9-17, KSnapshot has all its features on top - it's very easy to use. In a nice touch, either the whole screen (the default), or the active window can be selected and captured. The one drawback is that the program does not actually support saving files in all of the advertised formats. JPG fails to save properly, although a correctly named file of size zero is created.
TGif is a 2-D drawing package that has a very complete feature set. If you need to do some simple CAD (Computer Aided Design) or drafting work, this can be your tool. For lots of information on the topic, head over to its Web site at http://bourbon.cs.umd.edu:8001/tgif/.
The next menu item is X Scanimage. This is an image acquisition utility that works with the SANE (Scanner Access Now Easy) package in conjunction with supported scanners. We did not experiment with this program. Type man xscanimage from the command line (or access the manual page via the KDE Help Browser) for a good overview of the program, as well as references for the other information you'll need to make this work.
Xfig is yet another drawing program with many features and a veritable cornucopia of export file format options. There is a prominent Help button in the upper right corner of the running application which contains links to a variety of instructional resources. Xmgr is a dataset plotting tool with a highly configurable interface, and a wealth of options and output modes.
The final entry in the eDesktop Graphics sub-menu is XV, an image format file viewer for X Window systems. To quote from the top of the XV manual page:
NAME
       xv - interactive image display for the X Window System

SYNTAX
       xv [options] [filename[filename...]]

DESCRIPTION
       The  xv  program  displays  images in the GIF, JPEG, TIFF,
       PBM, PGM,  PPM,  X11  bitmap,  Utah  Raster  Toolkit  RLE,
       PDS/VICAR, Sun Rasterfile, BMP, PCX, IRIS RGB, XPM, Targa,
       XWD, possibly PostScript, and PM formats  on  workstations
       and terminals running the X Window System, Version 11.
That's certainly comprehensive coverage. XV is the default viewer that is called by a variety of different programs when it's time to display an image file. In addition to viewing, there are a number of editing facilities that have gathered around the viewer core of this product. To look at the documentation (a 128-page manual), enter file:/usr/doc/xv-3.10a/ on the Location bar in the KDE File Manager, then click on the file xvdocs.ps.gz. This automatically decompresses the manual file and displays it in a PS Viewer window.
Figure 9-18 shows the Games menu, along with one of the more familiar time wasters available from this buffet of fun. In the interests of finishing the book in this millennium, we choose to allow you to explore the Games sub-menu on your own. Remember, Linux can be fun, too!
Hint
To run the Civilization clone, Freeciv, you must connect to a Freeciv server. If you just want to run Freeciv locally in single user mode, then first typecivserverin a terminal window and set up the server prior to choosing Freeciv from the Games menu. For more information about Freeciv, check http://www.freeciv.org/.
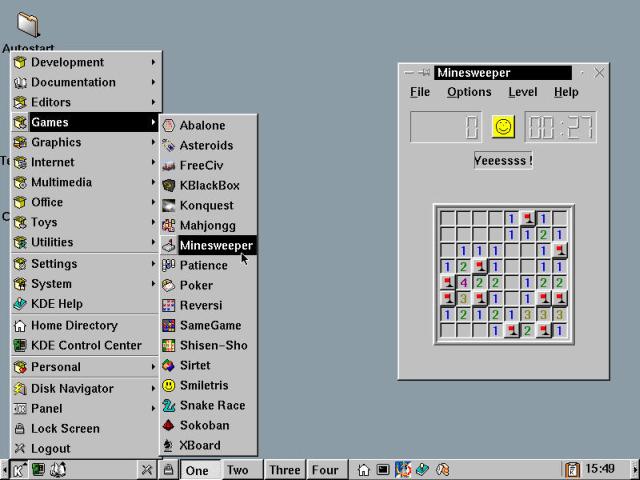
Figure 9-18
The OpenLinux KDE Games sub-menu, along with a version of Minesweeper.
With the exception of Composer, which is the (nearly) WYSIWYG HTML editor facet of Netscape Communicator, all of the editors available in this sub-menu are text editors. They do not work with formatted text of any type, neither Word documents nor RTF. The functionality ranges from the simplest of ASCII editing functions (X Editor) through the X version of the programmer's live-in editor, X Emacs. Let's take a look, in menu presentation order.
X Editor is a minimalist's dream editor. Three buttons (Quit, Save, and Load), as well as some mouse-controlled cut and paste features, are the complete suite of integration into the GUI environment for this text tool. There are a wide variety of search, replace, and cursor motion commands for Xedit; to learn more type man xedit in a terminal window.
XEmacs is the X Window version of this venerable programmer's all-in-one tool. Figure 9-19 illustrates the opening screen of XEmacs. The drop-down menus and buttons on the toolbar give you an idea of the range of functionality available with this editing environment. From program entry to compilation to reading e-mail, XEmacs does it all. We provide some introductory coverage of the Emacs editor in Chapter 15. Also make use of the XEmacs tutorial by pressing CTRL + h, t (meaning the CTRL and 'h' keys at the same time, and then separately, the 't' key) from the starting screen if you are unfamiliar with the editor.
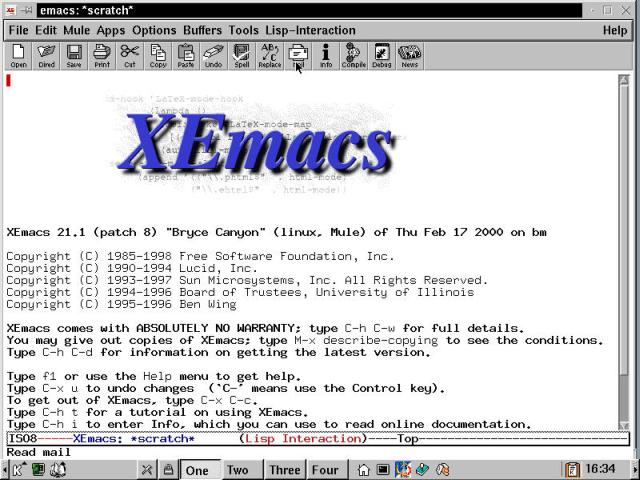
Figure 9-19
The XEmacs introductory screen.
Advanced Editor (aka KWrite, which may be invoked from the command line by typing kwrite) is a full-function, syntax-highlighting, adjust-the-screen-font-to-make-your-eyes-happy kind of text editor. KWrite is a member of the KDE family of programs, and we'll provide some extra coverage of this application in Chapter 10.
Composer, as noted previously, is the HTML editor which is incorporated into the Netscape Communicator product. Composer is good enough for many simple Web page layout and design tasks. One caveat: save early and save often. Netscape is notorious for its instability under Linux. This doesn't matter much when browsing, just reopen, and surf back over to where you were. But losing an hour's (or day's) work designing web pages is terribly, horribly annoying.
GVim is a GUI version of the popular *nix terminal editor Vim. This version offers a number of Vim's commands via a combination of toolbar selections and pull-down menus. There are over 100 defined format syntax highlighting rules, and a strong environment for program development and debugging. For details on the underlying (text/console mode only) Vim editor, see Chapter 15.
Nedit is another third party application that Caldera has included with the eDesktop 2.4, shown in Figure 9-20. Nedit is a good programmer's editor with a solid track record. Additionally, it is multi-platform. On the Web site, http://www.nedit.org/, you can find a variety of resources, including the Win32 port of Nedit.
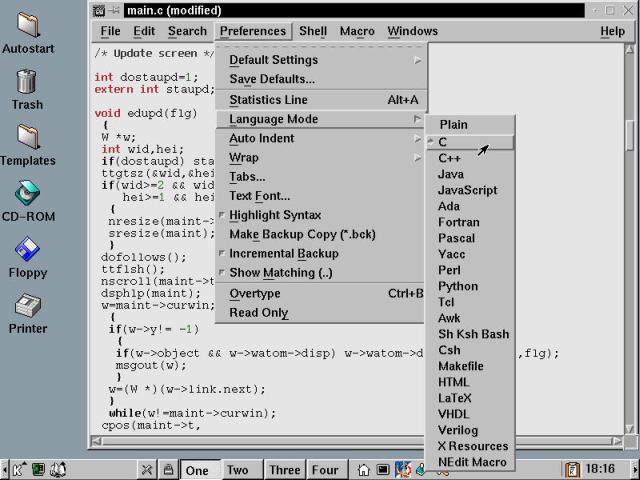
Figure 9-20
Nedit, with a C program in the editor window, and a range of configurable options.
Text Editor (KEdit) bears roughly the same relationship to KWrite that Notepad does to WordPad in the MS Windows environment. KEdit is a no-frills text tool with search and replace capability, but no syntax highlighting or other fancy tricks found in the other editors. Interestingly, KEdit does have built-in printing capability, which isn't in the current version of KWrite.
The complement of any good system is reams and reams of documentation. Caldera has done well in providing documentation with the OpenLinux distributions. Aside from the complete suite of manual pages (manpages) that we refer you to with great frequency, there are a number of other resources that are available on the system. Figure 9-21 shows the Documentation menu above a KDE Help Browser view of the HOWTO listings.
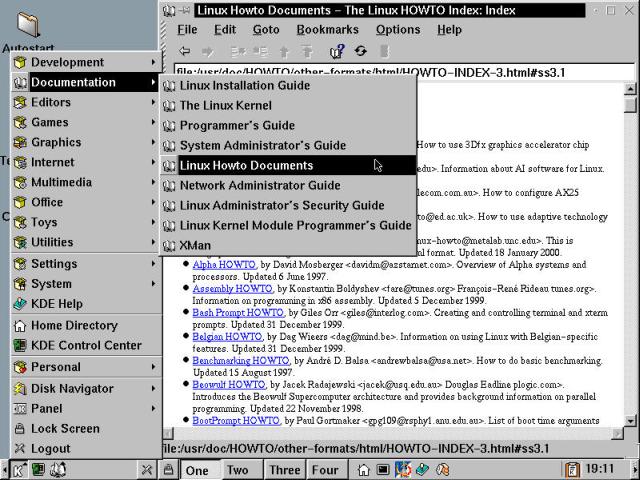
Figure 9-21
The OpenLinux Documentation Menu, including HOWTO documents.
Starting at the top of the list, we have the Linux Installation Guide by Matt Welsh, et al. This highly regarded work is (fortunately) not just about installation, but contains such sections as "Linux Tutorial," "System Administration," "The X Window System," and "Networking" (which includes both the TCP/IP and dialup varieties). This is recommended reading, although it can be challenging and fairly technical in spots.
Hint
It's really handy to have copies of these documents on your local system. Do check with the Linux Documentation Project (http://www.linuxdoc.org/) for updated versions.
The next menu item is The Linux Kernel, by David Rusling. This work describes the relationships between system hardware and kernel code, in a very technical style. While not for the faint of heart, this work is a good jumping off point for understanding what's going on in the Linux system. Following that, there's Programmer's Guide (The Linux Programmer's Guide, by Sven Goldt, et al.). Building on the base provided by The Linux Kernel, the LPG walks the reader through writing code the Linux kernel way. Again, this is highly technical, but interesting if hacking code is your thing.
The Linux System Administrator's Guide by Lars Wirzenius and Joanna Oja is the subsequent menu entry. The SAG covers a lot of ground in a fairly small amount of text. We strongly recommend that you read this document, it won't take more than a couple of hours. Then, down the road, when something happens on your OpenLinux system, you're more likely to remember that there was "something I read about that...." Written in a comfortable, colloquial style.
The next item on the menu is Linux Howto Documents: The Linux HOWTO Index. This document, along with all the linked HOWTO documents, is a snapshot of the contents from the Linux Documentation Project, as of the time that eDesktop 2.4 was released in February of 2000. Many of these documents are unchanged. If you have difficulties, however, then you should check to see if there is a newer version of the document online at http://www.linuxdoc.org/.
Olaf Kirch is the author of the next guide included with OpenLinux, The Network Administrators' Guide. TCP/IP networking, Ethernet, DNS, Serial Line IP (dialup networking) and many other topics are covered in depth by this fine work. If your computer is connected to others in any way, then at least parts of this guide are written for you.
The Linux Administrator's Security Guide, by Kurt Seifried, is an important work. Recently updated for the first time in a couple of years, we consider the LASG to be required reading for anyone connecting a Linux box directly to the Internet (that is, without an intervening firewall). Reading this is a good idea anyway. We'll come back to this document in Chapter 19. Also, the LASG is under active maintenance by Kurt under a new name - the Linux Security Knowledge Base; you can find the latest version at http://www.securityportal.com/lskb/kben00000001.html.
Winding down, we find the Linux Kernel Module Programmer's Guide by Ori Pomerantz. This work can be regarded as a companion for the Linux Programmer's Guide, mentioned previously.
The Documentation sub-menu closes with an entry which starts the program XMan, another interface (along with the KDE Help Browser and the command line version) to the manpages installed with your OpenLinux system. XMan is shown in Figure 9-22.
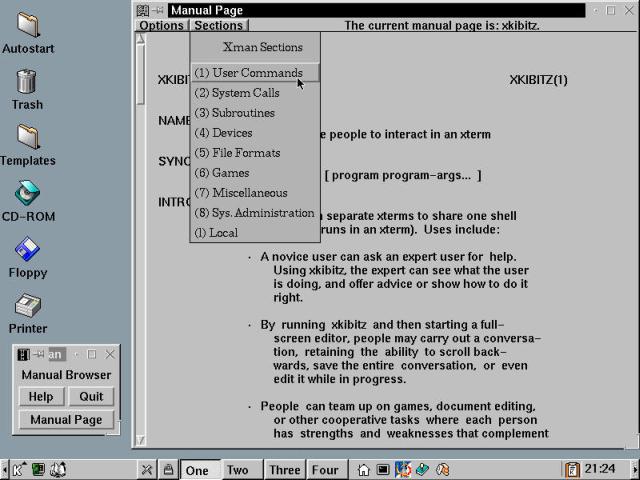
Figure 9-22
The XMan program, with the small XMan window and the manpage browser open.
In XMan, the starter window alone is opened first, and can remain independent of the browser window, which is shown taking up much of the screen in Figure 9-22. This is useful when you need to refer back and forth to manpages, but don't always want a large open window cluttering your environment. The interface is simple and intuitive; for more direction, choose the Help button in the starter window. One disconcerting feature is a slider bar on the left of the screen - we find that we've been strongly conditioned to look for a slider on the left only.
Hint
There are two other primary resources for documentation on your OpenLinux system: The directory /usr/doc in a full eDesktop installation contains documentation for 307 different packages. Additionally, other packages have resources in their installation directories. Check for these by typinglocate program_name | lessat the command line (where program_name is the target of your search). Then use less to look through or search the listing, looking for documentation off the beaten path.
Now we'll have a look at the last sub-menu, Development. Disclaimer: While both authors work with and around computers day and night, we are not developers (or at least haven't been in a long, long time), and any mistakes of omission or fact are ours.
There's an idealized view of programming that we'd like to share with you. The software developer works away at her desk from 9 until 5. She writes program code in exactly the manner that James Beard created his recipes, knowing what works together and what doesn't. The programmer compiles the code (cooks the meal), tests the results ( and adjusts the recipe), then repeats until done. Then the recipe can be published.
Heh. Nothing's that simple, not even coming up with new recipes. For one thing, a lot of programs are far larger than one individual can handle alone. So now we have a large number ( any more than one) of people working on different areas of the code, then integrating their work. It's these people who most need development tools, to track changes, versions, merges, compiles, test suites, the whole ball of wax. Let's have a look at the tools for code development included with OpenLinux.
Cervisia is a utility for accessing a CVS repository. CVS stands for Concurrent Versions System, and is a utility that allows multiple people to work on a single code base. Many Open Source projects are run from CVS repositories. While all of the work of CVS can be done from the command line, there are individuals who like working in a GUI environment, and this is a tool for them.
DDD stands for Data Display Debugger. It is a GUI interface to such command line debugging utilities as GDB, DBX, XDB, and more. DDD has context-sensitive help, and a variety of controls and features that prove quite useful. It only took us a few minutes to recompile the Joe editor code with debugging symbols (add "-ggdb" to the compiler options in the Makefile), and open the code in DDD, as shown in Figure 9-23. Then, if we knew what we were doing, we could make changes and observe their effects on the program, using this tool. The floating toolbar provides easy access to some of the most common commands, from starting (and temporarily stopping) execution, to stepping through execution, one line at a time, to editing and rebuilding the program.
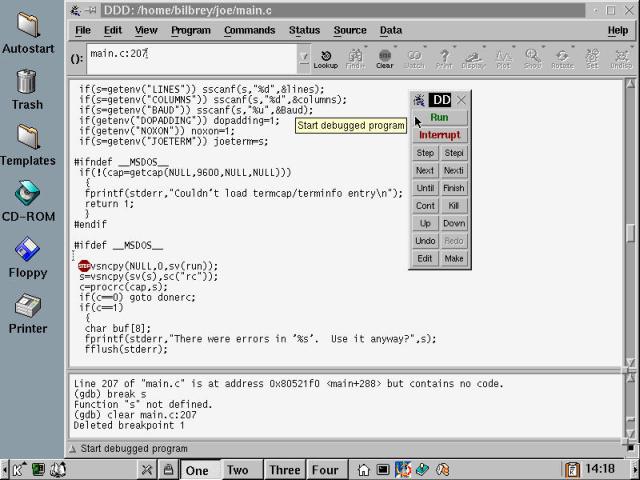
Figure 9-23
The DDD debugger with the Joe text editor program code seen in the window.
The next item, Debugger (aka kdbg) is the KDE entrant into the GUI debugging race. While it doesn't sport as many features as DDD, we understand from the documentation that there are hooks built into this debugging tool especially for working with QT. QT is the library of GUI routines from the company TrollTech; these are the foundation of KDE's look.
Forms Designer invokes the XForms Form Designer. This is a RAD (Rapid Application Development) tool that can be used to quickly build and test forms based on XLib, as shown in Figure 9-24. One correction from the program documentation - the given URL for more information has moved. The latest online home for XForms is http://world.std.com/~xforms/.
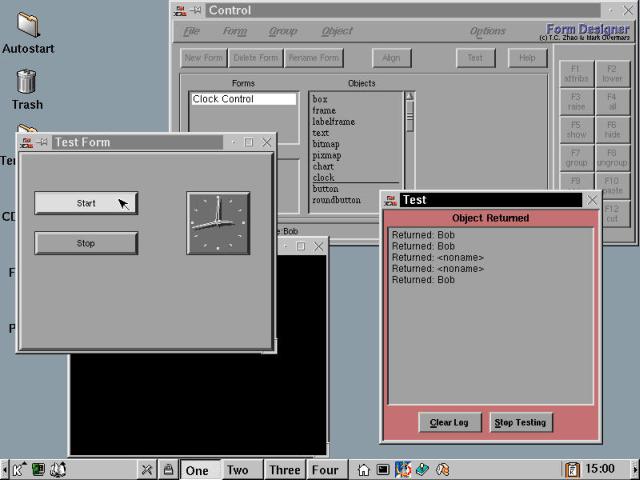
Figure 9-24
The Form Designer tool, with a simple two buttons plus clock setup under test.
The next two entries on the Development sub-menu are KDevelop 1.0 and KDevelop Setup. We're not sure why the latter is present, since it only runs once, and starting KDevelop auto-starts the setup routine if the configuration files aren't detected in the user's home directory. Anyway, KDevelop looks and feels very much like using one of the Microsoft Visual tools. We expect that the design was predicated on making it easier for developers to cross the divide from Windows to Linux code-smithing. We'll show you more of KDevelop in Chapter 10.
KTranslator is the last of the menu entries in Development. It is a tool for working with PO (Portable Object) files in a CVS repository, helping to ensure consistency of translation among various language-specific files. KTranslator does not provide translation services, but makes use of a base of known good translations to compare a new translation to. For instance, if "Fjord horse" was translated as "fjordhest" from one PO file in say, Norwegian, then when you reference another Norwegian PO file, the same translation might show up as "fjording." In this case, KTranslator leaps into action, pointing out the difference and letting you choose what's right.
You may have noticed some odd program groupings as we reviewed the KDE menus. It took a while for us to realize what was odd. Programs weren't listed (within a single sub-menu) by type, but by some other criteria. Some seem to be organized by alphabetical order, while others are less structured. Searching for an answer to this setup led us into the depths of the KDE menu structure. Come with us, while we have a look around.
There are two parallel directory structures that define the KDE menus for each user. One is the system menus, the contents of which are located in /opt/kde/share/applnk. These are editable only by the root user. The "Personal" part of each user's menus is located in ~/.kde/share/applnk (recall that ~ is the equivalent of the current user's home directory).
Using the KDE File Manager in Super User Mode (from the System sub-menu), we found that each menu level (directory) contains a hidden file named .directory. In this file, buried in among the names in different languages is a configuration line that begins: "SortOrder=". This is the key to the presentation order, and is shown in Figure 9-25.
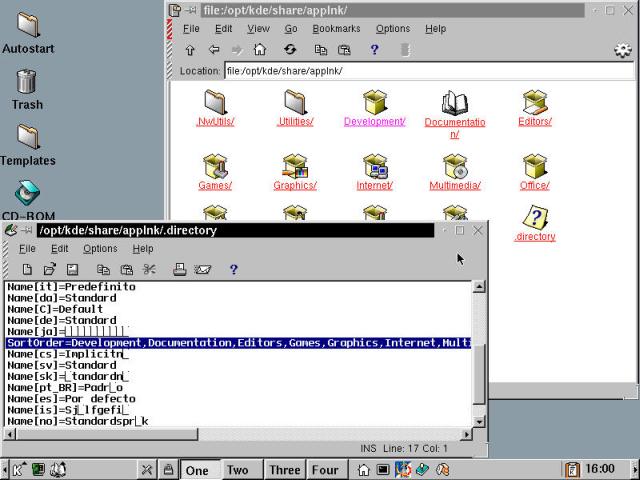
Figure 9-25
KFM showing the main KDE menu directory, Kedit open on the current .directory file.
While the easy (and recommended) method of making moves, addition, and deletions to the KDE menus is via the KDE Menu Editor, these directories and files may be worked with directly. The view shown in Figure 9-25 is of the top-level menu, with each of the sub-menus branching off in directories. The menu structure seen in KDE directly corresponds to this file structure - move a file from one directory to another, reload the menus, and the menu item is moved as well.
Each menu item is represented by a .kdelnk file. In standard file views (including when shown as icons), the .kdelnk file extension is hidden. To see the file extensions in the menu directories, change the View to Text, and select Show Hidden Files to see the .directory file that carries sorting information..kdelnk files have no special magic about them. They are simple text files that are recognized by KDE as objects which specify actions, locations, or other objects. Take a look in the Templates directory that is present on every KDE desktop (unless you've deleted it... hmmm). There are pre-defined .kdelnk files there for devices, FTP URLs, mime types, programs, plain URLs, and Web URLs. On opening the Program.kdelnk file (from the right click context menu, select Open with, type kedit in the dialog box, then press OK), you can see the format of a .kdelnk file first-hand.
# KDE Config File
[KDE Desktop Entry]
Type=Application
Exec=
Icon=exec.xpm
TerminalOptions=
Path=
Terminal=0
Name=Application
 ...
There are 20 more "Name=" lines, each of which applies to a different localization setting (when other language character sets are configured). The lines here tell KDE what the link is for, what it does, which icon to use in some views, and much more. We'll encounter all of these fields again in the section "Configuring the KDE Menus," but you can edit and change these files directly with a text editor rather than resorting to a GUI tool. Of course, you needn't ever edit .kdelnk files directly, since the Properties dialog box gives you all the control necessary to make changes.
The KDE Menu Editor may be invoked in at least three ways that we know of:
Any way you accomplish it, when you first open the KDE Menu Editor, you are presented with a screen that looks like the one illustrated in Figure 9-26.
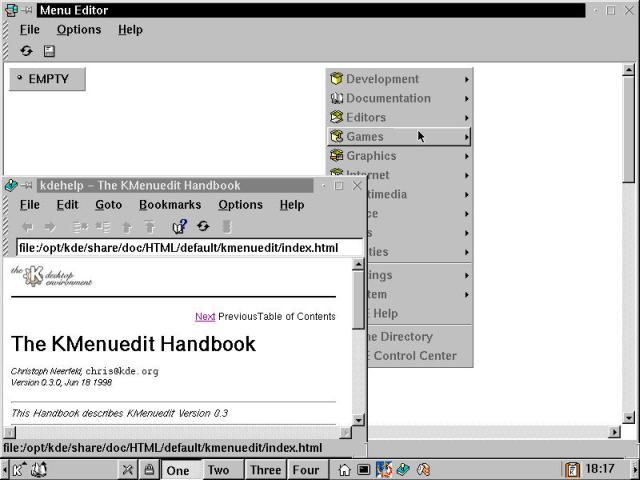
Figure 9-26
The KDE Menu Editor behind, with the KMenuedit Handbook in the foreground.
When the Menu Editor is opened for the first time, the KMenuedit Handbook comes up automatically. The hint is strong and clear: RTFM (Read The Fine Manual). You should read it for yourself. We can't cover everything here, and you'll probably learn something new that we missed entirely. Once you've done that, close the Help window and let's get to work with the KDE Menu Editor.
Good question. Logged in as a regular user, you only have write privileges for the parts of the menu that live in your home directory (where the "EMPTY" menu item lives). The entire menu shown on the right of the screen is only available for editing by the root user, which we'll address at the end of this section.
There are several different ways to add items to the personal menu:
Creating a new item opens a new dialog box, called "kmenuedit" - You are presented with an array of choices. The initial view is shown in Figure 9-27.
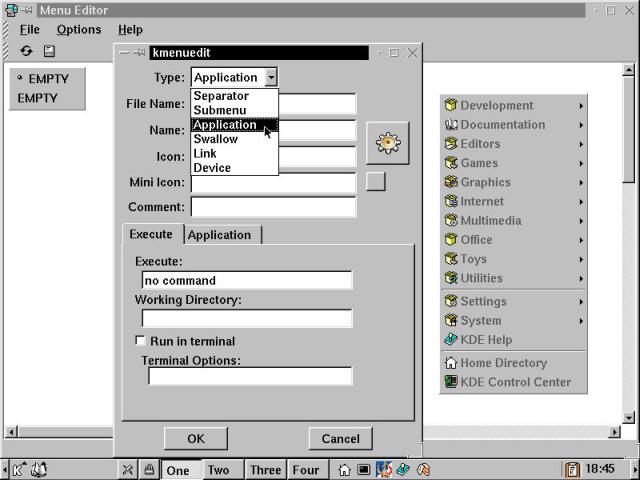
Figure 9-27
In Menu Edit: a kmenuedit dialog box, the new menu item specification tool.
There are six item types which are selectable from the Type drop-down list. Separator makes the simple beveled line, examples of which can be seen in the main menu to the right of the dialog box. Submenu creates a sub-menu item, complete with right-pointing arrow. Application allows you to create a link to an application. Swallow is special - it allows you to link to a program and run it inside the KPanel. The following is a working sample. Create the .kdelnk item in your Personal menu, save the changes, then move it to an open space in the KPanel, and save again. Now you have a working system load graph on the panel that also functions as a button to start the KTop program.
# KDE Config File
[KDE Desktop Entry]
Type=Application
SwallowExec=xload -nolabel -geometry 50x50+10000+10000
SwallowTitle=xload
Exec=ktop
Link provides the necessary fields to create a link to a URL (which, when activated, opens in a KFM window). Device helps you build links to system resources like CD-ROM or floppy drives, but these are created for you by the KDE Wizard.
In Figure 9-28, we show all of the necessary fields filled out to add an application menu item for the Joe editor (which we manually added to OpenLinux in Chapter 15). See the Help resources for both Menu Editor and KFM for the answers to questions about other link types, should you run into difficulty.
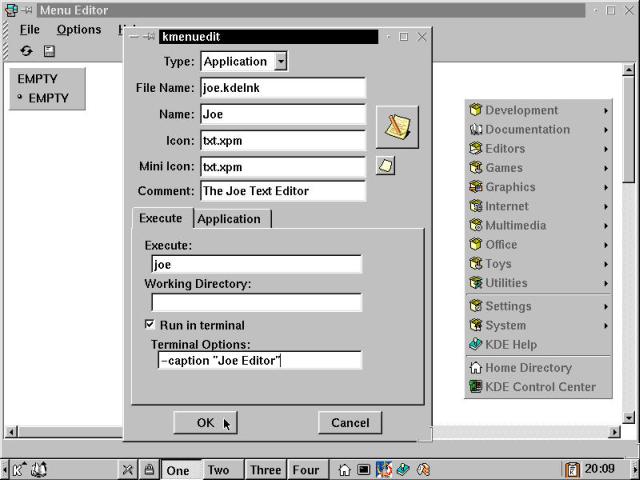
Figure 9-28
Creating a new menu item to start the Joe text editor, from Menu Editor.
After selecting the type, Application, the next field down is File Name. This is a non-critical item; if you leave it blank, then KDE names the .kdelnk file automatically. We prefer the control of naming it ourselves, for ease of identification later. Simply ensure that the filename terminates in ".kdelnk".
The Name is the text that will appear as the menu item. The two icon fields may be filled out manually or by clicking on the icon buttons and choosing from the resulting dialog boxes full of icons. The comment field is used as the tooltip text. The final field that must be filled out is the Execute: field. The name of the program, as you would type it at a command prompt must be entered here.For programs that are text mode (CLI) applications, like our example, there is an extra step we like to take - check the run in a terminal window. For informational purposes, we also add a caption for the terminal window title bar describing the contents.
To make it all come together, first click on the OK button, then choose File --> Save or the small disk icon on the Menu Editor toolbar to commit the changes to disk (and restart the KPanel and associated menus in the process). After that, you can test the fruits of your labor, as the Joe menu item appears in the Personal sub-menu off the KDE main menu.
Hint
If you haven't installed the Joe editor yet, then this example won't work for you. A decent substitute would be Vim, another text editor discussed in detail in Chapter 15.
If you haven't yet committed any changes, you can back out of your menu edits by closing the Menu Editor application, or choosing Reload (from either the File menu or the toolbar). However, this discards all of your changes. This argues for small changes, saved and tested, one at a time.
Before we talk about copying from place to place, there are a pair of menu editor tips of which you should be aware. First, while pressing the Shift key, select a menu with the middle mouse button (or right-left chord), drag and drop the menu in a different location. This is useful when you want to resize the main application window in a manner that hides the menu.
The second tip is that opening a sub-menu is accomplished by clicking on the menu entry (even grayed-out menu entries). The sub-menu is closed by the same action. Alternatively, the context menu contains open and close items.To copy an item, you can open the context menu for the entry, select copy, then right click in the destination area (KPanel or desktop), and paste. Or more easily, you can click, drag and drop, as shown in Figure 9-29. When you drop the item, you are offered the choices: Copy, Move, and Link. Link creates a link to an actual object (links to links are generally a bad idea). Move is fine if that's what you want to do, but you must have write permissions to the place the item is moving from (which isn't true in our example). Copy is the most common selection, and our choice, here.
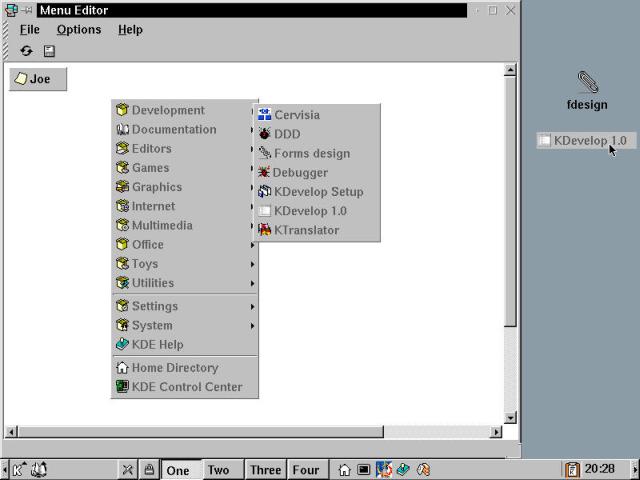
Figure 9-29
Copying a menu item to the KDE desktop from Menu Editor.
While you can add to your personal menu anytime, it takes the root user to make edits to the system level menu. Most commonly, we would edit the main menus to prune out entries for programs that weren't used, or to add new programs that need to be available for all the users on a system. However, we strongly recommend that you make a backup copy of the directory /opt/kde/share/applnk directory prior to starting in on the pruning and grafting. Doing so makes it much easier to recover from an errant deletion.
In this chapter, we discussed the KDE menu system. The KDE menus are clear and simple to use, with cascading sub-menus, icon, and text entries, and all the modern amenities. In the preceding pages, we looked at the contents of every major sub-menu. The menus are easy to edit, either manually or with the KDE Menu Editor. This chapter covered the following points:
Go to the Table Of Contents