
Email Brian
Brian's Website


Email Tom
Tom's Website
|
Email Brian Brian's Website |
|
Email Tom Tom's Website |
Go to the Table Of Contents
Did you read the Preface? Thanks!
For Starters...
"Real system administrators use a command line."
True or false, that's one of the legacies of Unix that Linux has dragged into the 21st century. The same voices that say Linux is stable, powerful, robust, and free (as in speech), also remind us that the power is on the command line and in the source. Yes, the command line offers a world of opportunity for both control and learning. But many people in this modern world simply want to get the job done, and that evokes a strong visceral desire to navigate desktop menus that open a GUI tool to modify a system parameter. When this comes up against command line advocacy, the latter clearly intimidates and scares off many casual users who might otherwise give Linux a try.
Now, to be honest, not everything is controllable by GUI tools in Linux - yet. Of course, that's true of Microsoft products, too. Hands up, how many people know what the Registry Editor is? OK, sure it's a GUI tool, but also an interface to the complex guts of Windows - it might as well be a command line. The registry is far more complicated than a host of configuration files, and in a proprietary binary format, to boot.
In this chapter we're going to look at two GUI approaches to system administration: COAS and Webmin. COAS is a product developed by Caldera, accessed from the KDE menu system. Webmin, on the other hand, run as a quasi-httpd service and is accessible both locally and remotely using a Web browser. This gives Webmin a much larger playing field - you must be physically sitting at a machine to use COAS; Webmin (providing it's configured and running) can be used to access any machine, running a wide range of Linux distributions.
One question we've run into time and again is how to determine which file is changed, when a GUI utility is used to modify some system configuration parameter. It's a good question, and it's really too bad that the tools don't show that information as a part of their operation. (The COAS documentation shows that the project has that functionality as a goal, though. COAS is discussed in detail in the next section.) But it's not hard to determine which configuration file is being changed; it just requires a little planning, as shown in the following listings in conjunction with Figure 13-1.
[bilbrey@gwydion bilbrey]$ su
Password: root_password

[root@gwydion /root]# cd /etc

[root@gwydion /etc]# touch /root/newest
In a terminal window, become the root user, then change directories to /etc, where most configuration files live. Then execute the command touch /root/newest. This step creates (or updates) a file of that name with the current date and time.
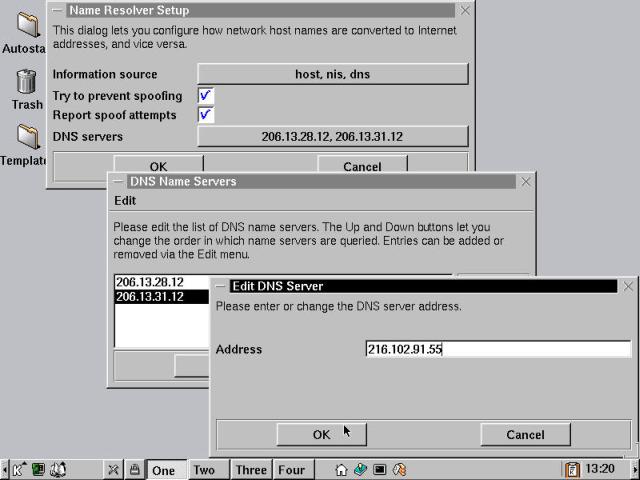
Figure 13-1
COAS Name Resolver configuration using sub-windows.
Now use COAS to modify a system configuration file. We chose a rather obvious example, the network name resolver configuration, where name servers for LAN connections are setup. Get there through K --> Settings --> COAS --> Network --> TCP/IP --> Resolver, type the root password when prompted, and use the utility to change the DNS server address as shown in Figure 13-1.
As the illustration depicts, we've edited the DNS servers list, using the Edit menu to add a new server to the list. Next we chose OK and Save when asked. Now, which file(s) were changed? Here's where that file that we touched comes into play. First we use the find command to locate all files (-type f, as opposed to directories) that have been edited more recently than the file /root/newest. There are three results, far less than the 163 files that live directly in /etc, not to mention all the configurations which are in sub-directories (where the find command also searched).
[root@gwydion /etc]# find . -type f -cnewer /root/newest
./nsswitch.conf
./host.conf
./resolv.conf

[root@gwydion /etc]# cat resolv.conf
# /etc/resolv.conf - DNS setup file
#
# possible entries are:
#
#       domain <domain>                 Local domain name. If not present, the
#                                       gethostbyname syscall is used to
#                                       determine the local domain name.
#
#       search <list_of_domains>        Search list for hostname lookup.
#                                       The search list is normally determined
#                                       from the local domain name but it
#                                       can be set to a list of domains.
#
#       nameserver <ip_addr>            Define which server to contact
#                                       for DNS lookups. If there are
#                                       multiple nameserver lines (Max=3),
#                                       they are queried in the listed order.
#
# !!! Automatically generated by lizard. Do not edit !!!
#
domain orbdesigns.com
search orbdesigns.com
nameserver 206.13.28.12
nameserver 206.13.31.12
nameserver 216.102.91.55
All three found files are actually rewritten by closing and saving the Name Resolver Setup dialog box: nsswitch.conf contains the Information Source data, the spoofing check box configuration is written to host.conf, and resolve.conf has the list of name servers, as shown in the previous listing.
Now, in many cases, having used the COAS dialog box to edit a system configuration, you might not care which files do what, and where. But should there come a day, you now have the tools to find out what's happening behind the scenes of your favorite GUI configuration tools.
Favorite? That's right. Like so many other parts of OpenLinux, there's more than one way to do the job. Caldera ships eDesktop with two distinct, capable suites of administration and configuration tools, called COAS and Webmin. Let's have a look at COAS first.
COAS stands for Caldera Open Administration System. COAS as a whole is released under the GPL, and has a Web site at http://www.coas.org. The team at Caldera that is leading the development process has set down an admirable set of goals for the tools they are writing (from http://www.coas.org/purpose.html):
When the developers talk about multiple user interfaces, they are referring to the availability of the COAS tools in four different modes: from the command line, via a Curses (menuing text in a terminal) interface, from within the X Window environment, and as a set of Java-enabled tools. Not all of these goals have been met, but much progress is being made. We're only going to look at the X-based GUI interface, which is available in KDE from the K --> Settings menu (or alternatively, via the KDE Control Center utility).
When starting a COAS module as a normal user, a small password entry dialog box is displayed, called "COAS su wrapper." For each tool that is invoked, the root password must be entered anew. For this reason, when you're going to be doing a variety of tasks with COAS, you might consider logging in as root to do the work, and then get back out again. That might be considered a disadvantage.
On the other hand, at the end of the installation process, the system is properly configured. Everything else that changes is often addressed in an incremental manner. For that purpose, having a single-purpose superuser session to accomplish a single task minimizes the exposure that a full root login entails. This is the main advantage of this usage model.
There are six major divisions to the COAS utilities. These are: Date & Time, Network, Peripherals, System, X-Server, and Kernel; each is addressed below in the following sections.
Hidden Information
This must be a secret, because we had to dig through a February 1999 article at http://www.linuxjournal.com/ on the subject of COAS to find it. (It's also buried in at least one module interface.) To get help on a feature in COAS, pressF2while in a feature (field, checkbox, and so on) of a COAS tool dialog box. This usually opens a dialog box with help information or a brief explanation of the current setting.
K --> Settings --> COAS --> Date & Time --> Timezone
The sole entry in the Date & Time category is Timezone: the Lizard Timezone utility is also used in the installation routine. The timezone can be set either by selecting a location from a Mercator projection world map, or by using a drop-down list of zones, listed by location or zone name (for example, America/Los_Angeles). Also, the time kept by the hardware clock (aka, the RTC or Real Time Clock) can be set for local or GMT timekeeping. Generally Linux systems should be running GMT. The exception is a dual boot system where the other OS (Windows, for example) expects to find local time in the hardware clock on boot.
K --> Settings --> COAS --> Network --> TCP/IP --> NIS
NIS Client Setup facilitates the configuration of the domain name and servers required to connect to NIS servers, elsewhere on the local network. NIS, formerly known as YP or Yellow Pages, is a protocol for remote validation of user logins. NIS is widely used on large networks, where users can be setup on central servers, and have access to resources network-wide without having to have their information configured on any specific local machine. NIS is widely used in conjunction with NFS (Network File System), as it makes administration and maintenance of user, directory, and file permissions much easier due to the centralized nature of the data. Get NIS domain and Server data from your LAN's sysadmin. The NIS Client and Name Resolver Setup dialog boxes are shown in Figure 13-2.
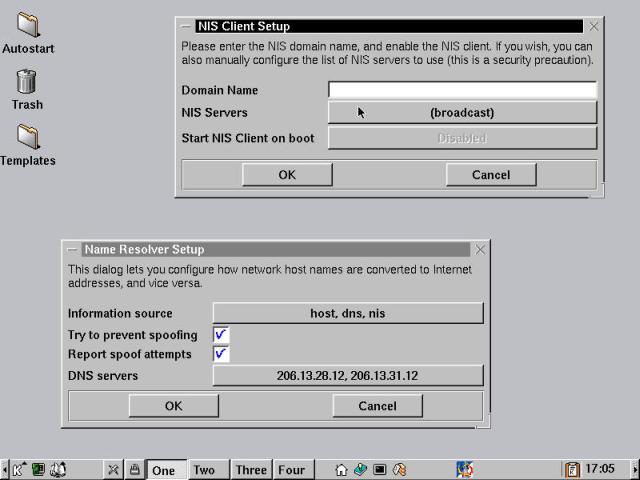
Figure 13-2
COAS NIS Client Setup and Name Resolver Setup dialog boxes.
K --> Settings --> COAS --> Network --> TCP/IP --> Resolver
There are three areas of configuration in the Name Resolver Setup utility from COAS. The first, labeled Information Source, sets the order in which resources for resolving network queries are consulted. The default order is "host, dns, nis", that is, check the local files, then the DNS resources, finally any configured NIS resources. The two spoofing checkboxes are security-related items, used in conjunction with the rlogin and rsh tools. Since we advise you to disable and remove those from your system, you can turn off the spoofing checks as well. Finally, DNS servers are the servers that are used to resolve name queries over a local LAN connection. These are independent of any DNS entries made in the Kppp account setup (dialup networking, Linux-style).
K --> Settings --> COAS --> Network --> Ethernet Interfaces
The Ethernet Interface Configuration dialog box permits configuration of all the networking (well, "Ether-networking") devices in your OpenLinux system. This dialog box is shown in Figure 13-3. In most cases, systems only have a single Ethernet NIC (Network Interface Card), which is always listed as eth0. Some systems have additional network cards, which permit the Linux system to perform as a router between different subnets. Select which device to configure from the Network Device pull-down list.
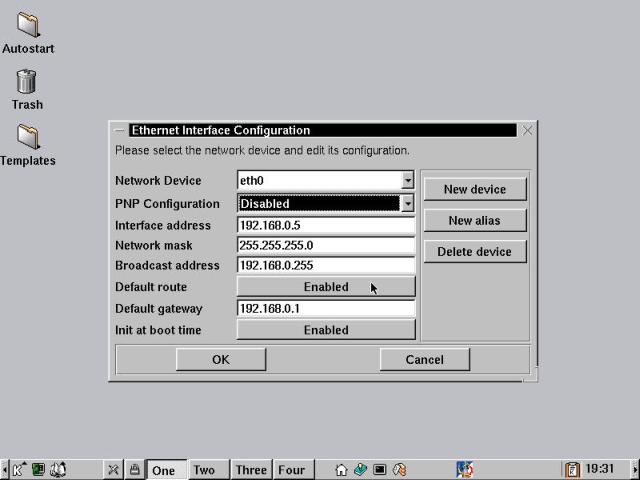
Figure 13-3
The COAS Ethernet Interface Configuration dialog box.
The PNP Configuration list defaults to Disabled if Ethernet was configured statically during the installation process. If the system resides on a network with a DHCP server, then this box should be set to DHCP. The only box that remains active in DHCP mode is the Default Gateway, which should be set to the IP of the system that provides connectivity to other networks, including the Internet. To enable the gateway routing, the Default route button is set to Enabled.
If the Ethernet card is configured statically, then the Interface address should be set to the actual IP address of your system, as supplied by your ISP, your system administrator, or yourself. One important thing to know: setting an IP that is the duplicate of another IP on the same subnet can bring whole networks down, or at the very least, hose the connectivity for the machines with duplicated addresses. If you are participating in a corporate network, you must get an IP assigned to you. Choosing one at random either doesn't work, or causes problems down the road.
Quick Tip
For more information about configuring Networking under Linux, consult http://www.linuxdoc.org/HOWTO/Net-HOWTO/index.html.
Unless your needs or network are unique, the network mask should be set to 255.255.255.0, and the broadcast address should be the same as the IP address setting, with the last segment changed to 255. To have the Ethernet interface initialized at system boot time, select the Init at boot time button.
K --> Settings --> COAS --> Network --> Internet Provider
The Setup Internet Provider dialog box is another holdover from the installation process. Several US and some European ISPs have their local dialup number database packaged with eDesktop. There is a User Defined option, which can be setup with the Details button to configure provider name, dialup access number, and the primary and secondary DNS addresses (as given by the ISP). See Chapter 3 for more details.
K --> Settings --> COAS --> Network --> Mail Transfer
Sendmail is the MTA (Mail Transfer Agent) program included with OpenLinux. Sendmail is the number one MTA in terms of message traffic, handling approximately 80 percent of all messages. It's highly configurable, and very complex. However, there are some simple configurations that cover perhaps 95 percent of all installations. These can be set up with the COAS Mail Transport Configuration dialog box, as shown in Figure 13-4.
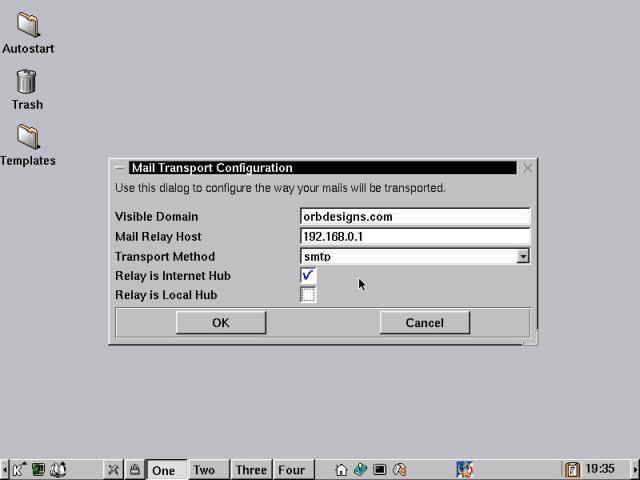
Figure 13-4
The COAS Mail Transport Configuration dialog used to configure mail transport details.
If you run your own mail server, then you'll want entries similar to those shown in the figure. If a smart host (an SMTP server provided by your ISP) handles your e-mail, then you should set the Visible Domain, Mail Relay Host, and Transport Method as appropriate.
For example, let's assume that you have an e-mail account with VeryBigISP.net, and your e-mail address is napoleon@verybigisp.net. Set theVisible Domain to verybigisp.net, the mail relay host to the mail server name (smtp.verybigisp.net, possibly), and the transport method to smtp. For more information on setting up Sendmail, consult Chapter 25.
Note
SMTP stands for Simple Mail Transport Protocol. The other mail transport option is UUCP (Unix to Unix Copy), which is rarely used, having been superceded by SMTP.
K --> Settings --> COAS --> Peripherals --> Modem
This COAS entry opens the modem setup module of the Lizard installer. See Chapter 3 for usage details.
K --> Settings --> COAS --> Peripherals --> Mouse
The GPM Mouse Configuration dialog box from COAS is used to set up the mouse for use in console applications (which use the GPM mouse daemon). This does not have anything to do with mouse configuration under the X Window/KDE environment, and can play havoc with the running X Window server, according to the OpenLinux documentation. The defaults given in the GPM module are identical to those set at installation time, and are correct (as long as your mouse works in X). The only remaining item to change is to enable the Start at boot time button, then reboot for the changes to take effect (or, as root, type /etc/rc.d/init.d/gpm start, thus avoiding a reboot to start a service). The dialog box is shown in the upper right corner of Figure 13-5.
Note
The most common use of GPM is to provide mouse functionality for programs likeVim(an editor) andMidnight Commander(a file manager) in console mode. If you do not need this capability, leave it turned off.
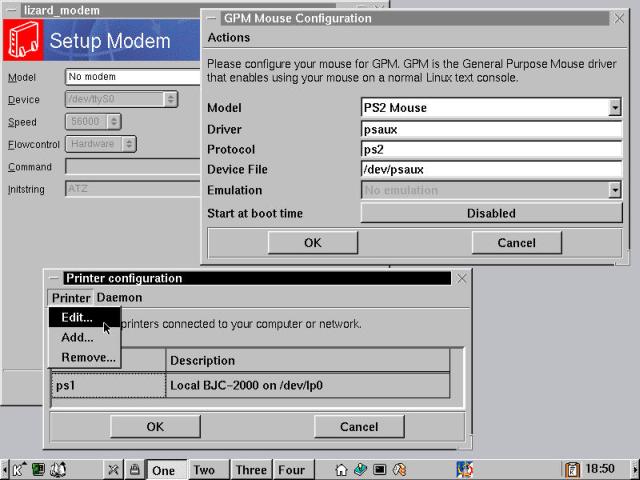
Figure 13-5
All the COAS peripherals in one shot: Setup Modem, Mouse, and Printer configuration.
K --> Settings --> COAS --> Peripherals --> Printer
If you installed OpenLinux on a system with a connected local printer, then it was probably configured automatically during installation (at least that's been our experience). Remote network printers, either Unix/Linux print servers, or Raw printers, such as HP Jet Direct devices, are generally easier to configure from the GUI printer setup utilities. The COAS Printer configuration dialog box seems best suited to working with the extensively pre-configured array of information for local printers.
We recommend using the Webmin Printer (look in the Hardware section under Webmin, later in this chapter) interface for most printer configurations, as the range of features it supports is much more complete.
K --> Settings --> COAS --> System --> Accounts
The COAS User Accounts utility provides several functions. Existing user data can be edited, new users may be added, and group information can be viewed. The File menu contains an Exit selection only. Most common functions are contained under the User menu, with Edit, Create and Delete User items. The Edit and Create User processes are almost identical. The first step in Create is to give an account name, in a separate dialog box. Then the new account information (all workable defaults) is displayed in an Edit User dialog box, like that shown in Figure 13-6.
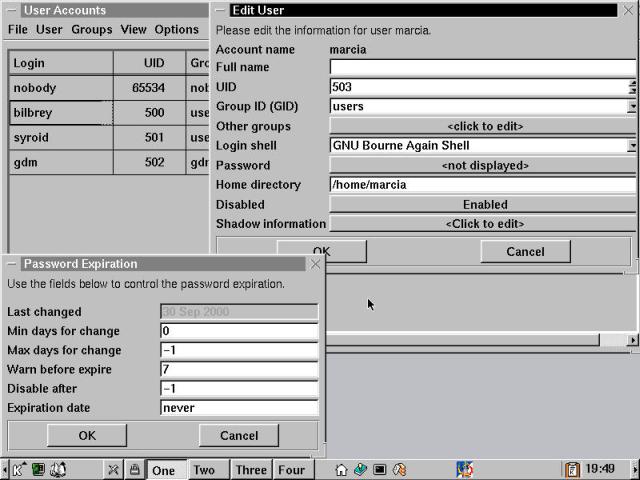
Figure 13-6
COAS User Accounts dialog box, editing a user's password information.
The UID and GID are set according to default configuration values when the account is created. Other Groups allows the user account to be added to additional groups beyond the default "users" group. The login shell (aka the command processor) defaults to the GNU Bourne Again Shell (bash); there are several other options if the account has special shell requirements.
The password should be set for new users at this time, and then they can change the password at first login. The user's home directory can be changed, and the account itself can be enabled or disabled. The final area of configuration is called Shadow information. Selecting this button shows the Password Expiration dialog box.
Shown in the lower left of Figure 13-6, Password Expiration provides administrative control over user password behavior. The settings in the illustration depict that passwords can be changed at any time (the "0" in Min days for change). The "-1" in Max days for change indicates that the password never expires. Alternatively, if the password is set to expire, warnings start seven days before the expiration date, and the account is auto-disabled after another week. The expiration date can be set if a strictly time-limited account is being created (for a contract worker, for instance).
Pro & Con
There are two schools of thought on password expirations. The first promotes regular password change as a matter of security: "the moving target is harder to hit" type of security. The other viewpoint states that users who are required to change passwords on a regular basis are far more likely to choose easy-to-remember (that is, horridly insecure) passwords, and/or write such passwords down in easily collectable locations. We agree with the latter option, and work with our users to make sure that their chosen, non-expiring passwords are secure.
If you try to finish creating a new user account without setting an initial password, a warning dialog box is displayed, with three options: No Password, Disable, or Edit Password. We strongly advise that you never create an account with no password. It's like leaving the keys in the ignition and the windows down in a really, really bad part of town, for a month.
The Groups menu has the Manage Groups entry that displays the Group Administration dialog box. It's rather a misnomer, since nothing can be administered from here; you can only select group names from one window and see which users belong to the group in another window. Group settings are configured on a per-user basis in the Edit User dialog box.
The View menu toggles the user list window between All Users and Regular Users. Regular users are those with UID numbers above the system default of 500 for OpenLinux systems.
The Options menu contains the Preferences entry, along with toggle items for Shadow Passwords and NIS Lookups. If you're participating on a network with NIS servers, then you probably want NIS Lookups enabled: check with your friendly local system administrator for details. Leave Shadow Passwords enabled as an important enhancer of system security, unless your network setup requires otherwise. Selecting Preferences displays the Edit Preferences dialog box, shown in Figure 13-7.
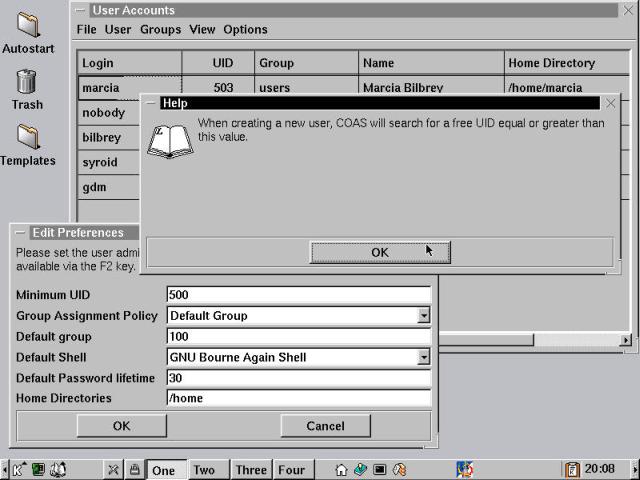
Figure 13-7
COAS User Accounts utility: the Edit Preferences dialog box, with Help box open.
The Edit Preferences dialog box allows setting a variety of the defaults that are used when new user accounts are created. One bit of good news here: we've finally come across a screen that tells us about using the F2 key to get context help. Assistance on the Minimum UID field is shown in the figure. In Group Assignment Policy, the Default Group is group ID 100 (aka "users"). The other possible setting is User Private Group, which makes a new group and GID to match the user account name at the time of account creation. The distributions we've used are split on this. If you have a preference, change the default. Also the default shell, password lifetime, and location of home directories can be set from this dialog box.
K --> Settings --> COAS --> System --> Daemons
We first introduced you to the System Services dialog box (aka, system daemons) at the end of the installation process in Chapter 3. OpenLinux eDesktop has 36 distinct services listed. One of our earliest tasks after installation is complete is shutting most of them down, using this dialog box as shown in Figure 13-8. For more details on this process and other security-related issues, see Chapter 21.
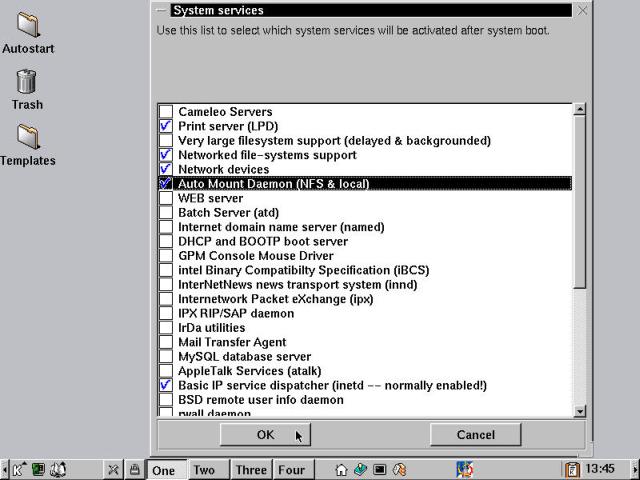
Figure 13-8
The COAS System services dialog box: select the system daemons to run at boot.
K --> Settings --> COAS --> System --> Filesystem
The COAS File System dialog box provides two levels of functionality. First, filesystem devices (hard disk partitions, CD-ROMs, NFS shares, and more) can be mounted and unmounted using the controls on the main window, as shown in Figure 13-9. The other feature is the Info button that displays a File System Info dialog box for the selected resource. This is also shown. Unfortunately, the information is wrong for some reason (/dev/hda3 is a 4.26 GB partition that's 3 percent used, according to the output of the command line df utility). We'll agree to call that one a "bug"!

Figure 13-9
The COAS File System and File System Info dialog boxes. The "info" is wrong.
K --> Settings --> COAS --> System --> Hostname
This COAS tool displays a single purpose dialog box permitting a change to the system hostname. Be aware that changing the hostname after all the system resources have been configured at installation can create problems (for example, system instability). If the hostname is set to A, and then changed to B, check the configuration files for system services like sendmail that expect to be working with the original host and domain names. The System Hostname dialog box is shown in the upper right corner of Figure 13-10.
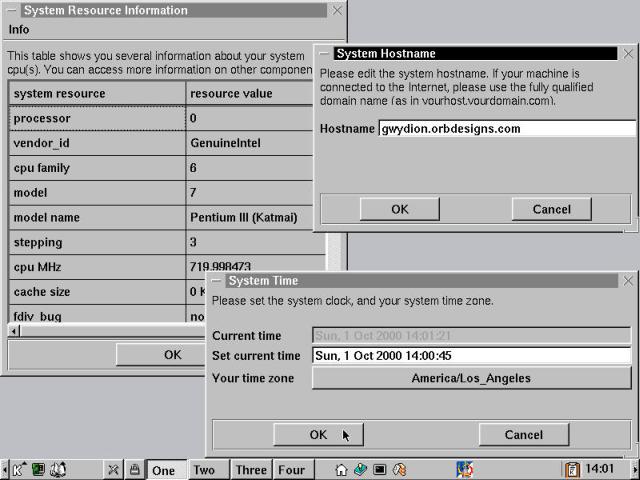
Figure 13-10
From COAS: System Resource, System Hostname, and System Time dialog boxes.
K --> Settings --> COAS --> System --> Resources
The System Resource Information dialog box is opened using this COAS selection. This is a system data display dialog box only, shown in the upper left corner of Figure 13-10. No values may be changed from this utility. The default display is data about the CPU. From the Info drop-down menu, sub-dialog boxes containing the following information are displayed:
K --> Settings --> COAS --> System --> Time
Figure 13-10 also shows the System Time dialog box, in the lower right corner of the illustration. This dialog box contains a dynamic display of the current time (shown in the gray field, indicating no editing takes place there). The Set current time box is best used by setting the time a bit in advance, then choosing OK at the right moment. The timezone can also be set here. Note that this does not change the hardware clock. To get more information on setting the hardware clock from the system clock, type man hwclock in a terminal window.
These are the paths for accessing the keyboard, mouse, and video modes configuration tools, respectively:
K --> Settings --> COAS --> X-Server --> Keyboard
K --> Settings --> COAS --> X-Server --> Mouse
K --> Settings --> COAS --> X-Server --> Video Mode
These COAS tools simply run the keyboard, mouse, and video setup routines from the Lizard installer. They can also be independently invoked by typing lizard_xserver -keyboard (for instance) in a terminal window as root.
K --> Settings --> COAS --> Kernel
When the COAS Kernel utility is selected from the menu, a notice dialog box displays first, indicating a slight delay while the system hardware is probed for changes. A Done button becomes active when the check is complete. Choosing Done displays the Kernel Modules dialog box, which is shown with a Module Information sub-dialog box in Figure 13-11.
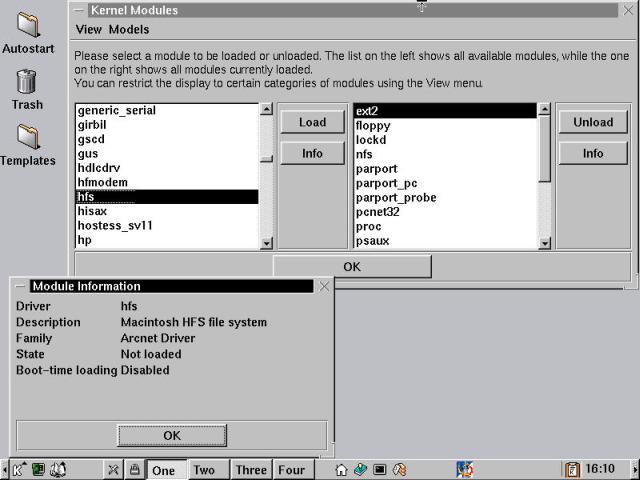
Figure 13-11
The COAS Kernel Modules dialog box, with the Module Information window open.
The View pull-down menu offers the following module types for display in the left window:
You'll note that this list closely corresponds to the major areas of configuration when compiling a kernel. All of the items that can be designated as modules during the kernel build are available in this utility.
Then, in the left window, modules can be selected and loaded into the running kernel. To be more precise, the attempt is made - if the matching hardware isn't present, then the module fails to load with a warning dialog box to match. Alternatively, a selected module can have the information about it displayed in a sub-window as illustrated. This is useful, as some of the modules have fairly cryptic names.
The right hand window shows the modules that are currently loaded into the kernel. These can be manually unloaded, although this is not generally recommended. For example, unloading the module pcnet32 kills our networking dead, as that's the driver for the Ethernet NIC. Some modules, like e2fs, are built-in and cannot be unloaded. Tread carefully when working with this section of COAS - there's thin ice everywhere.
COAS is on the Caldera OpenLinux roadmap. The tools make an appearance in the Linux Technology Preview (LTP) release, although the KDE menu route is gone. Access to the COAS suite is via the KDE Control Center in LTP.
In conversation with Caldera engineering personnel, we confirmed that both COAS and Webmin are both in active development for future releases. COAS provides a framework for modular administrative utility design. The tools can be used in a GUI environment for real-time requirements and called in scripts, as necessary. Thus, COAS fills a niche in the OpenLinux ecosystem that our next GUI administration tool, Webmin, doesn't serve. We see COAS as a viable environment, and look for the Caldera team to add more user documentation to complement the excellent development data. Now let's look at Webmin.
Webmin is a browser-based modular system administration tool. Developed independently, Webmin was acquired by Caldera in the first quarter of 2000. However, it is not Caldera-specific; it can be downloaded directly from http://www.webmin.com/webmin/, which also has copious quantities of developer documentation. User information can be had from Chapter 10 of the OpenLinux eDesktop 2.4 User's Guide, shipped with the retail version of eDesktop. Alternatively, the whole guide is also online, with Chapter 10 found at http://www.caldera.com/products/edesktop/usersguide/ch10.html. Since there's such great external coverage of this software, we'll skim over the package, show you the main categories and their contents, and hit a few areas we think are particularly important and that you should be aware of.
An interesting feature of Webmin - which is, in essence, a series of custom HTML forms fronting for a suite of scripts used to administer a system or systems - is that it is not served by the stock Apache httpd Webserver daemon that also accompanies eDesktop. Instead, a custom Webserver is used, the Miniserv perl-based server.
There are two ways to start Webmin. The first is as a system service (or daemon). It can be setup to start automatically at boot time, and monitor its configured device/port combination, waiting for a connection. The second method is to start Webmin from the KDE menu with K --> System --> Webmin. This initiates the Webmin server process, opens a Netscape browser window pointed to the correct port, and a displays a Netscape: Password dialog box, as shown in Figure 13-12.
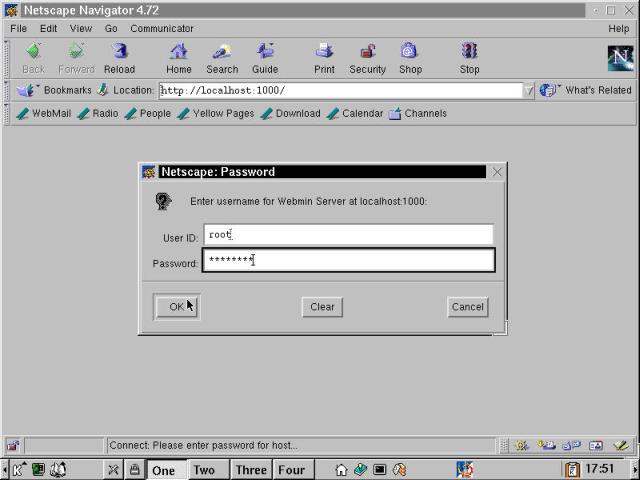
Figure 13-12
The initial Webmin login dialog box open over a Netscape browser window.
Initially, only the root user is configured to access Webmin. Observe in the illustrations that the browser is pointed to localhost, which translates to an IP address of 127.0.0.1, the internal, (or loopback) Ethernet address that every computer reserves for itself. The host port is set to 1000 by default. When the correct login information is entered, select OK to enter Webmin, shown in Figure 13-13.
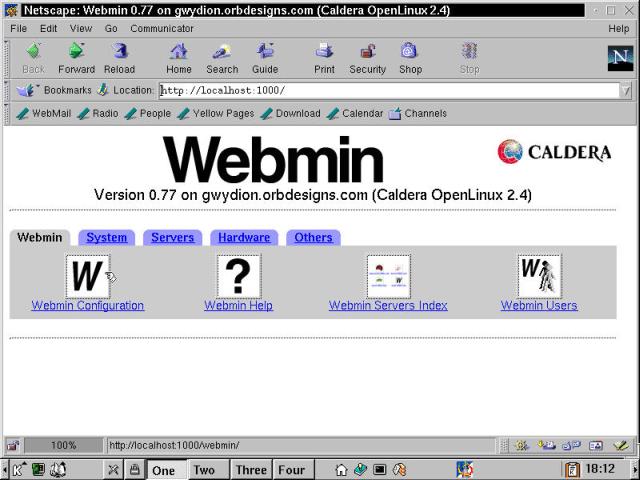
Figure 13-13
The Webmin introductory browser page shows the five section tabs.
The initial Webmin page shows version and machine information. Additionally, the distribution information is given, which is not strictly necessary, but is useful. Each Linux distribution has slightly different sets and locations of configuration files. So Webmin is setup by distribution and version level. Confirming that Webmin is setup for Caldera OpenLinux 2.4 is a good thing.
Configuration under Webmin is divided into five major sections, each represented by a tab view: Webmin, System, Servers, Hardware, and Others. We'll take a look at each of these in turn, starting with Webmin's self-configuration and help facilities.
This portion of Webmin provides access to Webmin configuration routines, the help system, an index of other Webmin servers on the local network, and Webmin user setup. The first, Webmin Configuration, is shown in Figure 13-14.
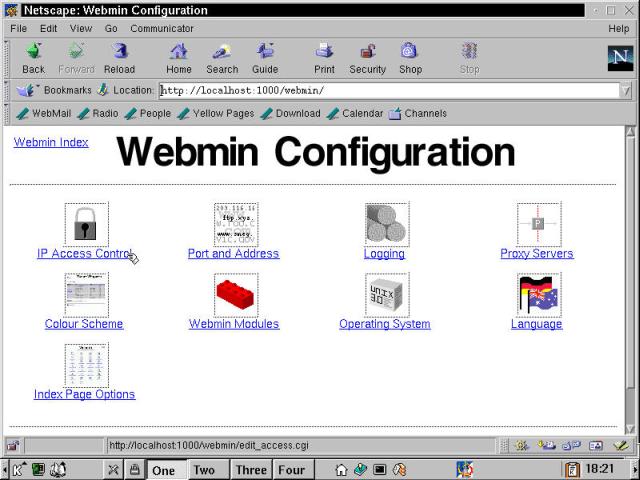
Figure 13-14
The Webmin Configuration page: access to nine different tools.
IP Access Control is a tool to allow (or deny) access to a specific listed group of IP addresses or resolvable Hostnames. By default, this is set to allow from all addresses. We strongly recommend changing this to only allow connections from the localhost, as well as other trusted addresses if necessary.
Note
So what's a trusted address? For example, let's suppose that the machine under discussion is a server in a rack someplace, without keyboard or monitor attached. You're the sysadmin, and you want to limit administrative access to those locations where you are likely to connect from. That may be your desk workstation, your boss's workstation, and your home machine (provided you have a static IP at home). Add localhost access as a fallback position.
Ports and Addresses permits changing the IP address and port bindings for the Webmin server. This is most useful in the circumstance where the machine is multi-homed (that is, has more than one Ethernet card in it, usually one pointed out towards the Internet, and the other on an internal, non-routable network). Binding Webmin to just the internal port address is recommended.
Another possible configuration has Webmin running on a machine which is a home workstation directly connected to the Internet, either by dialup or broadband (DSL or cable) connection. Unless external access is mandatory, bind Webmin to address 127.0.0.1, which is the IP version of localhost. Caldera configures Webmin to listen on port 1000, and claims that this makes the implementation more secure. Lacking better information, leave this as is.
Logging provides the ability to take note of accesses to Webmin, and log them to a file, /var/log/webmin/miniserv.log. Additionally, the logged entries can optionally attempt to resolve hostnames from the logged IP addresses, and clear the log file at a configurable rate. Logging could be useful if you want to use it as a memory aid for recent activity, or if there are several users that are allowed to perform Webmin tasks. For the most part, we tend to have a frantic initial period of activity during which we set a machine up and get it working the way we want. Then we simply let it run. We don't enable logging, since we don't run Webmin as a continuously available service.
Proxy Servers presents a dialog box to configure the HTTP and FTP proxy servers that Webmin needs to use to cross a firewall for specific purposes. These are required especially for the Software Packages modules, which need to download files or programs.
Color Scheme permits configuration of the colors used by Webmin in its interface. The dialog box for this is somewhat ... user-unfriendly. It requires setting the RGB values for each of the five elements that define most Webmin pages. If you're planning on spending a lot of time working in Webmin, take the time to work out a color scheme that is easiest on your eyes. Otherwise, don't bother.
Webmin Modules offers three distinct functions: installing new modules, cloning existing modules, and deleting installed modules. New modules can be made available either by the Webmin developers, or by the distribution publisher (Caldera in this circumstance). Of course third party modules can also be used, but unless you are prepared to audit the code, or are dealing with a trusted source, be wary.
Cloning modules is a useful feature for having two otherwise identical modules with different configurations ready for use under the Webmin interface. Conversely, modules should be deleted for those services that are not and will not be used on the machine. Part of the Webmin Modules page is shown in Figure 13-15.

Figure 13-15
The Webmin Modules configuration page: Clone and Delete modules shown.
Operating System presents a dialog box to change the operating system that Webmin recognizes as its host system. The registered change only applies to newly installed modules, not existing module configurations. For this purpose, we'd rather upgrade Webmin at the same time.
Language offers five different languages for all of the Webmin configuration pages: English, German, Russian (KOI8), Spanish, and French. The help text is still given in English, although the search tools are presented in the selected language. An interesting side effect of changing languages is that most options are presented in alphabetical order. So a different language creates a new option/menu ordering. This is disconcerting when trying to get back out of a foreign language - thank goodness for icons.
Index Page Options provides three features to be set up for the style of the main Webmin page. These are the number of columns (which defaults to four), Categorize Modules (creating the tabbed view seen in Figure 13-13), and Use an Alternative Header, which simply changes the look of the page while displaying all the same information. We strongly prefer the level of organization presented by the tabbed view; columns and header are trivial changes.
Opening Webmin Help brings up a simple search page. Enter the search term, optionally restrict the search to selected modules, and choose Search to execute (or Reset to blank the entries and start over). Depending on what you're looking for, you may get a lot of options to choose from, as with the "NFS" search term and a selected help page, as shown in Figure 13-16.
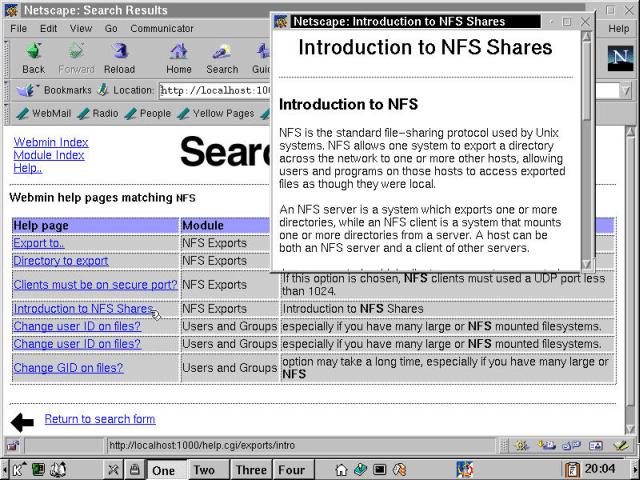
Figure 13-16
The results of a successful Webmin search for help, and some actual help in a sub-dialog box.
The drawback to Webmin Help is that it can range from very helpful indeed to non-existent, and you can't tell which is which without trying. Also, there's no interface to the help information except via the search tool. We miss not having a Table of Contents or Index style interface for help information to complement the search facility.
Help Cheater
A quick way to list nearly all of the help topics: search on a common vowel, such as "a" or "e." Because the search function is a Perl-driven regular expression search, just about every one of the help topics will match one vowel or another.
This feature provides an interface to other Webmin servers that are running on the local network. Other machines may be registered manually, using a form to enter Hostname or IP address, port number, and other specifics. Alternatively, there's a Find Servers function that scans machines on the local network looking for running Webmin servers. Once located by either method, the servers are available as links on this page, providing an easy route for administering multiple machines from a single login session. Webmin Users
The Webmin Users configuration page permits adding users and user permissions for specific modules to the Webmin interface. This is an extraordinarily useful tool, as the system administrator can use this feature to delegate specific tasks to different individuals. Let's say that Tom is the root, the all-powerful system administrator, and Brian is just the lowly Webmaster. Brian can be given access to just the Apache Webserver configuration module and nothing else, as shown in Figure 13-17.
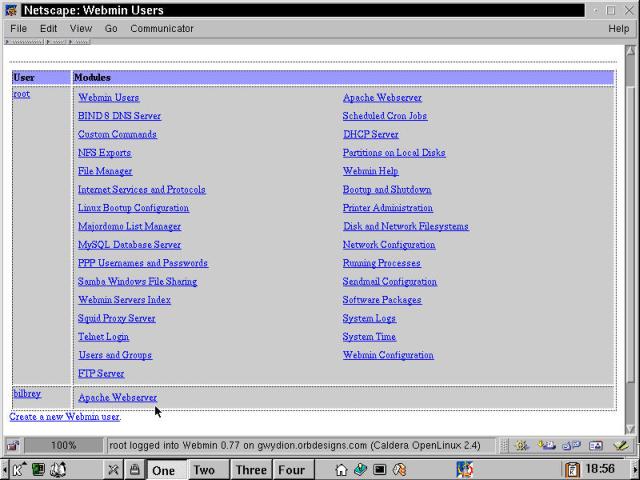
Figure 13-17
The Webmin Users configuration page, showing a limited permission user setup.
Then, for each authorized module, user specific configurations can be set up. For example, in the Apache Webserver module, the user can be granted or denied control of global options, virtual servers, process control (starting and stopping the server), and much more. Some modules have very little granularity to them; some have quite a lot. The depth and breadth of control that Webmin presents is impressive.
Not surprisingly, the Webmin System tab contains the modules for basic Linux OS and running configuration. The modules cover the range of system operations from startup to shutdown, not including servers, daemons, and hardware, which are in other sections. Now we'll examine the eight areas of Webmin System configuration. The System configuration page is illustrated in Figure 3-18.
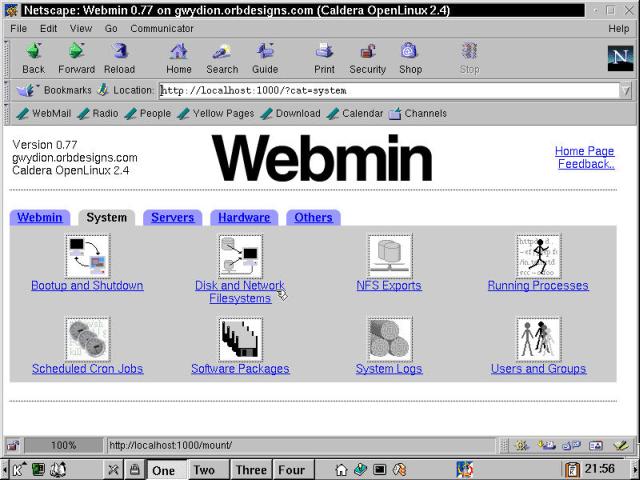
Figure 13-18
The Webmin System configuration modules page shows eight possibilities.
The Bootup and Shutdown page offers a unique view of the system. All system services are started or stopped by scripts in the /etc/rc.d/init.d/ directory. This view allows you to edit any of these scripts (as well as the rc.local script). Finally, there are buttons for Reboot and Shutdown at the bottom of the page.
Selecting a system service, a page is displayed and the associated service's script can be inspected to determine its behavior or edited. The order in which the service is started also can be modified, although that's a bit risky - usually the given startup order is there for a reason. Starting a service that depends on the network being up, before the network is up, does no good at all. Additionally, the service can be started or stopped from the edit page.
This configuration page provides access to the Filesystem table file, /etc/fstab, in a more human readable form. New mounts can be created from this module as well, including a wide variety of filesystem types, as shown in Figure 3-19.
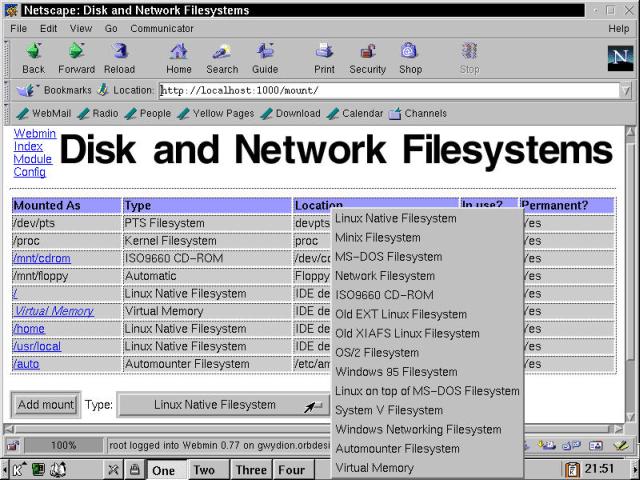
Figure 13-19
Disk and Network Filesystems page: the file system type list is open.
The NFS Exports page from Webmin allows you to view and edit existing NFS directory exports, as well as create new exports. The Create Exports page includes a variety of options and choices that are not clear unless you're already an NFS journeyman. Fortunately, the final form of access to the help system comes to the rescue at this point. The field descriptions are links to context sensitive help.
Warning
Even with the help, setting up an NFS service is fraught with the potential to leave gaping security holes in your system. If you are directly connected to the Internet, please don't run NFS services unless you really know what you're doing. Get Managing NFS and NIS by Hal Stern and Mike Loukides (O'Reilly and Associates), read and understand it. Then go forth and slay the NFS dragon.
From the Webmin System tab, the Running Processes module grants control of the current list of executing processes. The initial listing is very similar to the output from typing ps -ax in a terminal window. There is a Display menu just below the page header that offers the following options: PID, User, Memory, CPU, Search, and Run. The first four are data presentation configurations, Search displays a page to help locate a specific process, and Run is a command interface tool. In the main display page, all current processes are listed, and the PID is a link to more information. Also, the PID-specific pages provide process control, from re-prioritizing the CPU time to sending signals (like Terminate) to the process.
Cron jobs are system tasks that are scheduled to run repeatedly at specific time intervals. The command line Cron interface is dense with information, to put it politely. The Webmin interface to Cron is considerably more user friendly to Linux neophytes. Existing jobs are displayed on the first page, as shown in Figure 13-20. Creating a new Cron job is as simple as selecting the link, choosing an executable or script, and setting up the repeat interval from a set of lists for minutes, hours, days, months, and weekdays. Note that this Webmin module configures cron entries in /etc/crontab, the system (not user) crontab file.
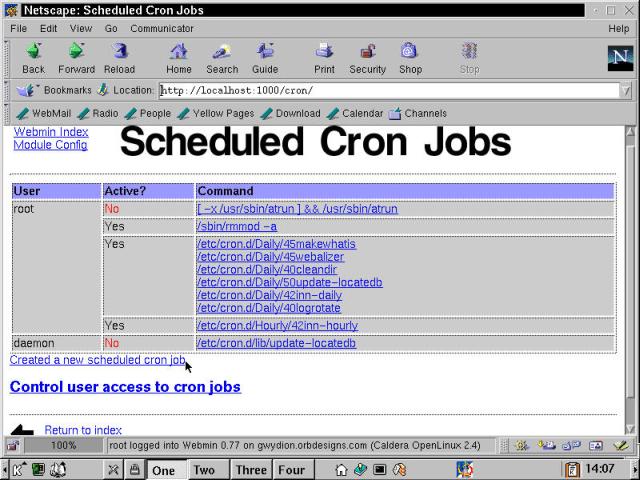
Figure 13-20
The Webmin Scheduled Cron Jobs module allows you to edit existing jobs or create new ones.
The Software Packages module is an interface to the installed RPM files on your system. The initial view is a functional directory tree, which may be opened or closed by branch or as a whole. Below the tree display are a number of sections:
rpm -q -f /fully/qualified/filename from the command line.This Webmin module provides control and viewing access to the system log files. For the most part, these logs are found in the /var/logs directory. Aside from viewing the contents of each of the logs (by default the last 20 lines), the setup files controlling the type and rate of logging can be configured from the System Logs module.
Users and Groups provide a simple straightforward interface to adding, editing, and deleting users and groups. Displayed in a convenient table format, it is easy to scan the list of users for discrepancies. In our survey of this module, we quickly noted that the account going by the name of postgres (a database server utility) is the only non-user that has a real shell attached to the account. Clicking on the postgres link, information about the account is displayed. A brief glance reassures us that logins are not permitted by this account. However, it might be worth looking into the Postgres documentation to see why the account requires a shell, or if it is just badly configured. On the Edit User page, several of the field descriptions are links to context-sensitive help, as illustrated in Figure 13-21.
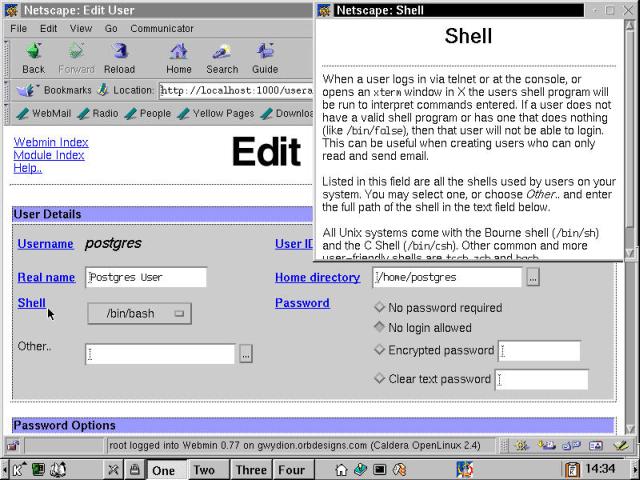
Figure 13-21
The Edit Users page, with help, accessed from the Users and Groups Webmin module.
Webmin presents a full-featured selection of server configuration modules, from Apache to Squid, and all the others in-between (alphabetically speaking). Similar to other areas of Linux, an easy setup routine may simply be a fast route to opening the gates to the kingdom, and handing out treasury keys to all the system crackers that come strolling by. If you're going to run a service on a network-connected machine, get some documentation and RTFM (Read The Fine Manual). Then fire up Webmin, and make use of these configuration modules.
Like most of the entries here, Apache is a big, complex package with lots and lots of configurable options. Below the list of configuration modules is a dialog box for creating new IP-based Virtual Servers. See Chapter 26 for a more in-depth treatment of setting up an Apache Web service. The following are modules in this section:
httpd server daemon when it is first started.
Alert
The version of BIND that accompanies OpenLinux eDesktop is
When you've started the named daemon, you're running a DNS (Dynamic Name Service) server. There are a number of interlocking configuration files that Bind uses, and this set of Webmin modules provides a nice aggregation of capabilities without being overwhelming in any one section. However, this is not a task for the faint-of-heart. Get a copy of DNS and Bind, 3rd Edition, by Paul Albitz and Cricket Liu (O'Reilly and Associates) to accompany your journey into the land of name servers. The main BIND 8 DNS Server modules configuration screen is shown in Figure 13-22. Most users never need to operate a local service, since name servers are usually a part of the connectivity "package" provided by every ISP.
Tricks of the Trade
On the other hand, a caching nameserver on a local network provides fast host lookups and is not all that difficult to implement. See Chapter 24 for details.
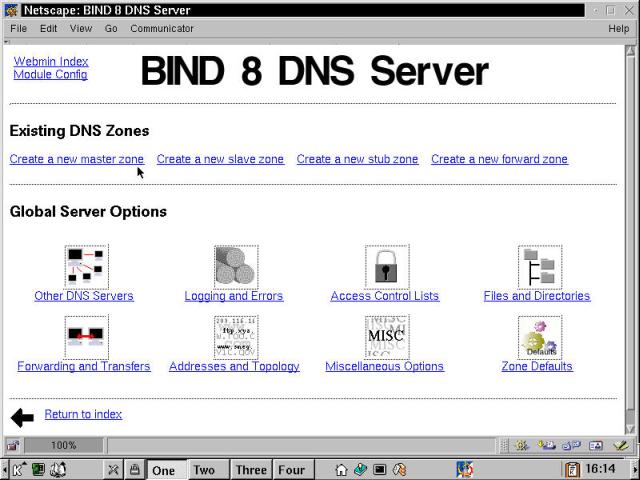
Figure 13-22
The Bind 8 DNS Server configuration modules offered by Webmin.
DHCP stands for Dynamic Host Configuration Protocol. It is a standard for TCP/IP networks that machines can use to get an IP assigned to them from an available pool of addresses, across the network at boot time. There should only be one DHCP server for any given sub-net, otherwise there is the strong probability that duplicate addresses will be assigned unless the servers are carefully configured to lease from sub-blocks that don't overlap. That can bring a network to its knees and create all sorts of difficult-to-debug problems that do not appear related to network addressing. For most small networks (say 10 to 20 machines or less), it is generally much easier to manually allocate static IP addresses for each machine.
The DHCP server configuration modules in Webmin permit configuration of subnets and shared networks, hosts and host groups, and a broad selection of global options. Additionally, you can list the active leases (see which addresses are currently assigned).
An FTP service is a fairly common offering at many hosts on the Internet. Like other daemons that provide services to the outer world, FTP has had its problems. Look to resources like the Vulnerabilities list at http://www.securityfocus.com/, and keep your eyes peeled for problems with and updates for WuFTP, the server package that comes with eDesktop. You'll want to upgrade to the latest version, and configure it for security, which is beyond the scope of this book. However, Webmin provides the tools to do the job right, with modules for configuring Users and Classes, Messages and Banners, Limits and Access Control, Networking, Logging, Aliases and Paths, Anonymous FTP, Permissions, and Miscellaneous Options.
Near the end of Chapter 3, we briefly described the /etc/inetd.conf file, which provides startup information for a variety of network services. At that time, we demonstrated how to shut all of those services off, all of them! Over time, we've re-installed several times in the course of testing and writing. This current installation is not fully locked down, and you can see in Figure 13-23 that several services are still running (shown in bold text in the Internet Services box).
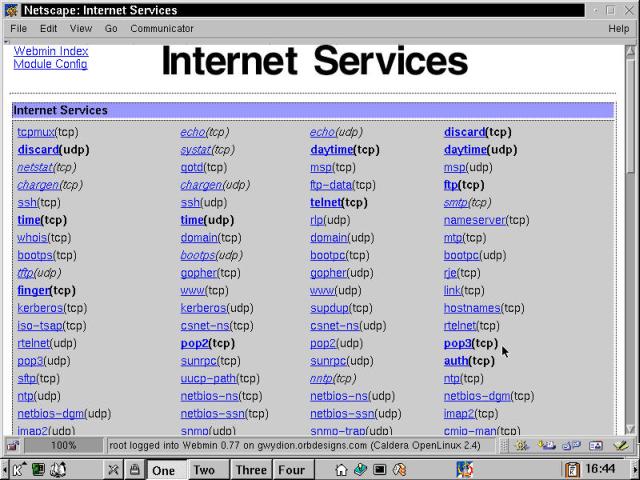
Figure 13-23
The Internet Services configuration module.
The Internet Services module that Webmin provides is another route into the inetd.conf file. Here you can select, modify, enable, or disable selected services. Our preferred method is to turn everything off for starters, then re-enable and secure what we need to accomplish our goals. This is a good tool for helping out with that process.
Majordomo is mailing list management software. The modules that Webmin provides guide you first through the creation of a new mailing list. Once the list is initialized, then a configuration page for that list is displayed in the browser window. These modules include List Members, Messages and Description, Subscriptions and Moderation, Email Options, Access Control, Headers and Footers, and Miscellaneous Options. There is considerable online documentation for setting up and maintaining a Majordomo list at http://www.greatcircle.com/majordomo/, as well as numerous other Internet locations. Majordomo is the most commonly used list management software.
The MySQL server itself, as well as any Database tables, can be administered via this Webmin module. The module doesn't run if the server isn't started. MySQL is a popular database package that is often teamed up with the Apache module mod_php to provide dynamic Web content. Along with individual database management, assorted global MySQL options that address various types and levels of Permissions are configurable.
PPP is Point-to-Point Protocol, the standard used for most dialup communications. The PPP Usernames and Passwords module coordinates adding, changing, and deleting PPP user accounts in conjunction with the same activities in the Users and Groups module. This linkage can greatly ease administrative headaches caused by unsynchronized user data, as long as Webmin is used for all such work.
Caution
Late breaking news - Do NOT use Webmin's modules to configure Samba. Use the SWAT utility instead (see Chapter 27). Webmin's modules have numerous known bugs regarding their interactions with Samba.
The Sendmail MTA (Mail Transfer Agent) configuration page is shown in Figure 13-24. Sendmail is widely regarded as one of the most difficult packages to configure in the Linux pantheon. Contrast this with the product's wide popularity, and the end result is what's affectionately known to system administrators as the "Sendmail Paradox." The Webmin modules provide a fair bit of help in overcoming these configuration complexities, but the short form is that unless your system is going to be a mail host on the Internet, you don't need to run Sendmail as a daemon. Look in Chapter 25 for more information.
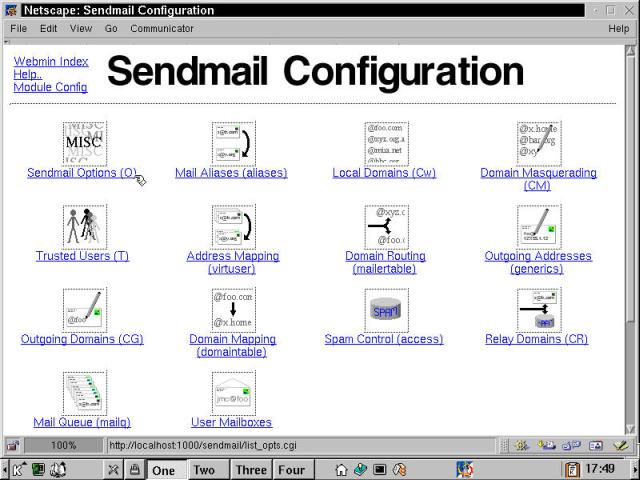
Figure 13-24
The Webmin configuration modules for Sendmail.
Squid is a caching proxy server that can be used in a variety of roles, from straight caching through filtering to direct access controls. While Webmin provides Squid configuration modules, OpenLinux doesn't ship with Squid.
The Hardware tab is something of a misnomer. The configuration modules herein are no more hardware-related than any other setup of a piece of software which runs on a real machine is.
This module presents an interface to the Lilo (LInux LOader) utility and configuration file. This is only slightly interesting, since Grub (GRand Unified Bootloader) is the default boot manager for the OpenLinux family of distributions. If Lilo is your game already, then you're probably very comfortable with setting it up and changing it from the command line. If you've installed Grub, this tool isn't for you.
The four modules in the Network Configuration section of Webmin provide the core of setting up Linux to participate in a LAN. The modules are as follows:
The Webmin partitioning tool is functional and remarkably easy to use, given the inherent complexities hidden under the covers of a hard disk. The numbers it reports are accurate, and the graphical layout that accompanies the sector allocation information is useful as well. We still miss seeing the actual size (in MB) of the partitions. The physical drive parameters are available on a separate screen, with lots of linked help, as there are many ways to break a system by messing with the storage sub-system. Additionally, each available partition can be viewed, and its parameters, size, and other attributes can be modified (if the partition is not already in use). The initial browser page of the Webmin Partition Manager module is shown in Figure 13-25.
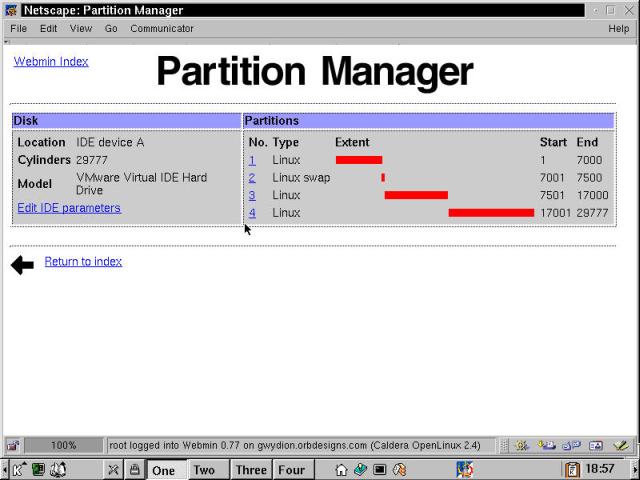
Figure 13-25
The Webmin Partition Manager module showing four partitions on a single drive.
The Printer Administration module that is supplied by Webmin with OpenLinux does a fine, user-friendly, intuitive job of configuring local printers and remote Unix and Windows printers. There are a couple of flies in this particular ointment, however. First, the controls to stop and start the printer daemon (lpd) do not work. Use the following script entries from the command line (as root), after changing configurations using Webmin. The first two stop and start the lpd daemon, clearing existing print queues in the process; the third command simply reloads the /etc/printcap file and restarts the printer daemon.
[root@gwydion syroid]# /etc/rc.d/init.d/lpd stop

[root@gwydion syroid]# /etc/rc.d/init.d/lpd start

[root@gwydion syroid]# /etc/rc.d/init.d/lpd reload
The second problem appears to be related to interactions between Windows 2000 shares and current versions of Samba. We can easily setup and print to devices on Windows 9x machines. But accessing Windows 2000 printer shares doesn't work, either with the 2.0.6 revision that ships with eDesktop, or the latest 2.0.7 release of Samba. Some web-based research and queries to the Samba technical mailing list revealed this is a known Samba problem due to the fact Microsoft changed the printer interface for Windows 2000.
The System Time module of Webmin provides different page sections to accomplish three related tasks. The first is setting the system time, and synchronizing the hardware clock to the system time. The second section reverses that. The third section offers an option to synchronize with a network timeserver (discussed in Chapter 19).
The Others portion of Webmin is an interesting area. It contains modules for custom commands, a file manager, and a Telnet login utility.
This module presents an interface to run and/or create user-defined commands. This is equivalent to a "run program" dialog box, with an HTML history list attached. The custom commands module isn't about creating scripts, but they can be called from custom commands. For example, you may have created a script to run a special limited backup. This script can be called in a custom command, and run from within Webmin.
The File Manager module is a Java-based applet that provides a graphical interface to the filesystem. Many file viewing and maintenance functions are implemented as buttons on a toolbar across the top of the page, as shown in Figure 13-26. This isn't the best tool for the job, and it doesn't support drag and drop file operations, but for a quick glance, edit (yes, edit), copy, paste, or delete, this can't be beat when you're already working in Webmin.
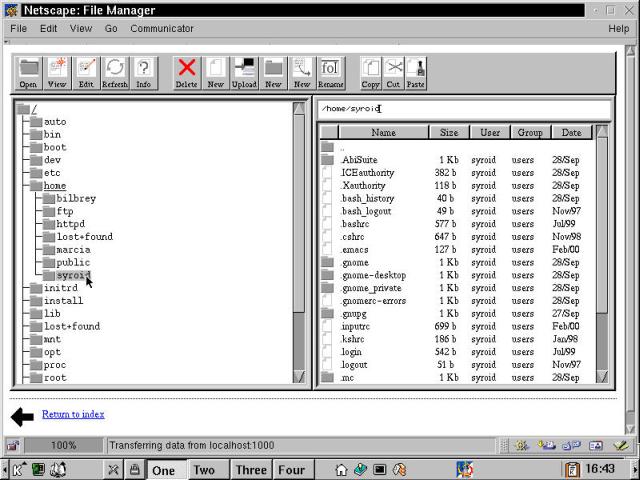
Figure 13-26
The Webmin File Manager module, courtesy of a useful Java applet.
This is another well-written Java application. We can't recommend using it, since any machine that runs telnet is an insecure machine, either already cracked, or bait for the script kiddies. In order to work with this, you need to enable telnet on your eDesktop installation (you did turn it off as we discussed in Chapter 3, right?). Do not do this if your computer is directly connected to the Internet.
Open Linux eDesktop is bundled with not one, but two, excellent GUI system administration tools. There's a lot of functional overlap between COAS and Webmin, but enough differences remain to give each its own niche in the Caldera distributions. This chapter covered the following points:
Go to the Table Of Contents