
Email Tom
Tom's Website


Email Brian
Brian's Website
|
Email Tom Tom's Website |
|
Email Brian Brian's Website |
Go to the Table Of Contents
Did you read the Preface? Thanks!
Text editors are crucial to the care and feeding of a GNU/Linux system. They are used to create and modify startup scripts, configuration files, and much more, as revealed in upcoming chapters. There are at least 28 console text editors, according to one online source. Some distributions ship with several of them.
OpenLinux comes with vim (an enhanced version of the vi editor), and XEmacs. Additionally, we cover the joe editor, to provide a third, neutral viewpoint. Neutral? The computing equivalent of the Crusades are continually being fought over whether vi or Emacs is a better tool - we thought we'd offer a third useful option.
vi (pronounced vee-eye) is a powerful, versatile text editor with roots that stretch back to the early days of UNIX. It was written by Bill Joy in the late 1970s to take advantage of the screen-addressable characteristics of the ADM-3a terminal available at the time. vi first shipped with the 2BSD distribution of UNIX and has since been ported to a diverse range of operating systems (DOS, Windows, OS/2, Macintosh, Atari, Amiga, and VMS). Over the years, vi has undergone numerous incarnations; the version bundled with OpenLinux is called vim (for Vi IMproved).
Becoming comfortable with vi or vim is a fundamental rite of passage for anyone serious about using, maintaining, or administering a Linux system. Why? Because vi is a standard across all distributions of Unix and Linux; whatever your variant, rest assured it ships with some incarnation of vi. While there are countless other text editors available, taking the time to learn vi means you can sit down at any *nix system and edit a file.
Users accustomed to working with today's GUI editors often find vim's keyboard commands to be initially cryptic and confusing, but there is a deep-seated philosophy behind this program design. The basic premise behind most Unix-derived text editors is that your hands have no business being away from the keyboard. Since your fingers can only reach about fifty keys, and vim has in excess of 100 commands, something has to give. The result in vi is a series of basic operations (movement, saving and quitting, copy and delete, and so on) that can joined together to create very complex commands, with a minimum of keystrokes. Bear with us, and we'll show you some amazing tricks that are easy to learn, and with a little practice become almost natural. But before we get to the hands-on mechanics, there are several concepts unique to vi and its offspring that require explanation.
First and foremost, vim operates using task-specific modes. While many people are used to invoking an editor and immediately going to work on the text of the document displayed, this is not the case with vim (unless you start it with a specific command option, which we'll address in the next section, "Starting vim"). vim has three distinct primary modes of operation:
i, I, a, A or s, for various versions of insert, append, or substitute. To quit input mode, press Esc. This returns vim to command mode.:) and type a command followed by Enter. Press Esc to exit line mode and return to command mode.
Tip
vim defaults to showing--INSERT--,--REPLACE--, and--VISUAL--in the status line when these states are active (:set showmode). To return to Command mode from these input mode states, pressEsc. When working in line mode (typing into the line at the bottom of the screen, for a search or other function),Ctrl + cterminates the current activity and vim returns to command mode.
There are three common ways to start vim:
vim [filename]
vim [+n] [filename]
vim [+/pattern] [filename]
The first opens vim, and loads the file specified. The second starts vim, loads filename, and moves to line n within the file. The third starts vim, loads filename, and moves to the first instance of pattern within the file. The second and third options are useful in situations where you know exactly the line (in the case of a compiler error) or context (when modifying a specific parameter) in the file that requires attention.
For example, to open the configuration file /etc/lilo.conf with the cursor located on the first line containing the string "delay", the command is:
vim +/delay /etc/lilo.conf
In addition, of course, you can also simply type vim from the command line in either a virtual terminal or console. This opens vim with an empty buffer. vim's complete command line syntax is as follows:
vim [options] [+command | -c command] [filename]
Options are command line switches that tell vim to function in a specific mode or style. For example, to open a file in vim as read-only, the command is: vim -R filename. Table 16-1 lists common options for vim.
Table 16-1
Common Options for vim
| Option | Description |
-e |
Starts vim in line editor (ex) mode |
-i |
Starts vim in input mode |
+N |
Places the cursor on line number N of the first file specified |
+/pattern |
Places cursor on line that matches pattern, in first file |
-R |
File(s) opened in read-only mode |
-x |
Starts vim, prompts for a key with which to encrypt files as they are written to disk |
+ command |
Starts vi and runs the option provided on the loaded file, option can be invoked with a "-c " instead of "+" |
filename. . . |
Specifies a filename(s) to open/edit |
Tip
If the filename you supply vim does not exist, vim creates a new file. This is a handy way to load vim and start an editing session on a new file in a single command. To open a new or existing file in input mode, add the "-i" option to the command line:vim -i filename.
To ground all these abstractions in a real-world context, let's take a quick walk through a sample editing session. In order to have something of substance to experiment with, copy the file /etc/lilo.conf to your home directory. Then begin a vim editing session on the copy. Here's one way to accomplish this:
[bilbrey@bobo bilbrey]$ cp /etc/lilo.conf ~/.
[bilbrey@bobo bilbrey]$ vim lilo.conf
More Info
Thecpcommand creates a copy from the source file (listed first) to the destination file. When the destination file is designated by a period, the copy (retaining the source file name) is written in the current directory. To force a copy to be written in the root of a user's home directory, append ~/. to the destination name. See Chapter 17 for more details aboutcp.
Figure 16-1 shows the initial screen, following the execution of the previous commands. The contents of the file lilo.conf vary based upon the installed system configuration. The status line (the last line of the screen) displays the filename as well as line and character counts.
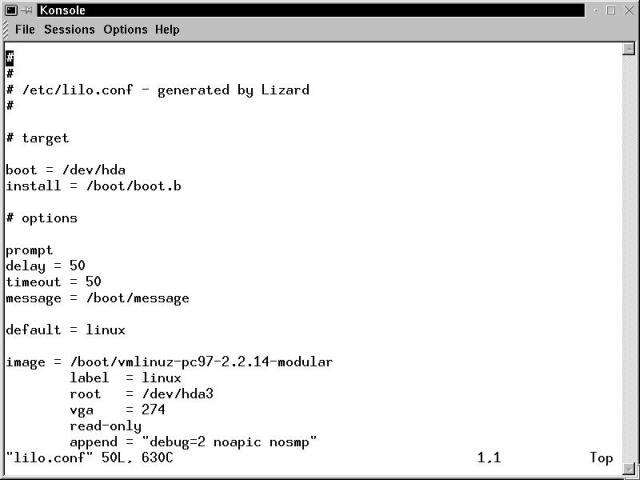
Figure 16-1
The initial vim screen with a file loaded, displaying a status line at the bottom of the window.
Vim uses what we term colon commands (because in many cases, a colon is the prefix to initiate a vim command) to read and write files into and out of the buffers. These buffers are where the actual document edits take place; they also provide user access to some advanced vim features such as online help. If vim is in the input or line modes, press Esc or Ctrl+c, respectively, to return to command mode in order to access these commands. The important commands that every user should know are listed in Table 16-2.
Context Information
Buffers are simply blocks of system memory vim controls. When you load a file, it's placed in one of these memory blocks. Any changes made to the file are made in the buffer. Only when a write command is issued (:w) are the changes physically saved to disk.
Table 16-2
Important vim Commands
| Command | Description |
:w |
Write buffer contents to file, prompt for name if required |
:w filename |
Write buffer contents to filename if file doesn't exist |
:w! filename |
Forced write of buffer, overwrite without prompting |
:q |
Quit buffer, provided no changes have been made |
:q! |
Force quit, discards changes to buffer |
:sh |
Open shell to execute commands outside of vim; to return to vim from the shell, type exit or press Ctrl+d. |
:help |
Open the online help file in a new buffer; :q quits help |
Simple cursor movement is accomplished either using the arrow keys, or via the keys h, j, k, and l. The letter key variants allow vim to be used at terminals that do not have fancy features such as cursor keys. Table 16-3 lists several common cursor positioning keystrokes and their associated actions.
Table 16-3
vim Cursor Positioning Commands
| Command | Description |
$ |
Move to the end of the current line |
0 |
Move to the beginning of the current line |
^ |
Move to the first non-whitespace on the line |
+ or Enter |
Move to the first non-whitespace on the next line |
- |
Move to the first non-whitespace on the previous line |
) |
Move to the end of the sentence |
( |
Move to the beginning of the sentence |
{ |
Move to the start of the next paragraph |
} |
Move to the end of the next paragraph |
w, W |
Move to the next word (right) |
b, B |
Move to the previous word (left) |
e, E |
Move to the end of a word |
H |
Move cursor to the top of the screen |
M |
Move cursor to the middle of the screen |
L |
Move cursor to the bottom of the screen |
h |
Move one character left |
j |
Move one line down |
k |
Move one line up |
l |
Move one character right |
nG |
Move cursor to line n |
G |
Move cursor to the end of file |
n| |
Move cursor to column n |
fx |
Move cursor to first occurrence of character x on the current line |
Fx |
Move cursor to last occurrence of character x on the current line |
; |
Repeat last 'f' or 'F' command |
Ctrl + b |
Move cursor up a full screen |
Ctrl + f |
Move cursor down a full screen |
Ctrl + u |
Move cursor up one half a screen |
Ctrl + d |
Move cursor down one half a screen |
Note the six word-positioning commands listed in Table 16-3 (w, W, b, B, and e, E). The lowercase entries are applicable to small words; the uppercase entries are applicable to big words. A small word is one that has alphanumeric or punctuation characters in it (not both), set off by whitespace (space, tab, carriage return) or punctuation. A big word encompasses the small word definition, and adds mixed alphanumeric and punctuation. This implies that the string /usr/local/src can be viewed as either one big word (set off by space at each end), or six small words (three slashes and three distinct strings).
Most movement commands can be combined with numeric prefixes, as illustrated by the G command. Thus, to move back five small words, type 5b. Typing 7$ puts the cursor at the end of the seventh line down from the current position. This also works with the screen position commands H, L, and M, in rather intuitive ways. 4H is the fourth line down from the top of the current screen, and 2L positions the cursor at the second line up from the bottom of the screen.
At the outset of your Vim experience, so many cursor commands might seem daunting. However, most users require just a little practice to start moving within files with a level of precision and control that is equivalent to or better than using a mouse.
In order to edit text, there must first be some text in the buffer. Files are edited in a workspace called a buffer. There can be multiple buffers, as we discuss shortly. Since the sample shown in Figure 16-1 has a file pre-loaded into the buffer, and the cursor is located at line one, column one, press i. This places vim in input mode, at the current cursor position. Type something random, press Enter, then Esc. Enter places a carriage return in the buffer, Esc terminates input mode, returning vim to command mode. Creating text is that simple. There are a few more immediately useful commands, though. These are listed in Table 16-4.
Table 16-4
vim Input Mode Commands
| Key(s) | Description |
i |
Inserts text before cursor location |
a |
Inserts text after cursor location |
o |
Inserts new line below current |
r |
Replaces current character |
c |
Changes text (variable) |
s |
Substitutes text |
I |
Inserts text before first non-blank |
A |
Inserts text after last character on line |
O |
Inserts new line above current |
R |
Overtypes text; input mode, overtype |
C |
Changes rest of line |
S |
Substitutes lines |
Of the commands listed, the most commonly used are the [a A i I o O] set, which effectively open a hole in the text buffer and allow text input at the specified location. The r command is exceptional in this list because it is a command for replacing a single character, thus typing rU replaces whatever character lies under the cursor with the letter "U". r is also the only command in the table which does not place vim in input mode, and does not require pressing Esc to terminate the session. The change and substitute commands are addressed in later sections of this chapter.
Vim has a small but powerful set of editing commands. We preface this section with two of the most crucial ones: press u to undo changes, and U to redo the previous undo. All of vim's delete and change functions are initiated from command mode. Recall that from input mode, pressing Esc returns the editor to command mode, and Ctrl+c interrupts line mode.
The keys d and x are the foundations of the deletion command set. dd deletes the current line. x deletes the character under the cursor. D deletes from the cursor location to the end of the line. All other deletions are combinations and permutations of d or x with numeric counts and cursor positioning commands. Some possibilities are disallowed, and vim beeps the console when an invalid combination is attempted. Table 16-5 lists a few examples of deletion.
Table 16-5
Sample vim Delete Commands
| Command | Description |
d+ |
Delete the current and following lines |
d$ |
Delete to end of line |
d0 |
Delete to beginning of line |
dG |
Delete from current location to the end of file marker |
d5w |
Delete the current and next four small words |
d4 |
Delete the current and 3 previous lines |
17x |
Delete the current character and the 16 following characters |
Some of these usages may seem rather obscure or perhaps just useless. In fact, text deletion multiplication is possible. The command 3d5w deletes three times, the next five small words, for a total of 15 small words deleted. Odd permutations are common in vim, but this flexibility is also what makes this editor so popular. The premise is that by knowing few basic commands and keystrokes, complex operations can easily be derived and strung together for powerful results.
Changing text is similar in form to that of text deletion. Specify how much of the text to change, with a numeric value plus a cursor position pattern. vim enters input mode, allowing typed text to replace that string which has been extinguished. To complete the change process, press Esc. For example, start at the beginning of a line (by pressing 0) and type c3$. This deletes the current and following two lines, and puts vim in input mode, awaiting keystrokes. c is the shortcut signaling the intent to change the rest of the line, starting at the cursor position. Vim's input mode signals itself by displaying the following string in the status line at the bottom of the screen:
-- INSERT --
While vim is in insert mode, type the replacement text then terminate the text entry by pressing Esc. As with deletion, there are many possible combinations of the change command. Know the rules of combination (by experimentation and practice) and the whole of vim kneels at your feet, figuratively speaking.
y, p and P. As with change and delete, yank and put work in conjunction with position commands and count modifiers to create an extensive range of behavior. For instance, y5w copies the current and next four small words into the yank buffer. The command yy yanks the current line. Please note - yank does not mean delete. In other terms, it provides the functionality of a copy to clipboard feature.
p places yanked text after the current cursor location, P (note the capitalization) places text before. The contents of the yank buffer remain unchanged until another yank operation overwrites the previous contents. Thus, it is easy to make a single copy of some text, from a word to several lines, and put (or paste) it several times throughout a file. There are variations in the p/P behavior depending on whether the contents of the yank buffer are line or text oriented. That is, a yanked line is inserted by p after the current line, whereas yanked text (not encompassing a carriage return) is inserted after the current character. So executing a 3yyp puts the three yanked lines after the current line, whereas 3yyP puts the lines prior to the current line, leaving two distinct copies of three lines, rather than two jumbled copies.
Note
Most of vim's commands are case sensitive. For example, d and D are two distinctly different commands. The first is the delete operator and is paired with another letter to indicate the extent of the deletion (i.e., dw deletes the current word); the second, D, deletes to the end of the current line.
Named buffers are a useful adjunct to the yank and put commands. Alone, yank and put work with the primary, unnamed buffer that is overwritten every time it is addressed by a yank, limiting it's utility. There are 26 named buffers, which are addressed by "a through "z. To use named buffers, prefix a yank command with the buffer name. For example, "a3yy copies the current line, and two following lines to the named buffer "a. "aP then puts the contents of that buffer before the current line.
More Information
The concept of "named buffers" is often misunderstood (or not understood at all) by users new to Linux. As noted earlier in this section, a buffer is a memory location controlled by vim. A named buffer is simply a buffer that can be explicitly referenced, using the name provided. So what's the big deal? Named buffers allow you to cut/copy one or more blocks of text to memory, and insert this text (repeatedly, if so desired) into a different location in the same document, or a different document entirely. The double quote preface discussed above is the "key" that signifies to vim you're using a named buffer.
When text is yanked to a buffer, and the buffer is addressed in upper case, the new yank is appended to the previous contents of the buffer. Here's some sample text and an example:
image = /boot/vmlinuz-pc97-2.2.10-modular
   label   = linux
   root    = /dev/hda1
   vga     = 274
   read-only
   append  = "debug=2 noapic nosmp"
Suppose that several copies of the previous text are required in the file, without the VGA line present. Position the cursor on the line beginning with image. Type "a3yy. The "a buffer contents are now:
image = /boot/vmlinuz-pc97-2.2.10-modular
   label   = linux
   root    = /dev/hda1
Now position the cursor onto the "read-only" line. Type "A2yy to yank the last two lines of the block, appending them to the initial three lines in the "a buffer. Position the cursor in an open portion of the working buffer and type "aP to paste the named buffer contents. This confirms that the contents of the "a buffer are as follows:
image = /boot/vmlinuz-pc97-2.2.10-modular
   label   = linux
   root    = /dev/hda1
   read-only
   append  = "debug=2 noapic nosmp"
The search and replace functions used in vim contain that unique mix of power and ease of use. The search function (initiated by a single slash: /) can be used as a tool to move quickly through a file, coupled with the replacement command for specific words, or generalized even further through the use of regular expressions (regex's), which tap the power of pattern matching. In this section, we offer some insight into the form and function of these commands. The following text is used to demonstrate various searches. Line numbers are added for your convenience only - they don't exist in the original file.
1   #
2   # /etc/lilo.conf - generated by Lizard
3   #
4
5   # target
6
7   boot = /dev/hda
8   install = /boot/boot.b
9
10  # options
11
12  prompt
13  delay = 50
14  timeout = 50
15  message = /boot/message
16
17  default = linux
18
19  image = /boot/vmlinuz-pc97-2.2.10-modular
20     label  = linux
21     root   = /dev/hda1
22     vga    = 274
23     read-only
24     append = "debug=2 noapic nosmp"
25
26  image = /boot/vmlinuz-pc97-2.2.10-modular
27     label  = linux
28     root   = /dev/hdc1
29     vga    = 274
30     read-only
31
Searching is initiated from command mode by typing /, followed by the text to be searched for. Position the cursor on the first line of the file, type /root, then press Enter. This is a basic search, and moves the cursor to the 'r' in the "root" on line 21. Type / again, followed by Enter. This repeats the previous search, starting from the current position and ending up on line 28. Searching is intuitive to use: straightforward, easy, and obvious. Additionally, there is the pattern matching utility of regular expressions to make searching for specific text strings even faster.
For example, position the cursor at the beginning of the file again by typing 1G in Command mode. Then type /r.*c followed by Enter. The cursor should be on line 28 again, having skipped over the intermediate root. Here's how this trick works: '/' search, look for 'r', followed by '.'any character, '*' O or more of the previous character, 'c'. That skips over the first "root = ..." line, since there's no 'c' there. We picked an example that works well in the given file, but is sufficiently cryptic for the uninitiated.
The search and replace command takes the following form:
:[x,y]s/pattern/replacement/flags
This searches for a pattern, optionally between lines x and y, and replaces all instances of pattern with replacement. Line number specifications can be replaced with the character %, which means to search the complete file. Common flags include g, which replaces all instances of the search pattern on every line (without this flag, vim will only replace the first occurrence it finds on each line), and c, which prompts for a confirmation for each replacement. For example,
:[2-5]s/recieve/receive/gThis replaces all occurrences of recieve with receive between lines 2 and 5, inclusive. Additionally, the first line number can be omitted (but not the comma), which indicates that matching starts with the current line. The dollar sign '$' represents the end of file in this context. To search from the current line to end of file, the specification would be :,$s/... For more information on patterns and searching, look through the online help file (type :help from command mode) and read the section on patterns and searching.
A filter command accepts some text as input, and returns text as output. For an example of the possibilities of filters, create an empty line at the top of the file by typing the following sequence: 1GO (go to first line of file, open a new line for input above the existing line). Then type ls -al and press Esc to terminate input mode.
Now, type !!sh and press Enter. The !! takes the contents of the current line and passes them to the specified filter (in this case, sh). The contents of the line are replaced by the result returned from the filter, which is a long form directory listing. Try this exercise again, with the line reading who.
Lines can be passed through a variety of filter commands. Sort is a proper example of a filter program. Type a list of random words, one per line, ten lines' worth. Position the cursor on the beginning word of the list and type 10!!sort and press Enter. In our trial of this example, we got the following results:
    one                           eight
    two                           five
    three                         four
    four                          nine
    five     --> 10!!sort -->     one
    six                           seven
    seven                         six
    eight                         ten
    nine                          three
    ten                           two
Text filters are very handy tools to have hanging on the work belt. A quick alphabetical sort is often the fastest way to make sense of an otherwise confusing list. Experimentation is recommended to learn more about the filtering capabilities of vim.
The vi and vim family of text editors have significant capabilities. In the preceding section, we only touch on some of these capabilities. There's more to discover, and the following list of online and system resources should facilitate learning about vim.
vim :: Further Resources
System Resources:
Type man vim from the command line in Linux
Type :help from command mode while running vimOnline Resources (vim and vi):
http://www.linuxdoc.org/HOWTO/Vim-HOWTO.html
http://www.math.fu-berlin.de/~guckes/vim/
http://www.thomer.com/thomer/vi/vi.htmlOn Dead Trees:
Learning the vi Editor, Linda Lamb and Arnold Robbins (O'Reilly and Associates)
Emacs is a different breed of editor. It first appeared on the computing scene as Multics Emacs, running on Honeywell systems in the late 70s. James Gosling, of Java fame, wrote a version known as Gosling Emacs, now owned by Unipress. Richard Stallman wrote the most common version - GNU Emacs. XEmacs (once Lucid Emacs) is the version that is included with OpenLinux eDesktop 2.4.
Over the years, Emacs has evolved beyond the common boundaries of a simple text editor. Current versions of Emacs are often referred to as "integrated operating environments." Emacs supports a diverse range of features including the following:
One of the big draws of Emacs is the diverse range of platforms it has been ported to, including Windows, MS-DOS, Solaris, SunOS, OpenBSD, FreeBSD, GNU/Linux, the MacOS, and Ultrix. This cross-platform support allows developers to work with a familiar interface on just about any operating system they choose.
Due to the depth and complexity of Emacs, we can only provide you with a passing glance at a few of the basic text editing features of this program. If what you read in the following pages piques your curiosity, we suggest consulting one of the resources at the end of this section as a starting point for further exploration.
As noted above, eDesktop ships with XEmacs, version 21.1. Note that this is not GNU Emacs, but an offshoot of the same code tree from another source. Many users share the common misconception that there are two distinct versions of Emacs on their system - XEmacs and "non-graphical" Emacs. Not so. Both installed "versions" are XEmacs. The command emacs is simply a symlink to xemacs that appends the -nw startup option.
To start XEmacs from a virtual console (Ctrl+Alt+Fn under KDE) type emacs. From a KVT terminal window type emacs -nw (the -nw option prevents Emacs from loading in GUI mode; to start the program as Xemacs, leave off the option). Figure 16-2 shows the Emacs opening screen in a KVT window.
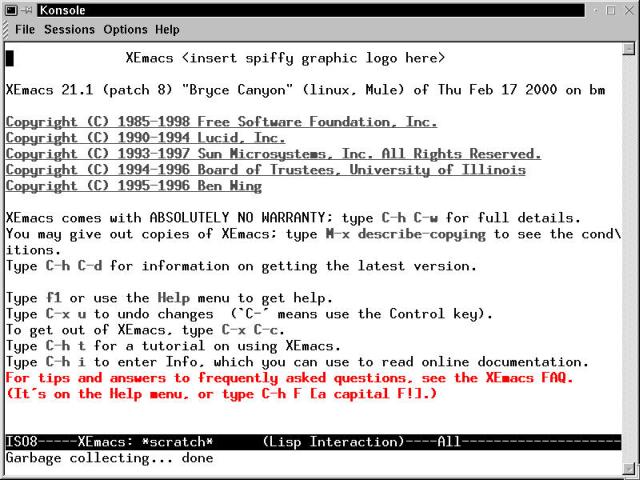
Figure 16-2
The opening Emacs screen shows you how to get help and quit.
The Emacs interface is initially divided into three distinct regions. The upper section of the screen is the main editing area, also called the buffer. We'll get to buffers and their role in Emacs later in this chapter under "Buffer Secrets."
Below the open buffer, shown in reverse video, is the mode or status line. This displays the buffer contents, the editing mode, the line number of the cursor's current position, and the percentage of file currently in view. Emacs supports several different editing modes: Fundamental (for plain text files), RMAIL (to read e-mail), C (for editing C source code), and so on. Each editing mode has its own set of keystrokes and related commands. Generally speaking, Emacs determines the correct mode to use based on the contents of the buffer.
Under the status line is the Echo Area, used for command input, command result messages, and error messages. The Echo area is also commonly referred to as the mini-buffer.
Emacs has an extensive command set that is accessed either by typing a command directly in the echo area, or by entering a series of keyboard shortcuts. Emacs macro command names are generally intuitive, even the more complex ones. For example:
forward-sentence
insert-file
backward-sentence
capitalize-word
Keyboard shortcuts in Emacs are referred to as key bindings, and come in two distinct varieties, each beginning with a control character. The first uses the Ctrl key, and is represented in both program help files and Web-based documentation by the character "C". So what would typically be written as Ctrl + x Ctrl + c (the key sequence to terminate an Emacs session) is represented in the Emacs documentation as C-x C-c.
The second control character used by Emacs is the Meta key, represented in the online documentation by the letter "M". The key binding written as M-d (kill or delete the word above the cursor) is translated as: Alt + d. Another way of accessing the Meta functions is by pressing and releasing Esc, then pressing the appropriate letter.
More Info
If you select the104-key keyboard option when installing OpenLinux 2.4 and have a keyboard with a so-called Windows key, this key will function as the Meta key. While some consider this a bug, it's a handy bug to be aware of.
Note the distinction here - using Alt or Ctrl requires you hold down the control key and press a letter. Using Esc is a sequential process; simply press and release the Esc key, then type the next letter or command. For consistency with the Emacs documentation, we use the C-x and M-x conventions for the balance of this section.
The best help resource when you're working in Emacs is Emacs itself. The program includes an excellent tutorial that can be displayed by using the command C-h t. In addition to the tutorial, the Emacs help system also provides a list of common key bindings. Type C-h b to open a split window listing the key bindings in the lower half of the editor screen as shown in Figure 16-3.
Warning
When running Emacs in a console, the help commands are accessed beginning with the C-h letter. When running in a terminal under KDE, instead useM-xhelp letter, since theC-his interpreted in the X environment as a backspace.
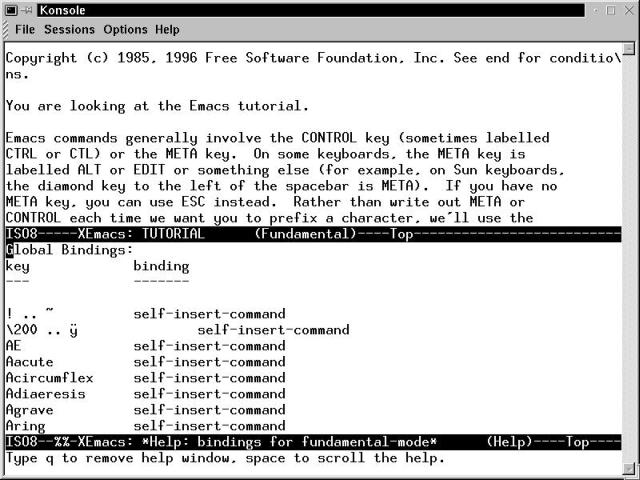
Figure 16-3
The Emacs editor shows a split window; the upper window displays the tutorial, and the lower window lists the program's key bindings.
In addition to the tutorial and key bindings, Help Apropos (C-h a) helps you find a command by supplying a concept, Help Character (C-h c) describes what command is associated with a given keystroke sequence, and Help Function (C-h f) describes a given function specified by name.
Hint
Figure 16-3 also illustrates a prominent feature of Emacs - the ability to have more than one window (or buffer) open at a time. To navigate between multiple open windows typeC-x oto shift the cursor focus to the next window andC-vto scroll the contents of the active window.
If you're unfamiliar with Emacs and simply want to take the program out for a test drive, Table 16-6 lists the important commands you'll need to get started.
Table 16-6
Essential Emacs Commands
| Key Binding | Emacs Command | Description |
C-h |
help-command | Get to online help |
C-x C-c |
save-buffers-kill-emacs | Exit Emacs |
C-x C-f |
find-file | Open a file |
C-x C-s |
save-buffer | Save a file |
C-g |
keyboard-quit | Halt a command |
C-p |
previous-line | Move up one line |
C-n |
next-line | Move down one line |
C-f |
forward-char | Move forward one character |
C-b |
backward-char | Move back one character |
C-d |
delete-char | Delete character under cursor |
Del |
backward-delete-char | Delete previous character |
Note that in Table 16-3, the Delete key is listed as acting on the character prior to the cursor, not the character under the cursor, as might be expected. This is because in console configurations, the Backspace key is bound to the keys C-h, which invokes help.
Buffers are a mainstay of the Emacs editor. Text files are visited (Emacs-speak for opened) and edited in buffers. Multiple buffers in different windows can exist within a single terminal window. Understanding buffer operations is central to effectively using Emacs. To display the Buffer List, type C-x C-b. You should see something similar to Figure 16-4.
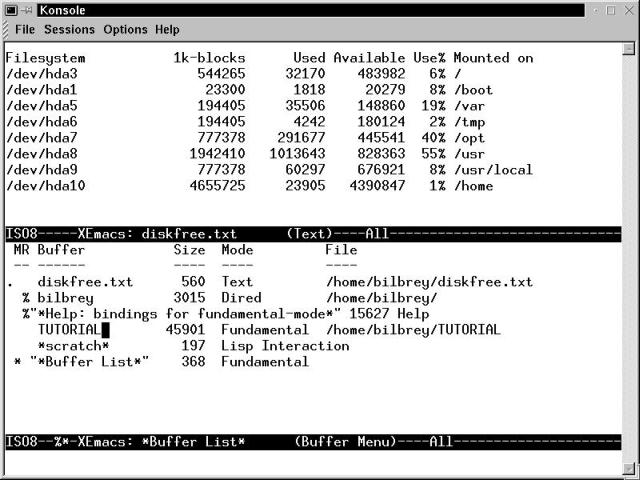
Figure 16-4
The Emacs editor showing the Buffer Menu screen.
To make a buffer active, type C-x b buffer (where buffer is a buffer name, or at least enough of one for tab completion). Kill a buffer by typing C-x k buffer (leave the buffer name off to kill the current buffer). For more complex buffer manipulation, type M-x buffer-menu to open a buffer window (see Figure 16-4). Use the cursor keys to move around the list and the commands listed in Table 16-7 to mark or act on a selected buffer.
Table 16-7
Commands for Marking or Acting on Selected Buffers
| Command | Description |
|
d Marks a buffer for deletion |
|
s Saves the selected buffer |
|
m Marks the buffer to open in a new window |
q |
Exits the buffer menu |
1 |
Immediately opens the selected buffer in the current window |
|
Opens the selected buffer in the current window, plus any other buffers marked with the m command Emacs file operations |
The command to open a file in Emacs is C-x C-f. The prompt in the mini-buffer displays Find file:. At this point, two options are available. Enter the name of the file to open, using tab completion as appropriate (as discussed in Chapter 15). Alternatively, press Enter at the initial Find file: prompt, which opens a new buffer displaying the contents of the user's default directory. Position the cursor on either a filename or a directory using the cursor keys and press Enter to load your selection.
Other file selection choices include C-x C-r, which opens a file in read-only mode, and C-x 4 f, which splits the buffer window and opens a file in a new window. The command C-x C-v (find-alternate-file) overwrites the current buffer with the selected file.
In contrast with vi and vim, Emacs is a modeless editor. What this means is that when a file is opened in Emacs, it is placed in a buffer and is immediately available for editing. To insert text, just start typing. Press the Insert key to toggle between insert and overwrite modes. This toggles the string "Ovwrt" in the status line for the affected window.
In Emacs-speak, the cursor position is referred to as point, which is the location in the file between the character under the cursor, and the character to the left of the cursor. The arrow keys function for standard up, down, right and left movement. Table 16-8 summarizes the commands for moving the point around a document.
Table 16-8
Emacs Point Motion Commands
| Keystroke | Description |
|
C-f Moves forward one character |
|
C-e Moves to the end of the line |
|
M-f Moves forward one word |
|
C-n Moves down one line |
|
M-> Moves to the end of the buffer (file) |
|
C-b Moves back one character |
|
C-a Moves to the beginning of current line |
|
M-b Moves back one word |
|
C-p Moves up one line |
|
M-< Moves to the start of the buffer (file) |
In Table 16-8, note that C-n, which moves the point down one line, does so even from the last line of the file, creating a new line and moving to it. The point moves relative to objects or landmarks in the buffer. So to find out how to move forward or back one paragraph at a time, use the help command. This is accessed by typing C-h A expression, where expression is, in this example, paragraph. The output from the help request is placed in a new window for viewing. A little investigation reveals that Alt +{ and Alt + } moves the cursor backward and forward by paragraphs, respectively.
Deleting, or killing, text in Emacs places it in a special buffer called a kill ring. Text can be resurrected from this kill ring by using the yank command, similar to vim. One distinct advantage of Emacs' concept of the kill ring is that it spans buffers. This allows text killed in one buffer to be yanked in another. Changes to the text by killing, deleting, and moving can be undone with the keyboard sequence C-x u. Table 16-9 lists some common kill commands.
Table 16-9
Common kill Commands
| Command | Description |
C-k |
Kill from point to newline |
M-d |
Kill the word the cursor is on |
M-Del |
Kill previous word |
M-k |
Kill the sentence the cursor is on |
There is a general-purpose kill command, kill region (M-w), which cuts all text between the current point and a subsequent mark and places it in the kill ring. To set a mark at the current point in a buffer press C-Space (Ctrl plus the Spacebar). Then move the point to a different location (thus defining a region between the current point and the mark) and press C-w. The marked region is deleted from the working buffer and sent to the kill ring.
The kill ring operates as a (nearly) bottomless stack. Cut text is pushed onto the top of this stack, and can be accessed by the command C-y, which places a copy of the most recently killed text at the point. The point then moves to the end of the yanked text. If text further down the ring is required, then follow the initial C-y with M-y (known as yank-pop), repeating until the desired killed text is yanked. The yank-pop command can only immediately follow a yank or a previous yank-pop.
Consecutive kill commands are automatically appended to the kill ring. Execute several C-k commands in a row, killing multiple lines. Now press C-y and all of the cut lines are yanked in one fell swoop. There are other ways to append text into the kill ring. They can be found with a little spelunking through the Emacs resources provided at the end of this section.
The Emacs search command operates in an incremental mode, similar to that described in the vim section earlier in this chapter. Typing C-s initiates a forward search; C-r starts a backward (towards the front of the document) search. When you've reached the intended target, press Enter to exit the search command. To cancel an incremental search and return to your original starting point in the document, type C-g.
Using lilo.conf as an example, let's explore incremental searching. Typing C-s followed by ima generates enough unique characters to locate the image = line. In the following listing, each progressive area of bold text indicates the position of the cursor after the entry of a character. Note after typing i, the il is bolded; this indicates not only the up-to-the-moment search location, but also the closing position of point (in this case, between the i and l) were the search to be terminated. C-r works to search in reverse, from point towards the beginning of the document.
1   #
2   # /etc/lilo.conf - generated by Lizard
3   #
4
5   # target
6
7   boot = /dev/hda
8   install = /boot/boot.b
9
10  # options
11
12  prompt
13  delay = 50
14  timeout = 50
15  message = /boot/message
16
17  default = linux
18
19  image = /boot/vmlinuz-pc97-2.2.10-modular
20     label  = linux
21     root   = /dev/hda1
22     vga    = 274
23     read-only
24     append = "debug=2 noapic nosmp"
25
If an incremental search doesn't fit your needs, then search (forward or back) non-incrementally by pressing Enter immediately following a C-s or C-r command. This passes an empty first argument to the search command and instructs it to perform a search without moving through the file as text is entered.
Additionally, C-M-s and C-M-r invoke regular expression searches. Regular expressions (regexs) are a method of specifying a pattern to match text. Regexs are explored in more detail in Chapter 17. Standard search and replace is accomplished by typing:
M-x replace-string Enter string Enter newstring Enter
or
M-x replace-regexp Enter string Enter newstring Enter
The second search expression is based on a pattern rather than an exact string match. Both of these commands replace every match within the buffer from the point (cursor) forward to the end of the file. In order to get a prompt from Emacs for each individual replacement, use M-x query-replace... or M-x query-replace-regexp... In Figure 16-5, the mini-buffer at the bottom of the screen shows a partially completed macro command.
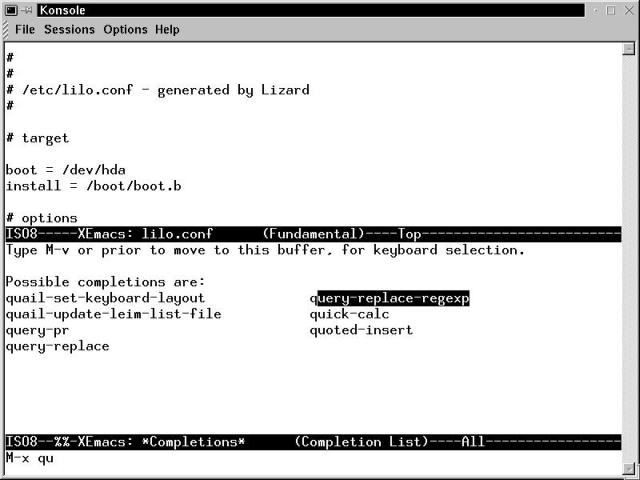
Figure 16-5
Locating an Emacs macro using the completions window.
Pressing Tab with a partial entry opens the completions window (shown above the status line) listing all of the macro commands that are possible given the current entry. The complete macro name can be identified and typed. Alternately, type M-v to shift the focus to the completions window, use the arrow keys to highlight the desired function, and press Enter to select a command. If there is only one possible entry for the supplied text, then the whole command is completed in the mini-buffer without opening a completions window. This is a useful way of finding or narrowing down a search for a function.
The most challenging aspect of Emacs is the vast set of features, add-ons, and functionality that have been added to the original program over the years. Some of the features may seem counterintuitive at first use, and only make sense with continued practice. Like any other activity, however, "practice makes perfect." The following section presents further resources for learning more about the Emacs editor.
Emacs: Further Resources
Emacs :: Further Resources
System Resources:
Typeman emacsfrom the command line
TypeCtrl+h tfrom within Emacs to run the tutorialOnline Resources:
http://www.linuxdoc.org/HOWTO/Emacs-Beginner-HOWTO.html
http://www.gnu.org/manual/emacs/On Dead Trees:
Learning GNU Emacs, Cameron, Rosenblatt and Raymond, (O'Reilly & Associates)
Like the other editor programs discussed in this chapter, Joe is an ASCII-text screen editor. In sharp contrast with Emacs, Joe does one thing and one thing only - edit text. And it does this very well. Joe is a useful addition to the stable of Linux editors for one reason: the keymap. Joe's command set and operating modes are patterned on the editors from MicroPro (Wordstar) and Borland (the editor in the Turbo line of IDE products). Many Linux users migrating from the DOS/Windows side of the fence have a passing familiarity with the use of these editors, which eases the transition into GNU/Linux.
Joe is not included in the current OpenLinux distribution package, but we put this lack to use in the following section by showing you how to download the requisite file and compile the program.
The following listing is a complete script capture of the ftp session, including decompressing the file, creating the makefile, and compiling the source code. The text in bold is what you type, word for word, space for space. Entries in bold italic should be filled in with the appropriate information based on the local installation. The downloaded filename may change (in particular, the version number); this would necessitate adjusting the tar command accordingly. The vertical ellipsis indicates removed material that is of no value to the functionality of the example.
From an open terminal window (the vertical ellipsis indicates removed largely irrelevant material):
[bilbrey@bobo bilbrey]$ ftp -i ftp.std.com
   Connected to ftp.std.com.
   220 ftp.std.com FTP server (Version wu-2.4(24) Thu Jun 27 21:48:03 EDT 1996) ready.
   Name (ftp.std.com:root): anonymous
   331 Guest login ok, send your complete e-mail address as password.
   Password:yourid@youremaildomain.whatever
   230-
   230- Hello!
      *
      *
      *
   230 Guest login ok, access restrictions apply.
   Remote system type is UNIX.
   Using binary mode to transfer files.
   ftp> cd src/editors
   250 CWD command successful.
   ftp> mget joe*
   local: joe2.8.tar.Z remote: joe2.8.tar.Z
   200 PORT command successful.
   150 Opening BINARY mode data connection for joe2.8.tar.Z (322108 bytes).
   226 Transfer complete.
   322108 bytes received in 6.36 secs (49 Kbytes/sec)
   ftp> exit
   221 Goodbye.

[bilbrey@bobo bilbrey]$ tar zxvf joe*tar.Z
joe/
joe/.jmacsrc
      *
      *
      *
joe/zstr.c
joe/zstr.h
joe/terminfo

[bilbrey@bobo bilbrey]$ cd joe

[bilbrey@bobo joe]$ make
cc conf.c -o conf
./conf /usr/local/lib 0
cc -O   -c b.c -o b.o
      *
      *
      *
ln joe jpico

[bilbrey@bobo joe]$ su
Password: YourRootPasswordHere
[root@bobo joe]# make install
cc -O   -c termidx.c -o termidx.o
      *
      *
      *
chmod a+r /usr/local/lib/terminfo

[root@bobo joe]# exit
exit

[bilbrey@bobo joe]$ joe
There you have it. One of the tasks most feared by new Linux users - acquiring, compiling, and installing new software, is complete. It isn't always this straightforward, but the previous example should provide a reasonably accurate template for reference.
Some versions of OpenLinux produce the following error when Joe is invoked in a KDE Virtual Terminal (kvt) window:
Sorry, your terminal can't do absolute cursor positioning. It's broken.
The fix requires two minor changes to the Joe Makefile, and a recompilation of the program code, which is a relatively straightforward process. Using any text editor, open the file called Makefile in the directory where the Joe source files were un-tarred.
Locate the reference toTERMINFO = 0 and change the entry to TERMINFO = 1. Move down roughly 28 lines, and change the EXTRALIBS = line to read: EXTRALIBS = -lcurses. Now save the changes and return to the command line. Next, execute the following sequence of commands:
make clean
make
su
make install
Joe now operates in both kvt and xterm windows with correct absolute cursor positioning. The Joe editor is shown running in Figure 16-6.
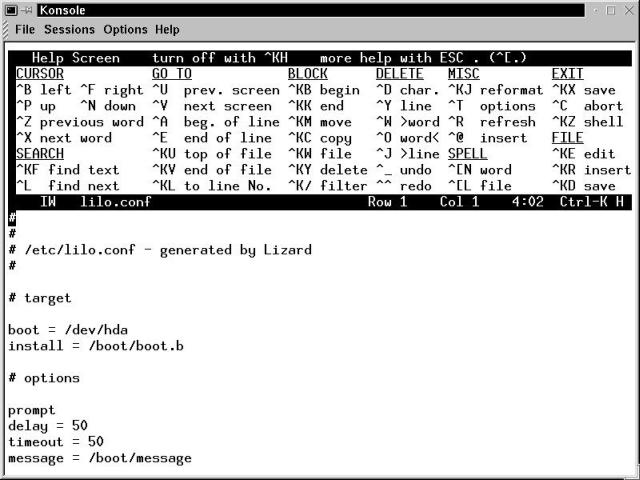
Figure 16-6
The Joe editor, shown in a terminal window with its help facilities enabled.
Joe is a modeless editor (like Emacs, unlike vim). Thus, text input is the default behavior. Joe is a small footprint (memory and CPU) program, without many of the extended features of the vim and Emacs editors. What we like about Joe is just that - its simplicity combined with its modeless operating paradigm. Conceptually, the modeless method of text editing is closer to the operating paradigm of GUI editors.
To start Joe and load a file, open a terminal window and type:
joe [filename]
To open an existing file from within Joe, the keyboard sequence is Ctrl + k e (hold down the Ctrl key, press k, release both, then press e). This generates a prompt at the bottom of the screen for the filename to edit. If you do not know the exact spelling or location of the file, two options exist:
Firstly, you can press Tab. This generates a file/directory list below the prompt. Use the cursor keys to navigate through the directory tree. Pressing Enter with the cursor on a file moves it to the end of the open prompt line. Press Enter a second time to load it into Joe. Alternatively, you can invoke a command shell from within Joe at any time by typing Ctrl + k z. Once in the shell, all the normal directory navigation commands work as expected. To return to Joe, simply type fg (to bring the process back into the foreground).
Hint
There are situations where you want to use joe to simply view a file, not change it. Although you could just invoke joe as usual, this would be dangerous, since you might accidentally alter the file and unthinkingly save it. To avoid this, use the-rdonlyoption before the file name on the command line. For example,joe x -rdonly ybrings up joe with two sub-windows, each containing one file, but the second one carries the notation "(Read only)" and does not allow you to change the file.
To move around in an open document, use the arrow keys. If you are working from a terminal lacking cursor keys, the mnemonic to remember is forward, back, previous and next:
Ctrl + z moves the cursor to the beginning of the previous word, Ctrl + x to the next. Ctrl + a and Ctrl + e change position to the beginning and end of the line. Ctrl + u and Ctrl + v move the cursor up and down a screen at a time, respectively.
To enter text, position the cursor and simply just type. To erase existing text to the left of the cursor, use Backspace or Ctrl + h. To delete text under and forward of the cursor, use Ctrl + d. Undo is executed by pressing Ctrl + _ (that is, "Ctrl + Shift + -", a case sensitive sequence). Ctrl + 6 is redo.
When your edits are complete, press Ctrl + k d to save the file. A prompt appears at the bottom of the editor screen allowing you to enter a new filename, or save an existing file with the same name. Ctrl + k q closes Joe, prompting you to save or discard any changes. Ctrl + k x saves the loaded file and exits without any further prompts. Use this last command with some caution, especially if you have any reservations about committing the changes.
If you forget a keyboard command, the online help window can be displayed by typing Ctrl + k h. This reduces the amount of screen space available for editing a file, but is a useful reference for learning the basics keystrokes and conventions of Joe. One piece of information to be aware of while working with Joe - the control commands are not generally case-sensitive (exceptions are noted).
Ctrl + y deletes the whole current line, including the newline character. This leaves the cursor at the beginning of the following line. Ctrl + j deletes the contents of the line between the cursor and the newline, leaving the cursor at the end of the truncated line.
Word deletion is accomplished by pressing either Ctrl + w to delete the word (or portion of a word) to the right of the cursor. Ctrl + o is the command to delete the word to the left of the cursor. The definition of "word" in this context is similar to that of the Emacs small word. A word is any contiguous segment of whitespace, punctuation, or alphanumeric characters, with a break indicated by one of the other types. The following line has eight words in it, not counting the newline at the end (which is counted as whitespace):
message = /boot/message
Blocks define a region of text to perform an action on and are at the core of working effectively with the Joe editor. To mark the beginning of a block, press Ctrl + k b. Ctrl + k k marks the end of a block, which must be closer to the end of the file than the beginning mark - blocks are directional. There can only be one marked block in the file at any given time.
To delete a block, press Ctrl + k y. To copy the contents of the marked block to the current cursor location, use Ctrl + k c. Ctrl + k m moves a marked block to the current location. Both of these leave the marked block at the new location. To write the contents of the marked block out to a file, press Ctrl + k w. Joe has no explicit cut and paste commands, no named buffers or kill rings. One method we have used in the past is to mark a block of text that will be used frequently, and press Ctrl + k w to write it to disk as a file. It can then be retrieved as desired with the Ctrl + k r command.
Filtering the marked block in a mode similar to that shown in the vim section can be accomplished using Ctrl + k / to initiate the command. For example, if a block of text needs to be converted to uppercase, use the following command sequence:
Ctrl+k / tr a-z A-Z
This command is interpreted to filter the marked block of text through the Unix tr (translate) filter, substituting capital letters in place of lowercase letters.
Joe :: Further Resources
Joe is a simple, useful editor. The following resources provide further assistance in learning this tool. One especially useful reference is the first listed online resource: a Joe Command Reference.
System Resources:
Type man joe from the command line.
From within joe, type Ctrl + k h to open the Joe help window, Esc . (Esc + period) to move to the next help window, Esc , (Esc + comma) to access the previous help window.Online Resources:
http://metalab.unc.edu/pub/Linux/docs/faqs/Joe-Command-Reference
http://heather.cs.ucdavis.edu/~matloff/joe.html
There are a multitude of console text editors for use in GNU/Linux. We provide introductory coverage of just three. Vim and Emacs ship standard with the current OpenLinux distribution. Last, but not least, joe is a capable small editor with a set of key commands that is familiar for some users migrating from the DOS side of the fence. This chapter covered the following points:
Go to the Table Of Contents