3.13. Building the Application Shell

Now that the main XUL widgets and some crucial concepts like the box model have been described, you can bring things together and create an application shell, a user interface that isn't (yet) hooked up to application code, but which can be re-used for different applications.

The XUL in Example 3-22 extends the xFly application work you've already done in Chapter 2. It defines the interface for a viewer that will let you browse the examples in this book, giving xFly a measure of introspection. Examine the code closely in Example 3-22 to give yourself a feel for how the elements in the UI interact with each other to form something that is greater than the sum of its parts. Look particularly at how box elements are used such as vbox, hbox, tabbox, and statusbar.

Example 3-22. xFly application main workspace

<?xml version="1.0"?>
<?xml-stylesheet href="chrome://global/skin" type="text/css"?>
<?xml-stylesheet href="chrome://xfly/skin" type="text/css"?>
<?xul-overlay href="chrome://xfly/content/xflyoverlay.xul"?>
<!DOCTYPE window SYSTEM "chrome://xfly/locale/xfly.dtd">
<window title="&window.title;"
  xmlns:html="http://www.w3.org/1999/xhtml"
  xmlns="http://www.mozilla.org/keymaster/gatekeeper/there.is.only.xul"
  type="xfly:main"
  width="800"
  height="600"
  onload="onLoad( )">
<script type="application/x-javascript" src="chrome://xfly/content/xfly.js" />
<stringbundle id="bundle_xfly" src="chrome://xfly/locale/xfly.properties"/>
<toolbox>
  <menubar id="appbar">
    <menu label="xFly">
      <menupopup>
        <menuitem label="Close" oncommand="exitxFly( )"/>
      </menupopup>
    </menu>
    <menu label="Examples">
      <menupopup>
        <!-- items to go here -->
      </menupopup>
    </menu>
    <menu label="Help">
      <menupopup>
        <menuitem label="About" oncommand="doAbout( )"/>
      </menupopup>
    </menu>
  </menubar>
</toolbox>
<hbox flex="1">
  <vbox id="left-frame">
    <tree id="example-tree" />
    <hbox align="start">
      <image src="chrome://xfly/skin/images/logo5.gif" />
    </hbox>
  </vbox>
  <splitter collapse="before" resizeafter="grow" persist="state">
    <grippy />
  </splitter>
  <tabbox id="raven-main-tabcontent" flex="1" orient="vertical">
    <tabs orient="horizontal">
      <tab id="tab-view" label="View Example"/>
      <tab id="tab-source" label="View Example Source"/>
    </tabs>
    <tabpanels flex="1">
      <iframe id="right-frame" name="right-frame"
      flex="3" src="chrome://xfly/content/examples/2-1.xul"/>
      <iframe id="right-frame-source" name="right-frame-source" 
          flex="3" src="view-source:chrome://xfly/content/examples/2-1.xul"/>
    </tabpanels>
  </tabbox>
</hbox>
<statusbar id="ch3-bar" persist="collapsed">
  <statusbarpanel class="statusbarpanel-iconic" id="book-icon"/>
  <statusbarpanel id="status-text" label="Thanks for reading the book!"
      flex="4" crop="right"/>
  <statusbarpanel class="statusbarpanel-iconic" id="example-status" flex="1"/>
</statusbar>
</window>

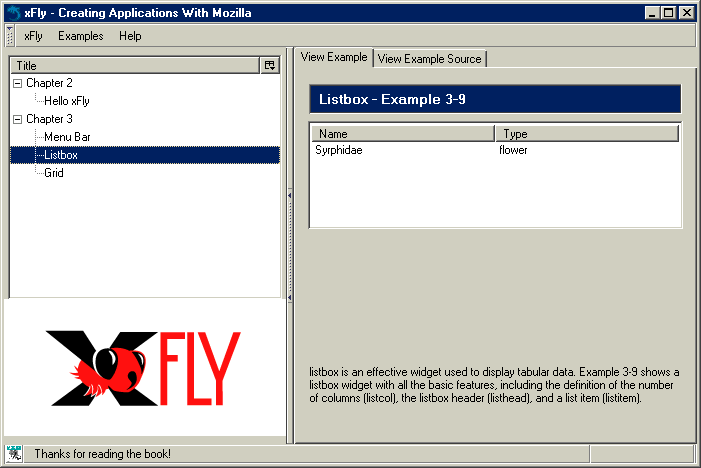
The main application windows consists of a menu bar, two frames, and a status bar. The menus provide access to application-level functions like closing the window, or launching an "About" window. At the bottom of the window, the status bar displays the book icon and some status messages for the application. Between the menu bar and the status bar are the two main panels: a vertical box (<vbox>) on the left that contains a tree for choosing examples with the xFly logo beneath it, and an <iframe> into which the examples are loaded on the right. There are two tabs in the example pane, one for showing the example rendered and one for looking at the source.

Figure 3-12. xFly example viewing application

The code in Example 3-22 is not the final code for xFly, but it does show some important widgets used for the main layout of the application. But the layout in Example 3-22 (in which a <toolbox> holds the menus, a <statusbar> displays messages from the application, and the box model is used to layout the application display) is a very useful template for XUL applications.

What remains to define is the tree structure that actually holds the various examples. In Example 3-22, the <tree> has an ID attribute that is meant to pick up content defined in an overlay. Example 3-23 shows what such an overlay would look like, but if you'd rather, you can take the content of the <tree id="example-tree"> element in this example, define it as direct content of the <tree> in Example 3-22, and end up with the application shell shown in Figure 3-12. See the section Section 3.11 earlier in this chapter for more information about how to add content to your XUL using overlay files.

Example 3-23. Example tree in the xFly application

<?xml version="1.0"?>
<overlay id="xflyOverlay"
    xmlns:html="http://www.w3.org/1999/xhtml"
    xmlns="http://www.mozilla.org/keymaster/gatekeeper/there.is.only.xul">
<tree id="example-tree" onselect="onExampleSelect( );" seltype="single" 
    hidecolumnpicker="false" 
    enableColumnDrag="true" flex="1">
  <treecols>
    <treecol id="type" label="Title" flex="1" primary="true" 
        persist="width ordinal hidden"/>
    <splitter class="tree-splitter"/>
    <treecol id="method" label="Example" flex="1" 
        persist="width ordinal hidden"/>
  </treecols>
  <treechildren>
    <treeitem container="true" open="true">
      <treerow>
        <treecell label="Chapter 2"/>
      </treerow>
      <treechildren>  <!-- Second level row -->
        <treeitem>
          <treerow>
            <treecell label="Hello xFly" 
                url="chrome://xfly/content/examples/2-1.xul"/>
            <treecell label="2-1"/>
          </treerow>
        </treeitem>
      </treechildren>
    </treeitem>
    <treeitem container="true" open="true">
      <treerow>
        <treecell label="Chapter 3"/>
      </treerow>
      <treechildren>  <!-- Second level row -->
        <treeitem>
          <treerow>
            <treecell label="Menu Bar" 
                url="chrome://xfly/content/examples/3-5.xul"/>
            <treecell label="3-5"/>
          </treerow>
        </treeitem>
        <treeitem>
          <treerow>
            <treecell label="Listbox" 
                url="chrome://xfly/content/examples/3-9.xul"/>
            <treecell label="3-9"/>
          </treerow>
        </treeitem>
        <treeitem>
          <treerow>
            <treecell label="Grid" url="chrome://xfly/content/examples/3-12.xul"/>
            <treecell label="3-12"/>
          </treerow>
        </treeitem>
      </treechildren>
    </treeitem>
  </treechildren>
</tree>
</overlay>