Chapter 4. CSS in Mozilla Applications
This chapter describes how Cascading Style Sheets (CSS) are used to create the look and feel of a Mozilla application's interface. Although XUL has a central role in creating a structure for an application's interface, defining widgets and their functionality, and creating the basic application code, it is CSS that creates the visible portion of an application. XUL and CSS often work so closely together that they seem inseparable, but XUL is generally responsible for the structure of an application's interface and CSS is responsible for the application's presentation. As described in the next sections, it is not until an XPFE application has been "skinned," or styled with stylesheets, that it has a usable interface.
The first few sections in this chapter provide basic information about using CSS and some examples of how the Mozilla interface is created. They include reference material you can refer back to as you learn more. Starting with the "Creating New Skins" section, you can dive in, have some fun with CSS, and begin to create your own skins. The xFly package example created earlier in the book shows how to add custom styles to the XUL files you created in Chapters Chapter 2 and Chapter 3.
4.1. Interface Basics
Before describing the practice of using CSS, let's get some basic theory out of the way. When we talk about the interface of an application, we mean all of the parts of the application that are displayed and allow the user to interact. Buttons, windows, pages, menus, sliders, and descriptive text are all parts of the interface. In Mozilla, XUL usually defines the basic structure of the interface and CSS defines its presentation. These two aspects of the interface -- the way it's organized and the way it's presented -- are kept as distinct from one another as possible in Mozilla and in many good programming environments. Indeed, this separation is what gives rise to the concept of skins -- coherent, separate, and typically swappable "looks" for the same underlying structure. Mozilla uses Cascading Style Sheets, a quickly evolving series of standards already common in HTML web page presentation, to define the skin of XUL application interfaces.
4.1.1. Skins Versus Themes
When we say skin in this chapter, we refer to the look of the interface -- to the CSS styles and its relationship to the XUL structure underneath. The term theme is also used often in conjunction with interfaces and skins. These words are used interchangeably, although there are some differences in their meaning.
A single, overall theme is made up of many skins. The Navigator component's skin described in navigator.css, for example, is part of the overall Modern theme of Mozilla. Following this definition, the Modern theme may be made up of as many as 20 or 30 different skins corresponding to the major components and major UI features within those components. In addition to navigator.css, for example, there are stylesheets for toolbar.css, linkToolbar.css, and others, which collectively make up the Navigator skin. The CSS files may also be described as skins, as when this book instructs you to "open the messenger.css skin in a text editor." All skins of a particular kind or look organized together comprise a single theme.
Themes are also often used to refer to the different looks that you can download and install for Mozilla and Netscape 6.x and 7.x. (To get new themes for the Mozilla browser go to View > Apply Themes > Get New Themes.) Any application created with Mozilla, though, can have different themes that users can install and select to customize the look of that application.
This distinction between a skin and a theme is not enforced -- or even acknowledged -- by many people in the Mozilla community, so you will see a profligate use of these terms in practice. Try to remain calm. The terminology differences aren't important. What is important is that you can create one (or many) looks for your application using CSS. This chapter will show you how.
4.1.2. Limitations of a Skin
Skins are used to style the structure of an interface that has been created with XUL. Once the interface has been defined in XUL, that structure is set and CSS can be used to change how that structure will look, but can't be used to change the structure itself. In practice, this means that you can use CSS to change the way a button looks -- but to move a button from one toolbar to another within the interface, you need to edit your XUL code. Skins generally affect the usability or appearance, but not the functionality of an interface, though the use of XBL in CSS is an exciting exception to this rule, as you will see.
This separation of the style and the content of an application means that there are a number of things you can't change in an application using CSS. Here are some examples of the kinds of interface elements that cannot be manipulated with a skin.
The position and contents of menus and menu items and the functionality they trigger.
The overall layout and functionality of buttons.
The general layout of the application (although you can use CSS to hide sections of an interface).
While the underlying structure of menus and buttons cannot be changed in the process of editing a theme, you can, of course, change the appearance of things quite radically. In fact, you can change whether an element -- say, an item in a menu -- has any visibility using the visibility or display CSS properties. One of the Mozilla extensions to CSS, -moz-box-ordinal, lets you set the order in which the elements in a container are displayed. We describe these extensions and others later in this chapter in the section Section 4.2.3.
4.1.3. Theme Abstraction (or Building Good Skins)
One of the most important parts of a well-written theme is that it be as separate as possible from the actual structure of the interface -- that it be abstracted as a layer so it can be switched or updated without affecting or forcing you to edit the underlying XUL. Keeping an application's style separate is not mandatory, however, and you can have all presentation code in your XUL files, although we explain why this isn't a good idea.
As we have tried to stress, at the most basic level, abstraction means that the XUL should describe the structure and the CSS should describe the presentation, or look, of the interface. In reality, of course, the presentation layer is itself divided into different layers, where lower, more basic files like xul.css describe the look and feel of common UI elements such as buttons and menus, and higher-level CSS files consistently describe the layout and stylistic details of a component. When working on a theme or skin for your application, you should use as few inline style attributes as you can, as well as ensure that your themes are organized into component subdirectories and that one skin does not depend on another that is farther down in the "skin hierarchy." (This is discussed later in this chapter in the Section 4.3.1 section.).
4.1.4. Cross-Platform Interface Considerations
Often in traditional interface development, you try to make things look and work right on a single platform. Using something like MFC on Windows, for example, you can drop in the widget it provides and be reasonably assured that the interface will look like a Windows application interface whenever and wherever your application is run.
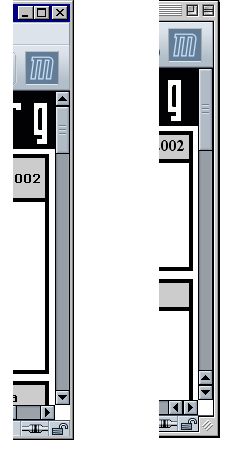
When you do cross-platform user interface development, you need to be aware of how your application will look on the platforms on which it will be used. One common difference, for example, is the layout of scrollbars in Windows applications and in Macintosh applications. On Windows, scrollbars typically have buttons at either end that advance the scrollbar button itself. On the classic Macintosh, the scrollbars are configured so that the buttons are clustered together. The difference is subtle, but it is a source of huge contention in the Mozilla world. Figure 4-1 shows the difference between the scrollbars on the two platforms. (This figure also shows a small notch in the lower righthand corner that is part of all classic Macintosh application windows and that shifts part of the Mozilla interface over to the left.)
When you use the XPFE, you use a single code base to deploy on any number of different platforms. In the Mozilla code, there are some tricks for making things work differently on different platforms. Like scrollbars, the layout of buttons in dialogs is another important area of platform difference. The layout code for the Open Web Location dialog, for example, is defined in platform-specific files, and slightly different dialog layouts are deployed transparently to users (depending on their platform). Figure 4-2 illustrates the differing layouts of this dialog on different platforms (note the different positions of the Open and Cancel buttons in the two images).

If you look in the global resources area of the xpfe in the source code (using a tool like Mozilla's LXR), you can see the platform subdirectories where the buttons in the dialogs are arranged with <spacer /> elements and different alignments:
mozilla/xpfe/global/resources/content/
  mac/
    platformDialogOverlay.xul
  os2/
    platformDialogOverlay.xul
  unix
    platformDialogOverlay.xul
  win
    platformDialogOverlay.xul
These platform-specific files allow the application developer to write XUL that works the same way on every platform, but preserves subtler aspects of an interface that users expect from their platform.