Table of Contents
At this point we are ready to look at the specifics of the content.xml file for word processing documents. We will build up from the most basic elements, characters and paragraphs, to sections and pages. This chapter also covers the topic of lists and outlines in OpenDocument word processing documents.
All OpenDocument files are based on Unicode, and are encoded in the UTF-8 encoding scheme. You may see a discussion of this at the section called “Unicode Encoding Schemes”. This means that you may freely mix characters from a variety of languages in an OpenDocument file, as shown in Figure 3.1, “Document with Mixed Languages”. It also means that those characters will not be easily viewable in a normal ASCII text editor.

In XML, whitespace in element content is typically not preserved unless specially designated. OpenDocument collapses consecutive whitespace characters, which are defined as space (0x0020), tab (0x0009), carriage return (0x000D), and line feed (0x000A) to a single space. How, then, does OpenDocument represent a document where whitespace is significant?
To handle extra spaces, OpenDocument uses the <text:s> element. This empty element has an optional attribute, text:c, which tells how many spaces occur in the document. If this attribute is absent, then the element inserts one space. Between words, the <text:s> element is used to describe spaces after the first one; thus, for a single space, you don’t need this element. At the beginning of a line, you do need the <text:s>, since OpenDocument eliminates leading whitespace immediately after a starting tag.
Tab stops are represented by the empty <text:tab> element, and a line break, which is entered in OpenOffice.org by pressing Shift-Enter, is represented by the empty <text:line-break> element. Example 3.1, “Representation of Whitespace” shows these elements in action.
Example 3.1. Representation of Whitespace
<!--
   The following is the XML for
   .Hello,..whitespace!... (where . represents the spacebar)
   Hello,--tab stops!       (where - represents the Tab key)
   Hello,|line break!       (where | represents Shift-Enter)
-->
<text:s/>Hello, <text:s/>whitespace! <text:s text:c="2"/>
Hello,<text:tab/><text:tab/>tab stops!
Hello,<text:line-break/>line break!
If you are using XSLT to extract the contents of an OpenDocument file to a plain text file, you may want to expand these elements into their original whitespace. Example 3.2, “XSLT Templates for Expanding Whitespace” shows the XSLT templates required to do this. The templates for <text:tab> and <text:line-break> are easy; we just emit the proper Unicode value. The code becomes slightly complex when we get to <text:s> because we need to be able to handle an arbitrary number of spaces. Here’s the pseudocode:
- Create a variable named spaces, which contains 30 spaces. Remember to use the xml:space="preserve" attribute to prevent Xalan from "helpfully" collapsing this whitespace.
- If the <text:s> doesn’t have a text:c attribute, simply emit one blank.
- If there is a text:c attribute, call a template named insert-spaces and pass the number of spaces in as a parameter named n.
- insert-spaces tests to see if $n is less than or equal to 30. If so, then the template emits that many spaces as a substring from the $spaces variable.
- If there are more than 30 spaces required, insert-spaces emits the entire $spaces variable, and then calls itself with $n minus 30 as the new number of spaces to emit.
[This is file uncompress_whitespace.xsl in directory ch03 in the downloadable example files.]
Example 3.2. XSLT Templates for Expanding Whitespace
<xsl:stylesheet version="1.0"
xmlns:xsl="http://www.w3.org/1999/XSL/Transform"
xmlns:text="urn:oasis:names:tc:opendocument:xmlns:text:1.0">
<xsl:template match="text:tab">
<xsl:text>	</xsl:text> <!-- emit a Unicode tab -->
</xsl:template>
<xsl:template match="text:line-break">
<xsl:text>
</xsl:text> <!-- emit a Unicode line feed -->
</xsl:template>
<xsl:variable name="spaces"
xml:space="preserve"> </xsl:variable>
<xsl:template match="text:s">
<xsl:choose>
<xsl:when test="@text:c">
<xsl:call-template name="insert-spaces">
<xsl:with-param name="n" select="@text:c"/>
</xsl:call-template>
</xsl:when>
<xsl:otherwise>
<xsl:text> </xsl:text>
</xsl:otherwise>
</xsl:choose>
</xsl:template>
<xsl:template name="insert-spaces">
<xsl:param name="n"/>
<xsl:choose>
<xsl:when test="$n <= 30">
<xsl:value-of select="substring($spaces, 1, $n)"/>
</xsl:when>
<xsl:otherwise>
<xsl:value-of select="$spaces"/>
<xsl:call-template name="insert-spaces">
<xsl:with-param name="n">
<xsl:value-of select="$n - 30"/>
</xsl:with-param>
</xsl:call-template>
</xsl:otherwise>
</xsl:choose>
</xsl:template>
</xsl:stylesheet>
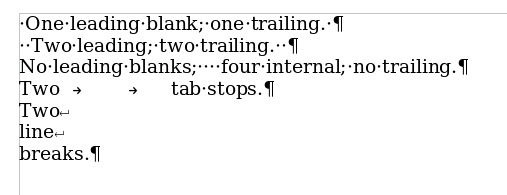
If you are creating an OpenDocument file from a source where whitespace has been preserved, you must reverse this process, creating the appropriate <text:s>, <text:tab>, and <text:line-break> elements. While there may be a simple and clever way of doing this conversion in XSLT, it eludes this author entirely. The straightforward approach of looking at the input string character-by-character is totally unsuited to the XSLT processing model, so we have created a Java extension function, which you may find in the section called “OpenDocument White Space Representation”. Example 3.3, “Test XML file for Whitespace Conversion” shows a section of a test XML file, and Example 3.4, “Test XSL file for Whitespace Conversion” shows part of the XSLT that calls the extension function. [The example files are named whitespace_compress_test.xml and compress_whitespace.xsl in directory ch03 in the downloadable example files.]
Example 3.3. Test XML file for Whitespace Conversion
<document xml:space="preserve">
<test> One leading blank; one trailing. </test>
<test>  Two leading blanks; two trailing.  </test>
<test>No leading blanks;    four internal; no trailing.</test>
<test>Two       tab stops.</test>
<test>Two
line
breaks.</test>
</document>
Example 3.4. Test XSL file for Whitespace Conversion
<xsl:stylesheet version="1.0"
xmlns:xsl="http://www.w3.org/1999/XSL/Transform"
xmlns:text="urn:oasis:names:tc:opendocument:xmlns:text:1.0"
xmlns:java="ODWhiteSpace"  exclude-result-prefixes="java">
<xsl:template match="/document">
<office:document-content
xmlns:office="urn:oasis:names:tc:opendocument:xmlns:office:1.0"
exclude-result-prefixes="java">
<xsl:template match="/document">
<office:document-content
xmlns:office="urn:oasis:names:tc:opendocument:xmlns:office:1.0"  xmlns:text="urn:oasis:names:tc:opendocument:xmlns:text:1.0"
office:version="1.0">
<office:body>
<office:text>
<xsl:apply-templates select="test"/>
</office:text>
</office:body>
</office:document-content>
</xsl:template>
<xsl:template match="test">
<xsl:variable name="str" select="."/>
<text:p><xsl:copy-of
select="java:compressString($str)"/></text:p>
xmlns:text="urn:oasis:names:tc:opendocument:xmlns:text:1.0"
office:version="1.0">
<office:body>
<office:text>
<xsl:apply-templates select="test"/>
</office:text>
</office:body>
</office:document-content>
</xsl:template>
<xsl:template match="test">
<xsl:variable name="str" select="."/>
<text:p><xsl:copy-of
select="java:compressString($str)"/></text:p>  </xsl:template>
</xsl:stylesheet>
</xsl:template>
</xsl:stylesheet>
| | We are using the abbreviated format for Xalan extensions written in Java. The xmlns:java describes the path name to the extension. We have placed the ODWhiteSpace.class file in the same directory as the transformation program, so the fully qualified class name is just the class name; the exclude-result-prefixes ensures that the java prefix doesn’t appear in the transformation output. |
| | This provides the bare bones for the document we are creating; we are declaring only the namespaces that are required in the resulting document. |
| | When you call the extension function, it returns a set of nodes that represent your input string in OpenDocument format. If you use <xsl:copy-of>, the entire set will be copied to the output document. Don’t use <xsl:value-of>; that will convert the entire node set to a string, and you’ll get the string value of only the first node. |
To run this transformation with the program shown in the section called “An XSLT Transformation”, we use the following command line, which invokes the shell script from the section called “Transformation Script”:
odtransform.sh -in whitespace_compress_test.xml \
  -xsl compress_whitespace.xsl \
  -outOD whitespace_compress_test.odt -out content.xml
The product is a file named whitespace_compress_test.odt. Figure 3.2, “Document Created with Whitespace XSLT Extension” shows the result; the font has been made larger, and non-printing characters are displayed so that we can check that the file has the correct content.
Before proceeding, let’s note two things about the preceding example. First, congratulations! We’ve just created our first OpenDocument file without using an application like OpenOffice.org. Second, we sneaked the <text:p> element into the example.
Almost all the text in a document will be enclosed either in paragraphs or headings. The <text:p> and <text:h> elements provide these functions. The <text:h> element has a text:level attribute; its integer value starts at one to signify a level one heading. If you’re extracting data from an OpenDocument file, that’s really all you need to know about these two elements.
Note
If you use the non-numbered Heading style from the stylist, OpenOffice.org will insert a <text:p>, not a <text:h> element.
If you’re creating an OpenDocument file by using an XSLT transformation, you don’t want it to say "I am a Fugitive from a Chain Printer." You will need to add styles to your document, and this will require three steps:
- Create font declarations by putting <style:font-decl> elements within an <office:font-decls> element. If you just want to use the default font everywhere, this step is optional. (Even if you do want to use a variety of fonts, you can skip this step. We’ll show you the workaround later, and give you a stern warning not to use it.)
- Create <style:style> elements within an <office:automatic-styles> element. Each of these will contain a <style:type-properties> element whose attributes describe the style you want.
- Refer to the styles created in step two with the text:style-name attribute.
Note
Throughout this book, we will be dealing with the concept of a length. In stylesheets, a length is expressed as a number followed immediately by a unit of measurement. For example, 3.05cm or 24pt. The valid units in OpenDocument are in, cm, mm, px (pixels), pc (picas; 6 picas equals one inch), and pt (points; 72 points equal one inch). These lengths are actually a general way of measuring things. Thus, you will see sentences like, "The width attribute has a value which is a length." That means you might write something like width="2.57mm". Whenever we use the word "length" in this generic sense, it will be set in italics.
Font declarations are written as described in the section called “Font Declarations”. Rather than writing them yourself, you may wish to use an existing document, or you may create a document in an OpenDocument-compatible application which contains one letter from each font you will want. You can then unpack the files and copy the declarations. Your third option is to write them by hand.
No matter which method you use, we recommend you put the resulting declarations in a separate file and include them with an <xsl:include>. This makes your primary stylesheet shorter, and it also allows re-use of the declarations in other transformations. Example 3.5, “Font Declarations Include File” shows a sample stylesheet for inclusion into your primary transformation; Example 3.6, “Using an Included Font Declaration File” shows how you would use it.
Example 3.5. Font Declarations Include File
<!-- save this in file fontdecls.xslt -->
<xsl:stylesheet version="1.0"
xmlns:xsl="http://www.w3.org/1999/XSL/Transform"
xmlns:office="urn:oasis:names:tc:opendocument:xmlns:office:1.0"
xmlns:style="urn:oasis:names:tc:opendocument:xmlns:style:1.0"
xmlns:svg="urn:oasis:names:tc:opendocument:xmlns:svg-compatible:1.0"
xmlns:fo="urn:oasis:names:tc:opendocument:xmlns:xsl-fo-compatible:1.0">
<xsl:template name="insert-font-decls">
<office:font-face-decls>
<style:font-face style:name="Arial Unicode MS"
svg:font-family="'Arial Unicode MS'"
style:font-pitch="variable" />
<style:font-face style:name="Bitstream Vera Sans"
svg:font-family="'Bitstream Vera Sans'"
style:font-family-generic="swiss"
style:font-pitch="variable"/>
<style:font-face style:name="Bitstream Vera Sans1"
svg:font-family="'Bitstream Vera Sans'"
style:font-pitch="variable"/>
<style:font-face style:name="Bitstream Vera Serif"
svg:font-family="'Bitstream Vera Serif'"
style:font-family-generic="roman"
style:font-pitch="variable"/>
<style:font-face style:name="Lucidasans"
svg:font-family="Lucidasans"
style:font-pitch="variable"/>
<style:font-face style:name="Palatino"
svg:font-family="Palatino"
style:font-family-generic="roman"
style:font-pitch="variable" />
<style:font-face style:name="Bitstream Vera Sans Mono"
svg:font-family="'Bitstream Vera Sans Mono'"
style:font-pitch="fixed"/>
</office:font-face-decls>
</xsl:template>
</xsl:stylesheet>
Example 3.6. Using an Included Font Declaration File
<xsl:stylesheet version="1.0"
    xmlns:xsl="http://www.w3.org/1999/XSL/Transform"
    xmlns:office="urn:oasis:names:tc:opendocument:xmlns:office:1.0"
    xmlns:style="urn:oasis:names:tc:opendocument:xmlns:style:1.0"
    xmlns:fo="urn:oasis:names:tc:opendocument:xmlns:xsl-fo-compatible:1.0"
    xmlns:text="urn:oasis:names:tc:opendocument:xmlns:text:1.0"
> <!-- and any other namespaces you might require -->

<xsl:include href="fontdecls.xsl"/>

<xsl:template match="/">
<office:document-content
    xmlns:office="urn:oasis:names:tc:opendocument:xmlns:office:1.0"
    xmlns:style="urn:oasis:names:tc:opendocument:xmlns:style:1.0"
    xmlns:fo="urn:oasis:names:tc:opendocument:xmlns:xsl-fo-compatible:1.0"
    xmlns:text="urn:oasis:names:tc:opendocument:xmlns:text:1.0"
> <!-- and any other namespaces you might require -->
    <office:scripts/>
    <xsl:call-template name="insert-font-decls"/>
    <!-- remainder of your transformation -->
</office:document-content>
</xsl:template>

</xsl:stylesheet>
Your transformation will then create an <office:automatic-styles> element, which will hold all the <style:style> elements that you want. You should give each <style:style> an appropriate style:name and style:family attribute. For OpenOffice.org documents, styles to be applied to characters should have a style:name of the form T followed by an integer and have a style:family of text. Styles to be applied to paragraphs or headings should have a style:name of the form P followed by an integer and have a style:family of paragraph.
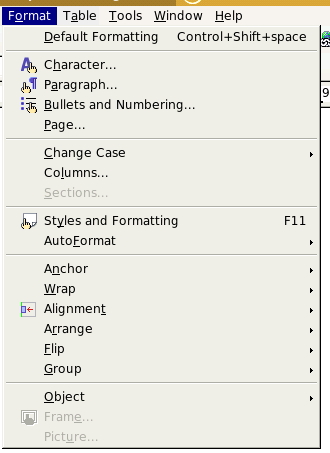
OpenDocument applications such as OpenOffice.org let you change the format of individual characters, paragraphs, or pages, as you see in Figure 3.3, “OpenOffice.org Format Menu”. The following attributes of the <style:text-properties> element affect character styles. Most of these attributes come from the XSL-FO namespace. (The <style:text-properties> element will be contained in a <style:style> element.)
- style:font-name
The name of a <style:font-face-decl>. If you do not have any font declarations, you may use a svg:font-family attribute with a font name as its value. This is cheating. Don’t do it. (We said we would warn you!)
- fo:font-size
The text size, expressed either as a length or a percentage. For fonts, a length is expressed as a positive integer followed by pt (points). Other units of measurement will be converted to points when you view them in OpenOffice.org.
- fo:font-weight
Values are bold and normal.
- fo:font-style
Values are italic and normal.
- style:text-underline-style, style:text-underline-type, style:text-underline-color, style:text-underline-width, style:text-underline-mode
Oy, you wouldn’t believe how many combinations of underlining you have available to you! The style:text-underline-style attribute may have values none, solid, dotted, dash, long-dash, dot-dash, dot-dot-dash, and wave.
The style:text-underline-type has the possible values none, single, and double. The default is single.
The style:text-underline-width has values auto, normal, bold, thin, dash, medium, and thick.
The style:text-underline-color is specified as in fo:color and has the additional value of font-color, which makes the underline color the same as the current text color.
Finally, style:text-underline-mode may be set to skip-white-space so that whitespace is not underlined.
- fo:color, fo:background-color
Text color and background color in the form of a six-digit hex value. Example: #cc32f5. The background color may also be set to transparent.
- fo:font-variant
This can have a value of normal or small-caps.
- fo:text-transform
Possible values are none, lowercase, uppercase, capitalize, and small-caps. capitalize corresponds to the “Title” choice in OpenOffice.org’s Character Font Effects dialog, which capitalizes the first letter of every word. uppercase corresponds to the “Capitalize” choice, which displays all the words in uppercase.
- style:text-outline
Set to true to get outline text
- fo:text-shadow
The value is the horizontal and vertical displacement of the shadow, separated by whitespace. The default value is 1pt.
- style:text-blinking
Set to true if you want the readers of your document to hate you forever.
- style:text-position
This attribute is used to create superscripts and subscripts. It can have two values; the first value is either sub or super, or a number which is the percentage of the line height (positive for superscripts, negative for subscripts). An optional second value gives the text height as a percentage of the current font height. You must provide the percent symbol. Examples: style:text-position="super" produces normal superscripts, and style:text-position="-30% 50%" produces a subscript at 30% of the font height below the baseline, with letters 50% of the current font height.
- style:text-rotation-angle, style:text-rotation-scale
The angle is the number of degrees to rotate text counterclockwise; its value can be 0, 90, or 270. The text rotation scale can be set to line-height or fixed.
- style:text-scale
The percentage by which to scale character width, given with a percent symbol; for example: 50%.
- fo:letter-spacing
The value is a length to add to the normal inter-character spacing; it can be positive to expand text or negative to compress text. If you want kerning of double characters, set style:letter-kerning to true.
- style:font-relief
Possible values are none, embossed, and engraved.
Before we go further, let’s put these to work. Figure 3.4, “Styled Headings” shows two headings. The first one is a level five heading which we have made red and italic. (If you are reading this in a printed book, use your imagination to see the color.) The second heading is a level five heading with the red italics applied to only some of the words. In order to apply styles to only part of a paragraph or heading, we need to enclose it in a <text:span> element, which delineates an inline area of text.
In any case, we do not apply the style attributes directly to the heading, paragraph, or span. Instead, we declare the style in the <office:automatic-styles> area and then use a text:style-name attribute in the <text:p>, <text:h>, or <text:span>.
Example 3.7, “Markup for <text:h>” shows the relevant excerpts of the XML for the two headings.

Example 3.7. Markup for <text:h>
<!-- from styles.xml -->
<style:style style:family="paragraph"
style:name="Heading_20_5" style:display-name="Heading 5"
style:parent-style-name="Heading" style:class="text"
style:default-outline-level="5">
<style:text-properties fo:font-size="85%" fo:font-weight="bold"/>
</style:style>
<!-- from content.xml -->
<office:automatic-styles>
<style:style style:name="P1" style:family="paragraph"
style:parent-style-name="Heading_20_5">
<style:text-properties fo:color="#ff0000"
fo:font-size="11.8500003814697pt"
fo:font-style="oblique" />  <style:style style:name="T1" style:family="text">
  <style:text-properties fo:color="#ff0000" fo:font-style="italic" />
</style:style>
</office:automatic-styles>
<office:body>
<text:h text:style-name="P1" text:outline-level="5">Crime and
<style:text-properties fo:color="#ff0000" fo:font-style="italic" />
</style:style>
</office:automatic-styles>
<office:body>
<text:h text:style-name="P1" text:outline-level="5">Crime and  Punishment</text:h>
<text:h text:style-name="Heading 5" text:level="5">Reading
<text:span text:style-name="T1">Crime and
Punishment</text:span> for Fun and Profit</text:h>
</office:body>
Punishment</text:h>
<text:h text:style-name="Heading 5" text:level="5">Reading
<text:span text:style-name="T1">Crime and
Punishment</text:span> for Fun and Profit</text:h>
</office:body>
| | The level 5 heading style is found in the styles.xml file; its style:family attribute shows that it applies to block elements such as paragraphs and headings. Note the style:display-name, which shows the style name without the hexadecimal encoding of the blank as _20_. |
| | The styles that apply to the characters in the heading are stored in a <style:text-properties> element. |
| | This definition in content.xml creates a style based on Heading 5, so it is also has style:family="paragraph" and its style:name begins with P. |
| | This style sets fo:font-style to oblique instead of italic, for some unknown reason. |
| | The inline style has a style:family="text" and its style:name begins with T. |
| | Styles are always applied by referring to the appropriate text:style-name. |
Paragraph styles affect the location, indention, and look of paragraphs (and headings). Here are some of the styles you will most commonly use.
- fo:line-height
This specifies a fixed line height; specifying none does its normal line height calculation. Specifying a length (24pt) or a percentage (125%) may lead to overlapping or cut-off text if some characters are larger than the line height.
- style:line-height-at-least
The value is a length which specifies the minimum line height.
- style:line-spacing
The value is a length that specifies a fixed distance between lines in a paragraph.[2]
- fo:text-align, fo:text-align-last
Values for this attribute are start, end, center, and justify. OpenOffice.org maps "left" to start and "right" to end, no matter the directionality of the text.
If you choose justified text, then you have the option to position the last line as well by setting fo:text-align-last to justify, center, or start.
- fo:margin-left, fo:margin-right, fo:text-indent
The values for the margins are a positive length telling how far to indent from the given side; the value for the first-line indent can be either positive or negative. If you specify fo:text-indent, you must also specify margins.
- fo:margin-top, fo:margin-bottom
These attributes control spacing before and after a paragraph. The value for these attributes is a length or a percentage relative to the parent style.
- fo:break-before, fo:break-after
The value of column or page tells whether to put a column or page break before or after the paragraph. You may use only one of these in a style specification. The default value of auto lets the application make the decision as to whether a break is necessary before the text.
- fo:orphans, fo:widows
A number giving the minimum number of lines in a paragraph before and after a page break. You may keep a paragraph together with the next one by setting fo:keep-with-next to always.
- fo:background-color
This is the background color for the paragraph, expressed as a six-digit hex value.
You may draw borders on all four sides of a paragraph by specifying fo:border. You may set an individual side with fo:border-left, fo:border-right, fo:border-top, and fo:border-bottom. Each of these has a value of the form:
width style color
Where:
- width is a length specifcation or one of the keywords thick and thin.
- style is one of none, solid, or double.
- color is a six-digit hexadecimal color value.
If you have a double border, you may completely control the spacing of the lines by specifying a style:border-line-width (or style:border-line-width-side) attribute which has three length specifiers as its value:
- The width of the inner line.
- The space between the lines.
- The width of the outer line.
Example 3.8, “Border Specification” shows the markup required for a green double border on all four sides, with an inner line width of 0.5 millimeter, a distance of 0.25 millimeters between the lines, and an outer line width of 1 millimeter. The total width of the border is the sum of the individual widths and distances of the style:border-line-width attribute.
Example 3.8. Border Specification
<style:style style:name="P1" style:family="paragraph">
    <style:properties
        style:border-line-width="0.5mm 0.25mm 1mm"
        fo:border="1.75mm double #008000"/>
</style:style>
To set the padding between the border and the paragraph content, use the fo:padding attribute (for all four sides), or fo:padding-left, fo:padding-right, fo:padding-top, and fo:padding-bottom to set padding on sides individually. The value of these attributes is a length specifier.
Note
Padding will not be shown unless there is a border. For example, if you set fo:padding-left but do not have a fo:border-left or fo:border, OpenOffice.org will not add any padding on the left.
So, how does the <text:tab> element know where the tabs are? You tell it by adding a <style:tab-stops> element, which contains a list of <style:tab-stop> elements.
The <style:tab-stop> element has a required style:position attribute, whose value is a length specification. By default, tab stops are left-aligned, but you may change this with the style:type attribute, whose value may be one of left, center, right, or char. This last value lets you align on a specific character, such as a decimal point. The character on which to align is specified as the value of the style:char. Space between tab stops is normally filled with blanks. You may specify a different filler character (also called a "leader") as the value of the style:leader-text attribute. The leader character fills the space before the tab stop. You may also specify a style:leader-style with a value of solid, dotted, or dash.
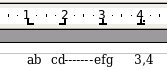
Example 3.9, “Various Tab Stops” shows the XML for a paragraph with a left-aligned tab stop at one centimeter, a right-aligned stop at two centimeters, a centered stop at three centimeters with a dash as a leader character, and a tab stop on comma at four centimeters. Figure 3.5, “Tab Stops in OpenOffice.org” shows a paragraph using this formatting.
Example 3.9. Various Tab Stops
<style:style style:name="P3" style:family="paragraph">
    <style:paragraph-properties>
        <style:tab-stops>
            <style:tab-stop style:position="1cm"/>
            <style:tab-stop style:position="2cm" style:type="right"/>
            <style:tab-stop style:position="3cm" style:type="center"
                style:leader-style="dash" style:leader-text="-"/>
            <style:tab-stop style:position="4cm" style:type="char"
                style:char=","/>
        </style:tab-stops>
    </style:paragraph-properties>
    <style:text-properties style:font-name="Bitstream Charter"/>
</style:style>
Not all documents are written in the Latin alphabet. There is the entire family of CJK (Chinese-Japanese-Korean) syllables and ideographs. Languages which do not lay out their characters in a simple left-to-right fashion are in a class called Complex Text Layout; examples of such languages are Arabic, Hebrew, Hindi, and Thai. OpenDocument lets you specify certain character attributes for the CJK characters by adding the -asian suffix; attributes for Complex Text Layout characters have a suffix of -complex. In the following style, Western and Complex characters will be bold, but CJK characters will be normal:
<style:style style:name="T5" style:family="text">
    <style:text-properties
        fo:font-weight="bold"
        style:font-weight-asian="normal"
        style:font-weight-complex="bold" />
</style:style>
Here is a list of the attributes which can take either the -asian or -complex suffix:
- style:font-name-asian, style:font-name-complex
- style:font-name-asian, style:font-name-complex
- style:font-family-asian, style:font-family-complex
- style:font-family-generic-asian, style:font-family-generic-complex
- style:font-style-name-asian, style:font-style-name-complex
- style:font-pitch-asian, style:font-pitch-complex
- style:font-size-asian, style:font-size-complex
- style:font-size-rel-asian, style:font-size-rel-complex
- style:language-asian, style:language-complex
- style:country-asian, style:country-complex
- style:font-style-asian, style:font-style-complex
- style:font-weight-asian, style:font-weight-complex
At this point, we know enough to write an XSLT document that will extract all the headings from an OpenDocument file and create a new "outline" document. A heading at level x is preceded by x-1 tabs. Thus, a level one heading starts in the left margin of the document, and a level three heading has two tab stops followed by the heading text.
Example 3.10. Extracting Headings from an OpenDocument File
<?xml version="1.0"?> <xsl:stylesheet version="1.0"
| | To make this document shorter, we’ve included only the namespaces that are necessary both here and in the root element of the output document. |
| | There are two ways to implement this stylesheet. You can create a separate style for each level of heading, or have a single style with all the tab stops in it. The second method seems more to the point, though it does make the processing a bit more difficult. |
| | This is the place where laziness triumphs; the XPath expression finds all <text:h> elements at any level in the document. It’s inefficient in terms of machine time, but easy for us. |
| | Karma strikes back; because we were lazy earlier, we have to do some hard work here. XSLT doesn’t have a "for loop" such as those in procedural programming languages, so we need to produce the required number of <text:tab> elements by recursion. This template gets a parameter, n; if the value is non-zero, the template emits a <text:tab-stop> into the output, then calls itself to emit n-1 more tab stops. |
You will find a sample file, XSLT file, and resulting heading file in files document_with_headings_to_extract.odt, extract_headings.xsl, and extracted_headings.odt in the ch03 directory in the downloadable example files. The command to do the transform was:
odtransform.sh -inOD document_with_headings_to_extract.odt \
 -in content.xml \
 -xsl extract_headings.xsl \
 -out content.xml -outOD extracted_headings.odt
You start a new section of a document by enclosing your content in a <text:section> element. This element has a required text:name attribute, which has the same name as an existing <style:style> element. The <text:section> element also has an optional text:style-name attribute, whose value is an internal name for the section.
The <style:style> that the section refers to will have a style:family="section". As with all other <style:style> elements, it will contain a <style:section-properties> element. If the contents of the columns are to be evenly distributed to all the columns, then the <style:section-properties> element will have its text:dont-balance-text-columns attribute set to false. A value of true indicates that column contents are not to be distributed equally.
The <style:section-properties> element will in turn contain a <style:columns> element. The <style:columns> element has a required fo:column-count attribute, whose value is the number of columns. A one-column section has a column count of zero. The fo:column-gap attribute gives the spacing between the columns.
The <style:columns> element contains one <style:column> element for each column. Each column has these attributes:
- style:rel-width
The proportional width of the column expressed in twips[3] followed by an asterisk instead of a length unit. Thus, a one-inch wide column is specified as style:rel-width="1440*".
- fo:start-indent, fo:end-indent
These specify the inter-column spacing in absolute units.
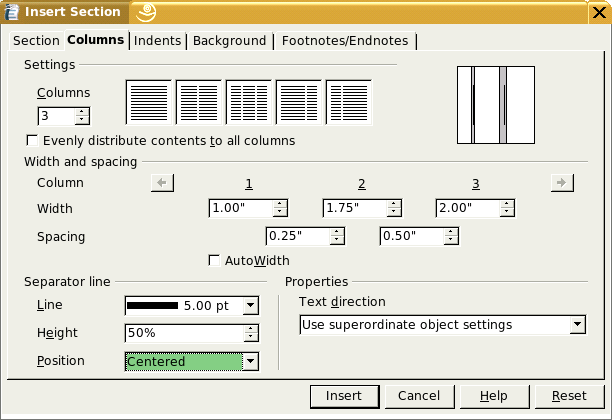
The style:rel-width includes inter-column spacing. Given the specifications shown in Figure 3.6, “Column Spacing”, the total width of the first column is 1.125 inches (one inch plus half of the quarter-inch spacing). The total width of the second column is 2.125 inches (1.75 inches plus half of the quarter-inch spacing plus half of the half-inch spacing). The total width of the second column is 2.25 inches (two inches plus half of the half-inch spacing).
If you place separators between columns, then you must place a <style:column-sep> element before the first <style:column> element. The <style:column-sep> element has these attributes:
- style:width—the width of the separator line
- style:color— its color as a six-digit hex value
- style:height— the separator height as a percentage value
- style:vertical-align—either top (the default), middle, or bottom of the space between the columns.
Example 3.11, “OpenOffice.org Representation of Sections” shows the XML for the three-column section with column widths and spacing as shown in Figure 3.6, “Column Spacing”. The columns have a five-point vertically centered separator line, and the section is indented one half inch from each margin. Content is not distributed evenly among the columns.
Example 3.11. OpenOffice.org Representation of Sections
<style:style style:name="Sect6" style:family="section">
    <style:section-properties text:dont-balance-text-columns="true"
        style:editable="false">
        <style:columns fo:column-count="3">
            <style:column-sep
                style:width="0.0693in"
                style:color="#000000"
                style:height="50%"
                style:vertical-align="middle"/>
            <style:column
                style:rel-width="1620*"
                fo:start-indent="0in"
                fo:end-indent="0.1252in"/>
            <style:column
                style:rel-width="3060*"
                fo:start-indent="0.1252in"
                fo:end-indent="0.25in"/>
            <style:column
                style:rel-width="3240*"
                fo:start-indent="0.25in"
                fo:end-indent="0in"/>
        </style:columns>
    </style:section-properties>
</style:style>
If you do not distribute content equally, then you may need to insert a manual section break within the text. This is done by applying a style with fo:break-before="column" in its <style:paragraph-properties>. Example 3.12, “Using a Section Style” shows the relevant style and content that uses the preceding section definition.
Example 3.12. Using a Section Style
<!-- This goes into the automatic-styles section -->

<style:style style:name="P1" style:family="paragraph"
    style:parent-style-name="Standard">
    <style:paragraph-properties fo:break-before="column" />
</style:style>

<!-- This is in the document content -->
<text:section text:style-name="Sect1" text:name="Section1">
    <text:p text:style-name="Standard">Column one</text:p>
    <text:p text:style-name="P1">Column two</text:p>
    <text:p text:style-name="P1">Column three</text:p>
</text:section>
Inserting a page break works in the same way as a section break: a paragraph or heading references a style which has a <style:paragraph-properties> element with a fo:break-before="page" attribute. Unlike sections, the specification for a page’s characteristics go into the styles.xml file rather than the content.xml file. However, the content.xml does refer to the style file, as shown in Figure 3.7, “Relationship Among Elements When Specifying Pages”.
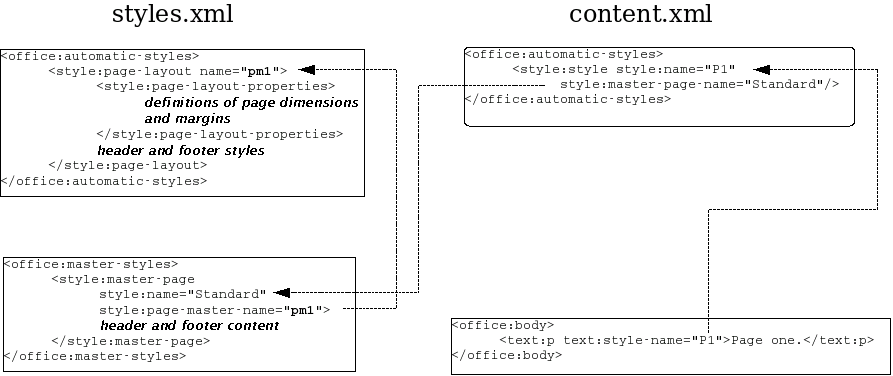
The styles.xml file contains one <style:page-layout> element for every different type of page your document uses. This element has a required style:name attribute and an optional style:page-usage attribute. The page usage can have a value of all (the default), left, right, and mirrored. If you use mirrored, then margins are mirrored as you move from page to page. The <style:page-layout> elements are placed within the <office:automatic-styles> element.
The <style:page-layout>’s content starts with a <style:page-layout-properties> element that has these attributes:
- fo:page-width, fo:page-length
the value is a length, such as 21.9cm.
- fo:margin-top, fo:margin-bottom, fo:margin-left, fo:margin-right
the value is a length.
- style:print-orientation
value is either portrait or landscape.
- style:writing-mode
one of: lr-tb (left to right; top to bottom), rl-tb, tb-rl, tb-lr, lr, rl, tb, and page. I have no clue what page value does.
- fo:background-color
a six-digit hex value, such as #ffff99; if omitted, the background is unfilled. If you are using a background image, then set fo:background-color to transparent, and use a <style:background-image> element as described in the section called “Background Images”.
- style:num-format
the page number format; possible values are 1, the default of arabic numerals, a and A for lowercase and uppercase lettering, and i and I for lowercase and uppercase roman numerals.
- style:footnote-max-height
the value is a length giving the maximum footnote height. If the value is zero, then the footnote area cannot be larger than the page area. Note: although a value of zero does not require a unit specifier, it can be present, so you may see a value such as 0in.
If your document contains footnotes, then the <style:properties> element, in turn, contains an optional <style:footnote-sep> element that describes how footnotes are separated from the main text. Its attributes are:
- style:width
value is a length specifier giving the thickness of the separator line.
- style:distance-before-sep, style:distance-after-sep
these values are length specifiers that give the distance before and after the footnote separator (as their names so aptly indicate).
- style:adjustment
the alignment of the separator line; values are left (default), center, or right.
- style:rel-width
how far the separator extends across the page, expressed as a percentage. Thus, a separator that takes up one fourth of the page width has a value of 25%.
But wait, that’s not all. If you have headers and footers on your page, you must add a <style:header-style> and/or <style:footer-style> as appropriate. Each of these tags contains a <style:header-footer-properties> element that specifies any attributes you wish to apply to the header or footer. If you don’t have a header or footer, then make these elements empty.
None of this is complicated; there’s just so much of it. The following is an outline of what a page master style looks like:
<style:page-layout style:name="pm4">
    <style:page-layout-properties page width, height, margins, writing mode>
        <style:footnote-sep line thickness, width, and distances />
    </style:page-layout-properties>

    <style:header-style>
        <style:header-footer-properties header specifications/>
    </style:header-style>

    <style:footer-style>
        <style:header-footer-properties footer specifications/>
    </style:footer-style>
</style:page-layout>
Example 3.13, “Full Page Master Specification” shows a complete specification for a landscape-oriented page that has both a header and footer. It has been reformatted for ease of reading. You may also wonder what is the absolute minimum you can get away with; if you are not using headers or footers, you can make a workable portrait-oriented page master with the specifications shown in Example 3.14, “Minimal Page Master Specification”.
Example 3.13. Full Page Master Specification
<style:page-layout style:name="pm2">
    <style:page-layout-properties
        fo:page-width="11in" fo:page-height="8.5in"
        style:num-format="1"
        style:print-orientation="landscape"
        fo:margin-top="0.5in" fo:margin-bottom="0.5in"
        fo:margin-left="0.5in" fo:margin-right="0.5in" style:writing-mode="lr-tb"
        style:footnote-max-height="0in">
        <style:footnote-sep style:width="0.0071in"
            style:distance-before-sep="0.0398in"
            style:distance-after-sep="0.0398in"
            style:adjustment="left"
            style:rel-width="25%"
            style:color="#000000"/>
    </style:page-layout-properties>
    <style:header-style>
        <style:header-footer-properties
            fo:min-height="0in" fo:margin-bottom="0.1965in"/>
    </style:header-style>
    <style:footer-style>
        <style:header-footer-properties
            fo:min-height="0in" fo:margin-top="0.1965in"/>
    </style:footer-style>
</style:page-layout>
In addition to the <office:automatic-styles> in the styles.xml file, you must have an <office:master-styles> element. This element contains header and footer content for each type of page, and also tells how pages follow one another. (For example, you might have a document where the first page is an envelope and the subsequent pages are letter-sized.)
The <office:master-styles> element contains one <style:master-page> for each <style:page-master> element you have defined. The <style:master-page> element has a required style:name attribute which gives the name that appears in the OpenOffice.org style catalog. The other required attribute is style:page-layout-name, whose value is the name of the <style:page-layout> defined earlier in the automatic styles.
If this page master has a specific page style that follows it (for example, a "title page" might be followed by a "contents page"), then you add a style:next-style-name attribute.
If your page has a header or footer, then this is where its content goes; not in the content.xml file where you might expect it. Example 3.15, “Master Styles” shows the master styles section for a document with two page styles, one of which is a landscape oriented page with a header and footer.
Example 3.15. Master Styles
<office:master-styles>

    <style:master-page style:name="Standard"
        style:page-master-name="pm1" />

    <style:master-page style:name="LandscapePage"
        style:page-master-name="pm2"
        style:next-style-name="Standard">
        <style:header>
            <text:p text:style-name="P1">Landscape page header</text:p>
        </style:header>
        <style:footer>
            <text:p text:style-name="P2">Landscape page footer</text:p>
        </style:footer>
    </style:master-page>

</office:master-styles>
If you have different headers (or footers) for left and right pages, then you may add a <style:header-left> or <style:footer-left> element to differentiate left pages from the (default) right pages.
After all this activity in the styles.xml file, we can finally turn our attention to the content.xml file, where we actually put these specifications to use. The text at the beginning of the first of a series of pages references a <style:style> which has a style:master-page-name attribute that specifies the appropriate master page. Text at the beginning of subsequent pages references a style whose <style:paragraph-properties> element has a fo:break-before="page". Example 3.16, “Using Master Pages in content.xml” shows the relevant portions of the content.xml for a simple document that has two pages.
Example 3.16. Using Master Pages in content.xml
<office:automatic-styles>
    <style:style style:name="P1"
        style:family="paragraph"
        style:parent-style-name="Standard"
        style:master-page-name="Standard">
        <style:properties style:page-number="0" />
    </style:style>
    <style:style style:name="P2" style:family="paragraph"
        style:parent-style-name="Text body">
        <style:paragraph-properties fo:break-before="page" />
    </style:style>
    <!-- etc -->
</office:automatic-styles>

<office:body>
    <office:text>
        <text:p text:style-name="P1">Page one.</text:p>
        <text:p text:style-name="P2">Page two.</text:p>
    </office:text>
</office:body>
The specifications for bulleted, numbered, and outline lists are contained entirely within the content.xml document, and are related to one another as shown in Figure 3.8, “Relationship Among Elements When Specifying Lists”.
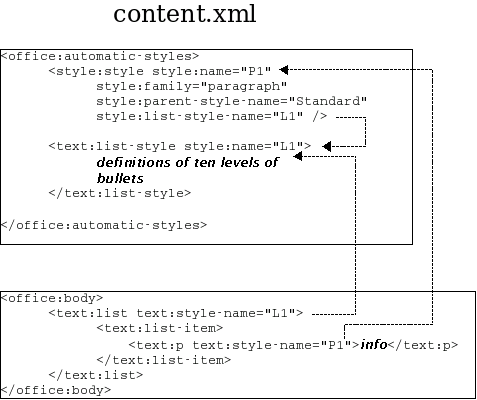
The essential information is contained in the <text:list-style> element, which contains ten <text:list-level-style-bullet> elements if the list is all bulleted, <text:list-level-style-number> elements if the list is all numbered, or a mixture if the list is outlined. In OpenOffice.org, there are ten of these elements because the application allows a maximum of ten list levels.
The <text:list-level-style-bullet> and <text:list-level-style-number> elements have the following attributes in common:
- text:level
An integer in the range 1 to 10.
- text:style-name
The value is a reference to a style in the styles.xml file. For bullets, OpenOffice.org sets this to "Bullet_20_Symbols", which is the name of a <style:style> that defines the font to be used for the bullet symbols. For numbering, the value is "Numbering_20_Symbols", which is the name of an empty <style:style> element.
- text:bullet-char
A single Unicode character to be used as the bullet; used for bulleted levels only.
The following attributes apply only to numbered lists.
- style:num-format
The format of the number; possible values are 1 for arabic numerals, a and A for lowercase and uppercase lettering, and i and I for lowercase and uppercase roman numerals.
- style:num-suffix
The character or characters to place after the number. OpenOffice.org creates this optional attribute for bulleted lists, even though it has no purpose.
- style:num-prefix
The character or characters to place before the number.
Thus, if you had numbered items of the form (a), (b), etc., the appropriate attributes would be style:num-prefix="(", style:num-format="a", and style:num-suffix=")".
Each <text:list-level-style-number> or <text:list-level-style-bullet> element contains a <style:list-level-properties> which specifies:
- text:min-label-width
The minimum space to allocate to the number or bullet.
- text:space-before
The amount to indent before the bullet. This attribute does not appear for the first level of bullet.
For bullets, the <style:list-level-properties> is followed by a <style:text-properties> that gives the style:font-name of the bullet symbol.
Once you have established the list styles, you use them by creating a <text:list>. This element will have a text:style-name attribute that refers to the list style you want, and that style determines whether the list is bulleted or numbered. Each item in the list will be contained within a <text:list-item> element.
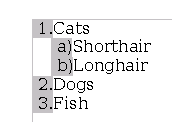
Example 3.17, “XML for an Outline List” shows the relevant part of the XML that produces the outline shown in Figure 3.9, “Screenshot of an Outline List”.
Example 3.17. XML for an Outline List
<office:automatic-styles>

    <text:list-style style:name="L1">
        <text:list-level-style-number text:level="1"
            text:style-name="Numbering_20_Symbols"
            style:num-prefix=" " style:num-suffix="."
            style:num-format="1">
            <style:list-level-properties
                text:space-before="0.25in"
                text:min-label-width="0.25in"/>
        </text:list-level-style-number>
        <text:list-level-style-number text:level="2"
            text:style-name="Numbering_20_Symbols"
            style:num-prefix=" " style:num-suffix=")"
            style:num-format="a">
            <style:list-level-properties
                text:space-before="0.5in"
                text:min-label-width="0.25in"/>
        </text:list-level-style-number>
        <text:list-level-style-bullet text:level="3"
            text:style-name="Bullet_20_Symbols"
            style:num-prefix=" " style:num-suffix=" "
            text:bullet-char="•">
            <style:list-level-properties
                text:space-before="0.75in"
                text:min-label-width="0.25in"/>
            <style:text-properties style:font-name="StarSymbol"/>
        </text:list-level-style-bullet>
        <!-- the bullet is repeated for levels 4 through 10 -->
    </text:list-style>

    <style:style style:name="P1"
        style:family="paragraph"
        style:parent-style-name="Standard"
        style:list-style-name="L1"/>
</office:automatic-styles>

<office:body>
    <office:text>
        <text:list text:style-name="L1">
            <text:list-item>
                <text:p text:style-name="P1">Cats</text:p>
                <text:list>
                    <text:list-item>
                        <text:p text:style-name="P1">Shorthair</text:p>
                    </text:list-item>
                    <text:list-item>
                        <text:p text:style-name="P1">Longhair</text:p>
                    </text:list-item>
                </text:list>
            </text:list-item>

            <text:list-item>
                <text:p text:style-name="P1">Dogs</text:p>
            </text:list-item>

            <text:list-item>
                <text:p text:style-name="P1">Fish</text:p>
            </text:list-item>
        </text:list>
    </office:text>
</office:body>
In Example 3.10, “Extracting Headings from an OpenDocument File”, we extracted the headings from an OpenOffice.org document and placed them into a new document. In this case study, we will add the headings to the current document. They will be represented as a bulleted list in a section at the beginning of the document. This is definitely the most ambitious example so far. In fact, at several points we almost abandoned the idea in favor of a simpler example. However, we realized that we would have to handle the tricky details at some point, and there was no time like the present.
This program is written in Java and is run from the command line. It takes two arguments: the name of the original file, and the name of the new file. We had considered simply modifying the original file in place, but if you ran the program twice you’d end up with two sets of bullet items. Here’s the plan:
- Copy all the JAR file entries other than content.xml directly to the new file.
- Parse the content.xml JAR entry and build a document tree.
- Add a new paragraph style, list style, and section style to the document tree. This avoids conflicts with existing styles. It also requires us to find the largest paragraph, list, and section style numbers so we can assign a unique identifier to our new styles.[4]
- Add a new section at beginning of the document body.
- Add a bulleted list to the section. The bullet levels correspond to the heading levels. This is an interesting process in itself, and we’ll talk about it when we get there.
- Write the updated document tree to the output file as the new content.xml JAR entry.
We start with the declarations of imported classes, which is not terribly illuminating, so we won’t duplicate it here. You can see them in the AddOutline.java file in the ch03 directory in the downloadable example files.
We continue with the class declaration and class variables. In addition to finding the last list, paragraph, and section style numbers, we also need to keep track of their location in the document tree so that we can add our new styles immediately after the existing ones.
public class AddOutline
{
    /* The parsed document */
    protected Document document = null;

    /* Permanent pointer to root element of output document */
    protected Element documentRoot;

    /* List of heading elements */
    protected NodeList headingElements;

    /* Last numbers for paragraph, list, and section styles */
    int         lastParaNumber = 0;
    int         lastListNumber = 0;
    int         lastSectionNumber = 0;

    /* Node locations of last paragraph, list, and section styles */
    Node        lastParaNode = null;
    Node        lastListNode = null;
    Node        lastSectionNode = null;

    /* File descriptors */
    File        inFile;
    File        outFile;

    /* Streams for reading and writing jar files */
    JarInputStream  inJar;
    JarOutputStream outJar;
The main program is simplicity itself; it checks for the proper number of arguments, creates a class, and hands the arguments to the modifyDocument method.
public static void main(String argv[]) {

    // check for proper number of arguments
    if (argv.length != 2) {
        System.err.println("usage: java AddOutline filename newfilename");
        System.exit(1);
    }

    AddOutline adder = null;

    adder = new AddOutline();
    adder.modifyDocument(argv);

} // main(String[])
Here is the modifyDocument method
protected void modifyDocument(String argv[])
{
    JarEntry inEntry;
    JarEntry outEntry;

    /* Create file descriptors */
    inFile = new File(argv[0]);
    outFile = new File(argv[1]);

    openInputFile();

    /* Get the manifest from the input file */
    Manifest manifest = inJar.getManifest( );

    /* Open output file, copying manifest if it existed */
    try
    {
        if (manifest == null)
        {
            outJar = new JarOutputStream(new FileOutputStream(outFile));
        }
        else
        {
            outJar = new JarOutputStream(new FileOutputStream(outFile),
                manifest);
        }
    }
    catch (IOException e)
    {
        System.err.println("Unable to open output file.");
        System.exit(1);
    }

    try
    {
        byte    buffer[] = new byte[16384];
        int     nRead;

        while ((inEntry = inJar.getNextJarEntry()) != null)
        {
            if (!inEntry.getName().equals("content.xml"))
            {
                /*
                 * Create output entry based on information in
                 * corresponding input entry
                 */
                outEntry = new JarEntry(inEntry);
                outJar.putNextEntry(outEntry);

                /* Copy data */
                while ((nRead = inJar.read(buffer, 0, 16384)) != -1)
                {
                    outJar.write(buffer, 0, nRead);
                }
            }
        }

        inJar.close();
        openInputFile();

        while ((inEntry = inJar.getNextJarEntry()) != null &&
            !(inEntry.getName().equals("content.xml")))
        {
            /* do nothing */
        }

        /*
         * Create output entry based on information in
         * corresponding input entry, but update its
         * timestamp.
         */
        outEntry = new JarEntry(inEntry);
        outEntry.setTime(new Date().getTime());
        outJar.putNextEntry(outEntry);


        document = readContent();   /* parse content.xml */
        processContent();   /* add styles and bulleted list */
        writeContent();     /* write it to output JAR file */

        outJar.close();
    }
    catch (IOException e)
    {
        System.err.println("Error while creating new file");
        e.printStackTrace();
    }
}
| | Start by opening the input file, and copying its manifest file (if any) to the output file. We use a method to open the input file, because we’ll need to do it twice. |
| | The next stage is to copy all the JAR entries other than the content.xml file. The try block that starts here extends to nearly the end of the method; any error gives a generic error message and a stack trace. |
| |
We must then close the input file and re-open it in order to find the
content.xml JAR entry and process it.
You may be wondering why we didn’t just do this as one loop,
copying all the entries except content.xml and
processing it specially. We tried that, and it doesn’t work; the
XML parser closes its input file when it finishes, so the loop would
fail with an "Input stream closed" error when it got to
the entry after content.xml In this second loop, we use a while loop with no statements in the loop body to get to the desired entry in the JAR file. |
| | Here’s where the main work of creating the outline occurs; we will look at it in detail shortly. |
Here’s the code that opens the input file; nothing special to see here—keep moving along.
public void openInputFile()
{
    try
    {
        inJar = new JarInputStream(new FileInputStream(inFile));
    }
    catch (IOException e)
    {
        System.err.println("Unable to open input file.");
        System.exit(1);
    }
}
It doesn’t take much code to parse the XML file either. We need to create a parser, set its input source to the entry from the JAR file, and get the result when everything finishes. We must also have Xerces ignore any DTDs it might find in the <!DOCTYPE>; the relevant line is shown in boldface, and uses the ResolveDTD class described in the section called “Getting Rid of the DTD”.
public Document readContent( )
{
    try
    {
        DOMParser parser = new org.apache.xerces.parsers.DOMParser();
        parser.setEntityResolver(new ResolveDTD());
        parser.parse(new InputSource(inJar));
        return parser.getDocument();
    }
    catch (Exception e)
    {
        e.printStackTrace(System.err);
        return null;
    }
}
Now we must add the styles and text to the document tree; this is done in method processContent. The lines shown in boldface are methods that do much of the heavy lifting; we will look at each of those methods individually.
public void processContent()
{
    Node        autoStyles;
    Element     officeBodyStart;    /* the <office:body> element */
    Element     officeTextStart;    /* the <office:text> element */
    Element     textStart;          /* place to insert new text */
    Element     element;

    if (document == null)
    {
        return;
    }

    documentRoot = (Element) document.getDocumentElement();

    headingElements = document.getElementsByTagName("text:h");
    if (headingElements.getLength() == 0)
    {
        return;
    }

    autoStyles = findFirstChild(documentRoot, "office:automatic-styles");
    findLastItems(autoStyles);

    /*
     * Prepare to add the new styles by going to the next
     * available number. We'll insert the new style before
     * the next sibling of the last node. We have to do this
     * crazy thing because there is no "insertAfter" method.
     */
    lastParaNumber++;
    lastListNumber++;
    lastSectionNumber++;
    if (lastParaNode != null)
    {
        lastParaNode = lastParaNode.getNextSibling();
    }
    if (lastListNode != null)
    {
        lastListNode = lastListNode.getNextSibling();
    }
    if (lastSectionNode != null)
    {
        lastSectionNode = lastSectionNode.getNextSibling();
    }

    /*
     * Create a <style:style> element for the new paragraph,
     * set its attributes and insert it after the last paragraph
     * style.
     */
    element = document.createElement("style:style");
    element.setAttribute("style:name", "P" + lastParaNumber);
    element.setAttribute("style:family", "paragraph");
    element.setAttribute("style:list-style-name", "L" + lastListNumber);
    element.setAttribute("style:parent-style-name", "Standard");
    autoStyles.insertBefore(element, lastParaNode);

    /*
     * Create a <style:style> element for the new section,
     * set its attributes and insert it after the last section
     * style.
     */
    element = document.createElement("style:style");
    element.setAttribute("style:name", "Sect" + lastSectionNumber);
    element.setAttribute("style:family", "section");
    addSectionProperties(element);
    autoStyles.insertBefore(element, lastSectionNode);

    /*
     * Create a <text:list-style> element for the new list,
     * set its attributes and insert it after the last list
     * style.
     */
    element = document.createElement("text:list-style");
    element.setAttribute("style:name", "L" + lastParaNumber);
    addBullets(element);

    autoStyles.insertBefore(element, lastListNode);

    /*
     * Now proceed to where we will add text;
     * it's just after the first <text:sequence-decls>
     * in the <office:text> in the <office:body>
     */
    officeBodyStart = findFirstChild(documentRoot, "office:body");
    officeTextStart = findFirstChild(officeBodyStart, "office:text");
    textStart = findFirstChild(officeTextStart, "text:sequence-decls");
    textStart = getNextElementSibling( textStart );

    /*
     * Add a section
     */
    element = document.createElement("text:section");
    element.setAttribute("text:style-name", "Sect" + lastSectionNumber);
    element.setAttribute("text:name", "Section" + lastSectionNumber);
    addHeadings(element);
    officeTextStart.insertBefore(element, textStart);
}
| | Gather up all the <text:h> elements in the document; if there are none, then our job here is done. |
| | This line uses a utility method (findFirstChild) to find the first child of the document root whose element name is office:automatic-styles. |
| | Expanding on the comment: we want to place the new paragraph style after the last paragraph style in the current document, the new section style after the last existing style, etc. However, there’s no insertAfter method, so we have to insertBefore the next sibling of the desired node. |
| | We haven’t discussed the <text:sequence-decls> element yet; it’s used for numbering items in OpenOffice.org documents. The main text in your document normally immediately follows this element. However, if you have any text nodes (such as newlines) between elements, the DOM getNextSibling will not give us what we want; thus, we use our own utility method getNextElementSibling. |
As long as we’re talking about the utility routines, they’re fairly short, so we may as well present them here:
/*
 * Find first element with a given tag name
 * among the children of the given node.
 */
public Element findFirstChild(Node startNode, String tagName)
{
    startNode = startNode.getFirstChild();
    while (! (startNode != null &&
        startNode.getNodeType() == Node.ELEMENT_NODE &&
        ((Element)startNode).getTagName().equals(tagName)))
    {
        startNode = startNode.getNextSibling();
    }
    return (Element) startNode;
}

/*
 *  Find next sibling that is an element
 */
public Element getNextElementSibling( Node node )
{
    node = node.getNextSibling();
    while (node != null &&
        node.getNodeType() != Node.ELEMENT_NODE)
    {
        node = node.getNextSibling();
    }
    return (Element) node;
}
The next method, addSectionProperties is more of a convenience method than anything else:
/*
 * Add the appropriate properties to make a single-column
 * section
 */
public void addSectionProperties(Element sectionStyle)
{
    Element properties;
    Element columns;

    properties = document.createElement("style:section-properties");
    properties.setAttribute("text:dont-balance-text-columns",
        "false");

    columns = document.createElement("style:columns");
    columns.setAttribute("fo:column-count", "0");
    columns.setAttribute("fo:column-gap", "0cm");

    properties.appendChild(columns);
    sectionStyle.appendChild(properties);
}
The addBullets method is also quite straightforward; it’s a simple loop to create the ten levels of bullet styles. All levels except the first have text:space-before. Ordinarily OpenOffice.org creates its bullet styles with the StarSymbol font, and references a style named Bullet Symbols in the styles.xml file. We are dispensing with that, so our new document will use the bullet symbol from the default font.
/*
 * Add the ten bullet styles to the <text:list-style> element.
 */
public void addBullets(Element listLevelStyle)
{
    int     level;
    Element bullet;
    Element properties;
    for (level = 1; level <= 10; level++)
    {
        bullet = document.createElement("text:list-level-style-bullet");
        bullet.setAttribute("text:level", Integer.toString(level));
        bullet.setAttribute("text:bullet-char", "\u2022");

        properties = document.createElement("style:list-level-properties");
        if (level != 1)
        {
            properties.setAttribute("text:space-before",
                Double.toString((level-1) * 0.5) + "cm");
        }
        properties.setAttribute("text:min-label-width", "0.5cm");
        bullet.appendChild(properties);
        listLevelStyle.appendChild(bullet);
    }
}
Adding the headings is conceptually a recursive process, since each new level of heading opens a nested list. However, there is no guarantee that heading levels will increase and decrease sequentially; a level three heading can be followed by a level seven heading, followed by a level one heading. (This is not good document design, but it is certainly possible.) Thus, rather than write this method recursively, we decided to use an array to simulate a stack. Here’s the pseudo-code:
- Set the current level to zero
-
For each heading in the document:
- If the heading level is greater than the current level, open one new <text:list> element for each level from the current level to the given heading level.
- If the heading level is less than the current level, close off open lists. Start at the current level and append that list to the end of the previous level. Then append that list to its predecessor, and so on until you get to the current level.
- Now accumulate all the text from the heading (skipping over formatting information and elements), and append it to the list at the current level.
- If you are not at level zero, close off all currently open lists as in step 2b.
/* Add headings to a section */
public void addHeadings(Element startElement)
{
    int currentLevel = 0;
    int headingLevel;
    int i;
    int level;
    Element ulist[] = new Element[10];
    Element listItem;
    Element paragraph;
    Text    textNode;

    for (i=0; i < headingElements.getLength(); i++)
    {
        headingLevel = Integer.parseInt(
            ((Element)headingElements.item(i)).getAttribute("text:level"));
        if (headingLevel > currentLevel)
        {
            for (level = currentLevel; level < headingLevel; level++)
            {
                ulist[level] = document.createElement(
                    "text:list");
                if (level == 0)
                {
                    ulist[level].setAttribute("text:style-name",
                        "L" + lastListNumber);
                }
            }
            currentLevel = headingLevel;
        }
        else if (headingLevel < currentLevel)
        {
            closeLists(ulist, currentLevel, headingLevel);
            currentLevel = headingLevel;
        }

        /* Now append this heading as an item to current level */

        listItem = document.createElement("text:list-item");
        paragraph = document.createElement("text:p");
        paragraph.setAttribute( "text:style-name", "P" + lastParaNumber );
        textNode = document.createTextNode("");
        textNode = accumulateText(
            (Element) headingElements.item(i),
            textNode);
        paragraph.appendChild(textNode);
        listItem.appendChild(paragraph);
        ulist[currentLevel-1].appendChild(listItem);

    }
    if (currentLevel != 1)
    {
        closeLists(ulist, currentLevel, 1);
    }
    startElement.appendChild(ulist[0]);
}
| | We add levels by creating <text:list> elements. Only the first level unordered list has a text:style-name attribute. |
| | The work of closing lists when the level decreases has been passed on to a separate routine. |
| | No matter whether we have added levels, closed levels, or are at the same level, we have to add a <text:list-item> at the current level. The accumulateText method gathers all the text nodes in the heading. |
| | Another call to the closeLists method closes any nested lists. |
Here is the closeLists method. Each <text:list> that is being closed is within a <text:list-item> element of its parent list.
/*
 * Join elements in the ulist[] array to close all open lists
 * from currentLevel back down to newLevel
 */
public void closeLists(Element ulist[], int currentLevel, int newLevel)
{
    int i;
    Element listItem;
    for (i = currentLevel-1; i > newLevel-1; i--)
    {
        listItem = document.createElement("text:list-item");
        listItem.appendChild(ulist[i]);
        ulist[i-1].appendChild(listItem);
    }
}
Finally, the accumulateText method, which recursively visits all the child nodes of the <text:h> element in question. Tabs and line breaks are replaced with a single blank each; any other elements are ignored.
/*
 * Return a Text node that contains all the accumulated text
 * from the child nodes of the given element.
 */
public Text accumulateText(Element element, Text text)
{
    Node node = element.getFirstChild();
    while (node != null)
    {
        if (node.getNodeType() == Node.TEXT_NODE)
        {
            text.appendData(((Text) node).getData());
        }
        else if (node.getNodeType() == Node.ELEMENT_NODE)
        {
            if (((Element) node).getTagName().equals("text:tab-stop") ||
                ((Element) node).getTagName().equals("text:line-break"))
            {
                text.appendData(" ");
            }
            else
            {
                text = accumulateText((Element) node, text);
            }
        }
        node = node.getNextSibling();
    }
    return text;
}
This covers all the methods used to process the document tree. All that remains is the method to serialize the document tree, writing it to the new document’s content.xml JAR file entry.
public void writeContent()
{
    if (document == null)
    {
        return;
    }
    PrintWriter out = null;
    try
    {
        out =
        new PrintWriter(new OutputStreamWriter(outJar, "UTF-8"));
    }
    catch (Exception e)
    {
        System.out.println("Error creating output stream");
        System.out.println(e.getMessage());
        System.exit(1);
    }
    OutputFormat oFormat = new OutputFormat("xml", "UTF-8", false);
    XMLSerializer serial = new XMLSerializer(out, oFormat);
    try
    {
        serial.serialize(document);
    }
    catch (java.io.IOException e)
    {
        System.out.println(e.getMessage());
    }
}
| | First, construct an output stream with your favorite encoding method |
| | A serializer requires an output format. This constructor’s three parameters are the output method (which is normally one of "xml", "html", or "text"); the character encoding, which should be "UTF-8" to keep your international clients happy; and a boolean that tells whether the output should be indented or not. Set this to false to avoid unwanted whitespace text nodes. |
| | The OutputFormat is used when creating the serializer. |