Table of Contents
A frame in an OpenDocument word processing document is much like a section; it’s an independent area of text which may have multiple columns. The difference between a frame and a section is that a frame may “float” and have the main text wrap around it. Frames are also anchored to the page, a pargraph, or an individual character. They may also act as though they are just another character in the stream of the text.
Each frame will have a <style:style> element whose style:name begins with fr and whose style:family is graphic (yes, frames are actually considered to be graphic objects). Its style:parent-style-name will be Frame.
Within the <style:style> is a <style:graphic-properties> element with these relevant attributes:
- style:vertical-rel
This attribute tells where the frame is anchored: page, paragraph-content, or char. If the frame is anchored as a character, then this attribute has the value baseline.
- style:vertical-pos
This gives the vertical position with respect to the anchor: top, middle, or bottom. If you have manually adjusted a frame by moving it, then this value will be from-top, and the offset will be in the body of the document.
- style:horizontal-rel
Depending upon the anchorage of the frame, this attribute can have the following values: page and page-content (the entire page or just the text area), page-start-margin and page-end-margin, paragraph and paragraph-content, paragraph-start-margin and paragraph-end-margin, or char. If you have frames nested in frames, you may use the following values as well: frame and frame-content (the entire frame or just the occupied area), frame-start-margin, and frame-end-margin.
- style:horizontal-pos
The values used for this attribute are left, center, right. If you have manually adjusted a frame by moving it, then this value will be from-left, and the offset will be in the body of the document.
- style:wrap
How should text wrap around this frame? none, left (all text appears at the left of the frame), right (all text appears to the right of the frame), parallel (text appears on both sides of the frame), dynamic (what OpenOffice.org calls “optimal” page wrap), and run-through (the text appears behind the frame). [5]
- style:number-wrapped-paragraphs
This attribute has the value no-limit unless you have checked the “First paragraph” option, in which case this attribute is not present.
A frame can have borders and columns. The borders are set as described in the section called “Borders and Padding”, and the columns are set as described in the section called “Sections”. A frame’s background color is set with the fo:background-color attribute; the value is a six-digit hex value. You may set the style:background-transparency attribute to a value from 0% to 100%.
In the body of the document, each frame is represented by a <draw:text-box> element, with these attributes:
- draw:style-name
A reference to the corresponding <style:style> for the frame within the <office:automatic-styles> section.
- draw:name
OpenOffice.org will assign a value of the form Framen where n is an integer; within OpenOffice.org, this appears within the Format … Frame … Options dialog pane.
- text:anchor-type
This attribute has one of the values page, frame, paragraph, char, or as-char.
Note
A frame that is anchored to the page appears between the <text:sequence-decls> element and the beginning of the page text, and has a text:anchor-page-number to identify the page to which it is anchored.
- svg:width
The width of the frame.
- svg:x, svg:y
These are included only if the frame is not left, right, or center aligned.
- draw:z-index
This attribute is used to determine the placement of overlapping elements; the larger the number, the closer to the “front” it is.
Inside the <draw:frame> element is a <draw:text-box> which has a fo:min-height attribute giving the frame’s minimum height. There are optional fo:max-height and fo:max-width attributes as well, which may be expressed as a length or a percentage. The actual text for the frame is inside the <draw:text-box> element.
Example 4.1, “XML Representation of a Frame” shows the style and body information for a frame that has text that wraps on the left.
Example 4.1. XML Representation of a Frame
<!-- in the style section -->
<style:style style:name="fr4" style:family="graphic"
  style:parent-style-name="Frame">
    <style:graphic-properties style:run-through="foreground"
      style:wrap="left"
      style:number-wrapped-paragraphs="no-limit"
      style:vertical-pos="top" style:vertical-rel="paragraph"
      style:horizontal-pos="center"
      style:horizontal-rel="paragraph" />
</style:style>

<!-- in the body section -->
<draw:frame draw:style-name="fr4" draw:name="Frame3"
  text:anchor-type="paragraph" svg:width="3cm"
  draw:z-index="2">
    <draw:text-box fo:min-height="0.2in">
        <text:p text:style-name="P1">
            A centered frame with text wrapping on its left.
        </text:p>
    </draw:text-box>
</draw:frame>
When you insert an image into an OpenDocument file, the application will store a copy of that image file in the Pictures directory and assign it an internal filename that, in the case of OpenOffice.org, looks something like this: 100000000000001800000018374E562F.png. The filename extension corresponds to the type of the original graphic.
As with many other items in OpenDocument, the specification for an image is contained both within the <office:automatic-styles> and <office:body> elements.
Each <style:style> element for an image has a style:family of graphic and a style:parent-style-name of Graphics. There is also a style:name attribute, which gives the name of this image syle.
The <style:style> element will contain a <style:graphic-properties> element that gives further information about the frame, exactly as described in the section called “Style Information for Frames”. Additionally, you will find the following attributes in the <style:properties> element which correspond to the settings in the graphic object toolbars shown in Figure 4.1, “Graphic Object Toolbars”.
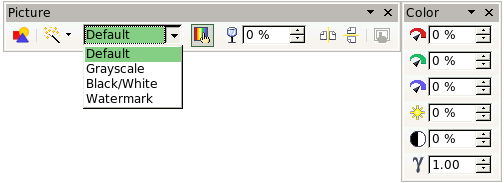
- draw:color-mode
This attribute has values which correspond to the drop-down menu: standard, greyscale, mono, and watermark.
- draw:transparency
Ranges from 0% (the default, opaque) to 100% (totally transparent).
- style:mirror
This attribute has the value horizontal, vertical, or horizontal vertical depending upon which of the icons on the toolbar have been selected.
- fo:clip
If you have chosen to clip the image, then the clip rectangle is specified as this example: rect(0.2cm 0.25cm 0cm 0.05cm) The values specify the amount of clipping at the top, right, bottom and left of the image. Hint: the values go clockwise from 12:00. (This option is not in the toolbar; it’s in the graphics dialog box.)
- draw:red, draw:green, draw:blue
The amount of extra red, green, or blue for the image. The value ranges from -100% (none of the color) to 100% (full amount of the color). The default is 0%.
- draw:luminance
The extra brightness of the images; range goes from -100% to 100%. The default is 0%.
- draw:contrast
Amount of extra contrast, also ranging from -100% to 100%. The default is 0%.
- draw:gamma
This value adjusts the brightness of midtone levels (rather than luminance, which brightens everything). Values range from 10% upwards. The default is 100%
Each image in the text is represented by a <draw:image> contained in a <draw:frame> element. The <draw:image> element has these attributes:
- draw:style-name
A reference to a <style:style> within the <office:automatic-styles> section. The name begins with the letters fr, since images are represented as frames, as discussed in the section called “Frames”
.- draw:name
This is an optional attribute; the Openoffice.org application will assign a value of the form Graphicsn where n is an integer.
- xlink:href
A reference to the image file; it begins with Pictures/ and is followed by the internal file name.
- svg:width, svg:height
This is the size of your image, with scaling factors taken into account. For example, if your original picture is one centimeter by one centimeter and you scale it to 75% horizontally and 125% vertically, the width will be 0.75cm and the height 1.25cm.
- svg:rel-width, svg:rel-height
These are percentages of the image’s original size. If the value is scale, that means that the given dimension is kept in scale with the other dimension.
- xlink:type, xlink:show, xlink:actuate
These three items always have the values simple (for xlink:type), embed (for xlink:show), and onLoad (for xlink:actuate).
A background image for a frame is entirely described in the style portion of your document. You need to put a <style:background-image> element within the frame’s <style:graphic-properties> element. This element will have xlink:href, xlink:actuate, and xlink:type attributes as described in the section called “Body Information for Images in Text” (even though the attributes are in the style section, not the body section).
The <style:background-image> has the following additional properties:
- style:repeat
The background image can be tiled repeat (the default if you don’t provide this attribute), stretched to fit the frame stretch, or appear at its normal size no-repeat.
- style:position
If the background image is not repeated, then you should tell where to place the image within the frame. The value of this attribute consists of two whitespace-separated values giving the vertical position of the image (top, bottom, or center) and horizontal position of the image (left, right, or center). The default is centered horizontally and vertically if you leave out this attribute.
- draw:opacity
The opacity of the background image, with values ranging from 0% (transparent) to 100% (opaque). Note that transparency equals 100% minus opacity.
OpenDocument allows you to enter fields with dynamic values into a document. These include date, time, and document information.
To insert a date, use a <text:date> element with a text:date-value attribute, which contains the date in ISO8601 format. The style:data-style-name attribute is a reference to an automatic style that describes how to display the date. You may use <text:date> as an empty element; when OpenOffice.org saves a file, the element is given content equivalent to the date as your style would display it. This is probably done so that an application that ignores all elements and uses content only will produce a reasonable result. Nonetheless, OpenOffice.org uses only the value of the text:date-value when it displays the field.
To insert a time use a <text:time> element with a text:time-value attribute, which contains the time in ISO8601 format. The style:data-style-name attribute is a reference to an automatic style that describes how to display the time. As with <text:date>, you may use <text:time> as an empty element even though a document saved by an application such as OpenOffice.org will have content.
In both cases, these elements will display the current date and time; if you want them to display the date and time at which they were inserted into the document, add the attribute text:fixed with a value of true.
The current page number is specified with the <text:page-number> element; its text:select-page attribute may have a value of current, previous, or next. Your best choice is clearly current.
The page count is specified with the <text:page-count> element. Again, OpenOffice.org puts content in these elements, but you don’t have to.
The subject, title, and author fields get their information from elements in the meta.xml file, as shown in Table 4.1, “Document Information Fields”. You may create these as empty elements; the application should fill them with their current values.
In the section called “Specifying a Page Master” we discussed how you set up the page layout to include room for footnotes. Within the document body, each footnote is contained within a <text:note> element, which has a unique text:id attribute of the form ftnn, where n is an integer. Footnotes set the text:note-class attribute to footnote; endnotes set the value to endnote.
Within the <text:note> is a <text:note-citation> element that describes the foonote/endnote marker. If you choose automatic numbering for the footnote, then the element’s content is the footnote number. If you choose a character for the footnote marker, then the <text:note-citation> element contains the marker character. The marker is duplicated in the text:label attribute.
The <text:note-citation> is followed by the <text:note-body> element, which contains the text in your footnote.
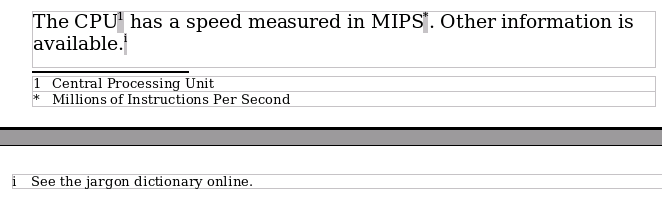
Figure 4.2, “Footnotes and Endnotes” shows a numbered footnote, a footnote marked with an asterisk, and a numbered endnote. The corresponding XML is in Example 4.2, “Footnote and Endnote XML”. The Footnote and Endnote styles come from the styles.xml file.
Example 4.2. Footnote and Endnote XML
<text:p text:style-name="Standard">
    The CPU
    <text:note text:id="ftn1"
      text:note-class="footnote">
        <text:note-citation>1</text:note-citation>
        <text:note-body>
            <text:p text:style-name="Footnote">
                Central Processing Unit
            </text:p>
        </text:note-body>
    </text:note>
    has a speed measured in MIPS
    <text:note text:id="ftn2"
      text:note-class="footnote">
        <text:note-citation text:label="*">*</text:note-citation>
        <text:note-body>
            <text:p text:style-name="Footnote">
                Millions of Instructions Per Second
            </text:p>
        </text:note-body>
    </text:note>. Other information is available.
    <text:note text:id="ftn3" text:note-class="endnote">
        <text:note-citation>i</text:note-citation>
        <text:note-body>
            <text:p text:style-name="Endnote">
                See the jargon dictionary online.
            </text:p>
        </text:note-body>
    </text:note>
</text:p>
OpenDocument files track three types of changes: insertions, deletions, and format changes. These are all combined into a <text:tracked-changes> element at the beginning of the <office:text> element. Each change is contained in a <text:changed-region> element with a unique text:id attribute.
A <text:changed-region> contains one of three elements:
- <text:insertion>
- <text:deletion>
- <text:format-change>
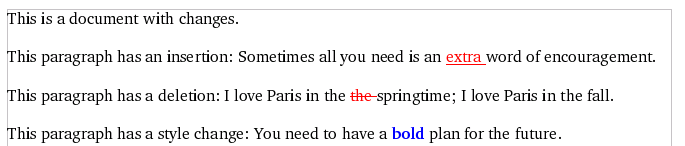
These all share a common <office:change-info> element, which has dc:creator and dc:date attributes. In the case of a deletion, the <office:change-info> element is followed by the deleted material. (If it is only a single word, then it is enclosed in a copy of the parent <text:p> or <text:h> element from which it was deleted.) Figure 4.3, “Document with Changes Tracked” shows a section of a document with these three types of changes, and Example 4.3, “OpenDocument Change Tracking” shows the markup.
Example 4.3. OpenDocument Change Tracking
<text:tracked-changes text:track-changes="false">
    <text:changed-region text:id="ct1256620744">
        <text:insertion>
            <office:change-info>
                <dc:creator>Phuong Nguyen</dc:creator>
                <dc:date>2005-06-04T20:57:00</dc:date>
            </office:change-info>
        </text:insertion>
    </text:changed-region>
    <text:changed-region text:id="ct1256247728">
        <text:deletion>
            <office:change-info>
                <dc:creator>Phuong Nguyen</dc:creator>
                <dc:date>2005-06-04T20:57:00</dc:date>
            </office:change-info>
            <text:p text:style-name="P1">the </text:p>
        </text:deletion>
    </text:changed-region>
    <text:changed-region text:id="ct1257148536">
        <text:format-change>
            <office:change-info>
                <dc:creator>Henry McCoy</dc:creator>
                <dc:date>2005-06-04T21:00:00</dc:date>
            </office:change-info>
        </text:format-change>
</text:changed-region>
In the body of the text, we must be able to determine where these accumulated changes have occurred. For deletions, a <text:change> element is placed where the deletion occurred; its text:change-id attribute will refer to the corresponding text:id of the <text:changed-region>.
For insertions and format changes, the start of the change is marked with an empty <text:change-start> element, and the end with an empty <text:change-end> element. Each of these also has a text:change-id attribute that refers to the corresponding text:id. Example 4.4, “Change Tracking in the Modified Text” shows the markup for the changes described in the preceding example.
Example 4.4. Change Tracking in the Modified Text
<text:p text:style-name="P1">This paragraph has an insertion:
Sometimes all you need is an
<text:change-start text:change-id="ct1256620744"/>extra
<text:change-end text:change-id="ct1256620744"/>word of
encouragement.</text:p>

<text:p text:style-name="P1"/>

<text:p text:style-name="P1">This paragraph has a deletion: I love Paris
in the <text:change text:change-id="ct1256247728"/>springtime;
I love Paris in the fall.</text:p>

<text:p text:style-name="P1"/>

<text:p text:style-name="P1">This paragraph has a style change:
You need to have a
<text:change-start text:change-id="ct1257148536"/><text:span
text:style-name="T3">bold</text:span><text:change-end
text:change-id="ct1257148536"/> plan for the future.</text:p>
Text tables in OpenDocument are, as with HTML tables, made up of rows, each of which contains cells. Again, the information for the table layout is in the <office:automatic-styles> section and the table data within the <office:body> section. In this section, when we refer to a length, we mean a number followed by a length unit; for example, 3.5cm.
Within the <office:automatic-styles> element, you will find the following for each table:
- one <style:style> element with a style:family of table describing general table attributes.
- each unique column style has a <style:style> element with a style:family of table-column describing the column width.
- each unique row style has a <style:style> element with a style:family of table-row describing the row attributes.
- a <style:style> element with a style:family of table-cell for each different style of cell in the table.
The information that styles the whole table corresponds to the information that is set in the portion of OpenOffice.org’s “Format Table” dialog box shown in Figure 4.4, “Table Width and Spacing”. In this section, we will be talking in terms of that particular application in order to make the concepts more concrete.
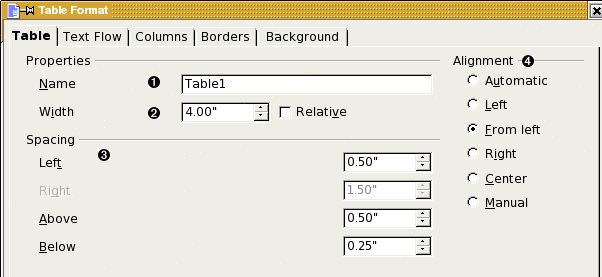
The “whole table’s” <style:style> element has a style:name attribute containing the table name (1). Its child <style:table-properties> element contains the remaining information:
The style:width attribute (2) is a length that gives the total width of the table. If you check the “Relative” checkbox, then the width of the table as a percentage of the page width is stored in the style:rel-width attribute.
The spacing (3) is represented by fo:margin-left, fo:margin-right, fo:margin-top, and fo:margin-bottom attributes, which all have length values. The left and right margins plus the width always add up to the distance between the page margins.
In a document created by OpenOffice.org, the application sets some of the margins depending upon the setting of the alignment (4). The table:align attribute interacts with the margins in strange and wondrous ways when OpenOffice.org creates a document. If you are creating a document programmatically, set this attribute to
- margins, and set both left and right margins (the “Manual” option). If you don’t set them, then the table will fill the page width (the “Automatic” option).
- left, and set the left margin; OpenOffice.org sets the right margin. (This corresponds to the “Left” and “From left” entries in the dialog box.)
- right, and set the left margin; the right margin is set to zero. There is no “From right” option.
- center, and don’t set left or right margin, since OpenOffice.org will calculate them for you when the document is opened.
The top and bottom margins are up to you, no matter what alignment you choose.
Figure 4.5, “Other Table Properties” is the dialog box that corresponds to other attributes in the table’s <style:table-properties> element.
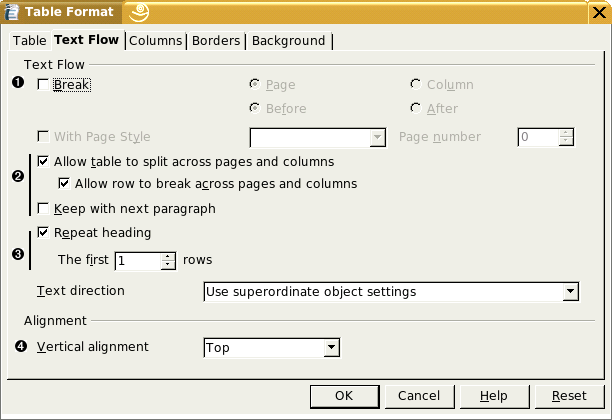
break-after and break-before (with values page or column)
If you don’t want tables to split across pages and columns, then set the style:may-break-between-rows attribute to false. The “allow row to break across pages and columns” is set in the row style specifications.
“Keep with next paragraph” corresponds to the fo:keep-with-next attribute set to always.
- “Repeat heading” is handled in the body of the text, not the style.
- “Vertical alignment” is set on the cells that are currently highlighted, not on the entire table.
A column’s <style:style> element has a a style:family of table-column and a style:name attribute of the form demoTable.A (table name followed by a column designator). If all the columns have the same width, then you will have only one such element.
A column’s child <style:table-column-properties> element will have a style:column-width attribute, giving the column width as a length (3.5cm), and a style:rel-column-width, which is in the form of an integer followed by an asterisk. If you add up all the relative column widths, you will get a sum of 65535.
Rows have <style:style> elements with a style:family of table-row. Their style:name attribute has the form demoTable.3 (table name, integer). This element contains a <style:table-row-properties> element that can specify such attributes as style:row-height, style:min-row-height (both length values), style:use-optimal-row-height (true or false), and fo:keep-together, which is set to always if you don’t want to allow a row to break across a page or column boundary. (The default is auto.)
When creating an OpenDocument file, put in the row style specifications only if you don’t want the defaults.
Cell styles are specified in <style:style> elements with a style:family of table-cell. Their style:name attribute has the form demoTable.C3 (table name, column designator, and an integer). OpenOffice.org does not necessarily create a separate style for every cell; nor should you. Create only as many styles as are needed to acommodate all the different cell styles in your table.
The child <style:table-cell-properties> element is where you set
- fo:vertical-align, with values top, middle, or bottom.
- borders and padding, as described in the section called “Borders and Padding”. Make sure you don’t specify a border twice. For example, when OpenOffice.org creates a table, all the cells within a row have a left border, but only the last cell has a right border. (If you specified left and right borders on all cells, you’d see two lines between cells.) Similarly, within a column, only the top cell has a top border.
- background color, using the fo:background-color attribute.
In OpenOffice.org, these specifications are placed in the document with the table style first, followed by the column styles, followed by the row styles and cell styles for each different row and cell.
Example 4.5, “Three by Two table without Repeating Headers” shows a three-by-two table without repeating headers.
Example 4.5. Three by Two table without Repeating Headers
<table:table table:name="demoTable" table:style-name="demoTable"><table:table-column table:style-name="demoTable.A" table:number-columns-repeated="3"/>
<table:table-row>
<table:table-cell table:style-name="demoTable.A1"
office:value-type="string"> <text:p>row 1, col 1</text:p> </table:table-cell> <table:table-cell table:style-name="demoTable.A1" office:value-type="string"> <text:p>row 1, col 2</text:p> </table:table-cell> <table:table-cell table:style-name="demoTable.C1" office:value-type="string"> <text:p>row 1, col 3</text:p> </table:table-cell> </table:table-row> <table:table-row> <table:table-cell table:style-name="demoTable.A2" office:value-type="string"> <text:p>row 2, col 1</text:p> </table:table-cell> <table:table-cell table:style-name="demoTable.A2" office:value-type="string"> <text:p>row 2, col 2</text:p> </table:table-cell> <table:table-cell table:style-name="demoTable.C2" office:value-type="string"> <text:p>row 2, col 3</text:p> </table:table-cell> </table:table-row> </table:table>
| | A table’s content is contained within a <table:table> element, which has a table:style-name attribute which references the <style:style> with the same name. It has non-alphanumeric characters translated to their hexadecimal equivalents. The table:name is the “display name” of the table that an application’s user interface shows you. |
| | In this example, all three columns have the same style, so the <table:table-column> has a table:number-columns-repeated attribute. If all three columns had different styles, then the XML would contain three <table:table-column> elements, each with a different table:style-name reference. |
| | If you have specified that your table does not have repeating headings (item 3 in Figure 4.5, “Other Table Properties”), then the <table:table-row> elements follow immediately. If your table has repeating headers, then the first n rows of the table will be enclosed in a <table:table-header-rows> element, where n is the number of header rows you specified. |
| | Each <table:table-row> contains the <table:table-cell> elements for that row. Each <table:table-cell> has a table:style-name reference and a office:value-type, which has the value string. (We will encounter other values when we discuss spreadsheets.) |
Horizontally merged cells are simple in OpenDocument. The first of the cells gets a table:number-columns-spanned attribute, whose value is the number of columns that have been merged. That cell is followed by n-1 <table:covered-table-cell> elements. Thus, a cell that spans three columns might look like Example 4.6, “Cells Spanning Columns”. In this example, the text:style-name attributes have been removed for ease of reading.
Example 4.6. Cells Spanning Columns
<table:table-cell table:style-name="horizspan.B2"
  table:number-columns-spanned="3" office:value-type="string">
    <text:p>This text spans three columns</text:p>
</table:table-cell>
<table:covered-table-cell />
<table:covered-table-cell />
Cells that span rows are an entirely different story. Rather than a simple table:number-rows-spanned attribute, OpenDocument represents the cells on either side of the large cell as sub-tables. Figure 4.6, “Cells Spanning Rows” shows a table with a cell that spans two rows. As far as OpenDocument is concerned, the table has only two rows. The second row consists of:
- A cell that contains a two-by-one subtable
- An ordinary cell (labelled main 2,2)
- A cell that spans two columns and contains a two-by-two subtable.

Example 4.7, “XML for Cells Spanning Rows” shows the relevant XML for the second row of this table named vertSpan. Most of the text:style-name and all of the office:value-type attributes removed for ease of reading. We’ve also added comments within the listing.
Example 4.7. XML for Cells Spanning Rows
<table:table-row>
    <table:table-cell>
        <table:table table:is-sub-table="true">
            <table:table-column table:style-name="vertSpan.A"/>

            <table:table-row>
                <!-- notice how the style name is constructed
                    for a sub-table cell -->
                <table:table-cell table:style-name="vertSpan.A2.1.1"
                  office:value-type="string">
                    <text:p>left 1,1</text:p>
                </table:table-cell>
            </table:table-row>

            <table:table-row>
                <table:table-cell>
                    <text:p>left 2, 1</text:p>
                </table:table-cell>
            </table:table-row>
        </table:table>
    </table:table-cell>

    <table:table-cell table:style-name="vertSpan.B2">
        <text:p>main 2,2</text:p>
    </table:table-cell>

    <table:table-cell table:number-columns-spanned="2">
        <table:table table:is-sub-table="true">
            <table:table-column table:number-columns-repeated="2"/>

            <table:table-row>
                <table:table-cell table:style-name="vertSpan.C2.1.1">
                    <text:p>right 1,1</text:p>
                </table:table-cell>
                <table:table-cell table:style-name="vertSpan.C2.2.1">
                    <text:p>right 1,2</text:p>
                </table:table-cell>
            </table:table-row>

            <table:table-row>
                <table:table-cell>
                    <text:p>right 2,1</text:p>
                </table:table-cell>
                <table:table-cell>
                    <text:p>right 2,2</text:p>
                </table:table-cell>
            </table:table-row>
        </table:table> <!-- ends subtable -->

    </table:table-cell>

    <!-- NOTE the covered-table-cell is required because
    the right sub-table has covered the rightmost column -->
    <table:covered-table-cell/>
</table:table-row>
Let’s put this information to use by creating a document that contains a table that summarizes the changes made in another OpenDocument file. We will use XSLT to do this transformation.
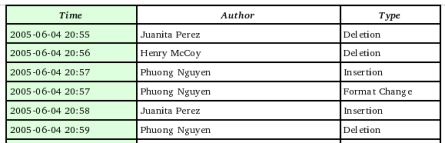
Figure 4.7, “Change Summary, Sorted by Time” shows a portion of some sample output, reduced and cropped to save space. It was produced by running the XSL transformation, changetable.xsl, on file changetest.odt, which you can find in directory ch04 in the downloadable example files.
The table will contain three columns: the time, author, and type of change. It can be sorted by any of the three columns, and the column that is used for the sort is highlighted in light green. The transformation accepts a parameter named sort with the value of time, author, or type to specify the sorting criterion.
The stylesheet begins with an <xsl:stylesheet> that provides all the relevant namespaces and an <xsl:output> element that sets the output method to XML and turns on indenting. These can be copied straight from Example C.6, “XSLT Framework for Transforming OpenDocument” and are not shown here.
Here’s the XSLT to set up the “outer structure” of the output document.
<xsl:template match="/">
<office:document-content xmlns:office="http://openoffice.org/2000/office"
xmlns:style="http://openoffice.org/2000/style"
xmlns:text="http://openoffice.org/2000/text"
xmlns:fo="http://www.w3.org/1999/XSL/Format"
xmlns:table="http://openoffice.org/2000/table"
office:class="text">
<office:scripts/>
<office:font-face-decls>
<style:font-face style:name="Bitstream Charter"
svg:font-family="'Bitstream Charter'"
style:font-pitch="variable"/>
</office:font-face-decls>
<office:automatic-styles>
<style:style style:name="P1" style:family="paragraph">
<style:text-properties style:font-name="Bitstream Charter"
fo:font-size="10pt" style:font-size-asian="10pt"
style:font-size-complex="10pt"/>
</style:style>
<style:style style:name="P2" style:family="paragraph">
<style:paragraph-properties fo:text-align="center"/>
<style:text-properties style:font-name="Bitstream Charter"
fo:font-size="10pt" style:font-size-asian="10pt"
style:font-size-complex="10pt"
fo:text-align="center"
fo:font-style="italic"
fo:font-weight="bold"/>
</style:style>
<style:style style:name="ctable" style:family="table">
<style:table-properties
style:width="15cm" table:align="center" />
</style:style>
<style:style style:name="ctable.A" style:family="table-column">
<style:table-column-properties style:column-width="4.5cm" />
</style:style>
<style:style style:name="ctable.B" style:family="table-column">
<style:table-column-properties style:column-width="7cm"/>
</style:style>
<style:style style:name="ctable.C" style:family="table-column">
<style:table-column-properties style:column-width="3.5cm"/>
</style:style>
<style:style style:name="ctable.A1" style:family="table-cell">
<style:table-cell-properties
fo:border-top="0.035cm solid #000000"
fo:border-right="none"
fo:border-bottom="0.035cm solid #000000"
fo:border-left="0.035cm solid #000000"
fo:padding="0.10cm">
<xsl:call-template name="set-bg-color">
<xsl:with-param
name="col-type">time</xsl:with-param>
</xsl:call-template>
</style:table-cell-properties>
</style:style>
<style:style style:name="ctable.B1" style:family="table-cell">
<style:table-cell-properties
fo:border-top="0.035cm solid #000000"
fo:border-right="none"
fo:border-bottom="0.035cm solid #000000"
fo:border-left="0.035cm solid #000000"
fo:padding="0.10cm">
<xsl:call-template name="set-bg-color">
<xsl:with-param
name="col-type">author</xsl:with-param>
</xsl:call-template>
</style:table-cell-properties>
</style:style>
<style:style style:name="ctable.C1" style:family="table-cell">
<style:table-cell-properties
fo:border="0.035cm solid #000000"
fo:padding="0.10cm">
<xsl:call-template name="set-bg-color">
<xsl:with-param
name="col-type">type</xsl:with-param>
</xsl:call-template>
</style:table-cell-properties>
</style:style>
<style:style style:name="ctable.A2" style:family="table-cell">  <style:table-cell-properties
fo:border-top="none"
fo:border-right="none"
fo:border-bottom="0.035cm solid #000000"
fo:border-left="0.035cm solid #000000"
fo:padding="0.10cm">
<xsl:call-template name="set-bg-color">
<xsl:with-param name="col-type">time</xsl:with-param>
</xsl:call-template>
</style:table-cell-properties>
</style:style>
<style:style style:name="ctable.B2" style:family="table-cell">
<style:table-cell-properties
fo:border-top="none"
fo:border-right="none"
fo:border-bottom="0.035cm solid #000000"
fo:border-left="0.035cm solid #000000"
fo:padding="0.10cm">
<xsl:call-template name="set-bg-color">
<xsl:with-param name="col-type">author</xsl:with-param>
</xsl:call-template>
</style:table-cell-properties>
</style:style>
<style:style style:name="ctable.C2" style:family="table-cell">
<style:table-cell-properties
fo:border-top="none"
fo:border-right="0.035cm solid #000000"
fo:border-bottom="0.035cm solid #000000"
fo:border-left="0.035cm solid #000000"
fo:padding="0.10cm">
<xsl:call-template name="set-bg-color">
<xsl:with-param name="col-type">type</xsl:with-param>
</xsl:call-template>
</style:table-cell-properties>
</style:style>
</office:automatic-styles>
<office:body>
<office:text>
<table:table table:name="ctable" table:style-name="ctable">
<style:table-cell-properties
fo:border-top="none"
fo:border-right="none"
fo:border-bottom="0.035cm solid #000000"
fo:border-left="0.035cm solid #000000"
fo:padding="0.10cm">
<xsl:call-template name="set-bg-color">
<xsl:with-param name="col-type">time</xsl:with-param>
</xsl:call-template>
</style:table-cell-properties>
</style:style>
<style:style style:name="ctable.B2" style:family="table-cell">
<style:table-cell-properties
fo:border-top="none"
fo:border-right="none"
fo:border-bottom="0.035cm solid #000000"
fo:border-left="0.035cm solid #000000"
fo:padding="0.10cm">
<xsl:call-template name="set-bg-color">
<xsl:with-param name="col-type">author</xsl:with-param>
</xsl:call-template>
</style:table-cell-properties>
</style:style>
<style:style style:name="ctable.C2" style:family="table-cell">
<style:table-cell-properties
fo:border-top="none"
fo:border-right="0.035cm solid #000000"
fo:border-bottom="0.035cm solid #000000"
fo:border-left="0.035cm solid #000000"
fo:padding="0.10cm">
<xsl:call-template name="set-bg-color">
<xsl:with-param name="col-type">type</xsl:with-param>
</xsl:call-template>
</style:table-cell-properties>
</style:style>
</office:automatic-styles>
<office:body>
<office:text>
<table:table table:name="ctable" table:style-name="ctable">  <table:table-column table:style-name="ctable.A" />
<table:table-column table:style-name="ctable.B" />
<table:table-column table:style-name="ctable.C" />
<table:table-header-rows>
<table:table-row>
<table:table-cell table:style-name="ctable.A1"
office:value-type="string">
<text:h text:style-name="P2">Time</text:h>
</table:table-cell>
<table:table-cell table:style-name="ctable.B1"
office:value-type="string">
<text:h text:style-name="P2">Author</text:h>
</table:table-cell>
<table:table-cell table:style-name="ctable.C1"
office:value-type="string">
<text:h text:style-name="P2">Type</text:h>
</table:table-cell>
</table:table-row>
</table:table-header-rows>
<xsl:choose>
<table:table-column table:style-name="ctable.A" />
<table:table-column table:style-name="ctable.B" />
<table:table-column table:style-name="ctable.C" />
<table:table-header-rows>
<table:table-row>
<table:table-cell table:style-name="ctable.A1"
office:value-type="string">
<text:h text:style-name="P2">Time</text:h>
</table:table-cell>
<table:table-cell table:style-name="ctable.B1"
office:value-type="string">
<text:h text:style-name="P2">Author</text:h>
</table:table-cell>
<table:table-cell table:style-name="ctable.C1"
office:value-type="string">
<text:h text:style-name="P2">Type</text:h>
</table:table-cell>
</table:table-row>
</table:table-header-rows>
<xsl:choose>  <xsl:when test="$sort = 'time' or $sort = 'author'">
<xsl:apply-templates
select="office:document-content/office:body/
office:text/text:tracked-changes"/>
</xsl:when>
<xsl:otherwise>
<xsl:apply-templates
select="office:document-content/office:body/
office:text/text:tracked-changes/
text:changed-region[text:insertion]"/>
<xsl:apply-templates
select="office:document-content/office:body/
office:text/text:tracked-changes/
text:changed-region[text:deletion]"/>
<xsl:apply-templates
select="office:document-content/office:body/
office:text/text:tracked-changes/
text:changed-region[text:format-change]"/>
</xsl:otherwise>
</xsl:choose>
</table:table>
</office:text>
</office:body>
</office:document-content>
</xsl:template>
<xsl:when test="$sort = 'time' or $sort = 'author'">
<xsl:apply-templates
select="office:document-content/office:body/
office:text/text:tracked-changes"/>
</xsl:when>
<xsl:otherwise>
<xsl:apply-templates
select="office:document-content/office:body/
office:text/text:tracked-changes/
text:changed-region[text:insertion]"/>
<xsl:apply-templates
select="office:document-content/office:body/
office:text/text:tracked-changes/
text:changed-region[text:deletion]"/>
<xsl:apply-templates
select="office:document-content/office:body/
office:text/text:tracked-changes/
text:changed-region[text:format-change]"/>
</xsl:otherwise>
</xsl:choose>
</table:table>
</office:text>
</office:body>
</office:document-content>
</xsl:template>
| | Style P1 will be used for all text except the table headings, which use style P2, which makes headings bold, italic, and centered. |
| | The table is 15 centimeters wide, with columns of 4.5, 7, and 3.5 centimeters. |
| | Because we will be adding a background color to only one cell in each row, we have to create separate styles for each cell in a row. Styles ctable.A1,ctable.B1, and ctable.C1 are for the cells in the first row. Note that only ctable.C1 has a right border. |
| | This template will add the background color to the style if the global sort parameter (specified by the user) matches the col-type, which is the “type of data this column contains.” |
| | We have to create a similar set of styles for the second and subsequent rows; none of these has a top border (since the bottom margin of the row above fills in that line) and, again, only ctable.C2 has a right border. |
| | The table begins with the three <table:table-column> elements, followed by the first row of the table. The first row is enclosed in a <table:table-header-rows> element, so it will be repeated in case the table extends across a page boundary. |
| | If the user decides to sort by time or author, all we have to do is hand all the <text:tracked-changes> elements off to a template and let it do the sorting by the values of the <dc:date> or <dc:creator>. If the user decides to sort by type, then we process all the insertions first, then the deletions, then the format changes. |
Here is the template that sets the background color attribute if the column name given to it as a parameter is the column we are sorting on:
<xsl:template name="set-bg-color">
    <xsl:param name="col-type"/>
    <xsl:if test="$sort = $col-type">
        <xsl:attribute name="fo:background-color">#ddffdd</xsl:attribute>
    </xsl:if>
</xsl:template>
The following template handles the sorting of time or date; notice that we must search the descendant:: axis, since the <office:change-info> element is a grandchild of the <text:changed-region>.
<xsl:template match="text:tracked-changes">
    <xsl:choose>
    <xsl:when test="$sort = 'time'">
        <xsl:apply-templates select="text:changed-region">
            <xsl:sort
                select="descendant::office:change-info/dc:date"/>
        </xsl:apply-templates>
    </xsl:when>
    <xsl:when test="$sort = 'author'">
        <xsl:apply-templates select="text:changed-region">
            <xsl:sort
                select="descendant::office:change-info/dc:creator"/>
        </xsl:apply-templates>
    </xsl:when>
    </xsl:choose>
</xsl:template>
Each <text:changed-region> creates a new table row, with the appropriate data in each cell. We call a template named format-time to change the ISO8601 format to something slightly less unpleasant.
<xsl:template match="text:changed-region">
    <table:table-row>
        <table:table-cell table:style-name="ctable.A2">
            <text:p text:style-name="P1">
                <xsl:call-template name="format-time">
                    <xsl:with-param name="time"
                        select="descendant::office:change-info/dc:date"/>
                </xsl:call-template>
            </text:p>
        </table:table-cell>

        <table:table-cell table:style-name="ctable.B2">
            <text:p text:style-name="P1">
                <xsl:value-of
                    select="descendant::office:change-info/dc:creator"/>
            </text:p>
        </table:table-cell>

        <table:table-cell table:style-name="ctable.C2">
            <text:p text:style-name="P1">
                <xsl:choose>
                    <xsl:when test="text:insertion">
                        <xsl:text>Insertion</xsl:text>
                    </xsl:when>
                    <xsl:when test="text:deletion">
                        <xsl:text>Deletion</xsl:text>
                    </xsl:when>
                    <xsl:when test="text:format-change">
                        <xsl:text>Format Change</xsl:text>
                    </xsl:when>
                </xsl:choose>
            </text:p>
        </table:table-cell>
    </table:table-row>
</xsl:template>
Here is the time formatter; it simply removes the T from the time, and drops the seconds from the time of day.
<xsl:template name="format-time">
    <xsl:param name="time"/>
    <xsl:value-of select="substring-before($time, 'T')"/>
    <xsl:text> </xsl:text>
    <xsl:value-of select="substring(substring-after($time, 'T'),1,5)"/>
</xsl:template>
The stylesheet ends with a template that will eliminate any stray text nodes from the output:
<xsl:template match="text()"/>
[5] If you want the frame in the background, then set the style:run-through attribute to background instead of foreground.