Preparing your design for simulation
PSpice is a mixed analog/digital electrical circuit design simulator that can calculate the behavior of analog-only, mixed analog/digital, and digital-only circuit designs with speed and accuracy. PSpice simulates mixed analog/digital circuit designs, calculates voltages and currents of the analog devices and nodes, and calculates the states of digital nodes (nodes connected to digital devices only).
Creating designs for simulation
In order to simulate a design with PSpice that is created in the design entry programs, Capture, you must begin the project as an analog type intended for simulation. Existing projects in the design entry programs cannot be simulated without special modifications.
To create a new project for simulation
-
From the File menu in Capture’s Project Manager, point to New and select Project.
The New Project dialog box appears. - In the Name text box, enter the name for the new project.
-
Under the Create a New Project Using frame, select Analog or Mixed-Signal Circuit Wizard.
- In the Location text box, enter the path where you want the new project files to be stored, or use the Browse button to locate the directory.
- Click OK.
- Enter any special libraries to be included, if necessary, and click Finish to create the new project directory and open the schematic page editor.
A design that is targeted for simulation has:
- parts for which there are simulation models available and configured
- sources of stimulus to the circuit
The part libraries for PSpice are in the PSpice subfolder in the tools\Capture\Library directory in your main installation directory. Each part must have a PSPICETEMPLATE property in order to netlist correctly for use with PSpice.
When creating designs for both simulation and printed circuit board layout, some of the parts you use are for simulation only (that is, simulation stimulus parts like voltage sources), and some of the parts you use have simulation models that only model some of the pins of a real device.
The parts that are to be used for simulation, but not for board layout, have a PSPICEONLY=TRUE property.
You can add this (or any) property to your own custom parts to make them simulation-only.
Placing stimulus sources
Parts for stimulus sources for simulation are in the SOURCE.OLB part library. You can place a source in the design as you would any other part.
Creating a simulation netlist
A netlist is the connectivity description of a circuit, showing all of the components, their interconnections, and their values. When you create a simulation netlist from Capture, that netlist describes the current design.
The flat netlist is generated for all levels of hierarchy, starting from the top, regardless of whether you are pushed into any level of the hierarchy. Flat netlists are most commonly used as input to PCB layout tools. The flat simulation netlist format for PSpice contains device entries for all parts on a subcircuit (child) schematic multiple times, once for each instance of the hierarchical part or block used.
Creating the netlist
You can generate a simulation netlist in one of two ways:
-
from Capture’s Project Manager by using the Create Netlist command under the Tools menu.
or - directly from within Capture by using the Create Netlist command under the PSpice menu
During the netlist process, Capture creates files with different extensions: the .NET file contains the netlist; the .ALS file contains alias information for cross-probing.
Setting up analyses
Unless you intend to run the simulation using a circuit (.CIR) file, you must create a simulation profile (or edit an existing one) before you can set up a PSpice simulation. See Creating a new simulation profile for more information.
To set up a PSpice simulation:
-
From design entry program PSpice menu, choose New Simulation Profile.
- In the Simulation Settings dialog box, click the Analysis tab.
-
Make your selections. The options are:
- Setting up an AC analysis
- Setting up a parametric analysis
- Setting up the loading of bias points
- Setting up a sensitivity analysis
- Setting up the saving of bias points
- Setting the temperature
- Setting up a DC analysis
- Setting the bias point detail
- Setting up a Monte Carlo/worst-case analysis
- Setting digital options
- Setting up a transient analysis
- Click OK.
Setting up an AC analysis
The AC analysis calculates the small-signal frequency response of the circuit (linearized around the bias point) over a range of frequencies.
To set up an AC analysis
- In the Simulation Settings dialog box, click the Analysis tab.
- From the Analysis type list, select AC Sweep/Noise.
- From the Options list, select General Settings.
- In the AC Sweep Type frame, choose either Linear or Logarithmic. (If Logarithmic, also select Decade or Octave.) Enter the start frequency, end frequency, and points in the text boxes.
- To have noise analysis enabled, under Noise Analysis, select the Enabled check box. Enter the output voltage, I/V source, and interval in the text boxes.
- Click OK.
To run the active simulation
Setting up the loading of bias points
The Load Bias Point analysis option includes a .LOADBIAS statement in the circuit file and loads the contents of the bias point file. Normally the bias point file is produced by a previous circuit simulation using the Save Bias Points option.
This option is available for the Time Domain (Transient), DC Sweep, and Bias Point analyses.
To set the bias load point
In the Simulation Settings dialog box, click the Analysis tab.
- From the Analysis type list, select Time Domain (Transient), DC Sweep, or Bias Point.
- From the Options list, select Load Bias Point.
- In the Load Bias Information from filename text box, enter the name of a file that contains a .LOADBIAS statement.
- Click OK.
To run the active simulation
Setting up the saving of bias points
The Save Bias Point analysis option inserts a .SAVEBIAS statement into the circuit file, and the bias point node voltages for the specified analysis (DC, OP, or TRAN) is saved to the file you specify.
To set the save bias load point
- In the Simulation Settings dialog box, click the Analysis tab.
- From the Analysis type list, select Time Domain (Transient), DC Sweep, or Bias Point.
- From the Options list, select Save Bias Point.
- In the Save Bias Information in Filename text box, enter a file name in which to save the bias point information.
- Under Options, type values in the text boxes for when to save bias information during the analysis:
- Under Options, select Do Not Save Subcircuit Voltages and Currents if you do not want to save the node voltages and currents for subcircuits.
- Click OK.
To run the active simulation
Setting up a DC analysis
The DC analysis performs a DC sweep. The DC sweep analysis calculates the circuit’s bias point over a range of values.
To set up the DC Sweep
- In the Simulation Settings dialog box, click the Analysis tab.
- From the Analysis type list, select DC Sweep.
- From the Options list, select Primary Sweep.
- Under Sweep variable, choose Voltage source, Current source, Global parameter, Model parameter, or Temperature.
- Under Sweep type, choose Linear, Logarithmic, or Value list. (If Logarithmic, also select Decade or Octave.)
- Click OK.
To run the active simulation
Setting up a Monte Carlo/worst-case analysis
Monte Carlo/Worst Case analyses vary the lot or device tolerances of devices between multiple runs of an analysis (DC sweep, AC sweep, or transient).
You can run either a Monte Carlo or a worst-case analysis, but not both at the same time. Before running either analysis, you must set up the device and lot tolerances of the model parameters to be investigated.
To set the Monte Carlo/Worst Case options
- In the Simulation Settings dialog box, click the Analysis tab.
- From the Analysis type list, select DC Sweep, AC Sweep/Noise, or Time Domain (Transient).
- From the Options list, select Monte Carlo/Worst Case.
- Choose either Monte Carlo or Worst-case/Sensitivity.
-
In the Output Variable text box, type the output variable, using the following format:
V(<net name> [,<net name>])
where <net name> must be a fully qualified net name. For example, V(sense) represents the voltage at a net, and V(a,b) represents the output voltage across two nets a and b. - Enter the Monte Carlo or Worst-case/Sensitivity options as described below.
- Click OK.
Monte Carlo options
You can set the following options:
- Number of runs
- Use distribution and custom distributions with the Distributions button
- In the Random number seed text box, type an odd integer ranging from 1 to 32767.
- In the Save data from list, select one of the following:
Worst-case/Sensitivity options
- From the Vary Devices That Have list, select Vary both DEV and LOT, Vary DEV, Vary LOT.
- In the Limit devices to type(s) text box, type a list of devices to include in the analysis.
- Select the Save data from each sensitivity run check box to save data from each sensitivity run.
Output file options
- Click the More Settings button.
-
From the Find list, select one of the following collating functions:
- Under Worst-Case direction, choose either Hi or Low.
- Select the List model parameter values check box to produce a list of the model parameters actually used for each run.
History support options
- Click the MC Load/Save button.
-
To enable saving of the randomly generated model parameter values for each run, complete the following steps.
- In the Load/Save Monte Carlo Parameter File dialog box, select the Save parameter values in the filename check box.
- In the text box that is enabled, specify the name and the location of the file in which the parameter data is to be saved. If required, you can use the Browse button to navigate to the required location.
The model parameter values are saved in a Monte Carlo parameter (.mcp) file. When you simulate the design, a.mcpfile with the complete history of variation of parameter values with in the tolerance range will be generated. -
To reuse model parameter values generated and saved during a previous Monte Carlo analysis, complete the following sequence of steps.
- In the Load/Save Monte Carlo Parameter File dialog box, select the Load parameter values in filename check box.
-
In the text box that is enabled, specify the name and the location of the
.mcpfile from which the parameter data is to be read. You can use the Browse button to navigate to the required location.
When you now simulate the circuit, all the parameter values stored in the.mcpfile will be reused during the simulation. - Click OK to save your settings.
To run the active simulation
Setting the bias point detail
The Bias Point analysis saves detailed bias point information to the simulation output file.
The information reported to the output file includes the following:
To save detailed bias point information to the output file
- In the Simulation Settings dialog box, click the Analysis tab.
- From the Analysis type list, select Bias Point.
- Under Output File Options, select any of the following that you want saved to the output file:
- Click OK.
To run the active simulation
Setting digital options
Set digital options for DC analyses.
To set the digital options
- In the Simulation Settings dialog box, click the Options tab.
- From the Category list, select Gate-level Simulation.
- Under Timing Mode, choose Minimum, Typical, Maximum, or Worst-case (min/max).
- Select Suppress simulation error messages to not include error messages in the waveform data file generated for this simulation.
- From the Initialize All Flip-Flops To list, select X, 0, or 1.
- In the Default I/O level for Interfaces box, enter a default propagation delay mode.
- Click OK.
To run the active simulation
Setting up a parametric analysis
A parametric analysis performs a sweep analysis while varying a global parameter. The simulator performs a series of simulations; there is one for each value of the parameter. All expressions in the circuit are re-evaluated with the new parameter value at the beginning of each run.
To set the parametric options
- In the Simulation Settings dialog box, click the Analysis tab.
- From the Analysis type list, select Time Domain (Transient), DC Sweep, or AC Sweep/Noise to use as the basic analysis.
- Under Options, select Parametric Sweep.
- Under Sweep variable, choose a variable to sweep during the analysis:
-
Under Sweep type, choose one of the following:
- Linear
- Logarithmic: Decade or Octave
- Value list
- Under Sweep type, the values in the Start Value and End Value text boxes vary depending upon which sweep variable type you select. The Start Value can be greater or less than the End Value.
- Click OK.
To run the active simulation
Setting up a sensitivity analysis
Performs a DC sensitivity analysis. One or more output variables can be specified. The <output variable>, if it is a current, is restricted to be current through a voltage source.
Device sensitivities are provided for the following device types only:
To set the sensitivity analysis
- In the Simulation Settings dialog box, click the Analysis tab.
- From the Analysis type list, select DC Sweep.
- From the Options list, select Monte Carlo/Worst Case.
- Choose Worst-case/Sensitivity.
-
In the Output variable text box, type an output variable, using the following format:
V(<net name> [,<net name>])
where <net name> must be a fully qualified net name. It has the form such as: V(sense), the voltage at a net; or a form such as: V(a,b), the output voltage across two nets a and b. - Click OK.
To run the active simulation
Setting the temperature
Set the temperature to specify the temperature or list of temperatures at which all analyses are performed. The temperatures are in degrees Centigrade. If more than one temperature is given, then all analyses are done for each temperature.
You can type either a single value for the Temperature box, or a list of temperatures. When a list is typed, the circuit is simulated multiple times, once for each temperature in the list. Running an analysis at multiple temperatures can also be done as a parametric analysis. With parametric analysis, the temperatures can be specified either by list or by range and increments within the range.
The default temperature for simulation is 27 degrees Celsius.
Therefore, it is recommended that you should not use the Temperature analysis option to sweep multiple temperatures when using Monte Carlo or worst case analyses in a circuit. For the same reason, sweeping the temperature with a DC Sweep analysis while performing one of these statistical analyses is not recommend. In addition, putting tolerances on temperature coefficients is not recommended.
To set the temperature
- In the Simulation Settings dialog box, click the Analysis tab.
- From the Analysis type list, select a basic analysis type.
- From the Options list, select Temperature (Sweep).
- Choose one of the following:
- Click OK.
To run the active simulation
Setting up a transient analysis
A transient analysis calculates the behavior of the circuit over time.
To set the transient option
- In the Simulation Settings dialog box, click the Analysis tab.
- From the Analysis Type list, select Time Domain (Transient).
- In the Run to Time text box, type the length of the transient analysis.
- Select Run in resume mode if you want to pause the simulation after running for a specific time. You can enter the time to run in the RunFor text box of the PSpice toolbar. After the simulation pauses, you can change parameters and restart the simulation.
-
To perform a Fourier Analysis, click the Output File Options button, then select (?) Enable Fourier.
A Fourier Analysis performs a decomposition into Fourier components of the transient analyses results. - Click OK.
To run the active simulation
To check if a part has a simulation model defined
- In schematic page editor, double-click a part on the schematic page. If a simulation model is available for a part, the part has:
-
The
PSPICETEMPLATEcontains @MODEL somewhere along the line.
The simulation model specified by the Implementation property must be contained in a model library that is configured.
Simulating your circuit
Simulating performs a PSpice circuit analysis on the current design. This command automatically performs an Electrical Rule Check (DRC), and netlist generation.
You must create a simulation profile (or edit an existing one) before you can set up a PSpice simulation. See Creating a new simulation profile for more information.
To simulate your circuit from within PSpice
-
From PSpice’s Simulation menu, choose Run.
The simulation creates output files with a .OUT extension, and if the simulation completes successfully, produces a file with a .DAT extension. The output (.OUT) file contains bias point information, model parameter values, and so on. The .DAT file is the waveform data file containing the simulation results to be displayed by PSpice. All viewpoint and sensor displays are automatically updated. - A Probe window appears and displays the results of the simulation (if you have this option enabled in the Probe windows settings of your simulation profile).
- If there are errors during the simulation, from the View menu, choose Output File.
To simulate your circuit from within Design Entry Programs
Interacting with a simulation
Overview
PSpice includes options for interacting with a simulation by changing certain runtime parameters in the course of the analysis. With the interactive simulation feature, you can do the following:
- Extend a transient analysis after TSTOP has been reached in order to achieve the desired results.
- Interrupt a bias or transient analysis, change certain runtime parameters, and then resume the simulation with the new settings.
-
Schedule changes to certain runtime parameters so that they are made automatically during a simulation.
For more details about interactive simulation, click the Related Topics below.
What the various versions of PSpice support
The following table identifies what interactive functionality is available with each version of PSpice.
Related Topics
Extending a transient analysis
Overview
Often, a long transient analysis will run to the completion time (TSTOP) without achieving the desired simulation results (achieving a steady state, for instance). To achieve better results, the value for TSTOP would have to be increased and the entire simulation would have to be rerun from the beginning. This was time-consuming and inefficient for large simulations.
You can set up a transient analysis so that it will pause automatically when it reaches the TSTOP value. Once paused, you can review the results and determine if the simulation should run longer. If desired, you can increase the value of TSTOP and resume the transient analysis from the point at which it paused, thus saving a good deal of processing time.
To help clarify under what conditions simulations will either be terminated or paused, the following table explains the different behaviors of PSpice for particular simulation scenarios:
How the RunFor value for TSTOP controls the simulation
When you enter a value for TSTOP in the RunFor text box on the simulation toolbar in PSpice, you can control the simulation in various ways:
- If the RunFor text box is blank, the original value for TSTOP in the Simulation Profile will be used. The simulation will run to completion and then stop.
- If you enter a value in the RunFor text box, the RunFor value will override any value for TSTOP in the Simulation Profile. The simulation will run until it reaches the RunFor value and then pause.
- If the simulation is paused before RunFor (TSTOP) is reached, you can enter a new value in the RunFor text box, then click the Run toolbar button. PSpice will resume the simulation, run for the additional time specified (RunFor), and then pause again.
- If you pause a simulation, and want to restart it using the original value for TSTOP in the Simulation Profile, clear the RunFor text box and press the Pause button again.
To extend a transient analysis
-
Click in the RunFor text box on the PSpice toolbar and enter a value for TSTOP.

-
Click the Run toolbar button to run the simulation.
The simulation will run and pause when it reaches the value you entered for TSTOP in the RunFor text box. (The original value for TSTOP in the simulation profile is overridden and ignored if you enter a value in the RunFor text box.) - Change any parameters you need to adjust. (See Interrupting a simulation.)
- Change the value of TSTOP in the RunFor text box, if needed.
-
Click the Run toolbar button to resume the simulation.
The simulation will resume from the point at which it last paused, and then run for the amount of time specified in the RunFor text box, at which point it will pause again. - Repeat Steps 3 – 5 as needed.
Interrupting a simulation
Overview
You can interrupt (pause) a simulation, change certain runtime parameters, and then resume the simulation from the point at which it was paused using the new parameters.
After you pause a simulation, you can change the following runtime parameters using the PSpice Runtime Settings dialog box:
The PSpice Runtime Settings dialog box will appear automatically whenever a simulation fails to converge. (In such cases, the simulation will be paused automatically.) It will also appear if you attach PSpice to a simulation that was paused in the background. (For more information about managing background simulations, click Using the Simulation Manager.)
To interrupt a simulation and change parameters
-
In PSpice, from the Simulation menu, choose Edit Runtime Settings.
The PSpice Runtime Settings dialog box appears.
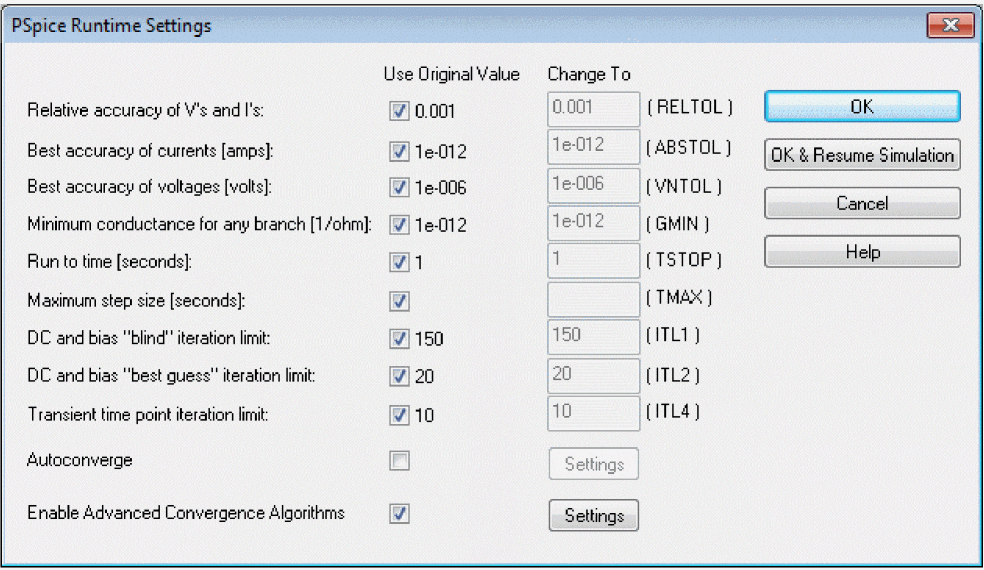
-
If you want to use the original value for a particular parameter, click the Use Original Value check box for that parameter.
The original parameter values are derived from the simulation profile. By default, the Use Original Value check boxes are checked (enabled). -
If you want to change one or more parameters, enter new values for each of the runtime parameters you want to change in the text boxes under the column Change To.
If a Change To text box is grayed out, uncheck the Use Original Value check box. - Select Autoconverge to specify that PSpice should try to converge the simulation.
- Click OK & Resume Simulation to resume the simulation with the new parameters.
Scheduling changes to runtime parameters
Overview
In certain situations, you may want to predefine a set of values for a parameter and schedule these values to take effect at various time intervals during a long simulation. For instance, you may want to use a smaller time step value during periods where the input stimulus changes rapidly, but otherwise use a larger value.
You can set up automatic changes to certain runtime parameters that will occur at scheduled times during a simulation. By scheduling the changes, you don't have to interrupt the simulation manually, and can even run it in a batch mode in the background.
The following runtime parameters can be changed at scheduled times during a simulation. Note that these only apply to transient analysis; you cannot interact with other analysis types.
PSpice command syntax for scheduling parameter changes
You can schedule parameter changes by entering them either in the Simulation Profile or in a text file using the new expression SCHEDULE, and then including that file in the simulation profile settings.
The expression SCHEDULE is a piecewise constant function (from time x forward use y) and takes the form:
SCHEDULE(x1,y1,x2,y2...xn,yn)
where x is the time value, which must be > 0, and y is the value of the associated parameter. You must include an entry for time=0.
When used with the .OPTION command, the syntax is as follows:
.OPTIONS <Parameter Name>={SCHEDULE(<time-value>, <parameter value>, <time-value>, <parameter value>, …)}
.OPTIONS RELTOL={SCHEDULE( 0s,.001,2s,.005)}
indicates that RELTOL should have a value of 0.001 from time 0 up to time 2s, and a value of 0.005 from time 2s and beyond (that is: RELTOL=.001 for t, where 0 < t < 2s, and RELTOL=.005 for t, where t < 2s).
To schedule changes to runtime parameters
- Open a standard text editor (such as Notepad) and create a text file with the command syntax shown above, using the appropriate values for the different parameters.
- In design entry program, open the design you want to simulate.
- From the PSpice menu, choose Edit Simulation Profile.
- Click the Configuration Files tab.
- Click Include in the Category field.
- Under the Filename text box, enter the name of the text file you created in Step 1, or click the Browse button to locate the file and enter the full path and filename.
- Click the Add to Design button to include the file as part of the circuit.
- Click OK.
When you run the simulation, the scheduled parameter changes will be included as part of the circuit file and the simulation will run to completion automatically.
Related Topics
Running multiple simulations
Overview
PSpice includes a Simulation Manager that provides enhanced control over how multiple simulations are processed. With the Simulation Manager, you can now control when particular simulations in a batch queue will actually be run. You can also preempt the current simulation to run another one first. Or, you can use the Simulation Manager to monitor the progress of a set of batch simulations that were set up and launched earlier.
None of the earlier functionality of batch processing has been lost. With the Simulation Manager, you now have even greater control and flexibility in setting up multiple simulations.
Related Topics
Using the Simulation Manager
Overview
The PSpice Simulation Manager provides a familiar, easy-to-use interface for controlling how multiple simulations are processed.
The Simulation Manager allows you to do the following:
You can accomplish most of these functions by selecting the desired simulation in the list, then clicking on the appropriate toolbar button to execute the command. For detailed procedures on performing these tasks, see the Related Topics section below.
Accessing the Simulation Manager
The Simulation Manager is invoked whenever you start a new simulation, either from PSpice or from a front-end design entry tool. Since it is active as long as a simulation is running in the background, you can also call up the Simulation Manager from the Windows system tray.
You can also launch the Simulation Manager by itself from the Windows Start menu. You do not need to have PSpice running in order to work with the Simulation Manager.
Understanding the menu commands
The main menu bar for the Simulation Manager is shown below. For a detailed description of a particular menu, click the name of that menu in the image.

Related Topics
Understanding the Simulation Manager
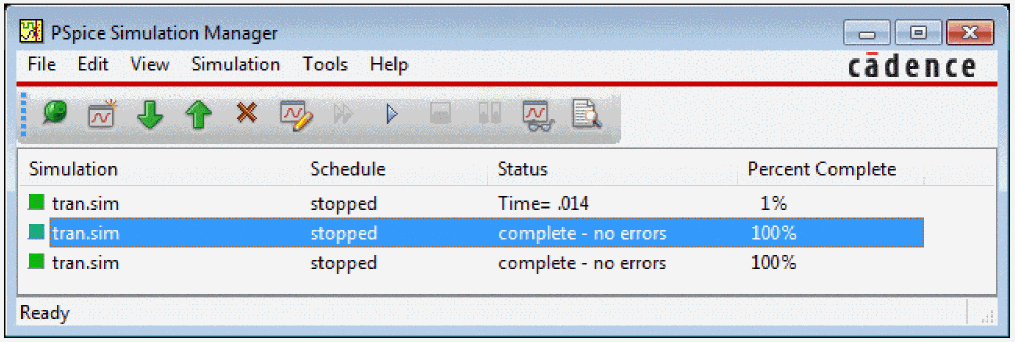
Understanding the information presented by the Simulation Manager
Every job listed in the Simulation Manager will have a specific entry for Schedule, Status and Percent Complete. In addition, certain color-coded icons are shown to the left of each simulation file name to indicate their current state. A quick glance over the list of jobs will tell you immediately where any particular job is and how it will be processed. The following tables explain the meanings of the various categories and states.
|
The simulation is either in the queue and has not been run yet, or has been run to completion. |
|
|
The simulation has been paused and is on hold, waiting to either be continued or stopped. |
|
| Percent Complete column | Explanation |
|
The percentage of completion for a simulation. This number increases as a simulation progresses. |
Available functionality of the Simulation Manager
What the various versions of PSpice support
The following table identifies what functionality in the Simulation Manager is available with each version of PSpice.
Error message handling by the Simulation Manager
How the Simulation Manager handles errors during simulation
Since each simulation that runs in the background runs independently, an error that occurs during one simulation will not prevent the remaining jobs in the queue from running subsequently, in order. The following common error conditions may arise, but these will not prevent the Simulation Manager from running the remaining simulations pending in the queue.
- Simulation crash: If a simulation crashes for whatever reason, the Simulation Manager will stop receiving progress updates. After a certain period, the Simulation Manager will stop that simulation and will automatically start the next job in the queue.
- Simulation pause: If a simulation pauses automatically and requires manual intervention to continue, the Simulation Manager will automatically start the next job in the queue.
-
Simulation stop: If a simulation stops automatically, the Simulation Manager will automatically start the next job in the queue.
Setting up multiple simulations
Overview
With the Simulation Manager, you can set up any number of batch simulations to be run sequentially in the background while you do other work in PSpice. Each new simulation that you set up will be added to the bottom of the simulation queue and will be assigned the schedule category “queued”. It will be run after all other queued jobs ahead of it have been run.
Once a job has been added, you can change its position in the queue, start, stop or pause it, or make other modifications to its status. See the Related Topics below for more details on modifying jobs in the Simulation Manager.
To add a simulation to the queue
- From the File menu, choose Add Simulation or click the Add Simulation button on the tabular.
- Locate the file (.SIM, .CIR) you wish to add to the queue.
Alternately, you can add a simulation to the queue by starting the PSpice simulation directly from within the front-end tool you are using, such as Capture.
Related Topics
Starting, stopping, and pausing simulations
Overview
In the Simulation Manager, you can easily manage the various batch simulations in the queue. The most fundamental controls that are provided are the ability to start a simulation, stop it, or pause it temporarily.
To start a simulation from the Simulation Manager
- Select a simulation in the list.
- From the Simulation menu, choose Run or click the Run Selected button on the toolbar.
To stop a simulation from the Simulation Manager
- Select the simulation that is currently running.
- From the Simulation menu, choose Stop or click the Stop Selected button on the toolbar.
To pause a simulation from the Simulation Manager
- Select the simulation that is currently running.
- From the Simulation menu, choose Pause or click the Pause Selected button on the toolbar.
Attaching PSpice to a simulation
A simulation that is running in the Simulation Manager will not be loaded into PSpice or displayed in Probe while it is running. This allows you to work on a different design in the PSpice application while a simulation is running in the Simulation Manager.
If you want to display a different simulation in PSpice by choosing from the list of jobs in the Simulation Manager, you can attach PSpice to a particular job in the queue.
To attach PSpice to a simulation
- In the Simulation Manager, select the simulation you want to attach to PSpice.
- From the View menu, choose Simulation Results.
The PSpice program will activate and the results of the simulation you selected will become the current display in Probe. If the simulation is currently running, you will be able to view the marching waveforms.
Setting options in the Simulation Manager
Each time you add a new simulation while another one is running, the Simulation Manager must decide how to treat the new job. The default setting is to add the new simulation to the bottom of the queue and continue running whatever job is currently being simulated.
You can change this default so that the Simulation Manager will start each new simulation immediately and either stop or pause whatever job is currently running. The options you can choose from are explained in the procedure below.
You can also choose to have the Options dialog box display each time you add a new simulation, or not show this anymore. If you disable the prompting, you can always enable it again using the following procedure.
In addition, you can define how paused simulations should be handled by the Simulation Manager. You can configure them to be resumed automatically after the previous simulation stops, or you can choose to leave them in a paused state until you manually resume them.
To set the default options for the Simulation Manager
-
From the Tools menu, choose Options.
The Options dialog box appears.
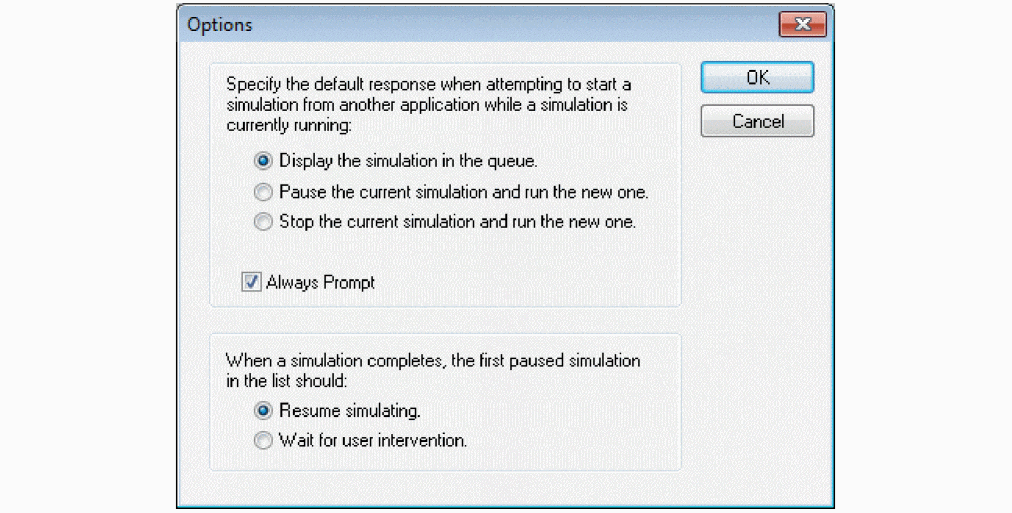
-
In the top frame dealing with simulations that are already running, click the appropriate radio button for the option you wish to set.
- If you want the Options dialog box to appear as a reminder each time you add a new simulation, be sure to check the Always Prompt box. (The default setting is to enable this feature.)
-
In the bottom frame dealing with paused simulations, click the appropriate radio button for the option you wish to set.
- Click OK to save the settings.
The Simulation Manager File menu
The File menu provides basic file management functions.
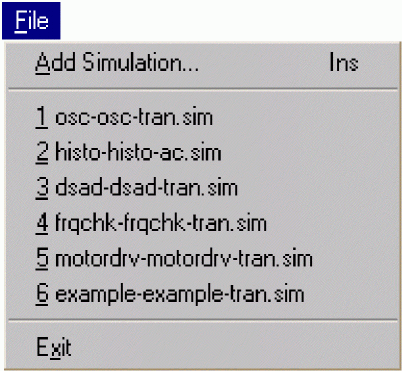
|
Opens a simulation file (.SIM) or circuit file (.CIR) and adds it to the queue. |
|
The Simulation Manager Edit menu
The Edit menu provides functions for modifying the list of jobs in the queue. Most of these commands are reproduced in the toolbar as well. For a description of the toolbar commands, click The Simulation Manager Toolbar.

The Simulation Manager View menu
The View menu provides controls for what is displayed in the Simulation Manager.

The Simulation Manager Simulation menu
Overview
The Simulation menu provides controls for how the different simulations are processed by the Simulation Manager.

The Simulation Manager Tools menu
Overview
The Tools menu allows you to change certain default settings used by the Simulation Manager when starting a simulation.

| Menu command... | Function… |
Related Topics
The Simulation Manager Toolbar
The Toolbar provides quick access to the most commonly used functions in the Simulation Manager. All of the buttons on the Toolbar have tooltips to help remind you of what they do – just pass the cursor over the button to see the tooltip.
Entering distributions
To enter your own distribution
- Under Monte Carlo Options, click the Distributions button.
- In the Distribution name text box, type a name for the distribution, then click Save to save the distribution with the current simulation profile.
-
In the Distribution curve values text box, type distribution curves, using the format:
(<deviation>,<probability>) - To remove a distribution from the current simulation profile, under Existing distributions, select the distribution name and click Delete.
- Click OK to close the Distributions dialog box and return to the Simulation Settings dialog box.
For more information on distributions, refer to the .DISTRIBUTIONS section of the Commands chapter of the PSpice Reference Manual.
Using markers
You can place markers in your design to indicate the points for which you want to see simulation waveforms displayed in PSpice. You can place markers before or after simulation is done.
When placed before simulation, markers can be used to limit results written to the waveform data file and to automatically display those traces in PSpice. After simulation results appear in PSpice, placing additional markers on the design automatically displays traces in the current Probe window.
Power markers allow you to measure the power dissipation of a particular device. You can use these markers in the same way you use current and voltage markers. Power markers are annotated with "W" and are placed on devices that have PSpice models. The corresponding power dissipation waveforms for the devices will be calculated and displayed in Probe.
Markers can be placed on subcrcuit nodes as well. This allows you to perform cross-probing between the front-end design entry tool and PSpice at the lower level circuits of a hierarchical design.
The available markers are as follows:
| Waveform | Markers menu command | Advanced submenu command |
Limiting waveform data file size
When PSpice performs a simulation, it creates a waveform data file. The size of this file for a transient analysis is roughly equal to:
(# transistors) * (# simulation time points) * 24 bytes
The size for other analysis types is about 2.5 times smaller. For long runs, especially transient runs, this can generate waveform data files that are several megabytes in size. Even if this does not cause a problem with disk space, large waveform data files take longer to read in and take longer to display traces on the screen. You can limit the file size by suppressing part of the data from a transient run. For more details, click Suppressing data from a transient run.
You can also limit the waveform data file size by setting options that determine how much data is collected. For more details on these data collection options, click Setting data collection options.
Setting data collection options
One reason that waveform data files are large is that, by default, PSpice stores all net voltages and device currents for each step (for example, time or frequency points). However, if you have placed markers on your schematic prior to simulation, PSpice saves only the results for the marked wires and pins.
To limit file size by setting collection options
- Choose PSpice – Edit Simulation Profile to display the Simulation Settings dialog box.
- Click the Data Collection tab.
-
In the Data Collection Options section, choose the desired option for each type of marker (Voltages, Currents, Power, Digital, Noise).
-
Select Save data in the CSDF format (.CSD) if you want the data to be stored in this format.
- Click OK to close the Simulation Settings dialog box.
- From the PSpice menu, point to Markers, then choose the marker type you want to place.
- Point to the wires, pins or devices you wish to mark and click to place the chosen markers.
- Right-click and select End Mode to stop placing markers.
-
From the PSpice menu, choose Run to start the simulation.
When the simulation is complete, the corresponding waveforms for the marked nodes or devices will be displayed in Probe.
Suppressing data from a transient run
Long transient simulations create large waveform data files because PSpice stores many data points. You can suppress a part of the data from a transient run by setting the simulation analysis to start the output at a time later than 0. This does not affect the transient calculations themselves – these always start at time 0. This delay only suppresses the output for the first part of the simulation.
To limit file size by suppressing the first part of transient simulation output
- Choose PSpice – Edit Simulation Profile to open the Simulation Settings dialog box.
- Select the Analysis tab.
-
From the Analysis Type list, select the
Time Domain (Transient)option. - In the Start saving data after text box, specify a delay time.
- Click OK to close the Simulation Settings dialog box.
- Choose PSpice – Run to start the simulation.
The simulation begins, but no data is stored until after the delay has elapsed.
Assigning marker colors
When you place markers, they are initially grey. Once PSpice completes the simulation and displays the marked traces, colors are automatically assigned to them. The color assigned to a marker will also be the color of its trace in PSpice.
- In PSpice, right-click a trace and choose Properties.
- Select the color you want for the trace from the drop-down Color list.
-
Click OK.
The color you assign for the trace in PSpice will then be associated with the corresponding marker in schematic page.
Viewing results
Use PSpice to view and perform waveform analysis of the simulation results.
To view results for the current design
To automatically start PSpice after simulation
- Choose PSpice – Edit Simulation Profile to display the Simulation Settings dialog for the currently active profile.
- Click the Probe Window tab, then select Display Probe window after simulation has completed.
- Select any other options you want to use.
- Click OK.
Viewing results as you simulate
You can configure PSpice to run automatically when the simulation has finished, or to monitor waveforms as the simulation progresses.
To start PSpice and monitor results during a simulation
- To enable waveform monitoring, do the following:
- From the PSpice menu, choose Run to start the simulation. PSpice starts automatically and displays one window in monitor mode.
- In PSpice, select the waveforms to be monitored by using the Add Trace command on the Trace menu or by placing markers.
- During a multiple run simulation (such as Monte Carlo, parametric or temperature), only the data for the first run is displayed. To view the curves for several runs:
Configuring PSpice Display of Simulation Results
To configure what PSpice displays when it is started, choose PSpice – Edit Simulation Profile, click the Probe Window tab, and then select one the following options under the Show frame:
Viewing Monte Carlo histograms
Monte Carlo analysis is frequently used to predict yields on production runs of a circuit. You can display data derived from Monte Carlo waveform families as histograms. This is part of the performance analysis feature of PSpice.
The data file generated by a Monte Carlo analysis can become quite large. You can limit what is displayed and view just a particular node by placing a voltage probe marker at the desired node in the circuit, and then collect data for only that node.
To display a histogram
- From PSpice’s Plot menu, choose Axis Settings.
- Select the X Axis tab.
- In the Processing Options frame, select the Performance Analysis check box.
- Click OK.
-
From the Trace menu, select a measurement definition and a trace.
The histogram display appears.
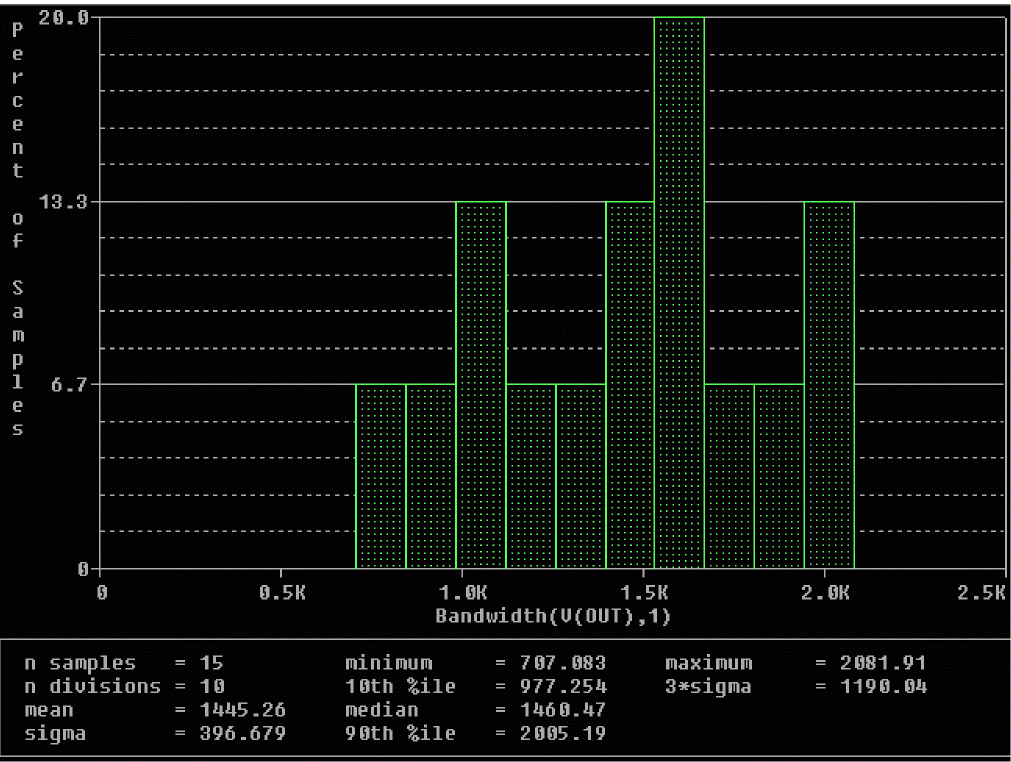
The Y axis is the percent of samples. The statistics for the histogram are shown along the bottom of the display. The statistics show the number of Monte Carlo runs, the number of divisions or vertical bars that make up the histogram, mean, sigma, minimum, maximum, 10th percentile, median, and 90th percentile.
Copying histogram data
You can use the copy function to transfer the raw histogram data points for a particular trace to the Windows clipboard. This allows you to save the data as a standard ASCII text file, or paste it directly into a report or other document for later reference.
To copy histogram data to the clipboard
- Select the trace name in the histogram.
-
From the Edit menu, choose Copy (or press Ctrl + C).
The histogram data points for the trace will be transferred to the Windows clipboard.
To copy the histogram display to the clipboard
1 From the Window menu, choose Copy to Clipboard.
The histogram graph will be transferred to the Windows clipboard.
Defining part properties needed for simulation
The part properties Implementation and PSPICETEMPLATE (for simulation) may already be defined for your parts, or you may have to edit them yourself, depending on which method you used to create the parts. In addition, you can add other simulation-specific properties: PSPICEONLY, IO_Level, MNTYMXDLY, and PSpiceDefaultNet.
For a complete index of all the part properties and what they are used for, see Index of PSpice symbol and part properties
Handling unmodeled pins
There are parts that have some pins that are not modeled. To see an example of this, place an instance of the PM-741 part from the OPAMP.OLB part library. The OS1 and OS2 pins are not modeled, so only the +, -, V+, V-, and OUT pins are netlisted for simulation.
For the simulator, these pins are treated as a large resistor connected to ground. They have a pin property of FLOAT=Unmodeled.
Double-click the part to see the Property Editing dialog box. Note that the PSPICETEMPLATE property for the part only calls out the +, -, V+, V-, and OUT pins. The OS1 and OS2 pins are not called out in the PSPICETEMPLATE because those two pins are not modeled in the simulation model for the PM-741 part. You can view the simulation model definition for the PM-741 part.
To view a part’s simulation model
- Click the part to select it.
-
Right-click and select View PSpice Model.
The model definition opens in a new tab and cannot be edited.
Saving a copy of your project
Use the Project Manager in Capture to save all of your simulation settings and analysis setup, as well as your schematic. To save a copy of a project
- In the Project Manager in Capture, from the File menu, choose Archive Project.
- Select Library files, Output files and/or Referenced projects, depending on what types of files you want to archive. Typically, you will want to include all file types to be sure you save everything related to the project.
- In the Archive directory text box, enter the path where you want the new archive copy to be stored, or use the Browse button to locate the directory.
- Click OK to create the archive of your project in the specified directory.
Return to top