Performing Circuit Analysis
Analyzing waveforms with PSpice
PSpice offers integrated waveform analysis functionality for viewing simulation results. Use waveform analysis for circuit performance analysis and data comparison from multiple files.
What is waveform analysis?
After completing the simulation, PSpice plots the waveform results so you can visualize the circuit’s behavior and determine the validity of your design.
Waveform analysis not only displays simple voltages and currents, but also complex arithmetic expressions involving voltages and currents and the Fourier Transform of these expressions. You can also use waveform analysis for Performance Analysis; see Using Performance Analysis for more information.
When a mixed analog/digital simulation runs successfully, PSpice displays analog and digital waveforms simultaneously with a common time base. You can add text labels and other annotation symbols to plots for clarification.
Taken together, simulation and waveform analysis is an iterative process. After analyzing simulation results, you can refine your design and simulation settings and then perform a new simulation and waveform analysis.
PSpice saves two kinds of waveform data file formats: ASCII and binary.
Performing post-simulation analysis of the results
This means you can plot additional information derived from the waveforms. What you can plot depends on the type of analyses you run. Bode plots, phase margin, derivatives for small-signal characteristics, waveform families, and histograms are only a few of the possibilities. You can also plot other waveform characteristics such as rise time versus temperature, or percent overshoot versus component value.
Pinpointing design errors in digital circuits
When PSpice detects setup and hold violations, race conditions, or timing hazards, a detailed message appears along with corresponding waveforms. PSpice also helps you locate the problem in your design.
What are the features of PSpice simulation profiles?
PSpice has the following features in simulation profiles:
Increased reusability of simulation profiles
Previous versions of PSpice allowed you to import settings only from a simulation profile that exists in the same project. You can now create a new simulation profile by importing settings from a simulation profile that exists in another project also. This increases the reusability of simulation profiles. For more information, see Creating a new simulation profile.
Support for profile level configuration
Previous versions of PSpice allowed you to configure model libraries, stimulus files and include files only at the global level (applicable to all designs) or at the design level (applicable only to the design). You can now configure model libraries, stimulus files and include files at the simulation profile level also.
The ability to configure model libraries, stimulus files and include files at the profile level has the following benefits:
- You can simulate the same circuit with different model libraries for each type of analysis and compare results. For example, you may want a part to be modeled using the DECODER model in the FRQCHK.LIB model library for AC analysis and using the DECODER model in the FRQCHK_1.lib model library for transient analysis. You can create two simulation profiles-one for AC and one for transient analysis, configure the FRQCHK.LIB model library at the profile level in the simulation profile for AC analysis, and configure the FRQCHK_1.LIB model library at the profile level in the simulation profile for transient analysis. Previous versions of PSpice required you to configure the model libraries at the design level and change the search order of the model libraries in a simulation profile before running the simulation, if you wanted to simulate the same circuit with different model libraries for each type of analysis.
- You can simulate the same circuit with different stimuli to test different characteristics like small signal response and large signal response, for each type of analysis. For example, you may want to simulate a circuit using the RF_AMP.STL stimulus file for AC analysis and the RF_AMP1.STL stimulus file for transient analysis. You can create two simulation profiles-one for AC and one for transient analysis, configure the RF_AMP.STL stimulus file at the profile level in the simulation profile for AC analysis, and configure the RF_AMP1.STL stimulus file at the profile level in the simulation profile for transient analysis. Previous versions of PSpice required you to configure the stimulus files at the design level and change the search order of the stimulus files in a simulation profile before running the simulation, if you wanted to simulate the same circuit with different stimuli for each type of analysis.
- You can simulate the same circuit using different include files for each type of analysis. For example, you may want to simulate a circuit using the RF_AMP.INC include file for AC analysis and the RF_AMP1.INC include file for transient analysis. You can create two simulation profiles-one for AC and one for transient analysis, configure the RF_AMP.INC include file at the profile level in the simulation profile for AC analysis, and configure the RF_AMP1.INC include file at the profile level in the simulation profile for transient analysis. Previous versions of PSpice required you to configure the include files at the design level and change the search order of the include files in a simulation profile before running the simulation, if you wanted to simulate the same circuit with different include files for each type of analysis.
Creating a new simulation profile
A simulation profile (*.SIM) saves your simulation settings for an analysis type so you can reuse them easily.
You can use PSpice to create a new simulation profile only by importing settings from a simulation profile that exists in the same project or in another project.
To import settings from an existing simulation profile to create a new simulation profile, do the following:
-
From the File menu in PSpice, point to New and choose Simulation Profile.
The New Simulation dialog box appears. - In the Profile name text box, specify a name for the profile (such as the name of the analysis type for the new profile).
-
Click the Browse button to specify the location and name of an another simulation profile (
.sim) to import its settings into the new profile. -
Click Create to create the profile and display the Simulation Settings dialog box.
A new simulation profile is created and can bee seen under PSpice Resources – Simulation Profiles of the project which you had selected to import the existing simulation profile in the Inherit from an existing profile text box.
See the following topics for information on the settings in various tabs of the Simulation Settings dialog box:
|
Library settings for simulation profiles |
|
Using a simulation profile
You can simulate the circuit using any of the simulation profiles you have created in the project. To use a simulation profile, open it in PSpice or make it active in the design entry program.
To open a simulation profile in PSpice
To make a simulation profile active in Capture
- From the PSpice toolbar in Capture, select the simulation profile you want to use. See PSpice toolbar in Capture for more information.
- Select the simulation profile in the Capture Project Manager, and choose Make Active from the PSpice menu in Capture.
The ![]() icon indicates an active simulation profile.
icon indicates an active simulation profile.
Each simulation profile is associated with a schematic. When you select a simulation profile in Capture, the folder for the associated schematic becomes the root schematic folder. When you run PSpice, only the pages in the root schematic folder are netlisted. If the schematic pages in the root schematic folder refer to pages in another schematic folder (as in the case of hierarchical designs), the pages in that schematic folder also get netlisted.
Editing a simulation profile
You can edit an existing simulation profile to change the simulation settings. You can edit the current simulation profile in PSpice. In the design entry program, you can edit the current simulation profile or select the simulation profile you want to edit.
To edit a simulation profile in PSpice
- From the Simulation menu, choose Edit Profile to display the Simulation Settings dialog box.
- Make the required changes in the Simulation Settings dialog box.
- Click OK to save the changes.
To edit the current simulation profile in design entry program
- From the PSpice menu, choose Edit Simulation Profile to display the Simulation Settings dialog box.
- Make the required changes in the Simulation Settings dialog box.
- Click OK to save the changes.
To select a simulation profile you want to edit in design entry program
- From the PSpice toolbar in the design entry program, select the simulation profile you want to edit.
- From the PSpice menu in the design entry program, choose Edit Simulation Profile to display the Simulation Settings dialog box.
- Make the required changes in the Simulation Settings dialog box.
- Click OK to save the changes.
See the following topics for information on editing the settings in the tabs in the Simulation Settings dialog box:
|
Library settings for simulation profiles |
|
Deleting a simulation profile
You can delete a simulation profile only from the Capture Project Manager.
To delete a simulation profile
-
Select the simulation profile in the Capture Project Manager and press DeleteWhen you delete a simulation profile, the profile is deleted from the project but the files related to the simulation profile are not deleted from the project directory. You can manually delete the files from the project directory. For example, if you delete a simulation profile named TRAN, you must delete the TRAN folder located at
<project_directory>\<design_name>-PSpiceFiles\<root_schematic_name>\.If you delete a simulation profile but do not delete the files related to that profile, and later create a profile with the same name for the schematic, Capture displays an error message that a profile with the same name exists. You can overwrite the old profile or create another profile with a different name.
Viewing the simulation queue
Use the Simulation Queue dialog box to set the order of a batch simulation and to view the progress of a batch simulation.
To set up a batch simulation
- From the File menu, choose Open Simulation.
- Select multiple .SIM or .CIR files by doing one of the following:
To set the batch simulation order
-
After selecting the files for a batch simulation, click Open.
The Simulation Queue dialog box appears. The file at the top of the Pending Simulations list is set to be simulated first. - To change the order, do one of the following:
- Click the Settings button to display the Simulation Settings dialog box, where you can view or change the simulation profile settings.
- Click the Start button to start the simulations.
General simulation settings for simulation profiles
Use the General tab of the Simulation Settings dialog box to specify the simulation input and output files and save a description of the simulation profile.
Profile name
The Profile name text box displays the name of the current profile. You can change the name here.
Input settings
Choose Schematic to have the simulation input come from a Capture design (*.DSN file), or choose Circuit File (*.CIR) to have the simulation input come from a circuit file. For either input type, enter the name of the file in the text box.
For a design-based simulation, also select the name of the top-level schematic page. Use the Analysis tab of this dialog box to enter simulation settings.
For a circuit-file-based design, the Analysis tab settings are unavailable. You can change the simulation settings by editing the commands in the .CIR file. See the PSpice Reference Guide for more information about circuit file commands.
Output settings
In the Output Filename text box, enter a file name (*.OUT) for the simulation output to be saved to.
In the Waveform Data Filename text box, enter a filename (*.DAT) for the simulation waveform data to be saved to.
Analysis settings for simulation profiles
Use the Analysis tab of the Simulation Settings dialog box to define the basic analysis type and set up additional advanced analyses and simulation options.
Analysis Types
From the Analysis Type drop-down list box, select the basic analysis type you want to use. For more information about these, see Setting up analyses.
Analysis Options
Under Options, select an advanced analysis you want to use. See Setting up analyses for more information about these.
Configuration Files Tab
Use the Configuration Files tab of the Simulation Settings dialog box to configure and edit the following:
- Stimulus settings for simulation profiles
- Library settings for simulation profiles
- Include files settings for simulation profiles
Stimulus settings for simulation profiles
Use the Configuration Files tab of the Simulation Settings dialog box to configure global, design and profile level stimulus files.
Click Stimulus in the Category field in the Configuration Files tab, and then configure the stimulus files.
Library settings for simulation profiles
Use the Configuration Files tab of the Simulation Settings dialog box configure global, design and profile level model libraries.
-
Click Library in the Category field in the Configuration Files tab, and then configure the model libraries.
Library search path
The Library Path text box displays the path that PSpice uses to search for models configured at the global level. You can edit or replace this path by typing a path in this text box, following these rules:
Use a semicolon (;) to separate two path names.
Do not follow the last path name with a semicolon.
Example:
To search first C:\Cadence\SPB_17.4\tools\pspice\library then C:\MYLIBS, type the following:
"C:\Cadence\SPB_17.4\tools\pspice\library";"c:\mylibs"
Include files settings for simulation profiles
Use the Configuration Files tab of the Simulation Settings dialog box to configure and edit include files for simulation.
-
Click Include in the Category field in the Configuration Files tab, then configure or edit the include files.
Options for simulation profiles
Use the Options tab of the Simulation Settings dialog box to fine-tune how PSpice performs calculations for analog and gate-level digital simulation, as well as what information to save to the simulation output file (*.OUT).
Option categories
From the Category list, select Analog Simulation, Analog Advanced, Gate-level Simulation, or Output file to display the settings for each option category.
Analog simulation options
Use the Analog Simulation settings to fine-tune analog simulation accuracy, set iteration limits, set operating temperature, and specify MOSFET parameters.
The option names in the text box correspond to the option names used in the PSpice .OPTIONS command. For more information about this command, refer to the PSpice Reference Guide.
The following tables defines all the options in the tab for the Analog Simulation category:
Analog Advanced options
Use the Analog Simulation settings to enter values for the total transient iteration limit, relative magnitude for matrix pivot, and absolute magnitude for matrix pivot.
The option names shown in the text box correspond to the option names used in the PSpice .OPTIONS command. For more information about this command, refer to the PSpice Reference Guide.
The following tables defines all the options in the tab for the Analog Advanced category:
Gate-level simulation options
Use the Gate-level Simulation settings to set timing, I/O levels for interfaces, drive strength, and error message limits.
The following tables defines all the options in the tab for the Gate Level Simulation category:
| Flag option | Meaning |
|---|---|
Output file options
Use the Output File settings to select the types of information PSpice saves to the simulation output file.
The following tables defines all the options in the tab for the Output file category:
Data collection options for simulation profiles
Use the Data Collection tab of the Simulation Settings dialog box to restrict the captured simulation data. This is especially useful for large circuit designs that produce more data than you need for waveform analysis.
You can also set the probe data accuracy from this tab. By default, probe data has 64-bit accuracy but you can choose a lower 32-bit accuracy.
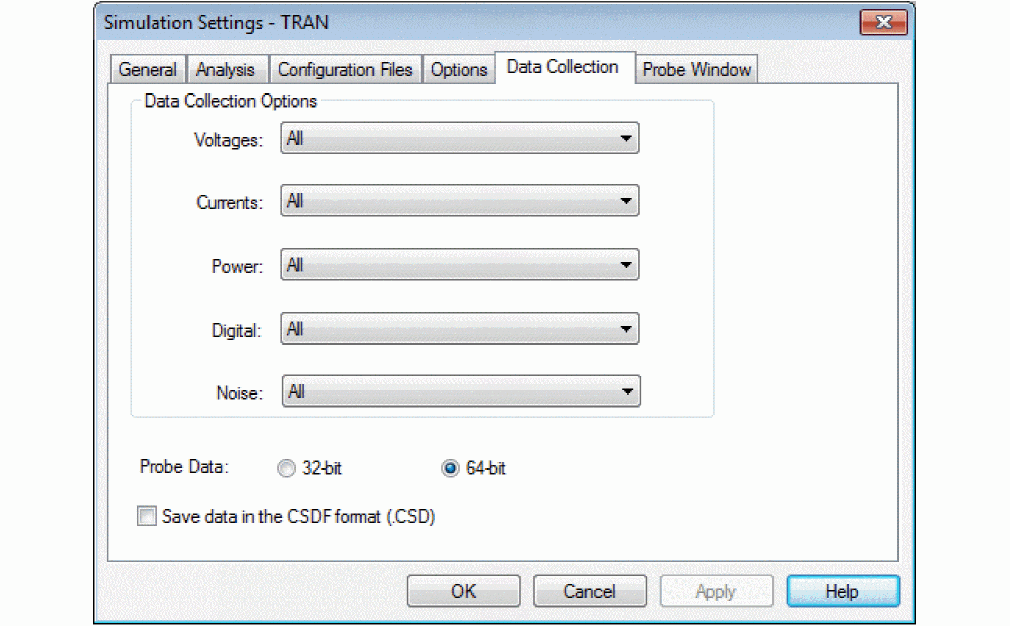
You can choose to apply the options in the table below to apply to Voltages, Currents, Power, Digital or Noise data. For more information on setting these options, see Setting data collection options.
Data Collection Options
Waveform data file format option
Select the Save data in the CSDF format (.CSD) check box to save the waveform data file in the ASCII Common Simulation Data Format instead of in the default binary format.
Probe Data accuracy options
By default, the probe data has 64-bit accuracy. You can set the accuracy by selecting a different radio button for Probe Data. A 64-bit accuracy setting ensures that the output does not have ramps. For example, when a small amplitude voltage is superimposed on a large amplitude voltage, the resolution might be lost, resulting in ramps.
Probe windows settings for simulation profiles
Use the Probe Windows tab of the Simulation Settings dialog box to set up how Probe windows are displayed for a simulation profile.
For more probe window options, see Setting Probe window options.
Probe window display options
|
Display the Probe windows that were displayed the last time the profile was opened. |
|
Return to top