2.5. Creating a Package
The previous two main sections introduced the concept of chrome and the prospect of creating standalone application windows. The next step is to make the example into an actual package -- a modularized collection of files that can be installed in Mozilla as a new application.
In the earlier section Section 2.3, you added features and complexity to your XUL file. In this section, you pull those features into separate files -- a CSS file, JS file, and a DTD file -- register these files together, and make them installable as a single package.
Only when you have packaged your work will your files have access to Mozilla files, such as CSS and scripts, be accessible from the special chrome:// type URLs, be able to accept new themes, and be able to get to the XPCOM objects in which much of the application for Mozilla is defined.
Tools are available that help set up the files that form the basis of a new package. Appendix B provides information about XULKit, which is a collection of scripts that automates part of the package creation process. It is recommended that you try to set up your own package by hand first to understand how packages are put together before using the XULKit scripts.
2.5.1. Architecture of a Chrome Package
The architecture of the Mozilla XPFE is component- or layer-based. One of the primary aims of the design was the separation of each different component of an application, namely content, functionality, and layout. This design results in greater modularization, making it easy to create and change a UI -- to change skins for your application, for example, update the language in which the user interface is presented, or bring in new script elements.
When a package is modularized like it can be in Mozilla, design determinations can be left to the designer, language in the user interface can be left to writers, and the application framework itself can be handled by software developers (though the programmer handles all of these in many small- to medium-sized projects). The next several sections provide more detail about each component and its content and file types. The way basic packages fit components together can be the basis for your own application development.
A package is a group of directories and related files that make up a Mozilla application. A small, typical package may include a single XUL file, a script file (currently JavaScript, with implementations for Perl, Python, Ruby, and other languages being developed), and a CSS file. However, a single package might include dozens of these files, and may also include XBL files, Image File Types (PNG, JPG, GIF), DTD, HTML, and RDF files. Each has an important role to play in the application.
2.5.2. Package Components
As you will discover, each component in a package is independent. It is possible for your application to exist with just one or two of these components. Yet they all tie together when necessary to create a full featured application, and they are all at your disposal to take advantage of.
2.5.2.1. Chrome content
The content is the XUL and XBL data, contained in one or more files. This content is pulled in at runtime from files, overlays, and bindings, for display in the window system. The cross-platform implementation ensures consistency in the native system, and fits into the "write once, run anywhere" model. The XUL defines a single set of UI elements for all platforms. The XUL parser is much less tolerant than many HTML parsers; in fact, it's completely intolerant. However, it needs to be because every element in XUL impacts others and affects the layout of the UI -- especially in the context of the Box Model, which Chapter 3 describes in detail.
The widget set consists of simple widgets that display by drawing themselves absolutely in their allotted space, and of more complex widgets that act as containers, draw on top of others, or accept input. A <label> widget is an example of the former, while <stack> is of the latter, more complex group. If the parser does not find an element in the content files, it fails to load and returns an error. Errors vary by type. An XML syntax error, for example, displays in the window in place of the expected content. It gives you the file the error originated in, along with the line number and column number.
Built as a complementary description language to XUL, XBL allows you to create your own widgets or add new behavior to existing XUL widgets. You may attach scripting and create (anonymous) content in a single binding or in many. With a little imagination, you can extend the content available to you infinitely by adding your own styling and behavior with XBL.
2.5.2.2. Chrome appearance
Loading up a XUL file with no styles attached to the XUL elements will render the UI as a plain, disproportioned group of widgets. While plain text on a web page can be effective for simply relaying information, the situation is not analogous in user interfaces.
Mozilla user interfaces without style are not very usable. Even to achieve the traditional plain gray interface that so many applications use, you must use CSS to style the Mozilla front end, and subtle effects, such as color grades or 3D button effects, often make even the most basic interface look and work better.
Themes and the ability to customize the look of an application are becoming more prominent. Mozilla developers realized this prominence during the design phase of Mozilla, and it's reflected in the architecture: the appearance of the interface is almost entirely separate from the structural representation in the content.
2.5.2.3. Chrome behavior
Mozilla currently supports only JavaScript as the bridge between the UI and the application code. JavaScript is the glue that binds the UI and the back end functionality, which is almost entirely written in C++.
Much of the infrastructure is in place for the support of other programming languages, however, and Python and Perl are currently being proposed as the next languages to fit into the framework. Currently, you will see JavaScript associated with XUL content via the following declaration:
<script type="application/x-javascript" src="xfly.js" />
type replaces the now deprecated language attribute and expects a MIME type for its value. As Mozilla matures and support for other languages arrives, this value may become interchangeable -- which fits in with the philosophy, common in open source projects, of there being More Than One Way To Do It. Note that the behavior component of a Mozilla application usually sits in the content subdirectory of a package, as described later in the section Section 2.5.3.
2.5.2.4. Chrome locale
Localization is the modification of software to meet the language of a location and the adaptation of resources, such as user interface and documentation, for that region. Widgets such as menu items, buttons, window titlebars, and alert dialogs commonly need to be localized. Beyond these widgets, there can be other localizable content in an application, from HTML pages to install packages.
The formats used by Mozilla are:
DTD (.dtd) files, which contain entities that host the strings to be included in your XUL content.
Property files (.properties), which contain string bundles that are accessed by dynamic content in JavaScript and C++ files or, theoretically, any language.
HTML files for certain pages installed with the application -- e.g., About Mozilla.
RDF files.
2.5.3. Directory Structure
Files can be organized in many different ways. If your application is small -- say a single window with a simple structure that needs to be available only in one language -- then having all your files in one directory may be easier. As the size of an application goes over a certain threshold, however, logically grouping your files into subdirectories is a good practice to make the files more accessible.
Most applications use a directory structure that mirrors the package component descriptions described earlier: XUL and JavaScript in a content subdirectory, CSS and images in a skin subdirectory, and DTDs and other resources for localizing the interface in a locale subdirectory. Figure 2-4 shows this common grouping.
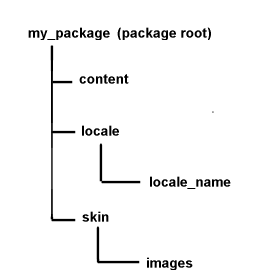
These three different directories usually contain the following type of files:
- content
The content directory is the home for the XUL files that contain the widgets to be drawn for you application. It is common practice to also place files related to behavior, namely JavaScript files, in this directory.
- locale
This directory contains the files that contain localized strings for your package. Most files are DTD files that contain the entities referenced in XUL files. There is a subdirectory for each language, and the naming convention is code-region, such as en-US.
- skin
The term "skin" is an internal name for a theme. The skin directory contains all CSS files and images that contribute to the appearance of the windows. This is a good place to put the application images -- in their own subdirectory.
2.5.3.1. The xFly application directory structure
The structure of the directories in which an application is defined (whether those directories are in the filesystem or subdirectories in an archive such as a JAR file) is an important part of that application's design and relationship to Mozilla. Use the following steps to make your xFly package self-contained, registerable, and adaptable.
On your computer, go to the directory where you have installed Mozilla and create a new directory underneath the chrome directory called "xfly."
All Mozilla applications live in the chrome directory.
Under that directory, create the three new directories, content, locale, and skin, as shown in Figure 2-5. The locale directory will have the default 'en-US' language pack structure.

2.5.4. Package Manifests
Now that you have created the directories for your package, you must tell Mozilla about them. All Mozilla packages must include manifests that describe their contents and make it possible to register them with Mozilla. A manifest is an RDF file (or series of RDF files) that sits within the package and interacts with Mozilla's chrome directory. RDF files are XML files that describe data in a machine-readable form.
Each xFly package subdirectory needs its own manifest file. Mozilla uses these files (in each case, called contents.rdf) when registering the application. These files are listed in Examples Example 2-5, Example 2-6, and Example 2-7. Create these files in your xFly content, skin, and locale subdirectories, respectively.
In the content manifest in Example 2-5, note the chrome:name, chrome:author, and the other metadata that the manifest provides to Mozilla. This information can be used by others to identify what your application is and who wrote it. For example, the name, author, and short description information for each browser theme you have installed is viewable by going to Preferences and selecting Appearance > Themes.
In Example 2-6, which describes the skin for xFly only, note that new skin resources for the Classic theme are all that is supplied, as indicated in the RDF:Seq, which lists only classic as affected by this new package.
In Example 2-7, which shows the third kind of manifest, for new locale information, the English language pack (en-US) is augmented with the localizable resources in the xFly package named there. The RDF:Seq structure in a manifest states, "to the package listed here (i.e., the en-US language pack), add the following."
Manifests are detailed in Chapter 6. For now, it's enough to see that each manifest describes the subdirectory in which it is located, and that the contents of those subdirectories make up the package collectively.
The content describes the content of the xFly package, the XUL, and the JavaScript. The skin describes the theme of xFly, or the CSS and images used to lay out the XUL. The third part describes the locale, or the strings in the UI that can be localized or adapted for various languages or locales.
2.5.5. Separating the Files
Once you have a subdirectory structure set up in accordance with the package component structure of your application, you can pull the pieces of your XUL file out into their own files and modularize your application. These separate files -- the basic XUL file and separate CSS, JS, and DTD files -- are registered as a single package and can then be launched as a standalone application.
Though the files contain the information you've already seen in the "Hello World" sample shown in Example 2-4, their interaction demonstrates how packages can work together in Mozilla. Each step taken to separate the different components requires editing the base XUL file.
2.5.5.1. The xFly CSS file
The inline style rule on the label widget can go almost unadulterated into a separate text file called xfly.css. Save the code in Example 2-8 in the chrome/xfly/skin/ directory.
Using style rules from an external file is different because you have to specify some way for the style rule to associate itself with the appropriate tags in the XUL file. CSS provides a rich collection of selectors, which bind style data to elements. In this case, where you have two separate elements that need to pick up rules, the id attribute on the XUL element is used to bind a unique element to an external style rule and the other style rule is bound by referring to the XUL element directly. Example 2-8 includes the selectors for the two elements, and Example 2-9 shows the updated XUL that uses xfly.css.
Note the extra stylesheet import statement at the top and the use of the new id attribute on the label. When you register the new files in your package with Mozilla, the xfly directory in that stylesheet processing instruction will point into your application directory structure (at the skin subdirectory, and at a file named after the directory itself, xfly.css). The label will pick up the style information in the file that was previously defined directly in its style attribute.
2.5.5.2. The xFly script file
The next step is to take the scripting portion, as simple as it is, out of the XUL file and put it into an external JavaScript file. Example 2-10 shows a XUL file that gets a function for the button from an external script file, given here as xfly.js.
Note that the function greet( ) is used to name the action that is performed when the button is clicked. The greet( ) function is now defined in the xfly.js file that the XUL file picks up with the script import statement:
<script type="application/x-javascript"
  src="chrome://xfly/content/xfly.js" />
Example 2-11 contains all of the code needed for the xfly.js file.
Save xfly.js in the content subdirectory of the xFly application (chrome/xfly/content/). The script import statement above uses the chrome:// URL to locate scripts from directories that were registered with Mozilla.
2.5.5.3. The xFly DTD
The final step in a basic application setup is to generalize parts of the interface that are written in a particular language, such as English. When you create a locale subdirectory for your package and place a DTD file that contains the English strings in the user interface, you can refer to and load that DTD just as you do with the CSS and script files.
For example, to localize the text of the label and button elements in the "hello xFly" example, you can use a special syntax to tell Mozilla to use an entity rather than a string. Because that entity is defined in xfly.dtd and located in the locale subdirectory, it can easily be swapped for an entity from a different language pack when the user switches languages in Mozilla.
Once again, the external file you create can be very simple. Example 2-12 contains the code needed for the xfly.dtd file, which you create and save in the locale subdirectory.
The updated XUL file that uses this external DTD, then, appears in Example 2-13. Once you have made the final changes in the XUL to refer to the external files you've created, save the code in Example 2-13 as xfly.xul in the chrome/xfly/content/ directory.
Like the CSS and script file imports, the updated DOCTYPE definition at the top of the file tells Mozilla to load additional entities as part of the xFly package. Those entities -- the English strings that display in the user interface -- are defined so they can be localized or internationalized without affecting the application's structure.
All three of these imports use the chrome:// URL to refer to resources that are internal to the xFly package. These type of URLs can also refer to resources elsewhere in Mozilla, such as image resources, strings that have already been defined in entities, and functions from scripts such as centerWindowOnScreen( ).
When you finish setting things up in the package directories, you should have a structure that looks like the tree structure in Example 2-14.
2.5.6. Registering a Package
Registering packages in Mozilla can be confusing at first, so don't worry about understanding everything at this point. Later chapters provide more detailed information about packaging and registration, and you can always copy the examples given here to install your own application. In general, to make your package registerable, create manifests that describe your package in terms that Mozilla can understand.
Although it's customary to make registration a part of the installation process by using the XPInstall API and installation scripts, you need a simple way to register the xFly application so you can see your work and test it as it develops. For this purpose, hacking the installed-chrome.txt file living in Mozilla's chrome directory will do.
The installed-chrome.txt file is a list of packages and package parts that Mozilla should find and register on start up. When you add entries to this file, you point to your package and tell Mozilla to register that package when it starts up.
Append the entries in Example 2-15 to the bottom of the installed-chrome.txt file in the main chrome directory.
When Mozilla starts up, it looks for the package manifests, reads them, and registers the xFly package.
When others install your application and use it on their machines (but do not use the hack to installed-chrome.txt), you can provide them with a JavaScript installation file that downloads and registers your package from a web page. See Chapter 6 for more information about these installation files and the XPInstall technology they are based upon.