4.4. Creating New Skins
You have already created the highest level of the directory structure you will need to create a skin for the xFly application (See "Creating the Hello xFly Package" in Chapter 2). So far, you have created three subdirectories corresponding to different parts of the package and you have added XUL to the xfly/content subdirectory. In the xfly/skin subdirectory, you will tell the xFly content where to expect to find its skin resources. As just mentioned, Mozilla applications outside of the browser itself typically restrict their skin to a single subdirectory and their skin manifest to a single RDF/XML file.
Since the skin subdirectory in your xFly package is already registered, you can create a new CSS file called xfly.css, save it in the skins subdirectory, and load it from your xfly.xul file by adding the following stylesheet loading instruction at the top:
<?xml-stylesheet href="chrome://xfly/skin" type="text/css" ?>
You will recall that the chrome pointer in the href resolves to a file named xfly.css (named after the directory) in the following registered directory in the chrome:
chrome/xfly/skin/
This CSS file will be the worksheet for all CSS for the xFly application. Any style rules you add here and associated with XUL elements in the xFly XUL code will affect the layout and presentation of that code on restart.
4.4.1. Importing the Global Skin
As you create a new skin for your application, the first step is to make sure that the application imports the global skin in which the most basic look and feel of the XUL widgets is defined. Even if you create a skin that looks completely different than the skins installed with Mozilla, you should import the global skin to avoid having to recreate so much of the basic presentation and behavior of the XUL widgets.
As much as possible, the global skin avoids providing theme-specific styles, and instead provides just enough information to make buttons, for example, look like buttons and menu items look like menu items. Increasingly, basic styles are also being defined in the XBL bindings for widgets. For instance, when you use a toolbar widget, you use a binding in which certain intrinsic looks and behaviors are defined in a way that's transparent to you and to the user of the application. The style for these bindings is located in the content subdirectories with the binding XML files. In this way, they "stay with" the widget and not with the selected skin. You can easily extend or overwrite any of the style information you pick up from the global skin, but loading the skin is a good place to start.
To do this, verify that you have the following line at the top of the xfly.xul file:
<?xml-stylesheet href="chrome://global/skin" type="text/css" ?>
If you do not have this line, add it now to the xfly.xul file and restart Mozilla. You ought to see a plain, UI-like collection of widgets in the XUL window. In the screenshots in Figure 4-8, you can see how loading the global skin affects the XUL file.
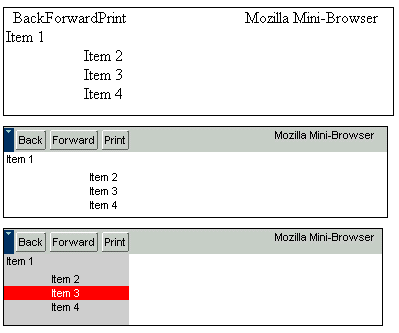
The first screenshot in Figure 4-8 shows a XUL file loaded in Mozilla with no skin information. The second is the same XUL file with the global skin loading instruction at the top. The third is a screenshot of that XUL file with an instruction for loading your own stylesheet, which in turn imports the global skin:
<?xml-stylesheet href="chrome://xfly/skin/sample.css" type="text/css" ?>
The CSS information in the skin file sample.css loaded above looks like this:
@import url(chrome://global/skin/)
box#bbox { background-color: lightgrey; }
button#rd { background-color: red; color: white; }
Taking advantage of the modularity of Mozilla skins, you can design a decent interface (if the last screenshot above can count as that) with just a few lines of code.
Once you import the global skin and see what it buys you in terms of look and feel, you can begin to create your own skin for the xFly, overriding global styles where appropriate, extending them by "cascading" new, more specific style rules for your widgets, or adding new styles.
Before you begin to add styles to the xfly.css file, import it (as a blank skin) into xfly.xul so you can see your progress as you go. Add the following line to the top of the xfly.xul file to import the xFly skin from the proper subdirectory of the xFly package:
<?xml-stylesheet href="chrome://xfly/skin" type="text/css" ?>
You won't see anything extra when you quit and restart the application, but you now have the skin structure in place so you can see your work progress.
4.4.2. Getting Started with Custom Styles
When you make a new skin, it's a good idea to define the most general styles for your application first. As we described above, more specific CSS rules tend to inherit from more general ones. For the xFly application, the most general aspects of the style are the rules that apply to the xFly windows themselves. You can create styles for all windows using the element name, window, or you can define different classes for windows if your application supports them. In the xfly.xul file, for example, the root <window> element has the attribute class="main", so it will pick up style rules given for window.main, as shown in Example 4-9.
The xFly application has both a main window and pop-up windows, so you might create style rules like the ones that follow to establish the basic look of the xFly application.
Now, with the two stylesheets (global.css and the xfly.css) referenced at the top, you already have a window that is starting to look like an application.
4.4.3. Creating Styles for the xFly Buttons
Now that you have created a single custom style for the xFly application, you can see how easy it is to associate cascading style rules with any element in your interface. The next logical step is to style the buttons in the xFly sample application, since they make up such a large portion of the interface itself.
When you use the button widget without any extra style information, you already get a lot of the button-like presentation and behavior. The button has different looks, for example, when you hover over it and when you click it, and it has a basic three-dimensional shape as seen in Figure 4-9.

A common update to regular XUL buttons is to give them images, like the navigation buttons in the main Mozilla browser window. Adding the class-based style rule in Example 4-10 to the xFly stylesheet (and, of course, the GIF image itself to the skin subdirectory) will give all the "fly" buttons background images with flies in them.
4.4.4. Describing the Skin in RDF
As described in Chapter 6, a manifest must accompany and describe the skin so it can be found and registered. The manifest is an RDF file called contents.rdf that sits at the highest level of the skin (i.e., at the top of the JAR or immediately under the modern directory when extracted to disk). Since the content, skin, and locale of an application are considered different packages, each must have its own manifest.
The listing in Example 4-11 shows the contents.rdf manifest that accompanies the xFly skin resources in the xfly.jar!/skin/ directory.
As you can see, the basic form of the manifest is something like, "This is the classic skin we have (given as a direct child of the RDF root element), which applies to the following packages: xfly." The second group of RDF in this manifest provides a list of packages to which the skin should apply. In the case of the xFly application, all XUL code is a single package. In Mozilla, a contents.rdf file in a package subdirectory of the modern.jar, for example, would describe the communicator package in a similar way, but it would be a composite of other package manifests in the theme to create a single, overarching manifest for the whole theme. Example 4-12 shows the manifest for just the Mozilla communicator package.
This RDF/XML file describes a skin to the chrome registry so it can be registered properly. All new packages must be accompanied by these sorts of RDF-based descriptions if they will be made available to users.