Table of Contents
Surprisingly, we have already covered a great deal of the information about spreadsheets. Spreadsheets share a great deal of their markup with tables that you find in text documents. This shouldn’t come as a surprise—a spreadsheet is just a two-dimensional table. It can have many blank rows and columns and can do calculations on the cell entries, but a spreadsheet is still just a table at heart.
However, there are things that make a spreadsheet, well, spreadsheetish. Most important, the <office:body> has an <office:spreadsheet> element as its child (rather than <office:text> for a word processing document). Other elements and attributes specific to spreadsheets are in the styles.xml file, but most are in content.xml.
The styles.xml file stores information that OpenOffice.org sets from the sheet tab of the Format Page dialog, shown in Figure 5.1, “Spreadsheet Page Options”. Specifically, this information is in the <style:page-layout-properties> element that is inside the first <style:page-layout> element within the <office:automatic-styles>.
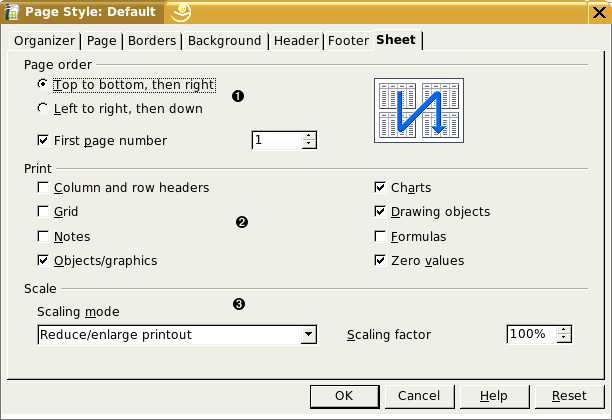
- The style:print-page-order attribute has a value of ttb for top to bottom, and ltr for left to right. If the first page number is not one (the default), then the style:first-page-number attribute will give the number that you specify.
- The value of the style:print attribute summarizes all the marked checkboxes as a whitespace-separated list. If you turn on all the checkboxes, the value will be these words (separated by whitespace): annotations, charts, drawings, formulas, grid, headers, objects, and zero-values.
- If you are scaling to a percentage, then the style:scale-to attribute will have the scaling percentage (with a percent sign) as its value. If you are fitting to a number of pages, then the style:scale-to-pages attribute will provide that value. If you are scaling to width and height, then the style:scale-to-X and style:scale-to-Y attributes will give the number of pages in each direction.
Example 5.1, “Page Options” shows this markup.
Example 5.1. Page Options
<office:automatic-styles>
    <style:page-layout style:name="pm1">
        <style:page-layout-properties
            style:print-page-order="ttb" style:first-page-number="2"
            style:scale-to-pages="1"
            style:writing-mode="lr-tb"
            style:print="formulas grid headers zero-values"/>
        <!-- etc. -->
    </style:page-master>
    <!--  more styles -->
</office:automatic-styles>
The <office:automatic-styles> element contains
- Column styles
- Row styles
- Sheet styles
- Number styles
- Cell Styles
Each differently styled column in the spreadsheet gets a <style:style> whose style:family is table-column. Its child <style:table-column-properties> element specifies the width of the column (style:column-width) in the form of a length, such as 1.1in.
The column styles are followed by <style:style> elements whose style:family is table-row. Their child <style:table-row-properties> element specifies the style:row-height. If you have chosen “optimal height” then this element will also set style:use-optimal-row-height to true.
A <style:style> element with a style:family="table" primarily serves to connect a table with a master page and to determine whether the sheet is hidden or not. Example 5.2, “Style Information for a Sheet” shows just such an element.
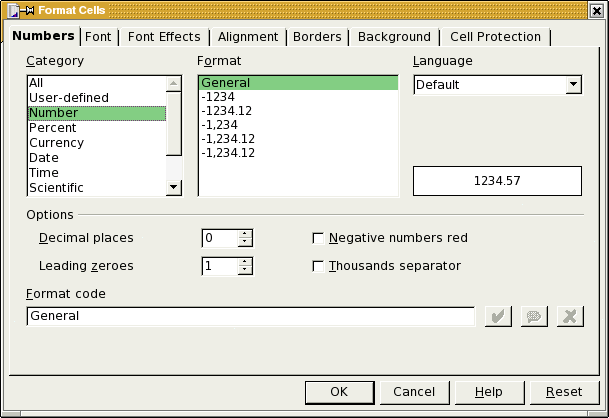
The other major style information in a spreadsheet deals with formatting numbers so that they show up as percentages, scientific notation, etc. A number style must convey two pieces of information: what kind of a number it is (number, currency, percent, date, etc.) and how the number is to be displayed. This is mirrored in the XML as a <number:entity-style> element, where entity can be number, currency, percent, date, etc.
This element has a required style:name attribute that gives the style a unique identifier, and a style:family attribute with a value of data-style. The contents of this element will tell how to display the number, percent, currency, date, etc.
Let’s start with the “pure numeric” styles: numbers, percents, scientific notation, and fractions.
A plain number is contained in a <number:number-style> element with a style:name attribute. Contained within this element is the description of how to display the number. In this case, we need only a simple <number:number> element that has these attributes
- number:decimal-places tells how many digits are to the right of the decimal symbol
- number:min-integer-digits tells how many leading zeros are present.
- number:grouping. If you have checked the“thousands separator” dialog item, then this attribute will be present and will have a value of true.
Example 5.3, “Number Style for format #,##0.00” shows a number style for displaying two places to the right of the decimal, one leading zero, and a grouping separator.
Example 5.3. Number Style for format #,##0.00
<number:number-style style:name="N2"">
    <number:number number:decimal-places="2"
	    number:min-integer-digits="1"
        number:grouping="true"/>
</number:number-style>
Note
The decimal symbol and grouping symbol are not specified in the style; they are set in the application.
If you want negative numbers to be red, then things become radically different. Rather than having one style, OpenDocument requires two styles, with the negative being the default and a “conditional style” for positive values. Here is the XML for a number with two digits to the right of the decimal, one leading zero, a thousands separator, and negative numbers in red:
Example 5.4. Number Style for format -#,##0.00 with Negative Values in Red
<number:number-style style:name="N112P0"
style:volatile="true">  <number:number number:decimal-places="2"
number:min-integer-digits="1" number:grouping="true"/>
</number:number-style>
<number:number-style style:name="N112">
<style:text-properties fo:color="#ff0000"/>
<number:number number:decimal-places="2"
number:min-integer-digits="1" number:grouping="true"/>
</number:number-style>
<number:number-style style:name="N112">
<style:text-properties fo:color="#ff0000"/>  <number:text>-</number:text>
  <number:number number:decimal-places="2"
  number:min-integer-digits="1" number:grouping="true"/>
<style:map style:condition="value()>=0"
number:min-integer-digits="1" number:grouping="true"/>
<style:map style:condition="value()>=0"  style:apply-style-name="N112P0"/>
</number:number-style>
style:apply-style-name="N112P0"/>
</number:number-style>
| | This is the format to be used for positive numbers. The style:volatile="true" tells the application to retain this style, even if it is never used. |
| | This is the main style for negative numbers. They should be displayed in red … |
| | … starting with a minus sign … |
| | … followed by the number with two decimal places, at least one leading zero, and a thousands separator. |
| | However, in the event that the value of the cell is greater than or equal to (>=) zero, use the positive number style (N112P0). |
Scientific notation is a variant on plain numbers; the outer <number:number-style> contains a <number:scientific-number> element with these attributes: number:decimal-places and number:min-integer-digits for the mantissa, and number:min-exponent-digits for the exponent part. You don’t need to put the E in the specification. Example 5.5, “Scientific Notation for Format 0.00E+00” shows the style for scientific notation with two digits to the right of the decimal point, at least one to the left, and at least two digits in the exponent.
Fractions are also variants of plain numbers. Their <number:number-style> element contains a <number:fraction> element that has these attributes: number:min-integer-digits (number of digits in the whole number part), number:min-numerator-digits, and number:min-denominator-digits. Example 5.6, “Fraction Style for Format # ??/??” shows a style for a fraction with an optional whole number part and at least two digits in the numerator and denominator.
A percentage is represented in much the same way as a plain number; the only differences are that
- The enclosing element is <number:percentage-style> instead of <number:number-style>.
- The enclosed <number:number> style is followed by a <number:text> element with a percent sign as its content.
Example 5.7, “Percent Style for Format #,##0.00%” shows a percentage with two digits to the right of the decimal, at least one to the left, and a grouping symbol.
Currency styles are similar to number styles. Specifying a currency always creates two styles: one for negative values, and one for positive values. Example 5.8, “Currency in Format -$#,##0.00” shows the XML for a currency format of US Dollars with two digits after the decimal point, a minimum of one digit before the decimal, and a thousands separator.
Example 5.8. Currency in Format -$#,##0.00
<number:currency-style style:name="N102P0"
| | The formatting for positive values appears first, contained in a <number:currency-style> element. |
| | The <number:currency-symbol> ’s content is the dollar sign. The number:language and number:country allow a program to distinguish the US dollar from the New Zealand dollar or Mexican new peso symbol, which look the same but have different countries and/or languages. |
| | The number portion of the display uses the same <number:number> element that we have already described[6]. |
| | For negative values, the minus sign precedes the currency symbol. |
| | As in Example 5.4, “Number Style for format -#,##0.00 with Negative Values in Red”, a <style:map> is used to choose whether to use the negative number format or the positive number format. |
The appearance of <number:text> elements mirrors the order in which the text appears. Example 5.9, “Currency Format for Greek Drachma” shows the negative number portion of the XML for the Greek drachma. In this format, the value is shown in red, the minus sign appears first, then the number, then a blank and the letters “Δρχ.” (We are showing only the negative number specification.)
Example 5.9. Currency Format for Greek Drachma
<number:currency-style style:name="N111">
<style:properties fo:color="#ff0000"/>
<number:text>-</number:text>
<number:number number:decimal-places="2"
number:min-integer-digits="1" number:grouping="true"/>
<number:text> </number:text>
<number:currency-symbol number:language="el"
number:country="GR">Δρχ</number:currency-symbol>
<style:map style:condition="value()>=0"
style:apply-style-name="N111P0"/>
</number:currency-style>
OpenDocument applications support a large number of different formats for dates and times. Rather than explain each one in detail, it’s easier to simply compose the style you want out of parts.
For dates, the enclosing element is a <number:date-style> element, with the usual style:name attribute. The number:automatic-order attribute is used to automatically order data to match the default order for the language and country of the data. You may also set the number:format-source to fixed, to let the application determine the value of “short” and “long” representations of months, days, etc. If the value is language, then those values are taken from the language and country set in the style.
Within the <number:date-style> element are the following elements, with their significant attributes:
- <number:year>
- Gives the year in two-digit form; the year 2003 appears as 03. If number:style="long" then the year appears as four digits.
- <number:month>
- If number:textual="true" then the month appears as an abbreviated name; otherwise a number without a leading zero. To get the full name of the month or the month number with a leading zero, set number:style="long".
- <number:day-of-week>
- The day of the week as an abbreviated name; to see the full name, use number:style="long".
- <number:day>
- The day of the month as a number without a leading zero; to see leading zeros, use number:style="long".
- <number:quarter>
- Which quarter of the year; in U.S. English, a date in October appears as Q4. If number:style="long", then it appears as 4th quarter.
- <number:week-of-year>
- Displays which week of the year this date occurs in; thus January 1st displays as 1 and December 31st displays as 52 (or, in OpenOffice.org’s case, as 1 if there are 53 weeks in the year, as there are in 2003!)
Example 5.10, “Date Styles” shows three date styles. The first will display the fourth day of the seventh month of 2005 as Monday, July 4, 2005; the second will display it as 07/04/05, and the third as 3rd Quarter 05.
Example 5.10. Date Styles
<number:date-style style:name="N79" number:automatic-order="true">
    <number:day-of-week number:style="long"/>
    <number:text>, </number:text>
    <number:month number:style="long"
        number:textual="true"/>
    <number:text> </number:text>
    <number:day/>
    <number:text>, </number:text>
    <number:year number:style="long"/>
</number:date-style>

<number:date-style style:name="N37" number:automatic-order="true">
    <number:month number:style="long"/>
    <number:text>/</number:text>
    <number:day number:style="long"/>
    <number:text>/</number:text>
    <number:year/>
</number:date-style>

<number:date-style style:name="N20106">
    <number:quarter number:style="long"/>
    <number:text> </number:text>
    <number:year/>
</number:date-style>
Time values are represented by the <number:time-style> element. Its sub-elements are
- <number:hours>
- Shows the number of hours; if you want leading zeros on hours less than ten, set number:style="long". If a duration is more than 24 hours, it will be displayed mod 24. If you do not want this to happen, then set number:truncate-on-overflow="false"on the<number:time-style>element.
- <number:minutes>
- Displays the number of minutes without a leading zero; if you want two digits, set number:style="long".
- <number:seconds>
- Displays the number of seconds without a leading zero; if you want two digits, set number:style="long". If you wish to see decimal fractions of a second, then add a number:decimal-places attribute whose value is the number of decimal places you want.
- <number:am-pm>
- This empty element inserts the appropriate am or pm (in the selected locale).
Example 5.11, “Time Style” shows the style required to display a time in the format 09:02:34 AM
Example 5.11. Time Style
<number:time-style style:name="N43">
    <number:hours number:style="long"/>
    <number:text>:</number:text>
    <number:minutes number:style="long"/>
    <number:text>:</number:text>
    <number:seconds number:style="long"/>
    <number:text> </number:text>
    <number:am-pm/>
</number:time-style>
Note
A <number:date-style> element may also specify hours, minutes, and seconds.
An OpenDocument-compatible application gets its cues for displaying numbers from the current language setting. You may set the display of a number to a specific language and country by adding the number:language and number:country attributes to a <number:entity-style> element. Thus, to make a date display in Korean format, you would start the specification as follows:
<number:date-style style:name="N5076"
  number:language="ko" number:country="KR">
    <number:year number:style="long"/>
    <number:text>년 </number:text>
    <number:month/>
    <number:text>월 </number:text>
    <number:day/>
    <number:text>일</number:text>
</number:date-style>
Finally, each different style of cell has its own <style:style> element. If the cell contains text, then it will contain a <style:text-properties> element that describes its border, background color, font, alignment, etc. If it contains a number, then the style contains a reference to one of the previously established number styles. Example 5.12, “Style for a Numeric Cell” shows the XML for the cell containing the time style shown in Example 5.11, “Time Style”.
Let us now turn our attention to the table content, which is contained in content.xml, inside the <office:body> element. Each sheet is stored as a separate <table:table>. Its table:name attribute is the name that will appear on the spreadsheet tab, and the table:style-name attribute refers to a table style as described in the section called “Styles for the Sheet as a Whole”.
The <table:table> element contains a series of <table:table-column> elements to describe each of the columns in the table. These each have a table:style-name attribute whose value refers to a <style:style> with that name. If several consecutive columns all have the same style, then a table:number-columns-repeated attribute tells how many times it is repeated. A hidden column will have its table:visibility attribute set to collapse.
Example 5.13, “Table Columns in a Spreadsheet” shows the XML for the columns of a table with eight columns. The second and last columns have the same style, and there are three identical columns before the last one.
Example 5.13. Table Columns in a Spreadsheet
<table:table-column table:style-name="co1"
    table:default-cell-style-name="ce1" />
<table:table-column table:style-name="co2"
    table:default-cell-style-name="Default" />
<table:table-column table:style-name="co3"
    table:default-cell-style-name="ce2" />
<table:table-column table:style-name="co4"
    table:number-columns-repeated="3"
    table:default-cell-style-name="Default" />
<table:table-column table:style-name="co2"
    table:default-cell-style-name="Default" />
The column specifications are followed by the <table:table-row> elements. These also have a table:style-name attribute referring to a <style:style> with a style:family="table-row". If the row is duplicated, then the table:number-rows-repeated gives the repetition count. A hidden row has table:visibility set to collapse.
Within the table row are the <table:table-cell> entries. If the cell contains a string, then the cell will contain a child <text:p> element that contains the text, as in the following example:
<table:table-cell>
    <text:p>Federico Gutierrez</text:p>
</table:table-cell>Cells that contain numbers also contain a <text:p> that shows the display form of the value. The actual value is stored in the <table:table-cell> element with two attributes: office:value-type and office:value. These are related as described in Table 5.1, “office:value-type and office:value”.
Table 5.1. office:value-type and office:value
| office:value-type | office:value |
|---|---|
| float | Used for pure numbers, fractions, and scientific notation. The value is stored without a decimal point if the value is an integer; otherwise . is used as the decimal point. |
| percentage | A display value of 45.6% is stored as 0.456. |
| currency | The value is stored using . as a decimal point, with no currency symbol. There is an additional table:currency attribute that contains an abbreviation such as USD or GRD. |
| date | The value is stored in a office:date-value attribute rather than a office:value. If it contains a simple date, it is stored in the form yyyy-mm-dd; if there is both a day and a time, it is stored in the form yyyy-mm-ddThh:mm:ss. |
| time | The value is stored in a office:time-value attribute rather than a office:value. The value is stored in the form PThhHmmMss,ffffS (where ffff is the fractional part of a second). |
Note
The content of the <text:p> element is provided as a convenience for programs that wish to harvest the displayed values. OpenOffice.org will display cell contents based upon the office:value and office:value-type only, ignoring the content of the cell’s <text:p>.
Figure 5.3, “Spreadsheet Showing Various Data Types” shows a simple spreadsheet with the default language set to Dutch (Netherlands).

Showing you the actual XML would be more confusing than illuminating. Instead, we’ve boiled down the linkage to Figure 5.4, “Spreadsheet Showing Number Style Linkages” Starting at a table cell:
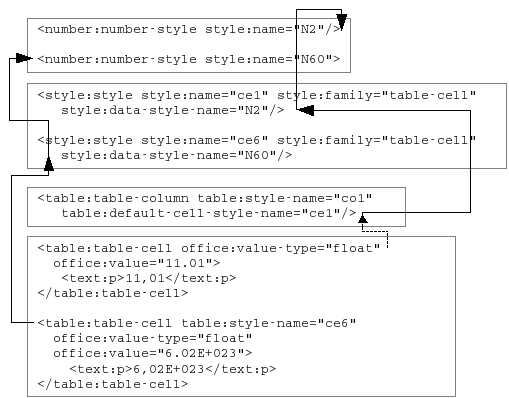
- If you have a table:style-name, then that’s the style for that cell.
- If you don’t have a table:style-name, then the column this cell is in leads you indirectly to the style via its corresponding <table:table-column>.
- In either case, you end up at a <style:style> element whose style:data-style-name attribute leads you to …
- A <number:number-style> that tells you how the cell should be formatted.
Formula cells contain a table:formula attribute. Within the table:formula attribute, references to individual cells or cell ranges are enclosed in square brackets. Relative cell names are expressed in the form sheetname.cellname. Thus, a reference to cell A3 in the current spreadsheet will appear as [.A3], and a reference to cell G17 in a spreadsheet named Sheet2 will appear as [Sheet2.G17]. The range of cells from G3 to K7 in the current spreadsheet appear as [.G3:.K7].
Absolute cell names simply have the preceding $ on them, much as you would enter them in OpenOffice.org. Thus, an absolute reference to cell C4 in the current spreadsheet would be written as [.$C$4].
Depending upon the return type of the formula, the table cell will contain appropriate office:value and office:value-type attributes. Example 5.14, “Return Types from Formulas” shows the result of three formulas; the first returns a simple number, the second returns a string showing roman numerals, and the third produces a time value from the contents of three cells.
Example 5.14. Return Types from Formulas
<table:table-cell table:formula="oooc:=SUM([.A1:.C1])"
  office:value-type="float" office:value="137">
	<text:p>137</text:p>
</table:table-cell>

<table:table-cell table:formula="oooc:=ROMAN([.B4])"
  office:value-type="string" office:string-value="CVII">
	<text:p>CVII</text:p>
</table:table-cell>

<table:table-cell table:formula="oooc:=TIME([.E1];[.E2];[.E3])"
  office:value-type="time" office:time-value="PT10H05M48S">
	<text:p>10:05:48 AM</text:p>
</table:table-cell>
According to the specification, an OpenDocument-compatible application should depend only upon the formula to generate its display. A program could generate a spreadsheet that would display identically to the preceding example when opened in OpenOffice.org, using only the information shown in Example 5.15, “Minimal Formulas”.
Example 5.15. Minimal Formulas
<table:table-cell table:formula="oooc:=SUM([.A1:.C1])"/>

<table:table-cell table:formula="oooc:=ROMAN([.B4])"/>

<table:table-cell table:formula="oooc:=TIME([.E1];[.E2];[.E3])"/>
If you are using an array formula which would be represented in OpenOffice.org within curly braces, such as {=B6:C6*B7:C7}, you must specify the number of rows and columns that the result will occupy. The preceding formula is marked up as follows:
<table:table-cell
    table:number-matrix-columns-spanned="2"
    table:number-matrix-rows-spanned="1" table:formula="oooc:=[.B6:.C6]*[.B7:.C7]"
    office:value-type="float" office:value="27">
    <text:p>27</text:p>
</table:table-cell>
Merging cells in spreadsheets is far easier than merging them in text tables. The first cell in the merged area will have table:number-rows-spanned and table:number-columns-spanned attributes. Their values give the number of rows and columns that have been merged. Any of the cells which have been covered by the merged cell will no longer be ordinary <table:cell> elements; they will become <table:covered-table-cell> elements, but the rest of their attributes and contents will remain unchanged.
We will use this information about spreadsheets to write a Python program that does currency conversion. All cells that are stored in one currency (such as U.S. dollars) will be converted to the equivalent values in a different currency (such as Korean Won) and saved to a new spreadsheet.
To find and change the appropriate <number:currency-style> elements, the program must know the values of number:country and number:language for the source and destination currencies. To find and change the appropriate <table:table-cell> elements, the program must know the three-letter abbreviation found in table:currency for the source and destination currencies.
Finally, we will need to provide format strings for positive and negative values in the destination currency, the currency symbol for the destination currency, and a conversion factor for multiplying the value of the numbers in the spreadsheet. We will store all this information in an ad-hoc XML file of the form shown in Example 5.16, “Money Conversion Parameters”, which converts U.S. dollars to Korean Won. [This is file currencyparam.xml in directory ch05 in the downloadable example files.]
Example 5.16. Money Conversion Parameters
<convert>
    <from language="en" country="US" abbrev="USD" />
    <to language="ko" country="KR" abbrev="KRW"
        symbol="₩"
        positiveFormat="$#,##0.00"
        negativeFormat="-$#,##0.00"
        factor="1175.19"/>
</convert>
The symbols in the format string have the following meanings:
- $ represents the currency symbol (as described by the symbol attribute).
- # represents a digit other than a leading or trailing zero.
- , means that this number has a thousands separator.
- 0 represents a digit including leading and trailing zeros.
- . represents the decimal point (which will be displayed in the appropriate locale within the application).
All the other characters in the format string are taken as text. This allows you to place blanks and other characters in a format.
Although Python requires functions to be defined before they are used, we are doing a top-down explanation of this program, so we will present functions in conceptual order rather than file order. Here’s the main program, which looks for three arguments on the command line: the filename of the OpenDocument file, the filename for the resulting document, and the filename of the parameter XML file. [The main program is file currency_conversion.py in directory ch05 in the downloadable example files.]
import xml.dom
import xml.dom.ext
import xml.dom.minidom
import xml.parsers.expat
import sys
import od_number
from zipfile import *
from StringIO import *

if (len(sys.argv) == 4):

    #   Open an existing OpenDocument file
    #
    inFile = ZipFile( sys.argv[1] )

    #   ...and a brand new output file
    #
    outFile = ZipFile( sys.argv[2], "w", ZIP_DEFLATED );

    getParameters( sys.argv[3] )

    #
    #   modify all appropriate currency styles
    #
    fixCurrency( "styles.xml" )
    fixCurrency( "content.xml" )

    #
    #   copy the manifest
    #
    copyManifest( )

    inFile.close
    outFile.close
else:
    print "Usage: " + sys.argv[0] + " inputfile outputfile parameterfile"
The import statements give us access to various Python libraries. od_number is a module that we have written to convert format strings to XML document fragments.
Here is the code that will open the parameter file and read the data into global variables.
def getParameters( filename ):
    global oldLanguage, oldCountry, oldAbbrev
    global language, country, abbreviation, currencySymbol
    global positiveFormatString, negativeFormatString, factor

    paramFile = open( filename, "r" )
    document = xml.dom.minidom.parse( paramFile )

    node = document.getElementsByTagName( "from" )[0]
    oldLanguage = node.getAttribute( "language" )
    oldCountry = node.getAttribute( "country" )
    oldAbbrev = node.getAttribute( "abbrev" )

    node = document.getElementsByTagName( "to" )[0]
    language = node.getAttribute( "language" )
    country = node.getAttribute( "country" )
    abbreviation = node.getAttribute( "abbrev" )
    currencySymbol = node.getAttribute( "symbol" )
    positiveFormatString = node.getAttribute( "positiveFormat" )
    negativeFormatString = node.getAttribute( "negativeFormat" )
    factor = float( node.getAttribute("factor") )

    paramFile.close()
| | Creating a DOM tree is easy with Python; just open a file and feed it to the parse function. |
| | Even though there is only one <from> element and <to> element in the parameter file, getElementsByTagName always returns a node list. No problem—we’ll just grab item [0] from that list. |
| | All the other parameters are string values, but the multiplication factor is a number, so we use float to convert from string to numeric. |
Take a deep breath and hold on tight; this is the largest function in the program.
def fixCurrency( filename ):
#
# Read the styles.xml file as a string file
# and create a disk file for output
#
dataSource = StringIO (inFile.read( filename ))
tempFileName = "/tmp/workfile"
dataSink = open(tempFileName, "w")
#
# Parse the document
#
document = xml.dom.minidom.parse( dataSource )
#
# Create document fragments from the format strings
#
posXML = od_number.ODNumber( document, positiveFormatString,
language, country, currencySymbol )
posXML.createCurrencyStyle( )
negXML = od_number.ODNumber( document, negativeFormatString,
language, country, currencySymbol )
negXML.createCurrencyStyle( )
#
# Fix number style elements
#
currencyElements = document.getElementsByTagName("number:currency-symbol")
for element in currencyElements:
if (element.getAttribute( "number:language" ) == oldLanguage and
element.getAttribute( "number:country" ) == oldCountry):
element.setAttribute( "number:language", language )
element.setAttribute( "number:country", country )
parent = element.parentNode
children = parent.childNodes
i = len(children)-1
while (i >= 0):
if (children[i].nodeName == "number:number" or
children[i].nodeName == "number:text" or
children[i].nodeName == "number:currency-symbol" or
children[i].nodeType == xml.dom.Node.TEXT_NODE):
parent.removeChild( children[i] )
i = i - 1
# select the appropriate number format markup
if ((parent.getAttribute("style:name"))[-2:] == "P0"):
fragment = posXML.getFragment()
else:
fragment = negXML.getFragment()
#
# and insert it into the <number:currency-style> element
for child in fragment.childNodes:  parent.appendChild( child.cloneNode(True) )
#
# Fix table cells (which only exist in content.xml)
parent.appendChild( child.cloneNode(True) )
#
# Fix table cells (which only exist in content.xml)  #
rowElements = document.getElementsByTagName("table:table-row")
for row in rowElements:
cell = getChildElement( row, "table:table-cell" )
#
rowElements = document.getElementsByTagName("table:table-row")
for row in rowElements:
cell = getChildElement( row, "table:table-cell" )  while (cell != None):
if (cell.getAttribute("table:currency") == oldAbbrev ):
# change the currency abbreviation
cell.setAttribute("table:currency", abbreviation )
# and the number in the cell, if there is one
valueStr = cell.getAttribute("office:value")
if (valueStr != ""):
result = float( valueStr ) * factor
cell.setAttribute("office:value", '%f' % result)
# remove any children of this cell
children = cell.childNodes
while (cell != None):
if (cell.getAttribute("table:currency") == oldAbbrev ):
# change the currency abbreviation
cell.setAttribute("table:currency", abbreviation )
# and the number in the cell, if there is one
valueStr = cell.getAttribute("office:value")
if (valueStr != ""):
result = float( valueStr ) * factor
cell.setAttribute("office:value", '%f' % result)
# remove any children of this cell
children = cell.childNodes  i = len(children)-1
while (i >= 0):
cell.removeChild( children[i] )
i = i - 1
# move to the next cell in the row
cell = getSiblingElement( cell, "table:table-cell" )
#
# Serialize the document tree to the output file
xml.dom.ext.Print( document, dataSink )
dataSink.close();
#
# Add the temporary file to the new .zip file, giving it
# the same name as the input file.
#
outFile.write( tempFileName, filename )
i = len(children)-1
while (i >= 0):
cell.removeChild( children[i] )
i = i - 1
# move to the next cell in the row
cell = getSiblingElement( cell, "table:table-cell" )
#
# Serialize the document tree to the output file
xml.dom.ext.Print( document, dataSink )
dataSink.close();
#
# Add the temporary file to the new .zip file, giving it
# the same name as the input file.
#
outFile.write( tempFileName, filename )
| |
The input file is a member of a .zip file;
we can’t pass the .zip file itself on to the parser.
Nor can we open a file descriptor for a member of the .zip archive, so
we are forced to read in the input file into a string, and use the
StringIO constructor to make it look like a file.
On the other hand, we can’t easily write a string to a member of the output file, so we create a temporary file on disk. (The filename is a Unix filename; change it as appropriate for your system.) |
| | We will convert the format strings to document fragments so that we can just copy the XML from the fragments into the DOM tree that we are modifying. This is nontrivial code, so it’s separated out into another module altogether. |
| | We don’t want to indiscriminately modify all the <number:currency-symbol> elements; you may have multiple currencies in your document, and you want to change only the ones specified in your parameters. |
| |
Before we put in the new format markup, we have to get rid of the
old markup. We don’t eliminate all the old stuff; we want to
keep any <style:properties> (for
red text) and <style:map> elements
(which select positive or negative formats).
When removing the children, we have to go in reverse order; if we had started by removing child number zero, then child number one would move into its place and we would miss it on the next loop iteration. |
| | This code presumes that you are using a file that has been created with OpenOffice.org; currency formats for positive values always end with the characters P0. |
| | This code uses the cloneNode() function to make sure that all of the fragment nodes’ descendants get copied into the document being modified. |
| | Rather than retrieve all the <table:table-cell> elements at once, which could strain memory with a large document, we get cells one row at a time. |
| | We can’t just go to the first child of the table row; there may be intervening whitespace text nodes. Thus, we have our own getChildElement() function to find the node we really want. A similar getSiblingElement() function finds the next sibling while avoiding those pesky whitespace nodes. |
| | Rather than try to update the value of the <text:p> inside the cell (which would force us to do all the calculation and formatting that OpenOffice.org does), we just eliminate it and let OpenOffice.org re-create it after a load and save. |
Copying the manifest also creates a temporary file:
def copyManifest():
    #
    #   read the manifest.xml file as a string
    #   and create a disk file for transfer to the .zip output
    dataSource = inFile.read( "META-INF/manifest.xml" )
    tempFileName = "/tmp/workfile"
    dataSink = open(tempFileName, "w")
    dataSink.write( dataSource );
    dataSink.close();
    outFile.write( tempFileName, "META-INF/manifest.xml" )
These are the utility functions that we mentioned in the preceding section. They search for the first child or next sibling of a node that has the desired element name, while avoiding any extraneous text nodes.
def getChildElement( node, name ):
    node = node.firstChild;
    while (node != None):
        if (node.nodeType != xml.dom.Node.ELEMENT_NODE or
          node.nodeName != name):
            node = node.nextSibling
        else:
            break
    return node

def getSiblingElement( node, name ):
    node = node.nextSibling;
    while (node != None):
        if (node.nodeType != xml.dom.Node.ELEMENT_NODE or
          node.nodeName != name):
            node = node.nextSibling
        else:
            break
    return node
Finally, the code for parsing the format string to produce an XML document fragment.
I put this into a module, even though it’s not something that would be useful for any other program. I did it this way because I didn’t know of any other way to do an “include.” Hey, this is my first Python program of any size greater than “Hello, World!” [This module is file od_number.py in directory ch05 in the downloadable example files.]
import xml.dom
import xml.dom.ext
import xml.dom.minidom
import re

class ODNumber:
    def __init__(self, document, formatString, language, country,
    currencySymbol ):
        self.thousands = False;     # thousands separator?
        self.nDecimals = 0;         # number of decimal places
        self.minIntegerDigits = 0;  # min. integer digits
        self.textStr = ""           # text string being built
        self.fragment = None        # fragment being built

        self.document = document    # copy parameters to class attributes
        self.language = language
        self.country = country
        self.currencySymbol = currencySymbol
        self.formatString = formatString


    def endStr( self ):
        if (self.textStr != ""):
            textElement = self.document.createElement( "number:text" )
            textNode = self.document.createTextNode( self.textStr )
            textElement.appendChild( textNode )
            self.fragment.appendChild( textElement )
            self.textStr = ""

    def addCurrency( self ):
        self.endStr()
        node = self.fragment.appendChild(
            self.document.createElement( "number:currency-symbol" ) )
        node.setAttribute( "number:language", self.language )
        node.setAttribute( "number:country", self.country )
        node.appendChild( self.document.createTextNode( self.currencySymbol ) )

    def addNumber( self ):
        node = self.fragment.appendChild(
            self.document.createElement("number:number") )
        node.setAttribute( "number:min-integer-digits",
            "%d" % self.minIntegerDigits )
        if (self.nDecimals > 0):
            node.setAttribute( "number:decimal-places",
                "%d" % self.nDecimals )
        if (self.thousands):
            node.setAttribute( "number:grouping", "true" )

    def createCurrencyStyle ( self ):
        """Scan a format string, where:

        $ indicates the currency symbol
        # indicates an optional digit
        0 indicates a required digit
        , indicates the thousands separator (no matter your locale)
        . indicates the decimal point (no matter your locale)

        Creates a document fragment with appropriate OpenOffice.org
        markup.
        """

        self.fragment = self.document.createElement("number:fragment")

        hasDecimal = False

        numchars = re.compile( "[#,0.]" )

        i = 0
        while (i < len(self.formatString)):
            char = self.formatString[i]

            if (char == "$"):
                self.addCurrency( )
            elif (re.search( numchars, char )):
                self.endStr( )
                while (re.search( numchars, char )):
                    if (char == ","):
                        self.thousands = True
                    elif (char == "0"):
                        if (hasDecimal):
                            self.nDecimals = self.nDecimals + 1
                        else:
                            self.minIntegerDigits = \
                                self.minIntegerDigits + 1
                    elif (char == "."):
                        hasDecimal = True;

                    if (i == len(self.formatString) - 1):
                        break;
                    i = i + 1
                    char = self.formatString[i]
                self.addNumber( )
            else:
                self.textStr = self.textStr + char
            i = i + 1
        self.endStr( )

    def getFragment( self ):
        return self.fragment
| | As we parse a string, anything that isn’t part of the format string or currency symbol gets accumulated into the textStr variable. This function dumps it out to an <number:text> element. |
| | If we have accumulated any text prior to the currency symbol (it could be a minus sign), output it. |
| | This function is called when we reach the end of the number part of the format string. |
| | We create a phony element to be the container for all the other elements that we are going to create. Why should we go to the trouble of creating our own tree structure to hold independently-created nodes when that’s part of the DOM’s job? |
| | This compiles a regular expression; matching against it is easier than doing a large conditional expression to see if we have a character that’s part of the number format. |
| | As soon as we find one of those crucial characters, we output any pending text, then gather the format information in the while loop. |
| | If the character isn’t a currency symbol or part of a number format, it’s just generic text to be accumulated. |
| | If there’s any pending text when we hit the end of the string, we need to put it into the output. |
| | A utility function to return the fragment that’s been built. Truth in advertising: Since this module wasn’t designed for object-oriented purity, it is here more for appearance’s sake than anything else. |
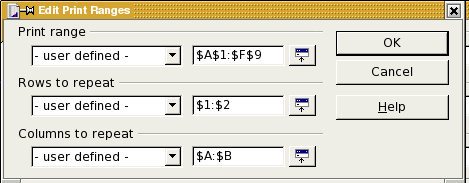
If you wish to specify a print range for the sheet (corresponding to the dialog box shown in Figure 5.5, “Spreadsheet Print Ranges” add a table:print-ranges attribute to the <table:table> element. Its value will be in a form like Sheet1.A1:Sheet1:F9.
The <table:table-column> elements that are to be repeated will be enclosed in a <table:table-header-columns> element; the <table:table-row> elements to be repeated will be enclosed in a <table:table-header-rows> element.
Example 5.17, “Structure of Print Ranges” shows the skeleton of the XML markup for the print ranges chosen in Figure 5.1, “Spreadsheet Page Options”.
Example 5.17. Structure of Print Ranges
<table:table table:name="Sheet1" table:style-name="ta1"
    table:print-ranges="Sheet1.A1:Sheet1.F9">

   <table:table-header-columns>
        <table:table-column table:style-name="co1"/>
        <table:table-column table:style-name="co2"/>
    </table:table-header-columns>

    <table:table-column table:style-name="co3"/>
    <table:table-column table:style-name="co4"/>
    <!-- remaining non-header columns -->

    <table:table-header-rows>
        <table:table-row table:style-name="ro1">
            <table:table-cell><text:p>Cell A1</text:p></table:table-cell>
            <table:table-cell> <!-- rest of row 1 --> </table:table-cell>
        </table:table-row>
        <table:table-row table:style-name="ro2">
            <table:table-cell><text:p>Cell A2</text:p></table:table-cell>
            <table:table-cell> <!-- rest of row 2 --> </table:table-cell>
        </table:table-row>
    </table:table-header-rows>

    <table:table-row table:style-name="ro3">
        <table:table-cell><text:p>Cell A3</text:p></table:table-cell>
        <table:table-cell> <!-- rest of row 1 --> </table:table-cell>
    </table:table-row>

    <!-- remaining non-header rows -->

</table>
Our task in this case study is to use XSLT to transform data from an XML-based student gradebook and convert it to an OpenDocument spreadsheet. This is the actual markup that I use for the classes that I teach, and it is the actual transformation that I use.
The source XML document’s root element is a <gradebook> element. It contains a <task-list>, which gives information about each <task> that has been assigned to a student. Each task has an id attribute, date the assignment was due, a max (maximum) possible score, a type (lab, quiz, midterm, etc.), a weight telling what percentage of the final score this task is worth, and a recorded attribute that tells whether the scores for this task have been recorded or not. For example, I always have a midterm exam which I enter in the task list at the beginning of the semester; I just don’t set its recorded flag until the midterm has been given.
Following the task list is a series of <student> elements, each of which has an id attribute (the social security number preceded by a letter S. The <student> element contains the student’s last and first names, email address, extra info, and a series of <result> elements.
Each <result> element has a score attribute and a ref attribute. This last attribute is a reference to a task id from the task list. If I have some comments about the student’s work, that becomes the text content of the <result> element. Example 5.18, “Sample Gradebook Data” shows part of a gradebook. No real students or social security numbers were harmed in creating this data. [This is file minigrades.xml in directory ch05 in the downloadable example files.]
Example 5.18. Sample Gradebook Data
<gradebook>
    <task-list>
        <task date="2003-02-07" id="P01" max="100" recorded="yes"
            type="lab" weight="12">Program 1 (Functions)</task>
        <task date="2003-02-21" id="P02" max="100" recorded="yes"
            type="lab" weight="12">Program 2 (Window and Document)</task>
        <task date="2003-03-07" id="P03" max="100" recorded="yes"
            type="lab" weight="12">Program 3 (Forms)</task>
         <task date="2003-04-04" id="M01" max="100" recorded="yes"
            type="midterm" weight="26">Midterm</task>
        <task date="2003-05-09" id="P04" max="100" recorded="yes"
            type="lab" weight="12">Program 4 (DHTML)</task>
        <task date="2003-05-24" id="F01" max="100" recorded="yes"
            type="final" weight="26">Final</task>
    </task-list>
    <student id="S111-22-5416">
        <last>Albanes</last>
        <first>Ysidro</first>
        <email>albanes.ysidro@example.com</email>
        <info/>
        <result ref="P01" score="95"/>
        <result ref="P02" score="100">Good work!</result>
        <result ref="P03" score="100"/>
        <result ref="M01" score="89"/>
        <result ref="P04" score="95"/>
        <result ref="F01" score="94"/>
    </student>
    <student id="S111-22-3520">
        <last>Berlant</last>
        <first>Troy</first>
        <email>berlant.troy@example.com</email>
        <info/>
        <result ref="P01" score="100"/>
        <result ref="P02" score="100"/>
        <result ref="P03" score="90"/>
        <result ref="M01" score="72"/>
        <result ref="P04" score=""/>
        <result ref="F01" score="96"/>
    </student>
    <!-- etc. -->
</gradebook>
The resulting spreadsheet should look like Figure 5.6, “Result of Gradebook Transformation”. The first row has the headings, with tasks labelled by their task ID. The second row shows the weights for each task as decimals (a weight of 12 becomes 0.12), and the remaining rows show the results for each student.

The XSLT file is fairly long, so we will look at it in parts. The first part establishes namespaces, includes a file with some standard font declarations, as described in the section called “Font Declarations”, and sets the course name in a parameter. The parameter allows users to enter the course name from the command line. [The entire XSLT file is file gradebook_to_ods.xsl in directory ch05 in the downloadable example files.]
<?xml version="1.0"?>
<xsl:stylesheet version="1.0"
    xmlns:xsl="http://www.w3.org/1999/XSL/Transform"
    xmlns:office="urn:oasis:names:tc:opendocument:xmlns:office:1.0"
    xmlns:meta="urn:oasis:names:tc:opendocument:xmlns:meta:1.0"
    xmlns:config="urn:oasis:names:tc:opendocument:xmlns:config:1.0"
    xmlns:text="urn:oasis:names:tc:opendocument:xmlns:text:1.0"
    xmlns:table="urn:oasis:names:tc:opendocument:xmlns:table:1.0"
    xmlns:draw="urn:oasis:names:tc:opendocument:xmlns:drawing:1.0"
    xmlns:presentation="urn:oasis:names:tc:opendocument:xmlns:presentation:1.0"
    xmlns:dr3d="urn:oasis:names:tc:opendocument:xmlns:dr3d:1.0"
    xmlns:chart="urn:oasis:names:tc:opendocument:xmlns:chart:1.0"
    xmlns:form="urn:oasis:names:tc:opendocument:xmlns:form:1.0"
    xmlns:script="urn:oasis:names:tc:opendocument:xmlns:script:1.0"
    xmlns:style="urn:oasis:names:tc:opendocument:xmlns:style:1.0"
    xmlns:number="urn:oasis:names:tc:opendocument:xmlns:datastyle:1.0"
    xmlns:anim="urn:oasis:names:tc:opendocument:xmlns:animation:1.0"

    xmlns:dc="http://purl.org/dc/elements/1.1/"
    xmlns:xlink="http://www.w3.org/1999/xlink"
    xmlns:math="http://www.w3.org/1998/Math/MathML"
    xmlns:xforms="http://www.w3.org/2002/xforms"

    xmlns:fo="urn:oasis:names:tc:opendocument:xmlns:xsl-fo-compatible:1.0"
    xmlns:svg="urn:oasis:names:tc:opendocument:xmlns:svg-compatible:1.0"
    xmlns:smil="urn:oasis:names:tc:opendocument:xmlns:smil-compatible:1.0"

    xmlns:ooo="http://openoffice.org/2004/office"
    xmlns:ooow="http://openoffice.org/2004/writer"
    xmlns:oooc="http://openoffice.org/2004/calc"
>

<xsl:output method="xml" indent="yes"/>

<xsl:include href="fontdecls.xsl"/>

<xsl:param name="courseName">Course</xsl:param>
The next line builds a “lookup table” of all the <student> nodes in the document, indexed by the value of their id attribute. We will use this index, which has the name student-index, to access a student’s information from another node’s context.
<xsl:key name="student-index" match="student" use="@id"/>
Here’s the first template: what to output when we encounter the root node of the document. It will create all the styles and begin the body of the document. We gave the cell styles meaningful names rather than using the OpenOffice.org naming convention (ce1, ce12, etc), because it helped us keep track of which cells had which style. OpenOffice.org doesn’t care what you name your styles, as long as they are all referenced correctly; this should be the case with all OpenDocument compatible applications.
Note the order in which the styles occur: column styles, row styles, number styles, and then cell styles.
<office:document-content office:version="1.0">

<office:scripts/>

<xsl:call-template name="insert-font-decls"/>

<office:automatic-styles>

    <!-- Column for last and first name -->
    <style:style style:name="co1" style:family="table-column">
        <style:table-column-properties fo:break-before="auto"
            style:column-width="2.5cm"/>
    </style:style>

    <!-- column for final grade and percentage -->
    <style:style style:name="co2" style:family="table-column">
        <style:table-column-properties fo:break-before="auto"
            style:column-width="2cm"/>
    </style:style>

    <!-- All other columns -->
    <style:style style:name="co3" style:family="table-column">
        <style:table-column-properties fo:break-before="auto"
            style:column-width="1.25cm"/>
    </style:style>

    <!-- Let all the rows have optimal height -->
    <style:style style:name="ro1" style:family="table-row">
        <style:table-row-properties fo:break-before="auto"
            style:use-optimal-row-height="true"/>
    </style:style>

    <!-- The table references a master-page which doesn't exist,
        but that doesn't bother OpenOffice.org -->
    <style:style style:name="ta1" style:family="table"
        style:master-page-name="TAB_Sheet1">
        <style:table-properties table:display="true"/>
    </style:style>

    <!-- Number style for a percentage -->
    <number:percentage-style style:name="N01">
        <number:number number:decimal-places="2"
            number:min-integer-digits="1"/>
        <number:text>%</number:text>
    </number:percentage-style>

    <!-- individual cell styles -->

    <!-- style for final grade letter -->
    <style:style style:name="centered" style:family="table-cell"
        style:parent-style-name="Default">
        <style:paragraph-properties fo:text-align="center"/>
    </style:style>

    <!-- style for the total grade percent -->
    <style:style style:name="percent" style:family="table-cell"
        style:data-style-name="N01"/>

    <!-- style for heading cells -->
    <style:style style:name="heading" style:family="table-cell"
        style:parent-style-name="Default">
        <style:paragraph-properties fo:text-align="center"/>
        <style:text-properties fo:font-weight="bold"/>
    </style:style>

    <!-- style for raw data cells (just use OpenOffice.org defaults) -->
    <style:style style:name="normal" style:family="table-cell"
        style:parent-style-name="Default"/>
</office:automatic-styles>

<office:body>
    <office:spreadsheet>
We now proceed to the spreadsheet content, starting with the column specifications.
<!-- calculate number of raw data columns --> <xsl:variable name="numTasks"
| | Calculate the number of columns in the spreadsheet by counting the number of tasks that have been recorded. |
| | We want the value of the courseName parameter to become the value of the table:table-name attribute. The $ gets the value of the variable; the braces tell XSLT to evaluate the contents as an XPath expression rather than the literal string $courseName. |
| | The first three columns should appear on every page if the printout is more than one page long, so their specifications are enclosed in a <table:table-header-columns> element. |
| | All the raw data columns have the same format, so we use the table:number-columns-repeated attribute, setting its value to the value of (that's what $ stands for) the numTasks variable. |
Having specified the columns, we continue to the rows, which contain the actual table data. The first row contains headings, all of which have the heading style (bold and centered).
<table:table-header-rows>
| | The first row should appear on every page if the printout is more than one page long, so its specification is enclosed in a <table:table-header-rows> element. |
| | <xsl:for-each> is XSLT’s only iterative structure; it selects all the specified nodes and then applies all the processing contained within it. |
| | The <xsl:sort> modifies the <xsl:for-each> by specifying the order in which the selected nodes are to be processed. Rather than processing tasks in document order, we process them in descending order by their date attribute. |
The next row contains the weights for each task. The first five cells will be unoccupied, and we use another <xsl:for-each> to place the weights into the remaining cells. Note that the calculation of the factor variable uses div for division. That is because the forward slash symbol is already used to separate steps in an XPath expressions, and using it for division as well would complicate life for everyone.
<table:table-row table:style-name="ro1">
    <!-- five empty cells -->
    <table:table-cell table:number-columns-repeated="5"/>
    <xsl:for-each select="gradebook/task-list/task[@recorded='yes']">
        <xsl:sort select="@date" order="descending"/>

        <xsl:variable name="factor" select="@weight div @max"/>

        <table:table-cell office:value-type="float"
            office:value="{$factor}">
            <text:p><xsl:value-of select="$factor"/></text:p>
        </table:table-cell>
    </xsl:for-each>
</table:table-row>
The only remaining job is to create the rows for each student; we will handle this by applying a template to all the <student> elements.
            <!-- Create one row for each student -->
            <xsl:apply-templates select="gradebook/student">
                <xsl:sort select="last"/>
                <xsl:sort select="first"/>
                <xsl:with-param name="numCols" select="$numTasks+5"/>
            </xsl:apply-templates>
        </table:table>
    </office:spreadsheet>
</office:body>
</office:document-content>
</xsl:template>
| | In this case, we are using <xsl:sort> to modify the order in which the templates are applied to the selected nodes. The first <xsl:sort> specifies the primary sort key; the second <xsl:sort> specifies the secondary key. You may have as many keys as you need. |
| | When we create the formula for calculating the student’s grade, we have to know the ending column number for the row. This is the number of tasks plus five, so we send that to the template as a parameter named numCols. |
Now we provide the template that handles the processing of the <student> element selected in the preceding code.
<xsl:template match="student">
    <xsl:param name="numCols"/>

    <!-- generate the column letter for the last column -->
    <xsl:variable name="lastCol">
        <xsl:call-template name="generate-col">
            <xsl:with-param name="n" select="$numCols"/>
        </xsl:call-template>
    </xsl:variable>
| | Any template which accepts parameters via <xsl:with-param> must declare the parameter name. |
| | The code for generating the letter corresponding to the last column number is non-trivial; rather than placing it here inside the template, we have put it in a template named generate-col (which does not correspond to any element name in our document). You can think of these named templates as subroutines rather than as templates that match document elements. That is why we call it via <xsl:call-template> instead of <xsl:apply-templates>. We are going to call the template with a parameter n (<xsl:with-param>). The parameter will be the number of columns in this template; its value will be the same as numCols. In the case of six tasks, the lastCol variable will end up with the value K. |
The code for the first name, last name, and student ID cells is quite straightforward; it uses the substring() function to eliminate the letter S from the student ID.
Warning
In XSLT, the first character in a string is character number one, not number zero, as you would find in most programming languages.
<!-- cells for last name, first name, and student ID -->
<table:table-cell>
    <text:p><xsl:value-of select="last"/></text:p>
</table:table-cell>
<table:table-cell>
    <text:p><xsl:value-of select="first"/></text:p>
</table:table-cell>
<table:table-cell>
    <text:p><xsl:value-of select="substring(@id,2)"/></text:p>
</table:table-cell>
The next columns are the final letter grade and the total percentage. Extra whitespace has been inserted into the following listing to make things easier to read.
<!-- formula for final grade letter -->
<table:table-cell
table:formula=
"oooc:=MID("FFFFFFDCBAA"; INT([.E{position()+2}]*10)+1; 1)"/>
<!-- formula for final grade as a percentage -->
<table:table-cell
table:number-matrix-columns-spanned="1"
table:number-matrix-rows-spanned="1"
table:formula=
"oooc:=SUM([.F{position()+2}:.{$lastCol}{position()+2}] *
[.$F$2:.${$lastCol}$2])/100"
office:value-type="float"/>
The letter grade formula works by looking at the column to its right (the percentage), multiplying it by 10 to give a number between 0 and 10, then grabbing the corresponding letter from the string FFFFFFDCBAA. It uses the position() function to figure out which row number is being output. Here’s how that function works: <xsl:apply-templates> has selected a set of student nodes and <xsl:sort> has sorted them. Each one in turn is being processed by the current <xsl:template>. The first one to be processed has a position() equal to 1, the second has a position of 2, etc. Since there are two rows of headings in the spreadsheet, the row number being output is the position() plus two. Thus, for the first student, the formula works out to oooc:=MID("FFFFFFDCBAA";INT([.E3]*10)+1;1) (the oooc: does not show up in the application).
The next cell also uses the position() function and the lastCol variable to create the correct formula. Because the cell contains an array formula, it needs the table:number-matrix-columns-spanned and table:number-matrix-rows-spanned attributes to specify the dimensions of the resulting array. If the template is processing the first student and there are six tasks, then the XSLT creates the formula that OpenOffice.org displays as {=SUM([.F3:.K3]*[.$F$2:.$K$2])/100}.
The following is the remainder of the template for handling a student. The lines have been numbered for reference.
 1  <!-- save the student's id -->
 2  <xsl:variable name="id" select="@id"/>
 3
 4  <!-- insert a cell for each recorded score -->
 5  <xsl:for-each select="/gradebook/task-list/task[@recorded='yes']">
 6      <xsl:sort select="@date" order="descending"/>
 7      <xsl:variable name="taskID" select="@id"/>
 8      <xsl:call-template name="insert_score">
 9          <xsl:with-param name="n"
10              select="key('student-index', $id)/result[@ref=$taskID]/@score"/>
11      </xsl:call-template>
12  </xsl:for-each>
13  </table:table-row>
14 </xsl:template>- Line 2
- Our current context is a <student> node, so this sets the variable named id to the value of the student’s id attribute.
- Lines 5-6
- We have to produce the student’s scores for each recorded task, so, as we have done before, we go to each recorded <task> element in turn, in reverse chronological order. At this point, our context has changed—it is now a <task> node.
- Line 7
- Still in the context of the <task>, we save itsid attribute in the taskID variable. In other words taskID contains the ID of our current task.
- Lines 8-11
-
The insert_score template takes a parameter named
n, which is set to the current student’s score
on the task being processed. The hardest part of this is line 10, so
let us examine it in detail:
- key('student-index', $id)
- Switch back to the context of the current student by retrieving her node from the index table that we built at the beginning of the document. Our context is once again the student node.
- result[@ref=$taskID]
- For this student, find the <result> node whose ref attribute is the same as the ID of the task we are processing. (This will give us only one node, since task IDs are unique.) Our context is now that <result> element.
- @score
- Retrieve the score attribute from the result.
That takes care of the major templates. Now we write the named templates (subroutines) that we referred to earlier. First is the insert-score template, which creates a table cell whose value is the passed parameter n. If a null value has been passed (in case someone does not have a score for a task), then we insert an empty cell.
<xsl:template name="insert_score">
    <xsl:param name="n"/>

    <xsl:choose>
    <xsl:when test="$n != ''">
        <table:table-cell office:value-type="float" office:value="{$n}">
            <text:p><xsl:value-of select="$n"/></text:p>
        </table:table-cell>
    </xsl:when>
    <xsl:otherwise>
        <table:table-cell><text:p/></table:table-cell>
    </xsl:otherwise>
    </xsl:choose>
</xsl:template>
Finally, we have the template to figure out the column letter corresponding to the last column for each row. The pseudo-code is as follows:
- If the column number is less than or equal to 26, then the column name is a single letter. Extract it from the string ABCDEFGHIJKLMNOPQRSTUVWXYZ
- Otherwise, you have a two-letter column name. The first letter will be the column number divided by 26 and the second letter will be the column number modulo 26.
<xsl:template name="generate-col">
<xsl:param name="n"/>
<xsl:variable name="letters">ABCDEFGHIJKLMNOPQRSTUVWXYZ</xsl:variable>
<xsl:choose>
<xsl:when test="$n <= 26">
<xsl:value-of select="substring($letters, $n, 1)"/>
</xsl:when>
<xsl:otherwise>
<xsl:value-of select="concat(
substring($letters, floor(($n - 1) div 26) + 1, 1),
substring($letters, (($n - 1) mod 26) + 1, 1))"/>
</xsl:otherwise>
</xsl:choose>
</xsl:template>The actual code for two-letter columns has to subtract one from the column number before dividing (so that the math works out right), and must add one to the result, because characters are numbered starting at one.
[6] If you want to have a replacement for the decimal part of the number (as in $15.--), you add number:decimal-replacement="--" to the <number:number> element.