Open the Set Input Delay Constraint dialog box using one of the following methods:
From the SmartTime Actions menu, choose Constraints > Input Delay.
Click the
 icon.
icon.
Right-click the Input Delay in the Constraint Browser.
Use the input delay constraint to define the arrival time of an input relative to a clock.
To specify the input timing delay constraint:
Open the Set Input Delay Constraint dialog box using one of the following methods:
From the SmartTime Actions menu, choose Constraints > Input Delay.
Click the icon.
Right-click the Input Delay in the Constraint Browser.
The Set Input Delay Constraint dialog box appears (as shown below).
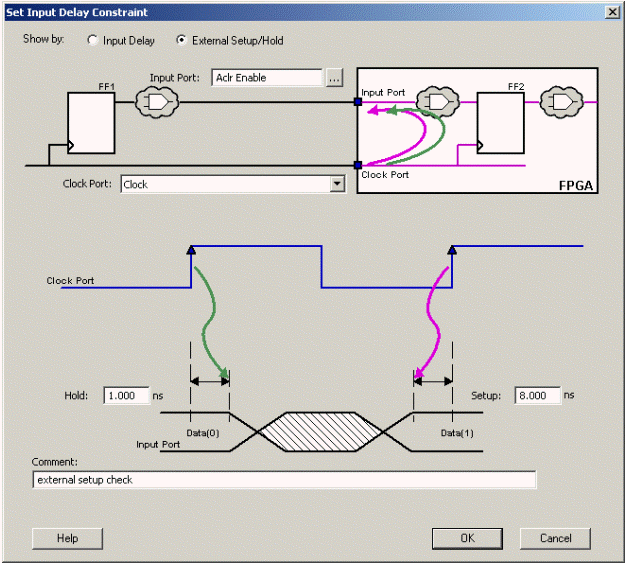
Set Input Delay Dialog Box
Select either External Setup/Hold or Input Delay.
External Setup/Hold enables you to enter an input delay constraint by specifying the timing budget inside the FPGA using the external setup and hold time. This is the default selection.
Note: The external hold information is currently used for analysis only and not by the optimization tools.
Input Delay enables you to enter an input delay constraint by specifying the timing budget outside the FPGA. You can enter the Maximum Delay, the Minimum Delay, or both.
Note: The Minimum Delay is currently used for analysis only and not by the optimization tools.
When you change values in one view, SmartTime automatically updates the other view.
Note: For the basic timing analysis flow of a simple design, select External Setup/Hold.
Specify the Input Port or click the Browse button to display the Select Ports for Input Delay dialog box.
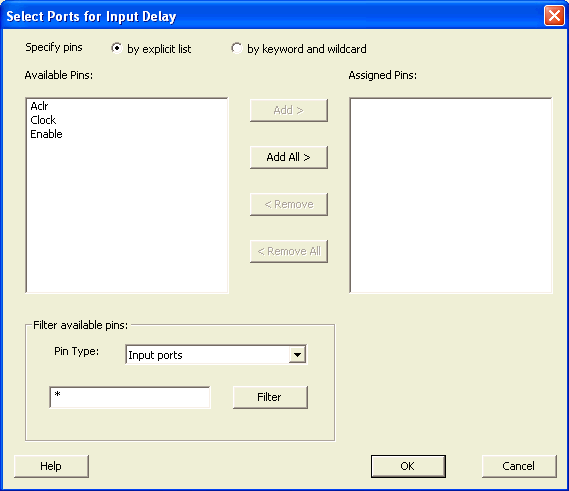
Select Ports for Input Delay Dialog Box
Select the name of the input pin(s) from the Available Pins list. Choose the Pin Type from the drop-down list. You can use the filter to narrow the pin list. You can select multiple ports in this window.
Click Add or Add All to move the input pin(s) from the Available Pins list to the Assigned Pins list.
Click OK.
The Set Input Delay Constraint dialog box displays the updated Input Port information.

Updated Set Input Delay Constraint Dialog Box
Select a clock from the Clock Port drop-down list.
If you
selected Show by: External Setup/Hold, specify
the External Setup.
If you selected Show by: Input Delay,
specify the Maximum Delay value.
If you selected Show by External Setup/Hold, specify the External Hold. If you selected Show by: Input Delay, specify the Minimum Delay value.
Click OK.
SmartTime adds this constraint to the Constraints List in the SmartTime Constraints Editor.