Chapter 7. Going Native
| If you know HTML, CSS, and JavaScript, you already have what you need to develop your own iPhone apps. With this book, you'll learn how to use these open source web technologies to design and build apps for both the iPhone and iPod Touch. Buy the print book or ebook or purchase the iPhone App. |

Our web app can now do many of the things that a native app can do: launch from the home screen, run in full screen mode, store data locally on the iPhone, and operate in offline mode. We’ve formatted it nicely for the device and set up native-looking animations to provide feedback and context to the user.
However, there are still two things that our app cannot do: it can’t access the device features and hardware (e.g., geolocation, accelerometer, sound, and vibration), and it can’t be submitted to the iTunes App Store. In this chapter, you will learn how to use PhoneGap to bridge this, um...gap on your, ah...phone. Clever name, that!
Intro to PhoneGap
PhoneGap is an open source development tool created by Nitobi (http://www.nitobi.com/) to act as a bridge between web applications and mobile devices. iPhone, Google Android, and BlackBerry operating systems are currently supported, and Nokia and Windows Mobile are in development.
In spite of its high profile, the iPhone is not even close to being the most widely used mobile device. The mobile landscape is littered with devices, platforms, and operating systems. If you are a web developer, you might be familiar with the pain of testing 10 or so browser versions across 10 or so operating system versions. Multiply that by 100, and you have mobile. There is simply no cost-effective way to develop and test across all of the possible combinations.
Thanks to Apple, it’s now clear that there is a market for devices that offer a full-featured web browsing experience. As more vendors include high-quality browsers on their phones, the work that we’ve done here becomes more valuable. By building a web app, we have effectively skirted much of the complexity of mobile development. We can have one codebase deployed to multiple devices and platforms.
Of course, different devices have different features. Maybe a particular phone doesn’t support multitouch, or doesn’t have an accelerometer. Even when devices do have the same features, each has its own way of exposing these features to the developer.
PhoneGap abstracts the APIs for the most widely available mobile phone features so mobile application developers can use the same code everywhere. You still need to deploy your app manually using the SDK provided by the vendor, but you don’t need to change your application code.
Note
There are other projects and products available that serve the same basic purpose as PhoneGap, such as RhoMobile (http://rhomobile.com/) and Titanium Mobile (http://www.appcelerator.com/). I’m not familiar enough with them to compare and contrast, but you might want to check them out in case one suits your needs better than PhoneGap.
Since this is an iPhone book, I’m going to focus on the iPhone portion of PhoneGap. Just be aware that you can also potentially deploy your app to Android, BlackBerry, and Windows Mobile devices with little or no modification.
Note
In the case of the iPhone, this SDK requirement means that you are going to need a Mac with Xcode installed, and you are going to have to pay money to join the iPhone Developer Program. Sorry about that. You can get the SDK by registering as an Apple developer at http://developer.apple.com/iphone/. Registration costs nothing, but you will need to enroll in an iPhone developer program if you want to submit your apps to the App Store or even run them on your own phone. You can, however, use the free SDK to test your apps in the iPhone Simulator, which is included with the iPhone SDK. After you’ve registered as an iPhone developer, return to http://developer.apple.com/iphone/, log in, and download the iPhone SDK. The iPhone SDK includes Xcode, which is the development environment that you’ll use to test your apps in the simulator, run them on your own iPhone, and submit them to the App Store.
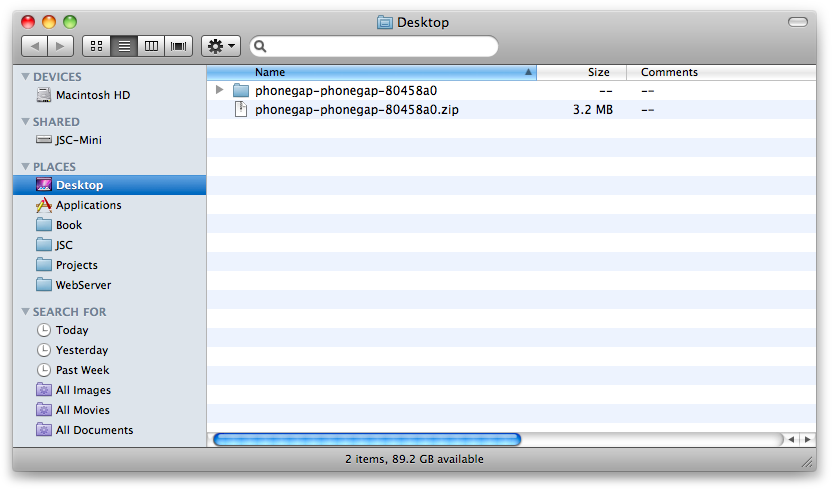
To get started with PhoneGap, you first need to download it. You can do so by visiting http://github.com/phonegap/phonegap and clicking the download button (Figure 7.1, “Download the latest version of PhoneGap from GitHub”). Assuming you’re on a Mac, you’ll probably want to download the ZIP version. When the download completes, unarchive it to your desktop (Figure 7.2, “Unzip the PhoneGap archive to your desktop”).
Figure 7.1. Download the latest version of PhoneGap from GitHub
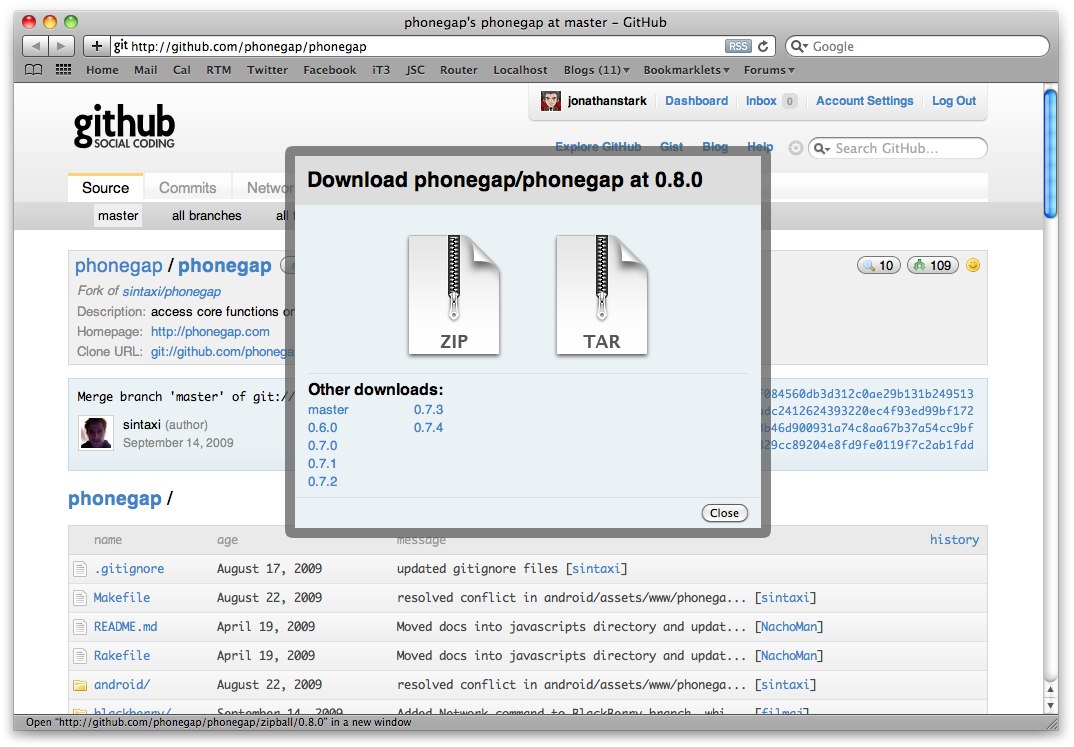
Figure 7.2. Unzip the PhoneGap archive to your desktop
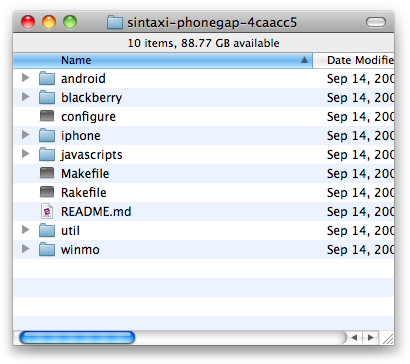
PhoneGap download contains a bunch of
device-specific directories (e.g., android,
iphone, blackberry,
windows mobile), and some
library and utility files and directories (Figure 7.3, “The top-level PhoneGap directory contains subdirectories for
various mobile platforms”). The only one we’ll be looking at is the
iphone directory.
Figure 7.3. The top-level PhoneGap directory contains subdirectories for various mobile platforms
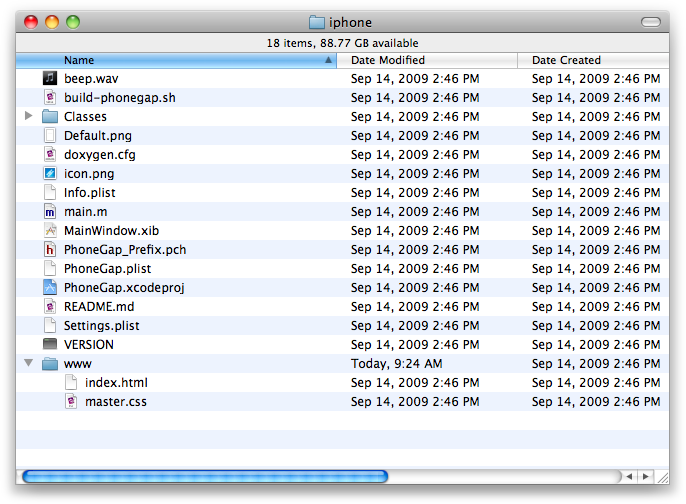
The iphone directory
contains the starter files for an Xcode project (Figure 7.4, “PhoneGap’s iPhone subdirectory contains starter files for an
Xcode project”). There is nothing magical about these files,
other than the fact that they were written for you
rather than by you; they’re just the kind of
garden-variety source files that you’d find in any Xcode project.
Figure 7.4. PhoneGap’s iPhone subdirectory contains starter files for an Xcode project
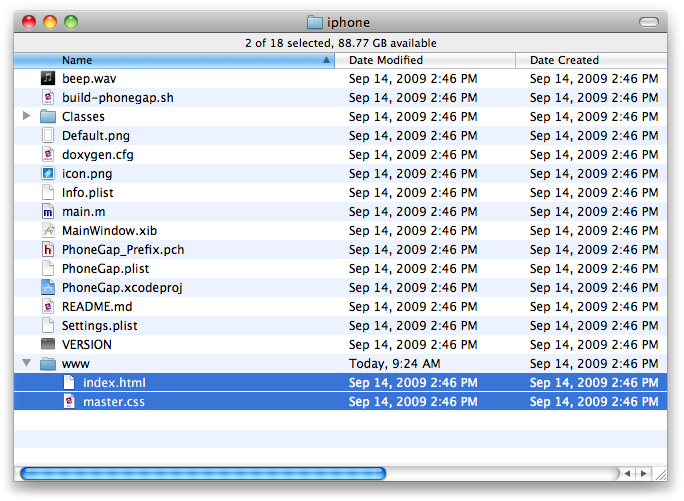
Inside the iphone
directory, there is a directory named www. You can
think of this as the web root of the application. By default, it contains
two sample files named index.html and
master.css. These are used as the demo PhoneGap
application. We don’t need them, so you can delete them both (Figure 7.5, “Delete the two default files from the www directory”).
Figure 7.5. Delete the two default files from the www directory
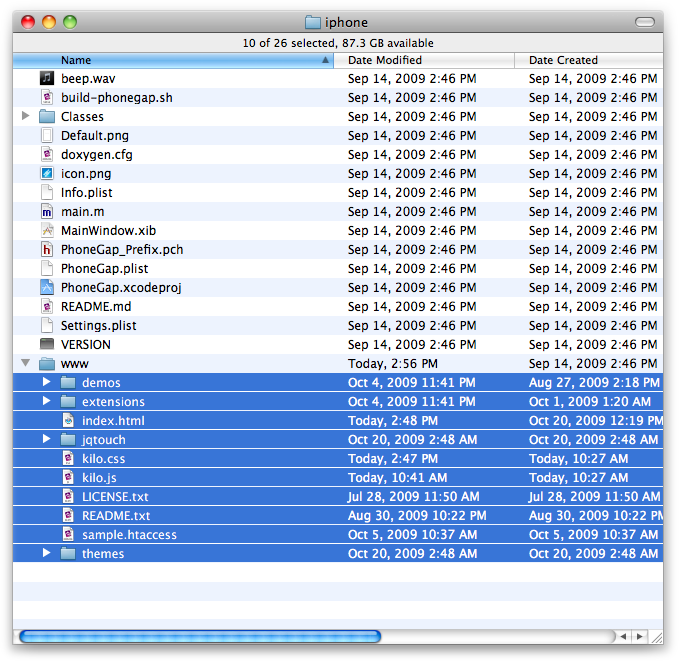
Next, copy all of the files from the Kilo app
that we’ve been working on into the www directory (on
the Mac, hold down Option while dragging files to make a copy). Don’t
change your folder structure or naming; just drop everything in there as
is (Figure 7.6, “Copy your entire web app into the www directory”).
Warning
If you have added a manifest link to the html tag in
index.html as described in Chapter 6, Going Offline, you must remove it. It’s
unnecessary when using PhoneGap and may cause performance
problems.
Figure 7.6. Copy your entire web app into the www directory
Next, go into your
index.html file, add the following line to the
<head> section, and save the file:
<script type="text/javascript" src="phonegap.js" charset="utf-8"></script>
You don’t need to copy the
phonegap.js file into your www
directory. When you build your app, Xcode takes care of this for
you.
Note
Make sure the main page for your app is named
index.html; otherwise, PhoneGap won’t know what
file to launch.
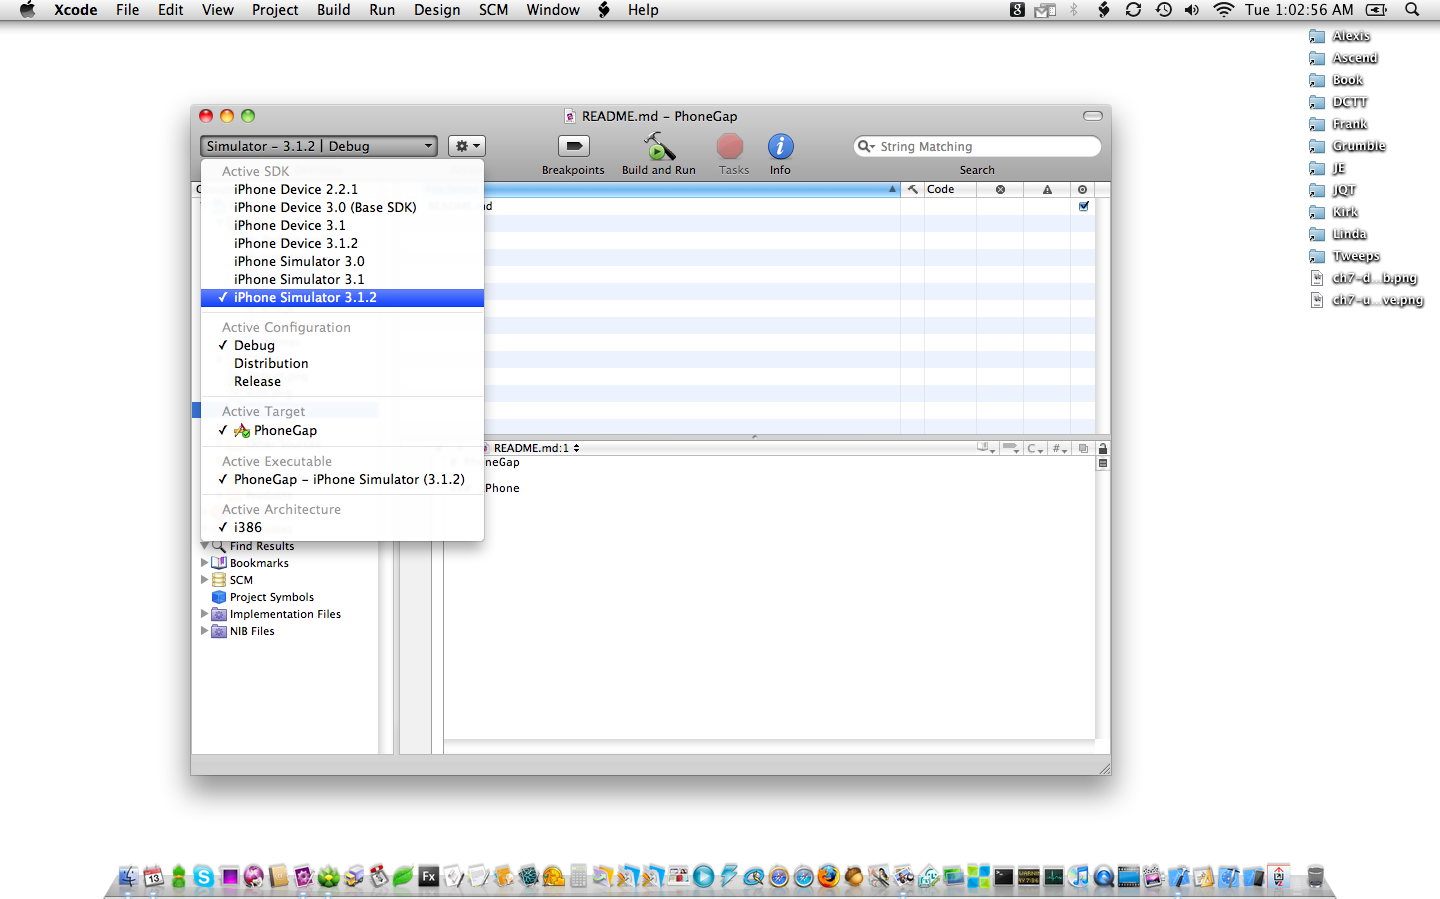
Unbelievably, we’re almost ready to test our
app. Open the project in Xcode by double-clicking the
PhoneGap.xcodeproj file in the Finder. Once the
project window is open, make sure you have the most recent version of the
iPhone Simulator (3.1.2 as of this writing) selected as your active SDK and
then click the Build and Run button (Figure 7.7, “Select iPhone Simulator 3.1.2 as your active SDK”). After about 10 seconds, the iPhone
Simulator should appear and launch your app.
Note
If the simulator does not launch, it means there is an error in your project. Look for a red number in the bottom right corner of the Xcode window; this is the number of errors encountered. Click the number for details about the error, and then review these steps to figure out where things went wrong. If you run into a problem you can’t resolve, visit the PhoneGap community resources at http://phonegap.com/community. Search through the wiki and Google Group for answers to your problem before posting a question. If you do post a question, include as much information as possible about the error.
Figure 7.7. Select iPhone Simulator 3.1.2 as your active SDK
Your app should now be running in the iPhone Simulator as a native app. This may seem like no big deal, because the app will look and feel just like the full-screen web app that we had running in Chapter 6, Going Offline. However, there is a profound difference: namely, that we can now start accessing device features that were previously unavailable. Before we get to that, though, we need to do a bit of cleanup.
Figure 7.8. You’ll notice a 40px gap at the bottom of the screen
Using the Screen’s Full Height
You’ll notice that there is a 40px gap at the bottom of
the window (Figure 7.8, “You’ll notice a 40px gap at the bottom of the screen”).
This occurs because jQTouch does not realize that we are running in full screen mode,
so it’s allowing room for the Safari toolbar. This makes sense from
jQTouch’s perspective, because the app technically isn’t running as a
full-screen web app. But it is running as a native app, and therefore
has access to the whole screen. Fortunately, the fix is easy. Just open
kilo.js and add the following code to the document
ready function:
if (typeof(PhoneGap) != 'undefined') {
    $('body > *').css({minHeight: '460px !important'});
}
Note
Now that you’ve opened your PhoneGap
project in Xcode, you might want to give Xcode’s built-in editor a try.
To edit the kilo.js file in Xcode, make sure the
PhoneGap group is open in the Groups & Files panel on the left
side of the Xcode window. Expand the www folder
and click kilo.js to open it in Xcode’s
editor.
This code uses the typeof
operator to make sure the PhoneGap object has been defined.
If the code is running inside of PhoneGap, this conditional will
evaluate to true. If the code is launched as a web app, the
PhoneGap object will be undefined and the conditional
will evaluate to false.
When the app is launched with PhoneGap, the
immediate children of the HTML body element will be given a minimum
height of 460px. To make sure that the declaration takes effect, I’ve
added the !important directive to override any conflicting
instructions elsewhere in the stylesheets. Now the app will completely
fill the window when launched (Figure 7.9, “After the body height is changed from 420px to 460px, the app
takes up the whole screen”).
Figure 7.9. After the body height is changed from 420px to 460px, the app takes up the whole screen
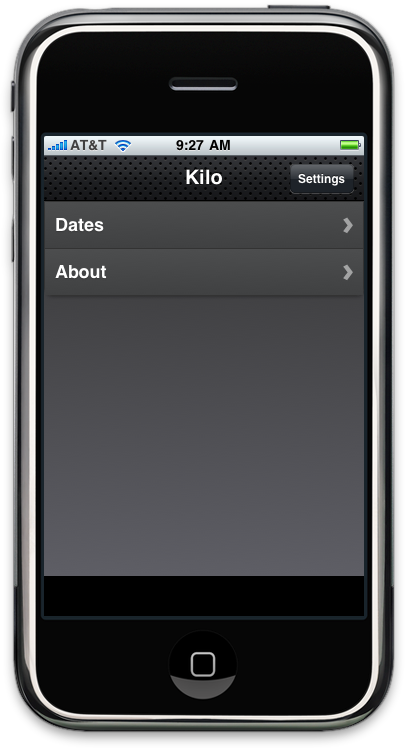
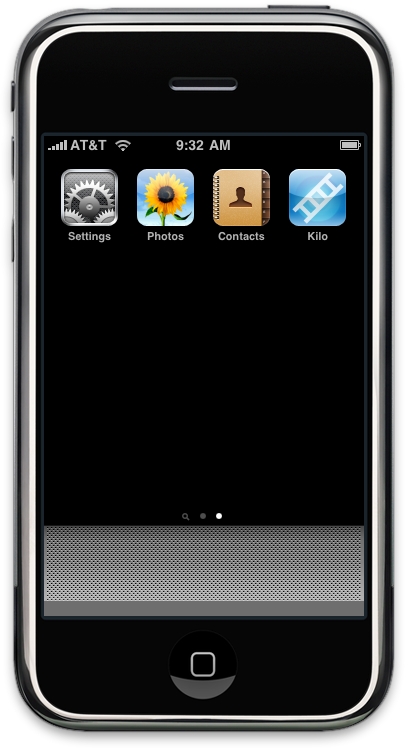
Customizing the Title and Icon
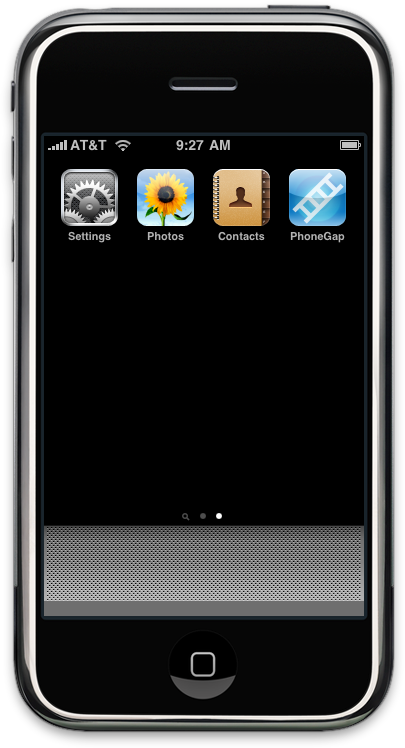
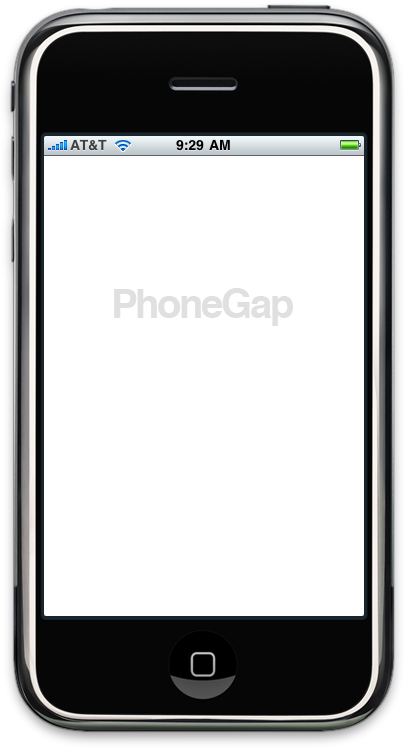
Next, we need to change the default name and icon for the app. By default, PhoneGap apps are called “PhoneGap” and have a blue icon with a ladder on it (Figure 7.10, “The default name and icon for our app”).
Figure 7.10. The default name and icon for our app
To change the app
name on the home screen, open the project in Xcode by double-clicking
the PhoneGap.xcodeproj file in the Finder. Once
it’s open, go to PhoneGap→Config→Info.plist in the Groups & Files panel. The
Info.plist file should be displayed in the
bottom-right panel of the window.
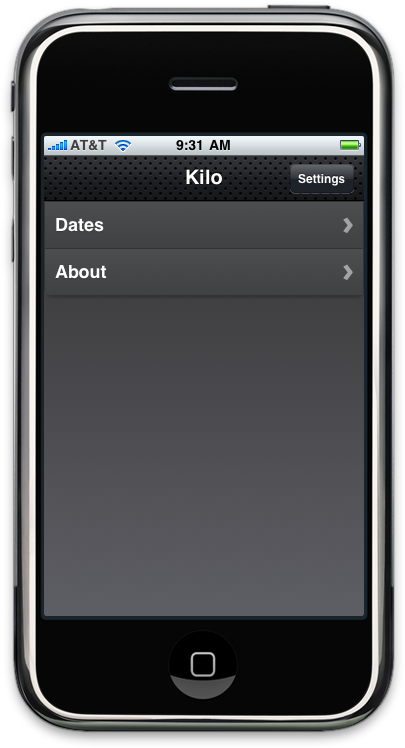
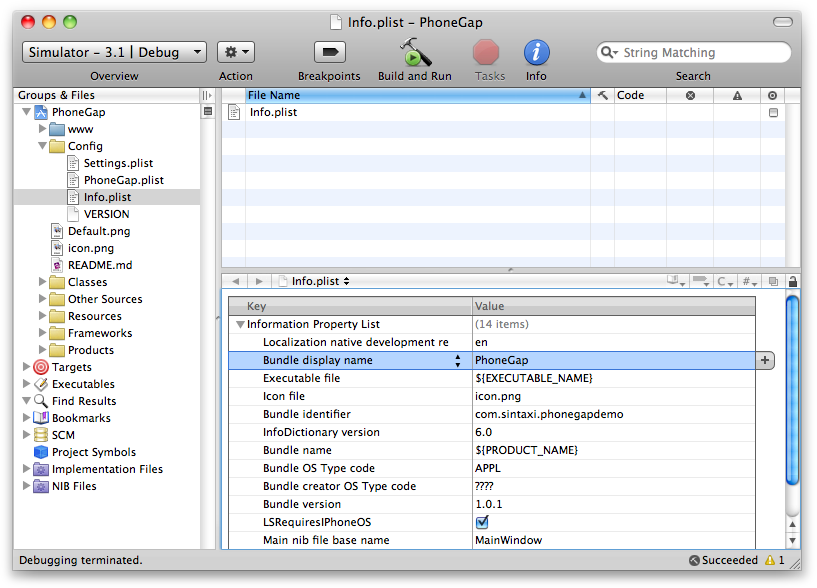
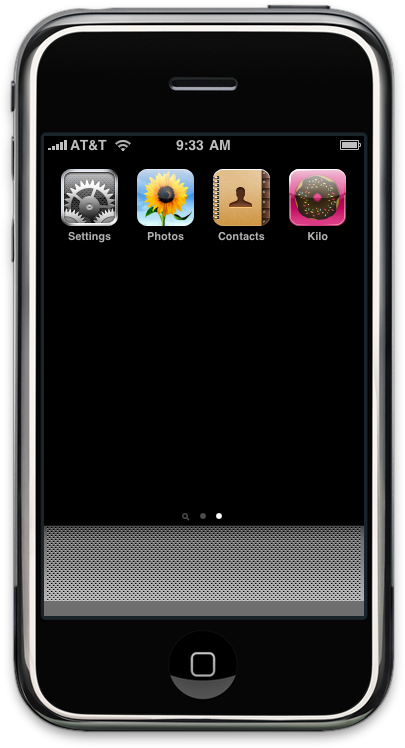
You should see that the bundle display name is set to PhoneGap (Figure 7.11, “The bundle display name in Xcode is PhoneGap”). Double-click PhoneGap and change it to Kilo (Figure 7.12, “The bundle display name is now set to the name of our app (Kilo)”). Then save the file, clean the project (by clicking Build→Clean), and click the Build and Run button. The iPhone Simulator should open and launch the app. Click the home button in the simulator to return to the home screen and note that the app name has been updated from PhoneGap to Kilo (Figure 7.13, “The new bundle display name now appears on the iPhone home screen”).
Figure 7.11. The bundle display name in Xcode is PhoneGap
Next, we need to change the home screen icon from the PhoneGap default (the ladder, pictured in Figure 7.10, “The default name and icon for our app”) to our custom icon. The file format for both the app icon and the Web Clip icon is a 57px × 57px PNG, so you can use the exact same web app icon that you created for the home screen icon in the section called “Adding an Icon to the Home Screen”.
Figure 7.12. The bundle display name is now set to the name of our app (Kilo)
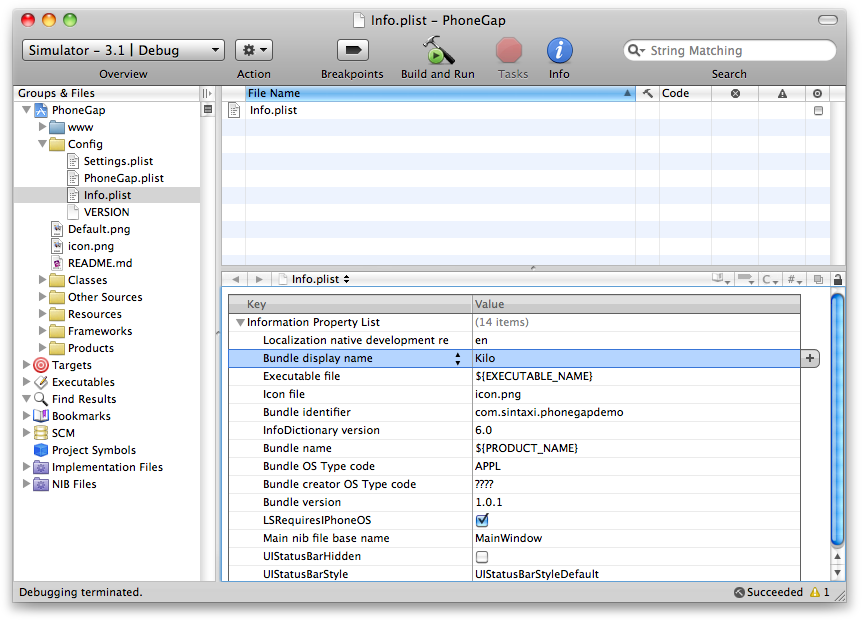
Figure 7.13. The new bundle display name now appears on the iPhone home screen
The only difference
is that with the Web Clip icon, we can prevent the iPhone from adding
gloss to the graphic by toggling the addGlossToIcon setting
in jQTouch; this setting will have no effect in PhoneGap. To prevent
adding gloss to your icon in PhoneGap, select
Config/Info.plist in the Groups & Files panel
of the main Xcode window and check the box next to
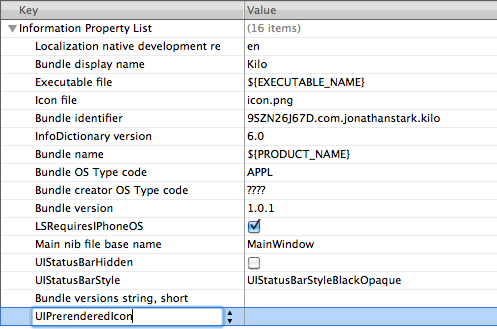
UIPrerenderedIcon in Info.plist (you
may need to add this to Info.plist; see next for
instructions).
Figure 7.14. Select Config/Info.plist in the Groups & Files panel of the main Xcode window
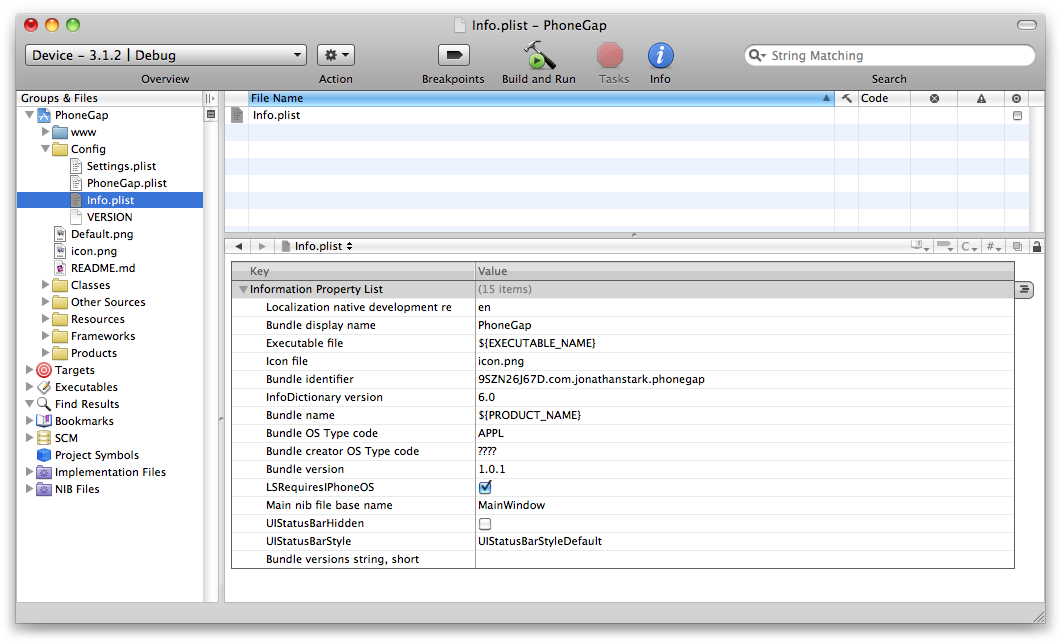
Figure 7.15. Select Add Row from the contextual menu
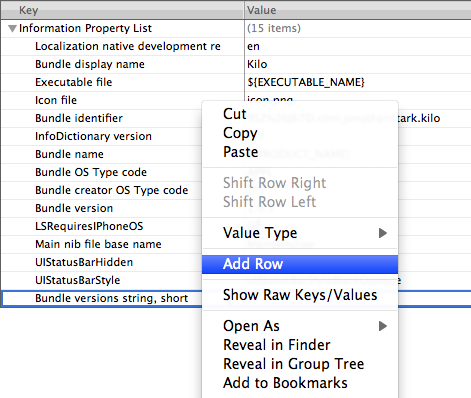
Figure 7.16. Type UIPrerenderedIcon in the key field
The default PhoneGap home screen icon is named
icon.png and is located in PhoneGap’s iphone
directory (Figure 7.20, “The default home screen icon is a white ladder on a blue
background”). Replace the default
icon file with your custom file (Figures 7.21 and
7.22), clean the project (click
Build→Clean), and click the Build and
Run button. The iPhone Simulator should open and launch the app. Click
the home button in the simulator to return to the home screen, and note
that the app icon has been updated to a chocolate frosted donut with
jimmies on a pink background (Figure 7.23, “Our custom app icon now appears on the iPhone home
screen”).
Figure 7.17. Press the Enter key to save your entry in the key field
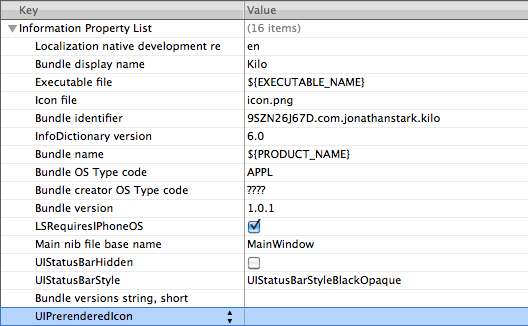
Figure 7.18. Select Boolean from the Value Type submenu
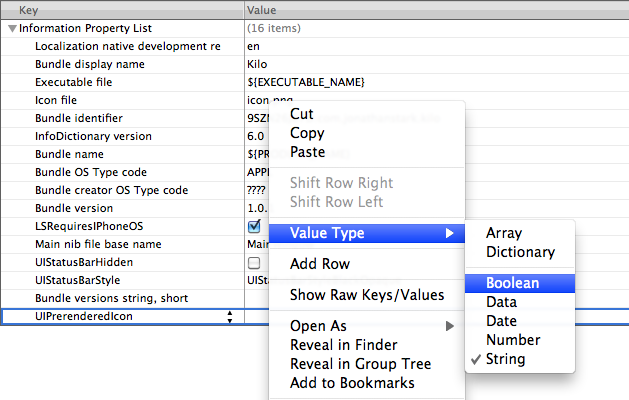
Figure 7.19. Check the checkbox to tell Xcode not to add gloss to your icon
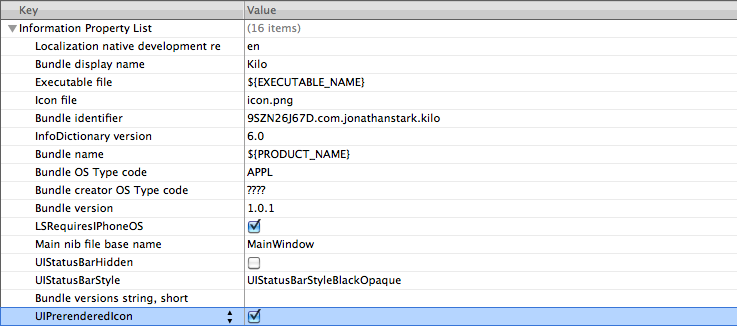
Figure 7.20. The default home screen icon is a white ladder on a blue background
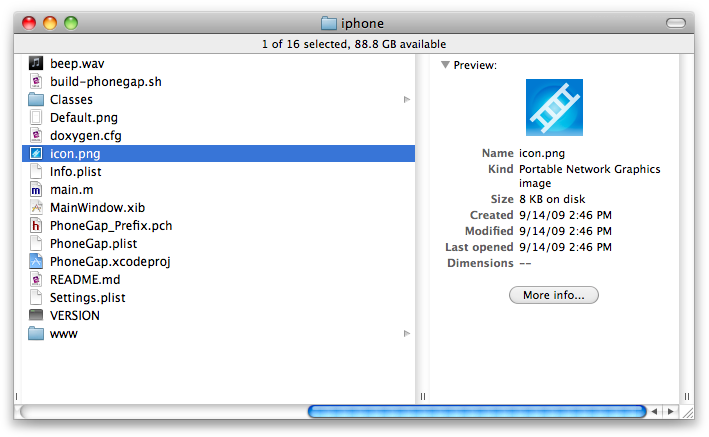
Figure 7.21. The custom home screen icon is a chocolate frosted donut with jimmies on a pink background
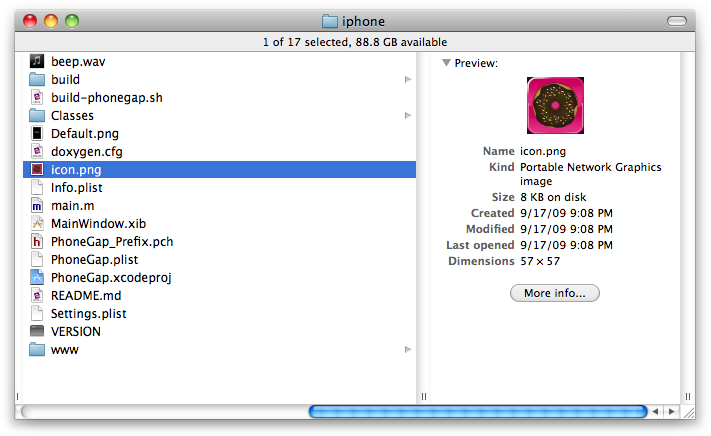
Figure 7.22. Replace icon.png in iphone directory with your own custom 57px × 57px png graphic
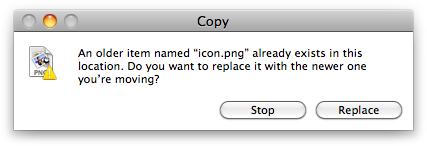
Figure 7.23. Our custom app icon now appears on the iPhone home screen
Creating a Startup Screen
Next we need to change the startup screen from the PhoneGap default (Figure 7.24, “We need to change the default startup graphic for the app”) to our custom startup screen. Back in the section called “Providing a Custom Startup Graphic”, you created a PNG file to serve as the startup screen when the web app is launched in full screen mode from a Web Clip icon on the home screen.
Figure 7.24. We need to change the default startup graphic for the app
For full-screen web apps that use a gray or black status bar, this graphic needs to be 320px × 460px, and for apps that use a black-translucent status bar, it must be 320px × 480px (20 pixels taller).
With PhoneGap, the startup screen has to be 320px × 480px regardless of what type of status bar is used. So if you created a 320px × 460px full-screen graphic, add 20px to the height.
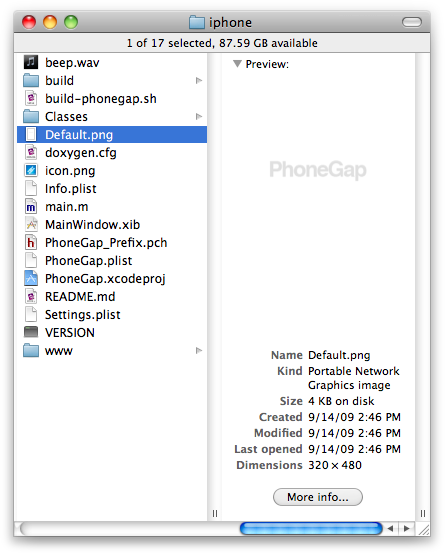
The default PhoneGap startup graphic is named
Default.png and is located in PhoneGap’s iphone
directory (Figure 7.25, “The default launch graphic says PhoneGap in gray text on a
white background”). Replace the
default startup graphic with your custom graphic (as shown in Figures
7.26
and 7.27) as shown in Figure 7.27, “Replace Default.png in the iphone directory with the custom 320px
× 480px PNG graphic”, clean the project, and click
the Build and Run button. The iPhone Simulator should open and launch
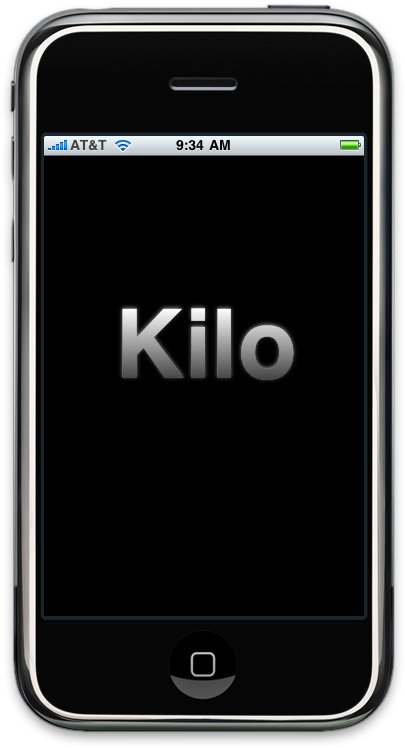
the app, and you should see the custom graphic displayed (Figure 7.28, “Our custom startup graphic now appears when the app is
launched”).
Figure 7.25. The default launch graphic says PhoneGap in gray text on a white background
Installing Your App on the iPhone
In the next section, we’ll add sound, vibration, alerts, and more to the Kilo example application. Some of these features can’t be tested in the iPhone Simulator, so you need to get Kilo installed on an actual iPhone before you can test any of this.
Figure 7.26. The custom launch graphic says Kilo in gray text on a black background
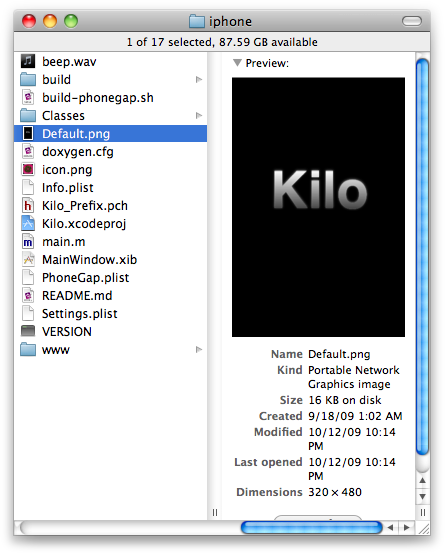
Figure 7.27. Replace Default.png in the iphone directory with the custom 320px × 480px PNG graphic
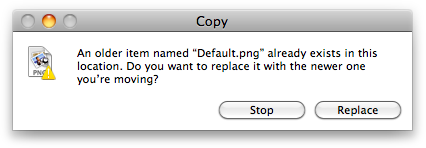
Figure 7.28. Our custom startup graphic now appears when the app is launched
To install an app on the iPhone, Apple requires that the app, the phone, and the developer (you) all be uniquely identified. These three pieces of data are combined in a file called a “provisioning profile” that you will add to Xcode.
In order to generate a provisioning profile,
you must first be a member of the iPhone Developer Program. You then run
the Development Provisioning Assistant (DPA) found in the iPhone Developer
Program Portal section of the iPhone developer site (http://developer.apple.com/iphone/). You’ll be making a
couple of trips into the Keychain Access application (located in
/Applications/Utilities) to create
certificate signing requests and to install signed
certificates that you download from the portal into your own keychain. The
DPA does an excellent job walking you through the steps needed to create
and install your provisioning profile, so I won’t rehash the instructions
here. However, I will give you some pointers:
When I first started with iPhone app development, I made a few test App IDs in the Program Portal, assuming that I could later edit or delete them once I figured out how things worked. Well, I was wrong; you can’t edit or delete App IDs. This means that two years later, I’m still staring at “JSC Temp App ID” when I log in to the developer portal. If you are anything like me, this will drive you crazy, so don’t make the same mistake!
Keep your input brief but descriptive in the DPA. If your descriptors are too vague, you’ll get confused as you add more items. If descriptors are too long, they’ll be truncated in the online interface. Try to keep things to a max of about 20 characters.
When prompted for an App ID description, just use the name of your app (and possibly a version number, if you are planning on having multiple versions active in the App Store at the same time—e.g., Kilo2).
When prompted for a device description, include the type of device (iPhone, iPod touch, etc.) and the hardware version (1G, 2G, 3G, 3GS, etc.). Don’t include the OS version, because this can change without invalidating the provisioning profile. Bear in mind that if you end up making beta versions of the app available to testers, you’ll also want to include an owner identifier (for example, you could use initials: ELS iPhone 3GS, JSC iPhone 2G, JSC iPhone 3G, JSC Touch 1G, etc.).
When prompted for a profile description, combine the name of the app with the target device (e.g., Kilo2 on JSC iPhone 3GS).
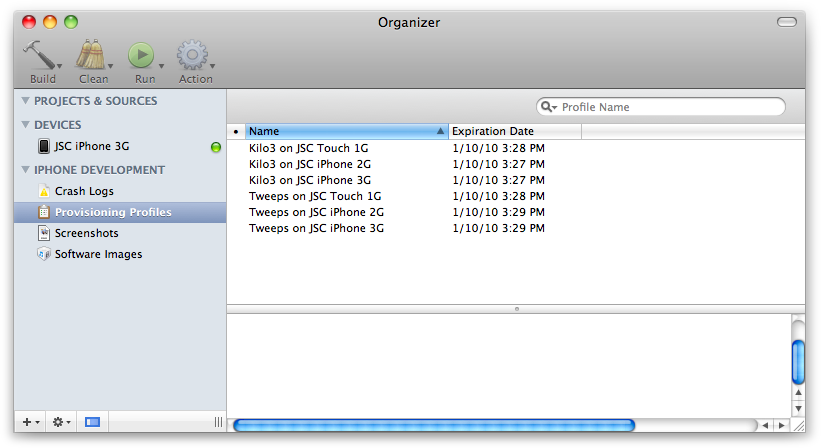
Once you’ve created your provisioning profile, you must download it and drag it onto Xcode’s dock icon to make it available to your device. This brings up the organizer window. If you have multiple apps, multiple devices, or both, you’ll have one provisioning profile for each combination displayed in Xcode (Figure 7.29, “Multiple provisioning profiles loaded in Xcode”).
Figure 7.29. Multiple provisioning profiles loaded in Xcode
Now that your provisioning profile is available in Xcode, you need to update the bundle identifier for your app. Select the appropriate provisioning profile in the Xcode organizer window and copy the app identifier (Figure 7.30, “Select the provisioning profile for your app/device combination in the Xcode organizer window to locate your app identifier”).
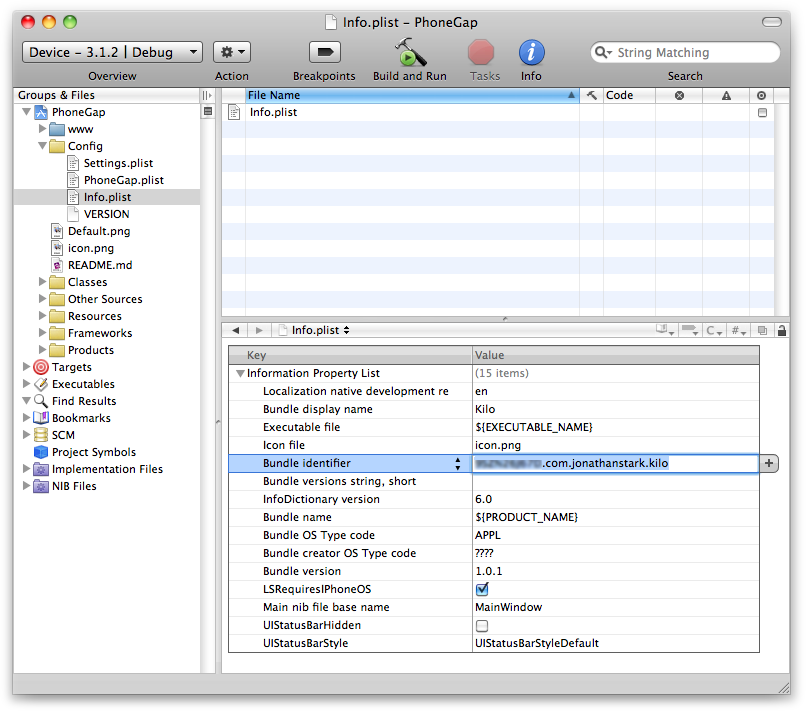
Then, click PhoneGap→Config→Info.plist
in the Groups & Files panel of the main Xcode window, and paste the
app identifier into the bundle identifier field. If your app identifier
ends with an asterisk, replace the asterisk with a reverse
domain-name–style string such as com.jonathanstark.kilo
(Figure 7.31, “Paste your app identifier into the bundle identifier field,
replacing the asterisk with a reverse domain-name–style string”).
Figure 7.30. Select the provisioning profile for your app/device combination in the Xcode organizer window to locate your app identifier
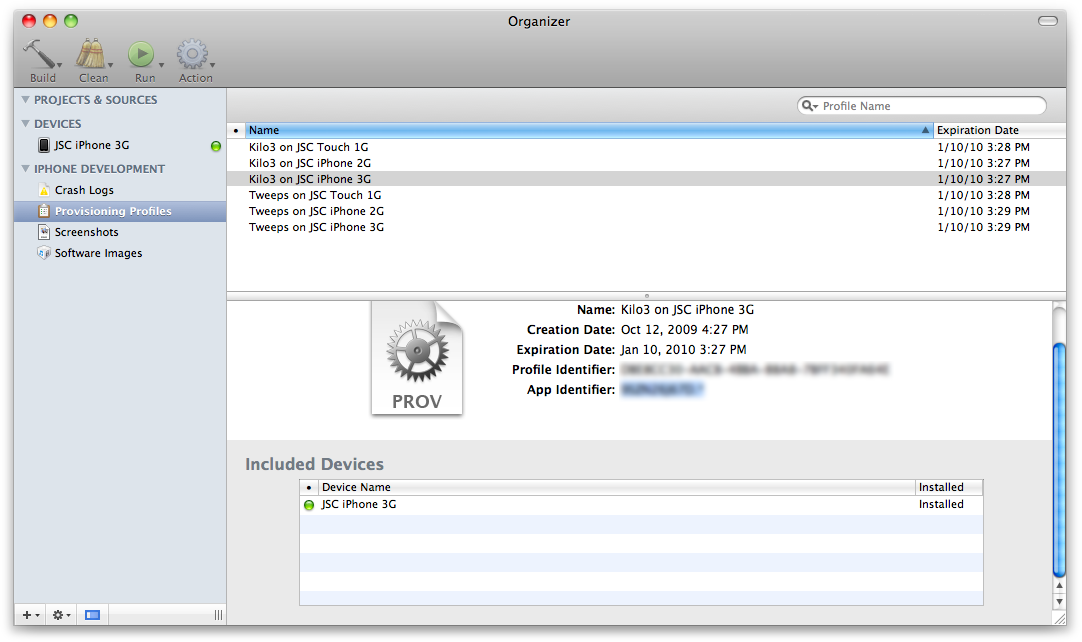
Figure 7.31. Paste your app identifier into the bundle identifier field, replacing the asterisk with a reverse domain-name–style string
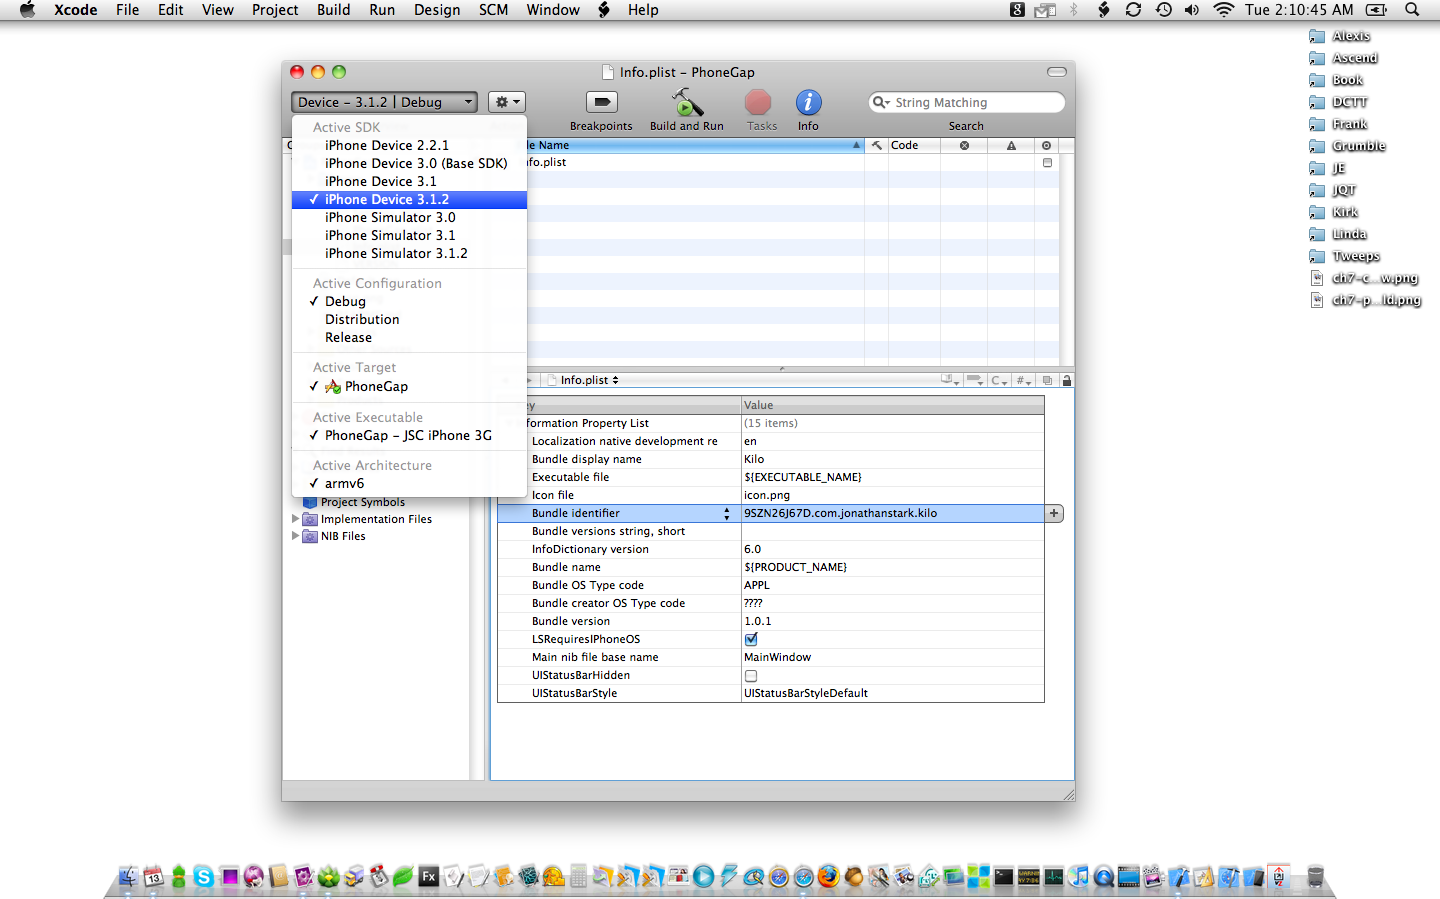
Now, plug your iPhone into your computer and
select the iPhone device option as your active SDK (Figure 7.32, “Select Device 3.1.2 as your active SDK, and click Build and Run
to install and launch your app on your iPhone”). Make sure to choose the iPhone
device version that matches the version of iPhone OS you are running on
your iPhone (the most recent is 3.1.2 as of this writing). Save the
Info.plist file, clean the project (click
Build→Clean), and click the Build and Run
button. After about 20 seconds, the app should launch on your iPhone. The
first time you launch it, you’ll be prompted to allow the
codesign application access to your keychain, and
you’ll also be prompted to install the provisioning profile on your
iPhone. If you get any errors, restart Xcode and try again.
Figure 7.32. Select Device 3.1.2 as your active SDK, and click Build and Run to install and launch your app on your iPhone
Now that the app is running on an actual iPhone, we can add some device-specific features.
Controlling the iPhone with JavaScript
The stage is now set for us to start enhancing our application with calls to the native device features. PhoneGap makes this possible by exposing certain functionality via JavaScript. This means that all you have to do to make the phone vibrate is add a bit of JavaScript to your code. For example:
navigator.notification.vibrate();
Pretty simple, right?
Beep, Vibrate, and Alert
PhoneGap makes beep, vibrate, and alert functions so
simple that I’m going to lump them together into one example.
Specifically, we’ll set up the app to beep, vibrate, and display a
custom alert when the user creates an entry that puts her over her daily
calorie budget. To do this, add the following function to the end of
kilo.js:
function checkBudget() { var currentDate = sessionStorage.currentDate;
var dailyBudget = localStorage.budget;
db.transaction(
var currentDate = sessionStorage.currentDate;
var dailyBudget = localStorage.budget;
db.transaction( function(transaction) {
transaction.executeSql(
function(transaction) {
transaction.executeSql( 'SELECT SUM(calories) AS currentTotal FROM entries WHERE date = ?;',
 [currentDate],
  function (transaction, result) {
 var currentTotal = result.rows.item(0).currentTotal;
 if (currentTotal > dailyBudget) {
 var overage = currentTotal - dailyBudget;
 var message = 'You are '+overage
+ ' calories over your daily budget.
+ ' Better start jogging!';
var message = 'You are '+overage
+ ' calories over your daily budget.
+ ' Better start jogging!'; try {
try { navigator.notification.beep();
navigator.notification.vibrate();
} catch(e){
// No equivalent in web app
}
try {
navigator.notification.beep();
navigator.notification.vibrate();
} catch(e){
// No equivalent in web app
}
try { navigator.notification.alert(message,
'Over Budget', 'Dang!');
} catch(e) {
alert(message);
}
}
},
errorHandler
navigator.notification.alert(message,
'Over Budget', 'Dang!');
} catch(e) {
alert(message);
}
}
},
errorHandler );
}
);
}
);
}
);
}Here’s the blow-by-blow description:
| Open the |
| Start a database transaction in preparation for calculating the total calories for the current date. |
| Run the |
Let’s break down the four parameters of the
executeSql() method:
| The first parameter is a prepared SQL statement that uses the SUM function to add up all the values in the calories column for the entries that match the current date. |
| The second parameter is a single-value array that will replace the question mark in the prepared statement on the previous line. |
| The third parameter is an anonymous function that will be called if the SQL query completes successfully (we’ll look at this in detail momentarily). |
And here is what’s going on in the anonymous function that was passed in as the third parameter:
| It starts off by grabbing the current
total from the first row of the result. Since we are just asking for
the sum of a column, the database is only going to return one row
(i.e., this query will always return one row). Remember that the
records of the result set are accessed with the |
| Check to see if the current calorie total for the day is greater than the daily budget specified on the Settings panel. If so, the block that follows will be executed. |
| Calculate how far the user is over her calorie budget. |
| Compose a message to display to the user. |
| This is a
The PhoneGap |
| This is a
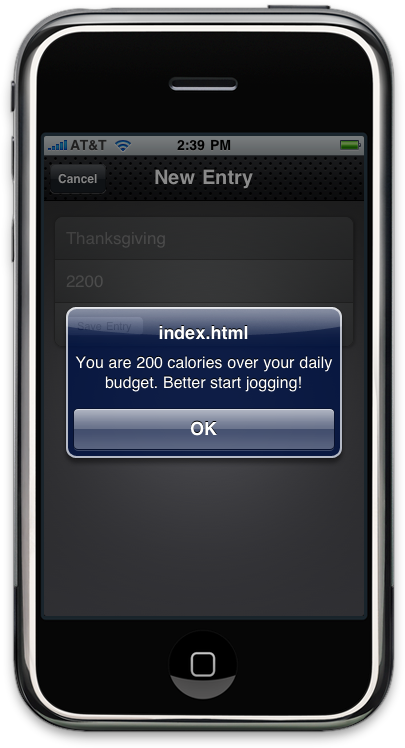
There are a couple of differences between the PhoneGap alert and the native JavaScript alert. For example, the PhoneGap alert allows you to control the title and the button name (Figure 7.34, “The PhoneGap alert allows you to specify the title and button label”); the JavaScript alert does not (Figure 7.35, “A native JavaScript alert does not allow you to specify the title and button label”). There is also a more subtle difference between the two alerts: the native JavaScript alert is modal and the PhoneGap alert is not. In other words, script execution will pause at the point at which you call a native alert, whereas execution will continue with the PhoneGap version. This may or may not be a big deal depending on the nature of your application, so keep this distinction in mind. |
| The fourth parameter is the name of the generic SQL error handler that will be called in the event of a SQL error. |
With our checkBudget() function
complete, we can now call it by adding a single line to the success
callback of our createEntry() function:
function createEntry() {
    var date = sessionStorage.currentDate;
    var calories = $('#calories').val();
    var food = $('#food').val();
    db.transaction(
        function(transaction) {
            transaction.executeSql(
                'INSERT INTO entries (date, calories, food) VALUES (?, ?, ?);',
                [date, calories, food],
                function(){
                  refreshEntries();
                  checkBudget();
                  jQT.goBack();
                },
                errorHandler
            );
        }
    );
    return false;
}
After you’ve made these changes, save the
kilo.js file, clean the project (Build→Clean), and click Build and Run.
Figure 7.33. The PhoneGap beep() method plays the beep.wav file from the iphone directory

Figure 7.34. The PhoneGap alert allows you to specify the title and button label
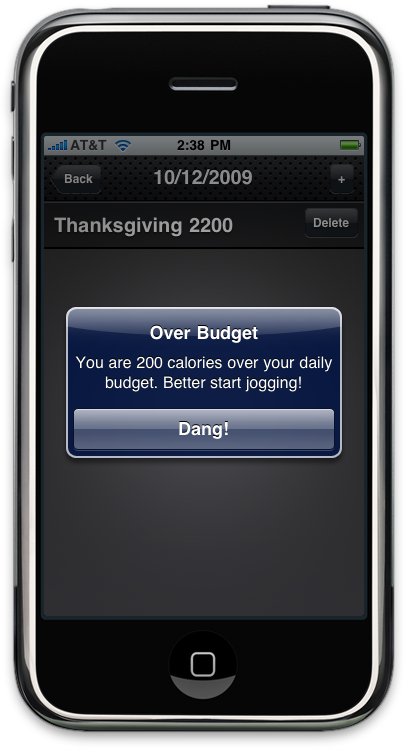
Figure 7.35. A native JavaScript alert does not allow you to specify the title and button label
Geolocation
Let’s update Kilo to save the location where entries are created. Once we have that information, we’ll add a “Map Location” button that will open the built-in Maps application and drop a pin at the point where the entry was created.
The first step is to add latitude and
longitude columns to the database to store the information. To do so, replace the
CREATE TABLE statement in kilo.js with
the following:
db.transaction(
    function(transaction) {
        transaction.executeSql(
            'CREATE TABLE IF NOT EXISTS entries ' +
            '   (id INTEGER NOT NULL PRIMARY KEY AUTOINCREMENT, ' +
            '    date DATE NOT NULL, food TEXT NOT NULL, ' +
            '    calories INTEGER NOT NULL, ' +
            '    longitude TEXT NOT NULL, latitude TEXT NOT NULL);'
        );
    }
);
Next, we’ll rewrite the
createEntry() function that we first saw in the section called “Inserting Rows” to use the geolocation feature of the phone to determine the current latitude and
longitude. Replace the existing createEntry() function in
kilo.js with this:
function createEntry() {
    try {
        navigator.geolocation.getCurrentPosition(
            function(position){
                var latitude = position.coords.latitude;
                var longitude = position.coords.longitude;
                insertEntry(latitude, longitude);
            },
            function(){
                insertEntry();
            }
        );
    } catch(e) {
        insertEntry();
    }
    return false;
}
| Begin the |
| Open a |
| Call the
|
| This is the beginning of the success
callback. Notice that it accepts a single parameter
( |
| These two lines grab the
|
| Pass the |
| This is the beginning of the error callback. |
| Because we’re in the error callback, this
will only be called if geolocation failed (perhaps the user did not
allow the application to access his location when prompted), so call the
|
| Begin the |
| Because we’re in the
|
| Return |
Wondering where the SQL
INSERT statement got to? Let’s take a look at the
insertEntry() function. This new
function is what creates the entry in the database. Add the following to
kilo.js:
function insertEntry(latitude, longitude) {
    var date = sessionStorage.currentDate;
    var calories = $('#calories').val();
    var food = $('#food').val();
    db.transaction(
        function(transaction) {
            transaction.executeSql(
                'INSERT INTO entries (date, calories, food, latitude, longitude) ' +
                    'VALUES (?, ?, ?, ?, ?);',
                [date, calories, food, latitude, longitude],
                function(){
                    refreshEntries();
                    checkBudget();
                    jQT.goBack();
                },
                errorHandler
            );
        }
    );
}
| The beginning of the
|
| Get the |
| Get the |
| Get the |
| Begin a database transaction. |
| Pass a callback function into the transaction, with the transaction object as its sole parameter. |
| Call the |
| Define the SQL prepared statement with question marks as data placeholders. |
| Pass an array of values for the
placeholders. If |
| Define the success callback function. |
| Define the error callback function. |
In order to confirm that Kilo is actually
saving these location values, we’ll want to display them somewhere in
the interface. Let’s add an Inspect Entry panel to display the stored
values. We’ll include a Map Location button on the panel that will
display where the entry was created. Add the following to
index.html, right before the closing body tag
(</body>):
<div id="inspectEntry">
    <div class="toolbar">
        <h1>Inspect Entry</h1>
        <a class="button cancel" href="#">Cancel</a>
    </div>
    <form method="post">
        <ul class="rounded">
            <li><input type="text" placeholder="Food" name="food" value="" /></li>
            <li><input type="tel" placeholder="Calories" name="calories"
                value="" /></li>
            <li><input type="submit" value="Save Changes" /></li>
        </ul>
        <ul class="rounded">
            <li><input type="text" name="latitude" value="" /></li>
            <li><input type="text" name="longitude" value="" /></li>
            <li><p class="whiteButton" id="mapLocation">Map Location</p></li>
        </ul>
    </form>
</div>
This should look very similar to the New Entry panel that we first saw in Example 4.5, “The HTML for the New Entry panel”, so I’ll just call out a couple of things.
| The input type has been set to
|
| The |
| This Map Location button won’t do anything when clicked at this point; we’ll add a click handler to it momentarily. |
Now we need to give the user a way to navigate to this Inspect Entry panel, so we’ll modify the behavior of the Date panel such that when the user taps an entry in the list, the Inspect Entry panel will slide up from the bottom of the screen.
The first step is to wire up the click event
handler (which we’ll create next), and also to modify the way clicks on
the Delete button are processed. Add the three highlighted changes below
to the refreshEntries() function in
kilo.js:
function refreshEntries() {
    var currentDate = sessionStorage.currentDate;
    $('#date h1').text(currentDate);
    $('#date ul li:gt(0)').remove();
    db.transaction(
        function(transaction) {
            transaction.executeSql(
                'SELECT * FROM entries WHERE date = ? ORDER BY food;',
                [currentDate],
                function (transaction, result) {
                    for (var i=0; i < result.rows.length; i++) {
                        var row = result.rows.item(i);
                        var newEntryRow = $('#entryTemplate').clone();
                        newEntryRow.removeAttr('id');
                        newEntryRow.removeAttr('style');
                        newEntryRow.data('entryId', row.id);
                        newEntryRow.appendTo('#date ul');
                        newEntryRow.find('.label').text(row.food);
                        newEntryRow.find('.calories').text(row.calories);
                        newEntryRow.find('.delete').click(function(e){
                            var clickedEntry = $(this).parent();
                            var clickedEntryId = clickedEntry.data('entryId');
                            deleteEntryById(clickedEntryId);
                            clickedEntry.slideUp();
                            e.stopPropagation();
                        });
                        newEntryRow.click(entryClickHandler);
                    }
                },
                errorHandler
            );
        }
    );
}
| Note that we have to add the
|
| The |
| The
|
Now let’s add the
entryClickHandler() function to
kilo.js:
function entryClickHandler(e){
    sessionStorage.entryId = $(this).data('entryId');
    db.transaction(
        function(transaction) {
            transaction.executeSql(
                'SELECT * FROM entries WHERE id = ?;',
                [sessionStorage.entryId],
                function (transaction, result) {
                    var row = result.rows.item(0);
                    var food = row.food;
                    var calories = row.calories;
                    var latitude = row.latitude;
                    var longitude = row.longitude;
                    $('#inspectEntry input[name="food"]').val(food);
                    $('#inspectEntry input[name="calories"]').val(calories);
                    $('#inspectEntry input[name="latitude"]').val(latitude);
                    $('#inspectEntry input[name="longitude"]').val(longitude);
                    $('#mapLocation').click(function(){
                        window.location = 'http://maps.google.com/maps?z=15&q='+
                            food+'@'+latitude+','+longitude;
                    });
                    jQT.goTo('#inspectEntry', 'slideup');
                },
                errorHandler
            );
        }
    );
}Before you try running the app, be sure to delete it from the phone (or the simulator). That’s because the database won’t be created if it already exists, and an easy way to remove the database is to remove the app. To remove the app, tap and hold on its home screen icon until the icons start wobbling, then click the X to remove it. Press the home button to stop the wobbling. Then, clean the project (Build→Clean) and click “Build and Run” to try it out.
Accelerometer
Next, let’s set up Kilo to duplicate the last entry in the
list by shaking the phone. Add the following function to the end of
kilo.js:
function dupeEntryById(entryId) {
    if (entryId == undefined) {
        alert('You have to have at least one entry in the list to shake a dupe.');
    } else {
        db.transaction(
            function(transaction) {
                transaction.executeSql(
                    ' INSERT INTO entries (date, food, calories, latitude, longitude)'
                    + ' SELECT date, food, calories, latitude, longitude'
                    + ' FROM entries WHERE id = ?;',
                    [entryId],
                    function() {
                        refreshEntries();
                    },
                    errorHandler
                );
            }
        );
    }
}
| This line makes sure that an
|
| Begin the usual database transaction steps. |
| Define an INSERT statement that copies
the values from the specified |
| Pass the |
| On success, call
|
| On error, call the standard SQL error handler. |
Now we need to tell the application when to
start and stop watching the accelerometer. We’ll set it up to start
watching when the Date panel finishes sliding into view, and to stop
when it starts sliding out. To do this, we just need to add the
following lines to the document ready function in
kilo.js:
$('#date').bind('pageAnimationEnd', function(e, info){
    if (info.direction == 'in') {
        startWatchingShake();
    }
});
$('#date').bind('pageAnimationStart', function(e, info){
    if (info.direction == 'out') {
        stopWatchingShake();
    }
});
| Bind an anonymous handler to the
|
| Check to see if the
|
| Bind an anonymous handler to the
|
| Check to see if the
|
Note
Technically, we could have bound to just one of the page animation events, like so:
$('#date').bind('pageAnimationEnd', function(e, info){
    if (info.direction == 'in') {
        startWatchingShake();
    } else {
        stopWatchingShake();
    }
});
The reason I didn’t do this is that
stopWatchingShake() would not get called until after the
page animation was complete. Therefore, the accelerometer would be
actively watched during the page transition, which can sometimes
result in choppy animation.
All that’s left for us to do is write the
startWatchingShake() and stopWatchingShake()
functions. Add the following functions to the end of
kilo.js:
function startWatchingShake() {
    var success = function(coords){
        var max = 2;
        if (Math.abs(coords.x) > max
        || Math.abs(coords.y) > max
        || Math.abs(coords.z) > max) {
            var entryId = $('#date ul li:last').data('entryId');
            dupeEntryById(entryId);
        }
    };
    var error = function(){};
    var options = {};
    options.frequency = 100;
    sessionStorage.watchId = navigator.accelerometer.watchAcceleration(success,
        error, options);
}
function stopWatchingShake() {
    navigator.accelerometer.clearWatch(sessionStorage.watchId);
}
| Begin the
|
| Begin defining the success handler. Note that it accepts a coordinates object as its sole parameter. |
| Define the threshold for the shake. The higher the number, the harder the user will have to shake. |
| Check to see if any of the coordinates has exceeded the threshold. |
| Get the |
| Call the |
| Define an empty error handler. |
| Define an |
| The |
| Call the |
| Begin the
|
| Call the |
And with that, we are ready to test. Save all
your files, clean all targets, and build and run Kilo on your device.
Navigate to the Date panel, add an entry if none exists, and shake the
phone. You should see the page reload with an additional entry.
Unfortunately, you’ll probably also see an Undo confirmation dialog
(Figure 7.36, “We need to deactivate the undo manager to watch the
accelerometer in peace”). To disable the undo manager so we
can watch the accelerometer without being interrupted, we need to add a
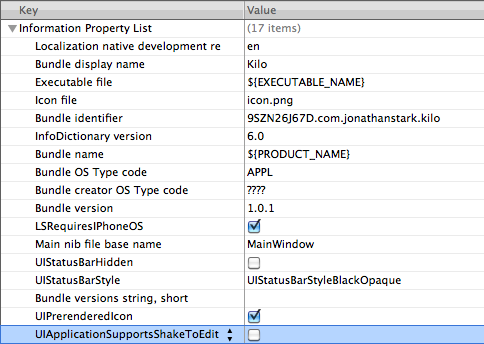
setting to Info.plist. Follow the steps described
in Adding Settings to Info.plist to add a setting for
UIApplicationSupportsShakeToEdit, and set it to
false (Figure 7.37, “Add the UIApplicationSupportsShakeToEdit setting to Info.plist
and leave it unchecked to disable “shake to undo” in your app”).
Figure 7.36. We need to deactivate the undo manager to watch the accelerometer in peace
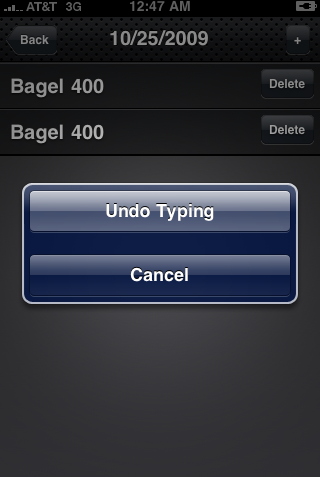
Figure 7.37. Add the UIApplicationSupportsShakeToEdit setting to Info.plist and leave it unchecked to disable “shake to undo” in your app
What You’ve Learned
In this chapter, you’ve learned how to load your web app into PhoneGap, how to install your app on your iPhone, and how to access five device features that are unavailable to browser-based web apps (beep, alert, vibrate, geolocation, and accelerometer).
In the next chapter, you’ll learn how to package your app as an executable and submit it to the iTunes App Store.